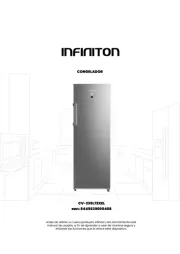
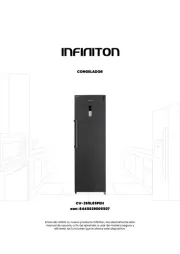
Infiniton CV-176IX Manual
Læs nedenfor 📖 manual på dansk for Infiniton CV-176IX (42 sider) i kategorien Fryser. Denne guide var nyttig for 30 personer og blev bedømt med 4.8 stjerner i gennemsnit af 15.5 brugere
Side 1/42

CV-1575 NF
B
U
U
H
U
é
é
6
CV-176IX

Contents
Safety and warning information…........2
Installing your new appliance………....8
Description of the appliance….......….11
Display controls…………………...…..12
Using your appliance……………........13
Helpful hints and tips……………… 14
Cleaning and care……………………14
Troubleshooting………………………15
Disposal of the appliance……………17
2
For your safety and correct usage before installing and first
using the appliance, read this user manual carefully, including
its hints and warnings. To avoid unnecessary mistakes and
accidents, it is important to make sure that all people using the
appliance are thoroughly familiar with its
operation and safety features. Save these instructions and be
sure that they remain with the appliance if it is moved or sold,
so that anyone using it its life, will be properly throughout
informed on usage and safety notices.its
For the safety of life and property, keep the precautions of
these user's instructions as the manufacturer is not
,
responsible for damages caused by omission.
Safety for children and otherswho are vulnerable people
According to EN standard
According to IEC standard
This appliance is not intended for use by persons (including
children) with reduced physical, sensory or mental
capabilities, or lack of experience and knowledge, unless
they have been given supervision or instruction concerning
use of the appliance by a person responsible for their safety.
This appliance can be used by children aged from 8 years
and above and persons with reduced physical, sensory or
mental capabilities or lack of experience and knowledge if
they have been given supervision or instruction concerning
use of the appliance in a safe way and understand the
hazards involved. Children shall not play with the appliance.
Cleaning and user maintenance shall not be made by
children without supervision.

3
Keep all packaging away from children as there is risk of
suffocation.
If you are discarding the appliance, pull the plug out of the
socket, cut the connection cable (as close to the appliance
as you can) and remove the door to prevent children playing
from suffering an electric shock or from closing themselves
inside it.
If this appliance, featuring a magnetic door seals, is to
replace an older appliance having a spring lock (latch) on the
door or lid, be sure to make the spring lock unusable before
you discard the old appliance. This will prevent it from
becoming a death trap for a child.
General safety
WARNING —This appliance is intended to be used in
household and similar applications such as
-staff kitchen areas in shops, offices and other working
environments;
-farm houses and by clients in hotels, motels and other
residential type environments;
-bed and breakfast type environments;
-catering and similar non-retail applications.
WARNING — Do not store explosive substances such as
aerosol cans with a flammable propellant in this appliance.
WARNING — If the supply cord is damaged, it must be
replaced by the manufacturer, its service agent or similarly
qualified persons in order to avoid a hazard.
WARNING — Keep ventilation openings, in the appliance
enclosure or in the built-in structure, clear of obstruction.
WARNING — Do not use mechanical devices or other
means to accelerate the defrosting process, other than those
recommended by the manufacturer.
WARNING — Do not damage the refrigerant circuit.
WARNING — Do not use electrical appliances inside the
food storage compartments of the appliance, unless they are
of the type recommended by the manufacturer.

4
WARNING — The refrigerant and insulation blowing gas are
flammable. When disposing of the appliance, do so only at
an authorized waste disposal centre. Do not expose to
flame.
WARNING —When positioning the appliance, ensure the
supply cord is not trapped or damaged.
WARNING —Do not locate multiple portable socket-outlets
or portable power supplies at the rear of the appliance.
Refrigerant
The refrigerant isobutene (R600a) is contained within the
refrigerant circuit of the appliance, a natural gas with a high
level of environmental compatibility, which is nevertheless
flammable. During transportation and installation of the
appliance, ensure that none of the components of the
refrigerant circuit becomes damaged.
The refrigerant (R600a) is flammable.
WARNING:risk of fire
If the refrigerant circuit should be damaged:
-Avoid opening flames and sources of ignition.
-Thoroughly ventilate the room in which the appliance is
situated.
WARNING — Refrigerators contain refrigerant andgases in
the insulation. Refrigerant and gases must be disposed of
professionally as they may cause eye injuries or ignition.
Ensure that tubing of the refrigerant circuit is not damage
prior to proper disposal.
Replacing the illuminating lamps
WARNING—The illuminating lamps must not be replaced by
the user! If the illuminating lamps is damaged, contact the
customer helpline for assistance.
This warning is only for refrigerators that contain illuminating
lamps.

7
Adequate air circulation should be around the appliance,
lacking this leads to overheating. To achieve sufficient
ventilation, follow the instructions relevant to installation.
Wherever possible the back of the product should not be too
close to a wall to avoid touching or catching warm parts
(compressor, condenser) to prevent the risk of a fire, follow
the instructions relevant to installation.
The appliance must not be locate close to radiators or
cookers.
Make sure that the mains plug is accessible after the
installation of the appliance.
Service
Any electrical work required to do the servicing of the
appliance should be carried out by qualified electrician or
competent person.
This product must be serviced by an authorized Service
Center, and only genuine spare parts must be used.
1)If the appliance is Frost Free.
2)If the appliance contains freezer compartment.
Installation Important!
For electrical connection carefully, follow the instructions
given in this manual.
Unpack the appliance and check if there are damages on it.
Do not connect the appliance if it is damaged. Report
possible damages immediately to the place you bought it. In
this case retain packing.
It is advisable to wait at least four hours before connecting
the appliance to allow the oil to flow back in the compressor.
Before maintenance, switch off the appliance and disconnect
the mains plug from the mains socket.
Do not clean the appliance with metal objects, steam
cleaner, ethereal oils, organic solvents or abrasive
cleansers.
Do not use sharp objects to remove frost from the appliance.
Use a plastic scraper.

Stand your appliance in a dry place to
avoid high moisture.
Keep the appliance out of direct
sunlight rain or frost. Stand the ,
appliance away from heat sources
such as stoves, fires or heaters.
●
●
It may not work properly if being left at
a temperature above or below the
indicated range for a long period.
Installing your new appliance
Before using the appliance for the first
time, you should be informed of the
following tips.
Ventilation of appliance
In order to improve efficiency
of the cooling system and
save energy, it is necessary to
maintain good ventilation around the
appliance for the dissipation of heat.
For this reason, sufficient clear space
should be available around the
refrigerator.
135°.
Note:
This appliance performs well within
the climate class from showed
in the table below.
SN to T
●
Leveling of appliance
For sufficient leveling and air
circulating in the lower rear section of
the appliance, the bottom feet may
need to be adjusted. You can adjust
them manually by hand or by using a
suitable spanner.
To allow the door to self-close, tilt the
top backwards by about 10mm.
●
●
Installing the door handle
For the convenience of transportation,
the door handles are separately
provided in a plastic bag, you can
install the door handles as follows.
1. Lever the screw hole covers on the
side which you want to install the
handle of the door, and then put them
back to the plastic bag.
2. Take the handle match on the right
side of the door as the example,
keeping axes of screw holes in the
handle and the door in a line, as the
picture shows.
Symbol Ambient Temperature
range( )°C
SN
N
ST
T
+10 to +32
+16 to +32
+16 to +38
+16 to +43
Class
Extended
Temperate
Temperate
Subtropical
Tropical
8
10mm
≤
≤
≤
≤≤
freezer doo r
screw hole c ove
handle part
screw
handle cov er
3. Fix the handle with the screws
provided in the plastic bag. And then
install the handle covers
.
as the above
figure shows
50-70mm

The side at which the door opens can
be changed, from the left side (as
supplied) to the right side, if the
installation site requires.
Warning! When reversing the door, the
appliance must not be connected to the
mains. Ensure that the plug is removed
from the mains socket.
Tools you will need:
8mm socket wrench Cross-shaped screwdriver
8mm wrenchThin-blade screwdriver
Note: Be fore you start la y the
refrigerator on its back in order to
gain access to the base you should ,
rest it on soft foam packaging or
similar material to avoid damaging
the backboard of the refrigerator To .
reverse the door the following steps ,
are generally recommended .
1. Stand the refrigerator upright .
2. Remove part from ① and part ②
the refrigerator body, and then take
down part on the door in the same ③
way. Remove the part screws ④ ,then
take off as the picture below. ⑤ part
Note: Please hold the freezer door by hand
during step 2 to prevent door dropping.
9
3. Take off the door and ① place it
on smooth surface with panel upwards.
Screw out the hinge axis ② (include
washer as show igure and) f Ⅱ Ⅲ
, and then turn the upper hinge
fixed board over as show igure ③ f
Ⅳ . ② ③ Finally fix part on part as
show igure and , fⅤ Ⅵ then place it at
side for use.
ⅣⅢ
ⅥⅤ
ⅡⅠ
①
③
②
①
②
④① Upper hinge cover
② Top cover block
③
④
⑤
Cover plate
Special flange self-
tapping screw
Upper hinge part
③
⑤

5. Place refrigerator flatwise, remove
part and then loose screws③ ④ .
Remove part and part② ① as the
picture.
4.Lever handle covers and loose ①
screws , remove the handle ② ③ as
show igure f Ⅰ ,then place it at side
for use. Take the screw hole covers ④
down f , and install as show igure Ⅱ
them in the right side fas show igure
Ⅲ. Change handle to left, install it as
show igure fⅣ. Detach door stopper
⑤ ⑥ and limit block and then install
door stopper and limit block to right as
show igure and fⅤ Ⅵ.
① ②Handle covers Screws
③ ④ Handle Screw hole covers
⑤ ⑥ Door stopper Limit block
⑦ - Self tapping screws
6. Screw out lower hinge axis, change
it to the near hole site as the picture
below, and then screw up and mount
washer as the picture below.
③
④
①
②
① Left Lower hinge part ② Front foot fixed board
③ Adjust able
bottom feet
part ④ special flange s elf-tapping screw
8. Take off the part place it at side ①,
for use as show figure Move the Ⅰ.
freezer door to appropriate position,
adjust part and door, then fix part ②
② . by screws as show figure Ⅱ
(Please hold upper door by hand when
installing). Fix the part ③ as show
f which is in the plastic bag) . igure Ⅱ(
Reverse part by 180°and install it ①
onto the left corner of the door as
show igure fⅢ. Finally mount part ④
as show igure fⅣ.( which was taken
down in step 2)
9.Finally install part ① and part ②
(both of which are taken down in step
2) refrigeratorin the body as the
picture below.
Ⅱ
④
Ⅰ
③② ①
Ⅳ
⑥⑦
⑤
Ⅴ
Ⅵ
Ⅲ
①②
7.Just remount to the step 5,change
part to right and part to left and ① ②
then fix them with screws Finally ④ .
install part③.
Note: washer may
st ick to t he door.
wa sher
hinge axis
Ⅱ②③
④
Ⅳ
Ⅲ
①
Ⅰ
10

Description of the appliance
View of the appliance
Upper cover of door
2. Corner cover
3. Flap cover
4. Handle(back)
5. Ice tray(inside)
6. Upper freezer drawer
7. Middle freezer drawer(huge box)
8. Freezer door
9. Lower freezer drawer
10. Freezer door seal
11. Adjustable bottom feet
12. Hinge cover
13. Block cover
14. Functional board part
15. Glass shelf
16. Shelf part(inside)
17. Cabinet
1.
Note: Due to constant improvement of our products, your refrigerator may be
slightly different from this instruction manual, but its functions and using methods
remain the same. To get more space in the freezer, you can remove drawer(except
lower freezer drawer), installation bracket and integrative ice maker/twistable ice
tray.
Note: To get the best energy efficiency of this product, please place all shelves,
drawers and baskets on their original position as the illustration above.
11

Display controls
We recommend that when you start
your refrigerator for the first time, the
temperature for the refrigerator is set to
-18°C. If you want to change the
temperature, follow the instructions
below.
Controlling the temperature
This feature also helps to keep the
vitamins and nutrition of fresh food for
longer period.
●
super freeze function. The light will
come on and the freezer temperature
setting displays -24 .℃
●Super freeze automatically switches
off after 26 hours and the freezer
temperature will revert back to the
previous setting.
● When super freeze function is on,
you can switch off super freeze function
by pressing “Super” or “Temp” button,
then the freezer temperature setting or
function mode will revert back to the
previous setting.
Press “Super” button to activate the
Super will quickly lower the
temperature within the freezer
so food will freeze faster.
1. Temp
2. Super
All functions and controls of the unit are
accessible from a control panel
conveniently located on the roof
refrigerator body. A display circuit board
allows easy configuration of features
and settings in a simple and intuitive
manner.
Important!
When the refrigerator is energized, all
the pilot lights will turn on for 3 sec and
you will also heard a long sound of
“beep”. The display board consists of
four buttons and eight pilot lights. You
will heard a short sound of “beep”
when you press the button.
Caution! When you set a temperature,
you set an average temperature for the
whole refrigerator cabinet.
Temperature inside the compartment
may vary from the temperature values
displayed on the panel, depending on
how much food you store and where
you place them. Ambient temperature
may also affect the actual temperature
inside the appliance.
-18℃
-20℃
-16℃
-24 -22℃ ℃
-14℃
Press “Temp” button to set
freezer temperature between -
14 and -24 as needed, ℃ ℃
and the light of the comparable
t e m p e r a t u r e w i l l b e l i g h t e n
corresponding values according to the
following sequence.
12

3. Alarm In case of alarm, “Alarm” icon
will light up and a buzzing
sound will start.
Press “Alarm” button to stop alarm and
buzzing then “Alarm” icon will turn off.
Caution! When the refrigerator is
turned on after a period of inactivity, the
Alarm may be activated. In this case,
press “Alarm” button to cancel it.
Door Alarm
The alarm light on and a buzzing sound
indicate abnormal conditions, such as
accidentally a door left open.
Leaving the door of refrigerator open
for over 2 minutes will activate a door
alarm and buzzer. The buzzer will beep
3 times per minute for 10 minutes.
Closing the door cancels the door
alarm and buzzer.
To save energy, please avoid keeping
the door open for a long time when
using refrigerator. The door alarm can
also be cleared by closing the door.
Temperature alarm
This is an important feature that alerts
●
●
●When the appliance is power off, you
can switch the appliance on by
pressing “Power” button for 1 second,
and the refrigerator returns to the
previous temperature setting.
users of potential damage to stored
food. If a power failure occurs, for
example a blackout in your area of
residence while you are away, the
temperature alarm may be activated
when power is restored to be the unit.
If you want to stop using it,
you can turn the appliance off
by pressing “Power” button.
●
can switch the appliance off by
pressing “Power” button for above 5
seconds, meanwhile the display panel
will be turned off.
Important! Do not store any food in the
fridge during this time. If you will not
use the refrigerator for a long time,
please pull the plug.
When the refrigerator is working, you
4. Power
Using your appliance
This section explains that how to use the refrigerator features. We
recommend that you read through carefully before using the appliance.
You can turn the flap cover upwards
when you want to take out the food in
the top chamber.
Before you open or close the flap
cover, you must lift it to the guide track
first. Then, the flap cover can slide
along the guide track to the top or the
bottom.
Flap cover
●
●
Freezer Drawer
It is used to store food which
needs to be frozen, including meat,
fish, ice cream, etc.
●
13

Switching off your appliance
If the appliance needs to be switched
off for an extended period, the following
steps should be taken prevent mould
on the appliance.
1. Remove all food.
2. Remove the power plug from the
mains socket.
3. Clean and dry the interior thoroughly.
4. Ensure that all the doors are wedged
open slightly to allow air to circulate.
Hints for the storage of frozen food
Ensure that frozen food has been
stored correctly by the food retailer.
Once defrosted food will deteriorate ,
rapidly and should not be re-frozen. Do
not exceed the storage period indicated
by the food manufacturer.
●
●
Hints for fresh food refrigeration
Do not place hot food directly into
t h e r e f r i g e r a t o r, t h e i n t e r n a l
temperature will increase resulting
in the compressor having to work
ha rd er an d will co nsu me more
energy.
Do cover or wrap the fo od,
particularly if it has a strong flavor.
Place food properly so that air can
circulate freely around it.
●
●
●
Hints for freezing
When first starting-up or after a
period out of use, let the appliance run
at least 2 hours on the higher settings
before putting food in the compartment.
●
Helpful hints and tips
Energy saving tips
We recommend that you follow the tips
below to save energy.
Try to avoid keeping the door open
for long periods in order to conserve
energy.
Ensure the appliance is away from
any sources of heat. (Direct sunlight,
electric oven or cooker etc.)
Don't set the temperature colder than
necessary.
Don't store warm food or evaporating
liquid in the appliance.
●
●
●
Place the appliance in a well
ventilated, humidity free, room. Please
refer to Installing your new appliance
chapter.
If the diagram shows the correct
combination for the drawers, crisper
and shelves, do not adju st the
combination as this is designed to be
the most energy efficient configuration.
●
●
●I c e d p ro d uc t s , i f c o n s u m e d
immediately after removal from the
freezer compartment, will probably
cause frost burns to the skin.
It is recommended to label and date
each frozen package in order to keep
track of the storage time.
●
●
Prepare food in small portions to
enable it to be rapidly and completely
frozen and to make it possible to
subsequently thaw only the quantity
required.
Wrap up the food in aluminum foil or
polyethylene food wraps which are
airtight.
Do not allow fresh, unfrozen food to
touch the food which is already frozen
to avoid temperature rise of the latter.
●
●
●●
Cleaning and care Cleaning and care
For hygienic reasons the appliance (including exterior and interior accessories)
should be cleaned regularly at least every two months.
Caution! The appliance must not be connected to the mains during cleaning.
Danger of electrical shock! Before cleaning switch the appliance off and remove
the plug from the mains socket.
1 4

Take care to keep door seals clean.
Sticky food and drinks can cause seals
to stick to the cabinet and tear when
you open the door. Wash seal with a
mild detergent and warm water. Rinse
and dry it thoroughly after cleaning.
Caution! Only after the door seals are
completely dry should the appliance be
powered on.
Door seal cleaning
Troubleshooting
If you experience a problem with your appliance or are concerned that the appliance
is not functioning correctly, you can carry out some easy checks before calling for
service, please see below. You can carry out some easy checks according to this
section before calling for service.
Warning! Don't try to repair the appliance yourself. If the problem persists after you
have made the checks mentioned below, contact a qualified electrician, authorized
service engineer or the shop where you purchased the product.
Caution!
-Don't use sharp objects as they are
likely to scratch the surface.
-Don't use Thinner, Car detergent,
Clorox, ethereal oil, abrasive cleansers
or organic solvent such as Benzene for
cleaning. They may damage the
surface of the appliance and may
cause fire.
Interior cleaning
-Wipe the digital panel and display
panel with a clean, soft cloth.
-Spray water onto the cleaning cloth
instead of spraying directly on the
surface of the appliance. This helps
ensure an even distribution of moisture
to the surface.
-Clean the doors, handles and cabinet
surfaces with a mild detergent and
then wiped dry with a soft cloth.
Exterior cleaningExterior cleaning
To maintain good appearance of your
appliance, you should clean it regularly.
You should clean the appliance interior
regularly. It will be easier to clean when
food stocks are low. Wipe the inside of
the fridge freezer with a weak solution
of bicarbonate of soda, and then rinse
with warm water using a wrung-out
sponge or cloth. Wipe completely dry
before replacing the shelves and
baskets.
Thoroughly dry all surfaces and
removable parts.
Although this appliance automatically
defrosts, a layer of frost may occur on
the freezer compartment's interior walls
if the freezer door is opened frequently
or kept open too long. If the frost is too
thick, choose a time when the supply of
food stocks are low and proceed as
follows:
1 . R e m o v e e x i s t i n g f o o d a n d
accessories baskets, unplug the
appliance from the mains power and
leave the doors open. Ventilate the
room thoroughly to accelerate the
thawing process.
2. When defrosting is completed, clean
your freezer as described above.
Caution! Don't use sharp objects to
remo v e fr o s t f ro m t h e fr e e zer
compartment. Only after the interior is
completely dry should the appliance be
switched back on and plugged back
into the mains socket.
1 5

Appliance is not
working correctly
●
●
●
●
●
●
●
●
●
●
●
●
●
Problem
Odours from the
compartments
Noise from the
appliance
The motor runs
continuously
A layer of frost
occurs in the
compartment
Temperature inside
is too warm
Possible cause & Solution
Check whether the power cord is plugged into the power
outlet properly.
Check whether the “Power” funtion is on by pressing the
“power” button for 1 second.
Check the fuse or circuit of your power supply, replace if
necessary.
The ambient temperature is too low. Try setting the chamber
temperature to a colder level to solve this problem.
It is normal that the refrigerator is not operating during the
automatic defrost cycle, or for a short time after the
appliance is switched on to protect the compressor.
The interior may need to be cleaned.
Some food, containers or wrapping cause odours.
The sounds below are quite normal:
Compressor running noises.
Air movement noise from the small fan motor in the fridge
compartment or other compartments.
Gurgling sound similar to water boiling.
Popping noise during automatic defrosting.
Clicking noise before the compressor starts.
Other unusual noises are due to the reasons below and may
need you to check and take action:
The cabinet is not level.
The back of appliance touches the wall.
Bottles or containers fallen or rolling.
It is normal to frequently hear the sound of the motor, it will
need to run more when in following circumstances:
Temperature setting is set colder than necessary
Large quantity of warm food has recently been stored
within the appliance.
The temperature outside the appliance is too high.
Doors are kept open too long or too often.
After your installing the appliance or it has been switched
off for a long time.
Check that the air outlets are not blocked by food and
ensure food is placed within the appliance to allow sufficient
ventilation. Ensure that door is fully closed. To remove the
frost, please refer to cleaning and care chapter.
You may have left the doors open too long or too frequently;
or the doors are kept open by some obstacle; or the
appliance is located with insufficient clearance at the sides,
back and top.
16

Increase the temperature by following the “Display
controls” chapter.
Check whether the top of the refrigerator is tilted back
by 10-15mm to allow the doors to self close, or if
something inside is preventing the doors from closing.
The water pan (located at the rear bottom of the
cabinet) may not be properly leveled, or the draining
spout located underneath the top of the compressor (
depot may not be properly positioned to direct water )
into this pan, or the water spout is blocked. You may
need to pull the refrigerator away from the wall to check
the pan and spout.
Temperature inside
is too cold
Doors can't be
closed easily
Water drips on the
floor
Disposal of the appliance
It is prohibited to dispose of this appliance as household waste.
Packaging materials
Packaging materials with the recycle symbol are recyclable. Dispose of the
packaging into a suitable waste collection container to recycle it.
Before disposal of the appliance
1. Pull out the mains plug from the mains socket.
2. Cut off the power cord and discard with the mains plug.
Warning! Refrigerators contain refrigerant and gases in the insulation.
Refrigerant and gases must be disposed of professionally as they may cause
eye injuries or ignition. Ensure that tubing of the refrigerant circuit is not
damage prior to proper disposal.
Correct Disposal of this product
This symbol on the product or in its packing indicates that this
product may not be treated as household waste. Instead, it should
be taken to the appropriate waste collection point for the recycling of
electrical and electronic equipment. By ensuring this product is
disposed of correctly, you will help prevent potential negative
consequences for the environment and human health, which could
otherwise be caused by the inappropriate waste handling of this
product. For more detailed information about the recycling of this
product, please contact your local council your household waste
disposal service, or the shop where you purchased the product.
1 7

To avoid contamination of food, please respect the following instructions
Opening the door for long periods can cause a significant increase of the temperature
in the compartments of the appliance.
systems.
- Store raw meat and fish in suitable containers in the refrigerator, so that it is not in
contact with or drip onto other food.
- Two-star frozen-food compartments are suitable for storing pre-frozen food, storing or
making icecream and making ice cubes.
- One-, two- and three-star compartments are not suitable for the freezing of fresh food.
-
- Clean regularly surfaces that can come in contact with food and accessible drainage
Order Compartments
TYPE
Target storage
temp.[ ]℃Appropriate food
1Fridge +2 +8
Eggs, cooked food, packaged food, fruits and
vegetables, dairy products, cakes, Drinks and
other foods which are not suitable for freezing.
2( Freezer***)*- ≤-18
Seafood (fish, shrimp, shellfish), freshwater
aquatic products and meat products
(recommended time is 3 months – nutrition
values and taste decrease with time), suitable
for frozen fresh food.
3 ***-Freezer ≤-18
Seafood (fish, shrimp, shellfish), freshwater
aquatic products and meat products
(recommended time is 3 months – nutrition
values and taste decrease with time). Not
suitable for freeing fresh food .
4 **-Freezer ≤-12
Seafood (fish, shrimp, shellfish), freshwater
aquatic products and meat products
(recommended time is 2 months – nutrition
values and taste decrease with time). Not
suitable for freeing fresh food.
5 *-Freezer ≤-6
Seafood (fish, shrimp, shellfish), freshwater
aquatic products and meat products
(recommended time is 1 month – nutrition
values and taste decrease with time). Not
suitable for freeing fresh food.
6 0-star -6 0
Fresh pork, beef, fish, chicken, some packaged
processed foods, etc. (Recommended to eat
within the same day, preferably not later than
3 days) .
Partially packed/wrapped up encapsulated
processed foods (non-freezable foods)
7 Chill -2 +3
Fresh/frozen pork, beef, chicken, freshwater
aquatic products, etc.(7 days below 0 and ℃
above 0 is recomm ended for consumption ℃
within that day, preferably no mo re than 2 days).
Seafood (less than 0 for 15 days, it is not
recommended to store above 0 ) ℃
~
~
~

8 Fresh Food 0 +4
Fresh pork, beef, fish, chicken, cooked food, etc.
(Recommended to eat within the same day,
preferably no mo re than 3 days)
9 Wine +5 +20
red wine,white wine,sparkling wine etc.
Water dispenser cleaning (special for water dispenser products):
- Clean water tanks if they have not been used for 48 h; flush the water system
connected to a water supply if water has not been drawn for 5 days.
- If the refrigerating appliance is left empty for long periods, switch off, defrost, clean,
dry, and leave the door open to prevent mould developing within the appliance.
Note: please store different foods according to the compartments or target storage
temperature of your purchased products.
WARNING
If the refrigerant circuit should be damaged:
-Avoid opening flames and sources of ignition.
-Thoroughly ventilate the room in which the appliance is
situated.
Risk of fire flammable materials /
:
It is dangerous to alter the specifications or modify this
product in any way.
Any damage to the cord may cause a shortcircuit, fire, and/or
electric shock.
Note: Children aged from 3 to 8 years are allowed to load and
unload refrigerating appliances.(This clause applies only to the
EU region.)
~
~

Mantenga todos los embalajes apartados de los niños p21-ya que
hay riesgo de asfixia.
Si va a desechar el aparato, tire el enchufe macho fuera del
tomacorriente, corte el cable de conexión (lo más cerca del
aparato como sea posible) y quite la puerta para evitar que los
niños la jueguen y protegerlos contra la descarga eléctrica o
desde su encierro.
Si este aparato, que está equipado con los sellos de puerta
magnéticos, es para reemplazar un aparato más viejo que
tiene un bloqueo de muelle (pestillo) en la puerta o la tapa,
asegúrese de hacer inútil el bloqueo de muelle antes de que
deseche el aparato viejo. Eso puede evitar formar la trampa
mortal para los niños.
Seguridad general
ADVERTENCIA - Este aparato está diseñado para ser
utilizado en el hogar y las aplicaciones similares tales como
-Áreas de cocina de personal en tiendas, oficinas y otros
entornos de trabajo;
-Casas de la granja y por los clientes en hoteles, moteles y
otros entornos de tipo residencial;
-Entornos de tipo cama y desayuno;
-Catering y aplicaciones similares no comerciales.
ADVERTENCIA- No almacene las sustancias explosivas tales
como latas de aerosol con un propulsor inflamable en este
aparato.
ADVERTENCIA-Si el cable de alimentación está dañado,
deberá ser reemplazado por el fabricante, su agente de servicio
o las personas similarmente cualificadas con el fin de evitar un
peligro.
ADVERTENCIA- Mantenga las aperturas de ventilación en la
carcasa del aparato o en la estructura construida libres de
obstáculos.
ADVERTENCIA—No utilice los dispositivos mecánicos u otros
medios para acelerar el proceso de descongelación, con
excepción de los recomendados por el fabricante.
ADVERTENCIA—No dañe el circuito de refrigerante.
ADVERTENCIA—No utilice los aparatos eléctricos dentro de los
compartimientos de almacenamiento de alimentos del aparato,
a menos que sean de tipo recomendado por el fabricante
19

21
Seguridad eléctrica
1El cable de alimentación no deberá ser alargado.
2 Asegúrese de que el enchufe de alimentación no esté
aplastado o dañado. Un enchufe de alimentación aplastado o
dañado puede sobrecalentar y causar un incendio.
3 Asegúrese de que pueda acceder al enchufe principal
del .aparato.
4 No tire el cable principal.
el enchufe de alimentación. Hay un riesgo de descarga
eléctrica o incendio.
6 No opere el aparato sin la cubierta interna de la luz
de . iluminación
5 Si la toma del enchufe de alimentación está floja, no inserte
7 Este refrigerador sólo se aplica junto con la fuente de
Uso diario
No almacene los gases o líquidos inflamables en el aparato,
hay riesgo de explosión.
No opere ningún aparato eléctrico en el aparato (por ejemplo,
máquina eléctrica de helados, mezcladores, etc.).
Durante el desenchufe, siempre tire el enchufe macho desde el
tomacorriente, no tire el cable.
No coloque los ítems calientes cerca de los componentes de
plástico de este aparato.
No coloque los productos de alimento directamente contra la
salida de aire en la pared trasera.
alimentación de corriente alternativa monofásica de
220~240V/50Hz. Si la fluctuación del voltaje en el distrito del
usuario es demasiado grande y el voltaje excede dicho alcance,
para la seguridad, asegúrese de aplicar el regulador de voltaje
automático CA de más de 350W para el refrigerador. El
refrigerador no deberá utilizar un tomacorriente especial en lugar
del común con otros aparatos eléctricos. Si enchufe deberá
coincidir con el tomacorriente del cable de tierra.

22
Almacene los alimentos congelados pre¬empaquetados de
acuerdo con las instrucciones del fabricante de alimentos
congelados.
Las recomendaciones de almacenamiento de los fabricantes de
aparatos deberán ser estrictamente cumplidas. Refiérase a las
instrucciones relevantes para el almacenamiento.
No coloque las bebidas carbonatadas o gaseosas en el
compartimiento de congelación p24-ya que el cual crea presión en el
contenedor, que puede causar su explosión, resultado en el
daño al aparato.
Los alimentos congelados pueden causar quemaduras por
congelación si son consumidos directamente desde el
compartimiento del congelador.
No coloque el aparato bajo la luz solar directa.
Mantenga las velas de quema, las lámparas u otros ítems con
llamas abiertas apartados del aparato para que el aparato no se
encienda.
Este aparato está diseñado para preservar los alimentos y/o
bebidas en el hogar normal como se explica en el manual de
instrucciones. Este aparato es pesado, se deberá tener cuidado
al moverlo.
No mueva ni toque los ítems desde el compartimiento de
congelador si sus manos están húmedas/mojadas, p24-ya que eso
puede causar las abrasiones en la piel o las quemaduras por
escarcha/congelación.
Nunca se mantenga de pie sobre la base, los cajones, las
puertas, etc. ni los utilice como soportes.
Los alimentos congelados no deben ser recongelados una vez
que hayan sido descongelados.
No consuma los helados o cubitos de hielo directamente desde
el congelador p24-ya que eso puede causar quemadura a la boca y
los labios por el congelador.
Para evitar la caída de objetos o causar lesión o daño al
aparato, no sobrecargue los estantes en la puerta ni coloque
demasiados alimentos en los cajones de verdura.
¡Precaución!
Cuidado y limpieza
Antes del mantenimiento, apague el aparato y desconecte el
enchufe macho desde el tomacorriente.

23
La circulación adecuada de aire deberá estar alrededor del
aparato, la falta de esa puede causar el sobrecalentamiento.
Para lograr suficiente ventilación, siga las instrucciones
relacionadas con la instalación.
Cuando sea posible, la parte trasera del producto no debe estar
demasiado cerca de una pared para evitar que toque o toque
piezas calientes (compresor, condensador) para evitar el riesgo
de incendio, siga las instrucciones pertinentes a la instalación.
El aparato no deberá ubicarse cerca de los radiadores u
hornos.
Asegúrese de que el enchufe macho sea accesible después de
la instalación del aparato.
Servicio
Cualquier trabajo eléctrico requerido durante el
mantenimiento del aparato deberá ser llevado a bajo por el
electricista cualificado o la persona competente.
Este producto deberá ser mantenido por un centro autorizado
de servicios y sólo se deberá utilizar los repuestos genuinos.
1)Si el aparato es libre de escarchas.
2)Si el aparato contiene el compartimiento de congelador.
¡Importante para instalación!
Para la conexión eléctrica cuidadosa, siga las instrucciones
dadas en este manual.
Desembale el aparato y verifique si hay daños en el cual. No
conecte el aparato si está dañad. Informe los daños posibles al
lugar donde compró el producto inmediatamente. En este caso,
retenga el embalaje.
Es aconsejable esperar durante por lo menos cuatro horas
antes de conectar con el aparato con el fin de permitir el reflujo
del aceite al compresor
No limpie el aparato con los objetos metálicos, limpiador de
vapor, aceites etéreos, disolventes orgánicos ni limpiadores
abrasivos.
No utilice los objetos afilados para eliminar las escarchas
desde el aparato. Utilice un raspador de plástico.

135º.
Instalación del nuevo electrodoméstico
Antes de utilizar el electrodoméstico por
primera vez, debería informarse sobre los
siguientes consejos.
Ventilación del
electrodoméstico
Con el fin de mejorar la
eficiencia del sistema de
refrigeración y ahorrar energía,
es necesario mantener una buena
ventilación alrededor del aparato para la
disipación del calor. Por esta razón,
debería existir un espacio lo
suficientemente libre cerca del
refrigerador.
Nota:
●Este electrodoméstico funciona bien
dentro de la clase climática SN hasta T
que se muestra en la siguiente tabla.
Puede que no funcione de manera
correcta si la temperatura está por
encima o debajo del rango indicado
durante un largo período.
Clase Símbolo Rango de temperatura
ambiente ºC ()
Temperatura
extendida SN De +10 hasta +32
Templado N De +16 hasta +32
Subtropical ST De +16 hasta +38
Tropical T De +16 hasta +43
●Mantener el aparato en un lugar seco
para evitar alta humedad.
●Mantener el aparato lejos de la
dirección del sol, la lluvia o las heladas.
Coloque el aparato lejos de fuentes
calientes como cocinas, estufas o
calentadores.
Nivelación del electrodoméstico
●Para una nivelación adecuada y
suficiente circulación de aire en la
sección inferior posterior del aparato
puede ser necesario ajustar las patas
inferiores. Se pueden ajustar de manera
manual o utilizando una llave correcta.
●Para que la puerta se cierre
automaticamente, inclinar la parte
superior hacia atrás unos 10mm.
≤
≤
≤
≤≤
10mm
24
50-70mm

Instalación de la manija de la
puerta
Las manijas de la puerta están separadas
en una bolsa de plástico para una
transportación cómoda. Puede instalar
las manijas de la siguiente manera.
1. Abrir el orificio de la cubierta del tornillo
del lado que desea instalar la manija de
la puerta y luego colocarlo en la bolsa de
plástico.
2. Tomar la manija que coincida con el
lado derecho de la puerta, por ejemplo,
mantener los ejes de los orificios del
tornillo en la manija y la puerta en línea
como se muestra en la imagen.
3. Fijar la manija con los tornillos que
vienen en la bolsa de plástico. Luego,
instalar el cobertor como se muestra
en la figura.
Puerta del congelador
Orificio del tornillo
Parte de l a manija
Tornillo
Cobertor de la manija
25

Inversión de la puerta
Si el lugar de alacinst ión lo requiere, se
puede cambiar el lado en el que se abre
la puerta, del lado zquiero (tal como se i
suministra) al lado derecho.
¡Advertencia! No se debe conectar el
electrodoméstico a la red eléctrica
durante el cambio de la puert Asegurar a.
que el enchufe se quite del toma
corrientes.
Herramienta qu necesitará: s e
Nota: Antes de menzar a colocar co el
refrigerador para ganar acceso a la base,
debería recostarlo en el embalaje de
espuma suave o en un material similar
pa evit daño de ra ar s en la placa
protección del refrigerador.
Generalmente, para revertir la puerta se
recomienda ir los segu siguientes pasos.
1. Colocar el refrigerador en posición
vertical.
2. Quitar la parte ① y la parte ② del
cuerpo del refrigerador, luego bajar la
parte ③ de la puerta de la misma manera.
Quitar los tornillos de la parte ④ y luego
la parte como se muestra en la ⑤
imagen.
Nota: Por favor, sostener la puerta del
congelador con la mano durante el paso
2 para evitar que la puerta se caiga.
3. Quitar la puerta ① y colocarla en la
superficie suave con el panel hacia arriba.
Desenroscar el eje de la bisagra ②
(incluyendo la arandela) como se
muestra en la imagen II y III, y luego girar
la bisagra superior del tablero ③ como se
muestra en la figura IV. Por último, fijar la
parte ② sobre la parte ③ como se
muestra en la figura V y VI, luego
colocarlo a un lado para su uso.
Llave cricket de tubo de 8mm Destornillador de cruz
Llave inglesa de 8mm
Destornillador de punta fina
①
②
④①
②
③
④
⑤
Bisagra superior
Bloque de cubierta superior
Plac a de cubierta
Tornillo autorroscante para
brida especial
Parte de bisagra superior
③
⑤
25

la puerta, luego ajustar la parte ② con
los tornillos como se muestra en la figura
II. (Por favor, sostener la puerta con la
mano mientras se instala). Ajustar la
parte ③ como se muestra en la figura II
(la cual está en la bolsa de plástico).
Invertir la parte ① a 180º e instalarla en
el rincón izquierdo de la puerta como se
muestra en la figura III. Por último,
colocar la parte ④ como se muestra en
la figura IV (que se obtuvo del paso 2).
9. Finalmente, instalar la parte ① y la
parte ② (ambas se tomaron en el paso 2)
en el cuerpo del refrigerados como se
muestra en la siguiente imagen.
①②
Ⅱ②③
④
Ⅳ
Ⅲ
①
Ⅰ
28

Vista del electrodoméstico
Descripción del electrodoméstico
1. Cobertor superior de la puerta
2. Cubierta de la esquina
3. Cubierta de la solapa
4. Manija (atrás)
5. Bandeja de hielo (por dentro)
6. Cajón superior del congelador
7. Cajón del medio del congelador
(caja grande)
8. Puerta del congelador
9. Cajón inferior del congelador
10. Sello de la puerta del congelador
11. Patas inferiores ajustables
12. Cubierta de la bisagra
13. Cubierta del bloque
14. Parte de la placa de
protección funcional
15. Estante de vidrio
16. Parte del estante (por dentro)
17. Gabinete
Not De l continu nuestrosa: bido a a mejora a de pr refrigerador puede dif un oductos, el erir
poco en las instrucciones del manual pero todos de usos son su func y méionamiento los
mismos. Para onseguir más cio su e los c espa en congelador pued quitar cajones
(excepto el cajón inferior), la instal ación l soporte máquina de de y la
hielo integrada/bandeja de hielo flexible.
Not obte ren fa los a: Para ner mejor el dimiento de este producto, por vor coloque todos
est yantes, cajones canastos en la de posición original como se muestra en la ilustración
arriba.
29

Controles de la pantalla
T y de la odas las funciones controles
unidad son accesibles desde el anel p de
control ubicado en el techo del
refrigerador. El circuito de la pantalla
permite una fácil configuración de las
características y ajustes en una manera
simple e intuitiva.
¡Importante!
Cuando el refrigerador está energizado,
todas las luces piloto se án encender por
3 escuchará un segundos se y sonido,
"beep", largo. La placa de la pantalla
consta y luces de cuatro botones ocho
piloto. Escuchará un "beep" corto cuando
presione el botón.
Control de la temperatura
Le recomendamos que cuando encienda
el refrigerador por primera vez la
temperatura se establezca a -18ºC. Si
desea cambiar la a siga temperatur las
siguientes instrucciones.
¡Precaución! Cuando configura la
temperatura, configura una temperatura
promedio para toda la cabina del
refrigerador. La temperatura dentro del
compartimiento puede variar de los
valores que se muestran en el panel
dependiendo de cuanta cantidad de
comida haya alamacenada y donde esté
ubicada. La temperatura ambiente
también puede afectar la temperatura
actual dentro del electrodoméstico.
1. Temperatura
Presiones el botón "Temp"
para establecer la temperatura
del congelador entre -14ºC y
-24ºC como sea necesario. La luz de la
temperatura comparable se iluminará
según los valores de la siguiente
secuencia.
2. Súper
"Super" bajará rapidamente la
temperatura dentro del
congelador para que los
alimentos se congelen más rápido.
Además, esta característica ayuda a
mantener las vitaminas y la nutrición de
los alimentos frescos por largos períodos.
● Presionar el botón “Super” para activar
la función de súper congelación. La luz
se encenderá y en la configuración de la
temperatura del congelador se mostrará
-24ºC.
-18℃
-20
℃
-14℃-16℃
-24℃-22℃
30
Produkt Specifikationer
Mærke: | Infiniton |
Kategori: | Fryser |
Model: | CV-176IX |
Bredde: | 600 mm |
Dybde: | 650 mm |
Højde: | 1750 mm |
Vægt: | 66000 g |
Produktfarve: | Rustfrit stål |
Indbygget skærm: | Ja |
Produkttype: | Stående |
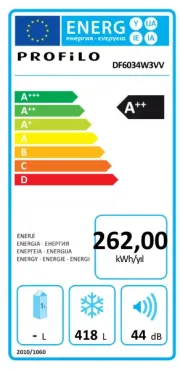
Årligt energiforbrug: | 300 kWh |
Placering af apparat: | Fritstående |
Dørhængsel: | Højre |
Tilsluttet belastning: | - W |
Støjniveau: | 43 dB |
Justerbare fødder: | Ja |
Energieffektivitetsskala: | A til G |
Støjemissionsklasse: | D |
Energieffektivitetsklasse: | F |
Vendbare døre: | Ja |
Fryser, netto rumindhold: | 254 L |
Frysekapacitet: | - kg/24t |
Opbevaringstid under strømafbrydelse: | - t |
Klimaklasse: | SN-ST |
Frostfri system: | Ja |
Stjernebedømmelse: | 4* |
Fryser antal hylder/kurve: | 7 |
Energiforbrug: | 0.81 kWh/24t |
Har du brug for hjælp?
Hvis du har brug for hjælp til Infiniton CV-176IX stil et spørgsmål nedenfor, og andre brugere vil svare dig
Fryser Infiniton Manualer

28 Januar 2025

5 Januar 2025

5 Januar 2025

5 Januar 2025

29 December 2024

29 December 2024

16 November 2024

15 September 2024

6 September 2024

3 September 2024
Fryser Manualer
- Fryser Ardes
- Fryser Royal Catering
- Fryser Danby
- Fryser Arendo
- Fryser Magimix
- Fryser Home Electric
- Fryser Kernau
- Fryser Ufesa
- Fryser Arctic Air
- Fryser Oster
- Fryser Master-Bilt
- Fryser Boretti
- Fryser Aldi
- Fryser Telefunken
- Fryser Maestro
Nyeste Fryser Manualer

8 April 2025

8 April 2025

6 April 2025

5 April 2025

30 Marts 2025

24 Marts 2025

21 Marts 2025

10 Marts 2025

9 Marts 2025

6 Marts 2025