Kensington sd200v Manual
Kensington
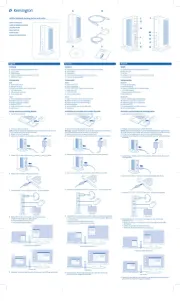
Docking Station
sd200v

| Mærke: | Kensington |
| Kategori: | Docking Station |
| Model: | sd200v |
| Antal USB 2.0-porte: | 5 |
| Udgange til hovedtelefoner: | 1 |
| Mikrofonindgang: | Ja |
| Kompatible operativsystemer: | Windows Vista, XP, Mac |
| Grænseflade: | USB |
| Antal VGA-porte (D-sub): | 1 |
Har du brug for hjælp?
Hvis du har brug for hjælp til Kensington sd200v stil et spørgsmål nedenfor, og andre brugere vil svare dig
Docking Station Kensington Manualer
8 August 2024
Docking Station Manualer
Nyeste Docking Station Manualer

26 August 2024

26 August 2024

24 August 2024

12 August 2024

8 August 2024


3 August 2024

3 August 2024

4 Juli 2024

28 Juni 2024