Kidde ​Titanium 002047 Manual

Kidde Vault ​Titanium 002047

Læs gratis den danske manual til Kidde ​Titanium 002047 (4 sider) i kategorien Vault. Denne vejledning er vurderet som hjælpsom af 23 personer og har en gennemsnitlig bedømmelse på 5.0 stjerner ud af 12 anmeldelser. Har du et spørgsmål om Kidde ​Titanium 002047, eller vil du spørge andre brugere om produktet?

Side 1/4
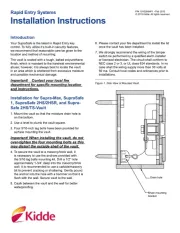
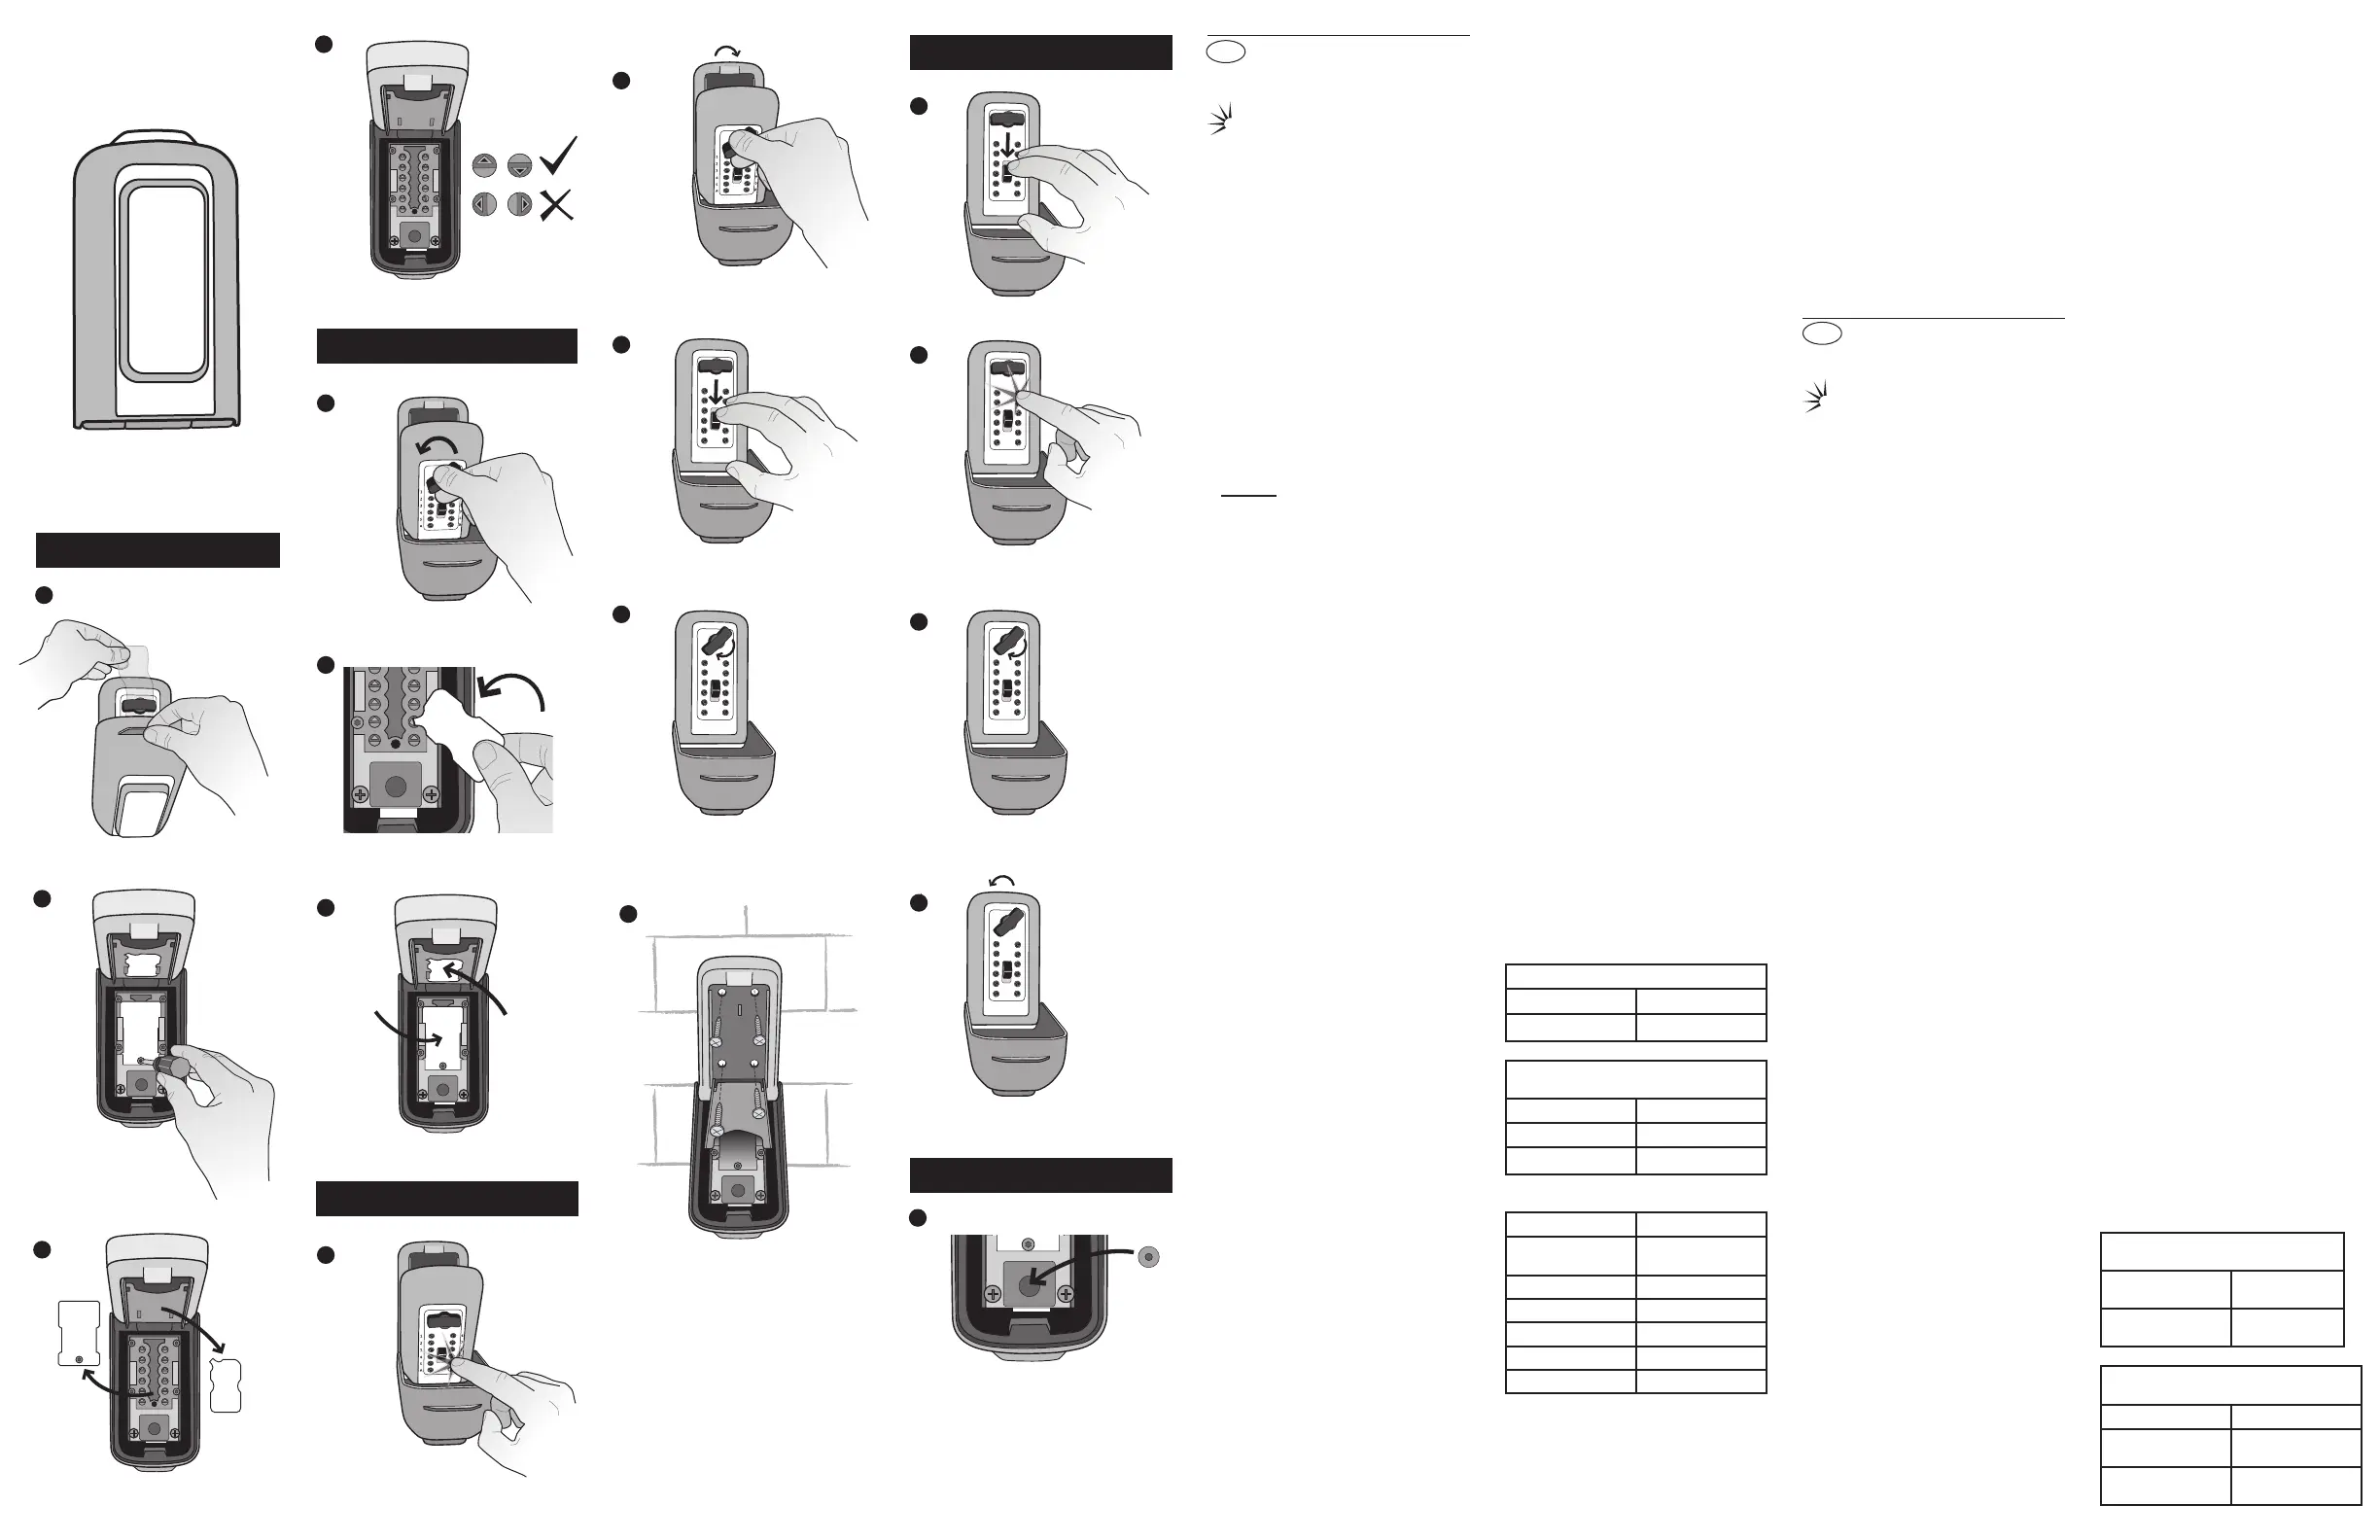
Installation Instructions
See pictures for step-by-step instructions. Further
information is provided below.
= Enter the combination.
A. Setting your combination
• There is no preset combination on your KeySafe
P500. Select your own combination. Each
number/letter can only be used once.
• Do not use a combination that can be easily
guessed.
1. Hold the clear plastic tab and pull open the
weather cover.
2. Press down on the CLEAR button.
3. Turn the OPEN handle clockwise 180° to open
the lid.
4. Use a screwdriver to remove the screw from the
code tamper plate.
5. Slide the tamper plate towards the hinge of the
KeySafe, pull out the plate and remove the plastic
card from the key cover.
6. There are 10 numbered buttons and 2 lettered
buttons with arrows on the back of the lid. Arrows
pointing away from the hinge are OFF and are not
part of the combination. Arrows pointing towards
the hinge are ON and are part of the combination.
7. With the KeySafe open, turn the open handle
counter clockwise 180°, back to the locked
position.
Important! The OPEN handle must be in
LOCKED position before the code can be
changed. Forcing the setting buttons when in
the OPEN position may damage the KeySafe
and void the warranty.
8. Use the code change tool on the plastic card to
set the combination. To add a number or letter
to the code, use the code change tool to push
in the grooved arrow by the number/letter you
wish to set. Turn 180° until the arrow pops back
up completely and the arrow points in the ON
direction. To remove a number or letter from
the code, use the code change tool to push
in the grooved arrow by the number/letter you
wish to set. Turn 180° until the arrow pops back
up completely and the arrow points in the OFF
direction.
9. Replace the plastic card on the key cover. Place
the code tamper plate over the back of the
lid and slide into place. Secure the plate with
the screw. Optional: To make the combination
tamper-resistant, secure the plate with the
anti-tamper screw using a Torx T15 anti-tamper
driver.
B. Testing your combination
1. Make sure OPEN handle is in the locked position.
If not, turn OPEN handle counter-clockwise
until it’s in the locked position. On the front of
the KeySafe, press only the buttons in your
combination. Press each button in until it clicks.
If you press the wrong button, push down on the
clear button and enter your code again.
2. Turn the OPEN handle clockwise 180° to open. If
the combination is set correctly, the OPEN handle
will turn fully and the locking bolt will retract. If not,
push down the CLEAR button and refer to section
B. Setting your combination.
C. Mounting the KeySafe P500
1. Press down on the CLEAR button.
2. Turn the OPEN handle clockwise 180° to open
the lid.
Masonry Installation:
1. Use the mounting template to position the holes
so they are as close to the center of the brick as
possible. Do not install screws into mortar since
this will weaken the mounting.
2. Use the mounting template to drill 4 mounting
holes using a 3/16” or 5mm masonry drill bit to
a depth of at least ¼” or 7mm deeper than the
length of the screw. Clean out dust and debris
from all holes.
3. If using the optional alarm sensor, refer to section
E. Optional Alarm Sensor Installation.
4. Position the KeySafe on the 4 holes and drive
the screws directly into the brick. Note: You
must use the size 6x60mm masonry screws
included with models 002045 and 002046,
or the masonry mounting kit, or equivalent
screws to maintain the LPS1175 security
certication. When mounting on a rendered
wall, it is recommended that the maximum
thickness of the render not exceed 10mm.
5. Tighten the screws until the heads are snug
against the back of the KeySafe. Be careful not to
over tighten the screws.
Note: Do not mount KeySafe closer than 6”
or 15cm to the corner of a masonry surface.
Make sure KeySafe is mounted ush with
masonry surface and the masonry screws are
only installed directly into brick. Never install
masonry screws into mortar. Minimize all gaps
This warranty is limited to repair or replacement
at UTCFS’ option. This warranty does not cover
forgotten or incorrectly set combinations. Damage
causedbymodication,abuseormisuse,wearand
tear, improper installation, application, storage, or
fault or negligence of a party other than UTCFS are
not covered. UTCFS will not be responsible for labor
costs of removal or reinstallation of products. The
repaired or replaced product is then warranted under
the terms of this limited warranty for the balance of
the term of the warranty or for 90 days, whichever is
longer. UTCFS MAKES NO OTHER WARRANTY,
EXPRESS OR IMPLIED, OF MERCHANTABILITY
OR FITNESS FOR A PARTICULAR PURPOSE.
IN NO EVENT SHALL UTCFS BE LIABLE
FOR LOSS OF USE, LOST PROFITS, THEFT,
PROPERTY DAMAGE, SPECIAL, INCIDENTAL
OR CONSEQUENTIAL DAMAGES. To obtain repair
or replacement information under the terms of this
warranty, please contact your local supplier.
Istruzioni d’installazione
Guarda le immagini per le istruzioni passo a passo.
Ulteriori informazioni sono fornite più in basso.
= Inserisci la combinazione.
A. Impostare la combinazione
• Nessuna combinazione è impostata di fabbrica.
Scegli la tua combinazione. Ogni numero / lettera
può essere impiegato una sola volta.
• Non impostare una combinazione che possa
essere facilmente intuita.
1. Trattenere la pellicola trasparente e sollevare il
guscio protettivo.
2. Abbassare il pulsante “CLEAR”.
3. Ruotare di 180° la maniglia in senso orario ed
aprire il coperchio.
4. Con un cacciavite rimuovere la vite che trattiene il
copri combinazione.
5. Asportare il copri combinazione ed anche la
tesseraplasticatassatasullosportellinocopri
chiave.
6. Sotto al copri combinazione troverete 12 bottoni,
di cui 10 con numeri e 2 con lettere. Sono tutti
orientati in direzione opposta dalle cerniere
del KeySafe, in posizione OFF. Per inserire
un numero od una lettera nella combinazione,
l’orientamento deve essere verso le cerniere del
KeySafe, a cui corrisponde la posizione ON.
7. Prima di procedere oltre, sempre mantenendo
lo sportello aperto, ruotare di 180° la maniglia in
sensoantiorarionoallaposizionedichiuso.
Importante! Solo in questa condizione sarà
possibile ruotare i bottoni e codicare la
combinazione. Se non si segue questa
indicazione potrebbero crearsi danni al
meccanismo ed anche la perdita della
garanzia.
8. Conl’aiutodellatesseraplasticata(chepuoi
utilizzare come “cacciavite”), ruota di 180° le
frecce corrispondenti ai numeri od alle lettere
che vuoi inserire in combinazione. Per ruotare la
freccia, spingila verso il basso, falla ruotare e poi
favorisci la sua “risalita” nella nuova posizione,
verso “ON”. Per togliere un numero od una lettera
dalla combinazione, esegui la stessa operazione,
orientando la freccia corrispondente verso “OFF”.
9. Al termine dell’operazione, riponi la tessera
plasticataedilcopricombinazionemetallicoal
loro posto, rifermando il secondo con la sua vite.
Suggerimento: per proteggere l’accesso al “vano
combinazione”, utilizzare una vite a testa speciale.
B. Prova della combinazione
1. Sempre con la maniglia in posizione di chiusura,
e sempre a sportello aperto, provare a digitare la
combinazione sulla pulsantiera posta sul fronte
esterno del coperchio del KeySafe. Premere
ipulsantinchésisenteun“click”.Seviene
digitato un pulsante sbagliato, abbassare il
pulsante “CLEAR” per annullare l’operazione e
ricominciare.
2. Quindi, ruotare di 180° la maniglia in senso
orario per aprire: se la combinazione è corretta la
maniglia ruoterà tirando il catenaccio. Altrimenti,
abbassareilpulsante“CLEAR”evericaipassi
dal capitolo B. Impostare la combinazione.
C. Installare il KeySafe P500
1. Abbassare il pulsante “CLEAR”.
2. Ruotare di 180° la maniglia in senso orario ed
aprire il coperchio.
Installazione su muratura
1. Utilizzare la “dima di montaggio” per segnare i
punti a parete sui quali realizzare i fori di alloggio
dei tasselli, cercando di mantenersi quanto più
possibilealcentrodelmattone.Evitaredissare
itassellinell’interstizio,cherendeilssaggiopiù
debole.
2. Eseguire i 4 fori con una punta dal diametro di
5mm arrivando ad una profondità di almeno 7mm
KeySafe™ P500
A
B
C
DEN
User Guide
Pushbutton combination
1
2
3
4
5
6
8
7
1
2
1
2
3
1
2
3
4
5
A
6
0
B
1
2
3
4
5
A
6
7
8
9
0
B
1
2
3
4
5
A
6
7
8
9
0
B
1
2
3
4
5
A
6
0
B
4
E
1
2
3
4
5
A
6
7
8
9
0
B
1
2
3
4
5
A
6
7
8
9
0
B
P/N10102761P1-01•September2012
© 2012 Kidde.
All rights reserved.
4
1
3
IT
between back of KeySafe and masonry surface.
Wood Installation:
1. Use the mounting template to position the holes
so at least 2 screws are driven into wall framing
or solid wood.
2. It is recommended to drill pilot holes for straight
mounting of the KeySafe. Use the mounting
template to drill 4 pilot holes 1” or 25mm deep
using a 1/16” or 2mm wood drill bit.
3. If using the optional alarm sensor, refer to section
E. Optional Alarm Sensor Installation.
4. Position the KeySafe on the 4 holes and drive the
screws directly into the wall.
5. Tighten the screws until they are snug against
the back of the KeySafe. Be careful not to over
tighten the screws.
Note: Only masonry installation is approved for
LPS 1175 certication.
D. Opening and Closing your
KeySafe
1. Press down on the CLEAR button.
2. Enter the combination. If you enter an incorrect
combination, press down on the CLEAR button to
reset the buttons and reenter the combination.
3. Turn the OPEN handle clockwise 180° to open.
When you turn the handle, the combination will
clear. Note: The open handle is designed so it
cannot be forced open. If an incorrect code is
entered and the handle is forced, the handle
will unlatch from the locking mechanism and
turn freely without opening the KeySafe. To
reset the handle, turn it all the way back to
the locked position where it will snap back
into place.
4. To relock, close the lid and turn the OPEN handle
counter-clockwise 180° back to the locked
position.
E. Optional Alarm Sensor
Installation
1. If you purchased the alarm sensor separately,
locate the small, round magnet that came with the
sensor. Attach the adhesive sticker to the back
of the magnet and then remove the paper from
the tape on the back of the magnet and stick the
magnetintotheholeaccordingtogureE.
2. Use the mounting template to drill a 3/8” or 10mm
hole through the wall so the wiring can be routed
to the alarm system.
3. Insert alarm sensor wires through the hole so they
pass through to the inside of the wall. Carefully
pushthealarmsensorintothewalluntilitisush
with the surface of the wall.
4. Connect the sensor to your alarm system per
your alarm system instructions. Alarm wiring
shouldonlybedonebyalicensed/certiedalarm
technician.
5. Congureyouralarmforthesensorandthen
open and close the KeySafe. Check your alarm
system to make sure the sensor is working
properly.
Parts Included
KeySafe P500, Europe 002045 includes:
Masonry mounting kit 10102698G1-01
Code change tool
KeySafe P500 with Alarm Switch, Europe
002046 includes:
Alarm switch 10102706G1
Masonry mounting kit 10102698G1-01
Code change tool
Accessories/Replacement Parts
Item Part #
Alarm switch R1075-N(US)
10102706G1(Europe)
Weather cover 10102726P1
Code tamper plate 10102703G1
Key Cover 10102725P1
Wood mounting kit 10102699G1
Masonry mounting kit* 10102698G1-01
*Note: Only masonry installation is approved for
LPS 1175 certication.
Limited Warranty
UTC Fire & Security Americas Corporation, Inc.
(“UTCFS”)warrantsthatthisproductwillbefreeof
defects in material and workmanship for one year
(twoyearsinEurope)fromthedateofpurchase.
maggiore rispetto alla lunghezza delle viti.
Pulire i fori da polvere e frammenti.
3. Se si desidera mettere in funzione il sensore
opzionale d’allarme, seguire le istruzioni di cui
al successivo paragrafo E.
4. Posizionare il KeySafe a parete e
ssareconleviti. (Attenzione: dovrete
impiegare le viti per mattone presenti
nella confezione degli articoli 002045 e
002046, o nel kit di ssaggio accessorio,
oppure viti equivalenti, per conservare la
certicazione).
5. Stringerelevitinchéletestesonoben
aderentiallasupercie.Evitaredistringerle
eccessivamente.
Attenzione: non installare il KeySafe a meno
di 15 cm dall’angolo della parete. Assicurarsi
che il KeySafe sia installato ben a lo con
la parete e che le viti da muratura abbiano
presa diretta sul mattone. Non ssare mai
le viti nell’interstizio trai i mattoni. Ridurre
l’eventuale sporgenza del retro del KaySafe
dalla supercie della parete.
Installazione su legno
1. Utilizzare la “dima di montaggio” per segnare
i punti a parete sui quali realizzare i fori di
alloggio dei tasselli, cercando di posizionarne
almeno due sui punti di maggiore tenuta.
2. Eseguire i 4 fori pilota con una punta da 2mm
di diametro arrivando ad una profondità di
almeno 25mm.
3. Se si desidera mettere in funzione il sensore
opzionale d’allarme, seguire le istruzioni di cui
al successivo paragrafo E.
4. Stringerelevitinchéletestesonoben
aderentiallasupercie.Attenzioneanon
stringerle eccessivamente.
ATTENZIONE: Soltanto l’installazione a parete
è approvata per la certicazione LPS1175.
D. Aprire e chiudere il KeySafe
1. Abbassare il pulsante “CLEAR”.
2. Digitare la combinazione. Se si digita una
combinazione errata, abbassare il pulsante
“CLEAR” per annullare l’operazione e digitare
nuovamente la combinazione.
3. Ruotare di 180° la maniglia in senso orario
per aprire. Al ruotare della maniglia la
combinazione si annulla. Nota: la maniglia è
frizionata, contro la forzatura. Forzandola
senza l’inserimento della corretta
combinazione, ruoterà sganciata dal
meccanismo, senza aprire il KeySafe. Per
ripristinare il buon funzionamento, girare
la maniglia, no alla posizione di chiusura,
dove si riaggancerà con il meccanismo.
4. Dopo l’apertura, per chiudere accostare il
coperchiodelKeySafeeruotaredi180°no
alla chiusura.
E. Installazione Opzionale del
Sensore d’Allarme (fornito a
parte)
1. Per applicare il magnete al punto indicato
nellagura1alcapitoloE,utilizzarela
pellicola adesiva, applicandola al retro del
magnete e, dopo averne rimosso la carta di
protezione, incollarla al punto indicato con
leggera pressione.
2. Per portare i cavi all’impianto di allarme,
realizzare un foro di 10mm secondo le
indicazioni sulla “dima di montaggio”.
3. Inlareicavinelforoperfarlipassare
attraverso la parete ed inserire il sensore di
allarmenelforoaliscioconlasuperciedella
parete.
4. Per il collegamento dei cavi all’impianto di
allarme, seguire le istruzioni sui manuali dello
stesso o rivolgersi al fornitore.
5. Una volta collegato, provare il sensore
aprendo e chiudendo il coperchio del KeySafe.
Parti incluse
KeySafe P500, Europa 002045
include:
Kitdissaggioa
muratura
10102698G1-01
Strumento per cambio
codice
KeySafe P500 con Contatto di Allarme,
Europa 002046 include:
Contatto di allarme 10102706G1
Kitdissaggioa
muratura
10102698G1-01
Strumento per cambio
codice
Ingående delar
KeySafe P500, Europe 002045 innehåller:
Betongmonteringssats 10102698G1-01
Verktyg för kodbyte
KeySafe P500 med alarmintegrationsmodul,
Europe 002046 Innehåller:
Alarmintegrationsmodul 10102706G1
Betongmonteringssats 10102698G1-01
Verktyg för kodbyte
Tillbehör/Ersättnings artiklar
Del Part #
Alarm strömbrytare 10102706G1
(Europe)
Väderskydd 10102726P1
Skyddsplatta Kod 10102703G1
Monteringsset trä 10102699G1
Monteringsset cement 10102698G1-01
Nyckelskydd 10102725P1
Begränsat ansvar och garanti
UTC Fire & Security Americas Corporation, Inc.
(“UTCFS”)garanterarattdennaproduktärfri
från fel i material och utförande under ett år.
Denna garanti är begränsad till reparation eller
utbyteefterUTCFSbeslut(tvååriEuropa).
Skadortillföljdavmodiering,misskötsel,
felaktig användning, slitage, felaktig installation,
tillämpning, förvaring, fel orsakade av annan
part än UTCFS eller till följd av annan parts
oaktsamhet omfattas inte. UTCFS ansvarar inte
för arbetskostnader till följd av borttagning eller
återinstallation av produkter. Den reparerade
eller utbytta produkten omfattas av villkoren i
denna begränsade garanti under återstoden av
garantitiden eller under 90 dagar, varvid den längsta
av dessa båda tidsperioder skall gälla. UTCFS
LÄMNAR INGA ANDRA, UTTRYCKLIGA ELLER
UNDERFÖRSTÅDDA, GARANTIUTFÄSTELSER
AVSEENDE SÄLJBARHET ELLER LÄMPLIGHET
FÖR ETT VISST ÄNDAMÅL. UNDER INGA
OMSTÄNDIGHETER KAN UTCFS HÅLLAS
ANSVARIGT FÖR UTNYTTJANDEAVBROTT;
UTEBLIVEN VINST; STÖLD; EGENDOMSSKADA
ELLER SPECIELLA, OFÖRUTSEDDA SKADOR
ELLER FÖLJDSKADOR. För information om
garantireparation eller -utbyte som omfattas av
villkoren i denna garanti, kontakta din lokala
leverantör.
Installations Vejledning
Se billeder i trin-for-trin vejledning.
Yderligereinformationndesnedenfor.
= indtast koden.
A. Setting your combination
• Der er ingen forudbestemt kode på Keysafe 500.
Vælg din egen kombination. Hvert tal/bogstaver.
Kan kun benyttes en gang.
• Benyt ikke en kombination som er let at gætte.
1. Hold den klare plastictab og træk i og åben
beskyttelseskappen.
2. Tryk på CLEAR .
3. Drej OPEN håndtag 180 med uret for at åbne
låget.
4. Benyt en skruetræker til at fjerne skruen fra
pladen der beskytter koden.
5. Drej pladen mod hængslerne – træk pladen ud og
fjern plastickortet.
6. Der er 10 nummererede taster og 2 bogstavtaster
med pile pile på bagsiden af låger. Pile der peger
ved fra hængslet er OFF og er ikke En del af
kombinationen. Pile der peger mod hængslet er
ON og er en del af kombinationen.
7. Med Keysafe open drejes håndtaget imod uret
180 grader, tilbage til lukkeposition. Vigtigt –
håndtaget skal være i lukkeposition inden
koden kan ændres. Ved at tvinge tasterne
i OPEN position kan skade Keysafe og
forhindre garantien.
8. Benyt plastickortet til indstilling af kombinationen.
For at sætte et nummer eller bogstav i koden
brug Plastickortet til at dreje pilen på det bogstav
og tal du ønsker sætte. Drej 180 grader indtil
pilen hopper helt op og pilen peger i ON position.
For at fjerne et tal eller bogstav fra koden,
brug plastickortet for at skubbe pilen ind for set
nummer du ønsker at fjerne. Drej 180 grader indtil
pilen hopper fuldstændigt tilbage, og pilen peger
KeySafe P500 con interruptor de alarma,
Europe 002046 incluye:
Interruptor de alarma 10102706G1
Kit de montaje en
pared
10102698G1-01
Herramienta para
cambiar eldigo
Accesorios/Partes
Elemento Parte nº
Interruptor de alarma 10102706G1(Europe)
Cubierta de intemperie 10102726P1
Placa de protección
del código
10102703G1
Kit de montaje en
madera
10102699G1
Kit de montaje en
pared de albañilería
10102698G1-01
Tapa de la llave 10102725P1
Garantía limitada
UTC Fire & Security Americas Corporation, Inc.
(“UTCFS”)garantizaqueesteproductoestarálibre
de defectos, tanto de material como de mano de
obra,porelperíododeunaño(dosañosenEuropa)
desde la fecha de compra. Esta garantía se limita
a reparar o reemplazar, a criterio de UTCFS. Esta
garantía no cubre el olvido de la combinación ni
suconguraciónincorrecta.Noquedancubiertos
por esta garantía los daños causados por la
modicación,abusoousoinadecuado,desgaste,
instalación inadecuada, aplicación, almacenamiento,
o error o negligencia por parte de alguien distinto
deUTCFS.UTCFSnoseráresponsablepor
costos de mano de obra derivados de la retirada o
la reinstalación de productos. El producto reparado
o reemplazado queda garantizado según los
términosdeestagarantíaporunplazode90días
ó hasta la fecha de vencimiento original, el plazo
que sea mayor. UTCFS NO OFRECE NINGUNA
OTRA GARANTÍA, EXPLÍCITA NI IMPLÍCITA, DE
COMERCIALIZACIÓN O IDONEIDAD PARA FINES
ESPECÍFICOS. BAJO NINGUNA CIRCUNSTANCIA
UTCFS SERÁ RESPONSIBLE POR PÉRDIDA
DE USO, PÉRDIDA DE BENEFICOS, LUCRO
CESANTE, ROBO, DAÑOS A LA PROPIEDAD,
O POR DAÑOS ESPECIALES, INCIDENTALES,
OCASIONALES O CONSECUENTES DE NINGÚN
TIPO. Para obtener información sobre la reparación
osustituciónbajolostérminosdeestagarantía,por
favor contacte a su distribuidor local.
Installations
instruktioner
Se bilderna för steg-för-steg instruktioner. Vidare
informationnnsbeskrivennedan.
= Fyll in kombinationen.
A. Att sätta din kombination
• Detnnsingenkombinationsomstandard
på KeySafe. Välj din egen kombination varje
nummer/bokstav kan bara användas en gång
• Använd inte en kombination som är lätt att gissa.
1. Tatagiikenochöppnaväderskyddet.
2. Tryck ner CLEAR knappen.
3. Vrid OPEN handtaget medurs 180° för att öppna
låset.
4. Användenskruvmejsel(sebild)förattlossa
skruven och plattan som sitter för kodlås .
5. Lägg täckplattan för kodlåset i KeySafe, använd
plastkortet för att ändra kombination på låset.
6. PåbaksidanavKeySafenns10numrerade
knappar och 2 knappar med bokstäver, knapparna
har pilar som markerar om de är ON eller OFF.
Pilar som pekar höger vänster är AV och ingår inte
I kombinationen. Pilar som pekar upp/ner är ON
ochärdelavdensattakombinationen.(sebild)
7. När du skall stänga KeySafe, vrid handtaget
motsols 180°, tillbaka till STÄNGD position.
Viktigt! OPEN handtaget måste vara i CLOSED
(stängd) position före koden kan förändrads.
Att försöka att ställa kod när handtaget är i
OPEN position kan skada KeySafe vilket gör
att garantin inte gäller.
8. Använd plastkortet för att sätta din kombination.
För att lägga till ett nummer eller en bokstav I din
kombination, ta Den siffra/bokstav du valt använd
plastkortet och ändra pilen rikting så att den pekar
motON,(vrid180grader).Omduvilländranågot
nummer gör tvärt om vrid nummer 180 garder så
attdetpåkarpåOFF.(sebild)
9. Sätt tillbaka plastkortet I KeySafe. Placera tillbaka
plattan för kodlåset med skruvmejsel..
Accessori/Parti di ricambio
Oggetto Part #
Sensore di allarme 10102706G1(Europe)
Guscio protettivo 10102726P1
Copri combinazione 10102703G1
Kit montaggio a legno 10102699G1
Kit montaggio a
muratura
10102698G1-01
Copri chiave 10102725P1
Garanzia limitata
UTC Fire & Security Americas Corporation, Inc.
(“UTCFS”)garantiscechequestoprodottosarà
libero da difetti nei materiali e nella manifattura
perunannodalladatadiacquisto(dueanniin
Europa). Questa garanzia è limitata alla riparazione
od alla sostituzione, secondo la scelta di UTCFS.
Questa garanzia non copre errori di impostazione
o smarrimento della combinazione. Danni causati
damodiche,abusooerratouso,improprie
installazione, applicazione e conservazione o da
colpa o negligenza da altra parte che UTCFS,
non sono coperti. UTCFS non sarà responsabile
per oneri di rimozione o re-installazione di
prodotti. Il prodotto riparato o sostituito sarà
coperto entro i termini di questa garanzia, per il
saldo dei giorni della garanzia o per 90 giorni,
il termine più lungo. UTCFS NON CONCEDE
ALTRA GARANZIA, ESPLICITA OD IMPLICITA,
PER COMMERCIABILITA’ O IDONEITA’ PER
UN PARTICOLARE SCOPO. IN NESSUN CASO
UTCFS SARA’ RESPONSABILE PER PERDITA DI
USO, PERDITA DI PROFITTI, FURTO, DANNI ALLA
PROPRIETA’, DANNI SPECIALI, INCIDENTALI O
CONSEQUENZIALI. Per ottenere informazioni per
la riparazione o la sostituzione secondo i termini di
questa garanzia, prego contattare il fornitore.
Notice d’installation
Suivez les illustrations pour des instructions
détaillées.Voustrouverezdesinformations
complémentairesci-dessous.
= Composer le code.
A. Conguration du code
• Iln’yapasdecodeprédénisurvotreKeySafe
P500.Dénissezvotreproprecode.Chaque
numéro/lettrenepeutêtreutiliséqu’uneseulefois
dans le code.
• N’utilisezpasuncodequipeutêtredevinétrop
facilement.
1. Saisir la languette en plastique transparent et tirer
pour ouvrir le cache de protection.
2. Presser vers le bas le bouton “CLEAR”.
3. Tourner le bouton “OPEN” de 180° dans le sens
horaire pour ouvrir le couvercle.
4. Utilisez un tournevis pour enlever la vis de la
plaque de protection anti-sabotage du code.
5. Faire glisser la plaque de protection du code vers
lacharnièreduKeySafe,dégagezlaplaqueet
retirer la carte plastique du couvercle de logement
desclés.
6. Sous la plaque de protection du code, il y a 10
boutonsnumérotés(0à9)and2boutonsavec
deslettres(AetB),quicomportentdesèches.
Lesèchesquipointentdansladirectionopposée
à la charnière sont dans la position OFF, et le
numéro/lettrecorrespondant(e)nefaitpaspartie
ducode.Lesèchesquipointentverslacharnière
sont dans la position ON, et font partie du code.
7. Alors que le KeySafe est ouvert, tourner le bouton
« OPEN » de 180° dans le sens antihoraire, pour
leramenerdanslaposition«verrouillé»
Important! Le bouton “OPEN” doit être dans la
position “verrouillé” avant que le code puisse
être modié. Forcer les boutons de réglage du
code alors que le bouton “OPEN” est dans la
position “déverrouillé”, peut endommager le
KeySafe et annuler la garantie.
8. Utiliserl’outilintégréàlacarteplastiquepour
changerlecode.Pourajouterunnuméroouune
lettre au code, utilisez l’outil pour enfoncer la fente
situéeàlabasedelaèchedunumérooudela
lettre que vous souhaitez ajouter. Tournez de 180°
jusqu’àcequelaècheeffectueundemi-tour
complet et pointe dans la direction ON. Pour
retirerunnuméroouunelettreducode,utilisez
l’outilpourenfoncerlafentesituéeàlabase
delaèchedunumérooudelalettrequevous
souhaitez retirer. Tournez de 180° jusqu’à ce que
laècheeffectueundemi-tourcompletetpointe
dans la direction OFF.
9. Replacer la carte plastique sur le couvercle de
logementdesclés.Repositionnerlaplaque
de protection du code à l’arrière du couvercle
du KeySafe et faites-la glisser vers sa position
initiale. Fixez la plaque avec la vis. Optionnel:
Instrucciones de
Instalación
Fíjeseenlasimágenesparaseguirlasinstrucciones
paso a paso. A continuación se proporciona
información adicional.
= Introducir la combinación.
A. Establecimiento de la
combinación
• La caja KeySafe P500 se entrega sin
combinaciónprejada.Seleccionesupropia
combinación. Cada número/letra se puede utilizar
sólo una vez.
• No utilice una combinación que pueda ser
adivinadafácilmente.
1. Sujetelapestañaplásticaytiredelacubierta
protectora.
2. Presione hacia abajo el botón CLEAR.
3. Gire la manilla OPEN media vuelta hacia la
derecha para abrir la tapa.
4. Utilice un destornillador para quitar el tornillo de la
placa que protege el código.
5. Deslice la placa hacia la bisagra de la caja, tire de
laplacayretirelatarjetaplásticadelatapaque
oculta la llave.
6. En parte trasera de la tapa de la caja hay 10
botones con números y 2 botones con letras,
todostienengrabadaunaecha.Silaecha
apunta hacia el lado contrario de la bisagra, indica
queesebotónestáenOFF,esdecir,quenoestá
activado y no forma parte de la combinación. Las
echasqueapuntanhacialabisagraindicanque
losbotonesestánenON,esdecir,queestán
activados y forman parte de la combinación.
7. Con la caja KeySafe abierta, gire la manilla OPEN
media vuelta hacia la izquierda, a la posición
cerrada.
Importante: La manilla OPEN debe estar
en la posición CERRADA antes de cambiar
el código. Si se fuerzan los botones de
jación del código cuando la manilla está
en la posición OPEN se puede dañar la caja
KeySafe e invalidará la garantía.
8. Para cambiar el código utilice la esquina alargada
delatarjetaplástica.Paraagregarunnúmeroo
letra al código, introduzca la esquina alargada
de la tarjeta en la ranura del botón que quiere
cambiar, presione ligeramente y gire 180º hasta
queelbotónsubacompletamenteylaecha
estéapuntandoenladirecciónON.Paraquitar
un número o letra de la combinación, introduzca
la esquina alargada de la tarjeta en la ranura del
botón que quiere cambiar, presione ligeramente y
gire 180º hasta que el botón suba completamente
ylaechaestéapuntandoenladirecciónOFF.
9. Vuelvaacolocarlatarjetaplásticaenlatapa
que oculta la llave. Ponga la placa protectora
del código en la parte posterior de la tapa de
la caja y deslícela hasta que quede en su sitio.
Asegúrela con el tornillo. Opcional: Para evitar
queseaccedafácilmentealacombinación,je
la placa con el tornillo tipo Torx T15 utilizando el
destornillador adecuado.
B. Prueba de la combinación
1. AsegúresequelamanillaOPENestáenla
posicióncerrada.Sinoloestá,girelamanilla
OPEN hacia la izquierda hasta que quede en
posición cerrada. En el frente de la caja KeySafe,
presione sólo los botones que forman su
combinación. Pulse cada botón hasta que oiga
un “clic”. Si pulsa un botón equivocado, presione
hacia abajo el botón CLEAR e introduzca su
código de nuevo.
2. Gire la manilla OPEN media vuelta hacia la
derecha para abrir. Si la combinación se p2-ha
jadocorrectamente.LamanillaOPENgirará
completamenteyelpernodecierreseretraerá.
Si no sucede esto, presione hacia abajo el botón
CLEAR y consulte la sección B: Establecimiento
de la combinación.
C. Instalación de la caja para llaves
KeySafe P500
1. Deslice hacia abajo el botón CLEAR.
2. Gire la manilla OPEN media vuelta hacia la
derecha para abrir la tapa.
Instalación en pared de albañilería:
1. Utilice la plantilla suministrada para ubicar los
agujeroslomáscercaposibledelcentrodel
ladrillo. No haga los agujeros en el cemento, p2-ya
quelasujeciónnoseríarme.
2. Utilice la plantilla para taladrar 4 agujeros de una
profundidad7mm(1/4”)mayorquelalongitud
deltornilloconlabrocade5mm(3/16”)para
hormigón. Limpiar los agujeros para que queden
libres de restos de la perforación.
3. Si utiliza el sensor de alarma opcional, consulte
la sección E: Instalación del sensor de alarma
opcional.
ES
FR
Poursécuriserdavantagelecode,xezlaplaque
avec la vis anti-sabotage, en utilisant un tournevis
anti-sabotage de type Torx T15.
B. Test de votre code
1. Assurez-vous que le bouton “OPEN” est en
position“verrouillé.Sinon,tournezlebouton
“OPEN” dans le sens antihoraire jusqu’à ce
qu’ilsoitenposition“verrouillé.Surleclavierdu
KeySafe, appuyer uniquement sur les boutons
qui composent votre code. Appuyer sur chaque
bouton jusqu’au “clic”. Si vous appuyez si un
mauvais bouton, presser vers le bas le bouton
“CLEAR”, et saisissez à nouveau votre code.
2. Tournez le bouton “OPEN” de 180° dans le sens
horairepourouvrir.Silecodeestcongure
correctement, le bouton “OPEN” tournera
complètementetlepênedeverrouillagese
rétractera.Sinon,presserverslebaslebouton
“CLEAR”,etréférez-vousàlasectionB.
Congurationducode.
C. Montage du KeySafe P500
1. Presser vers le bas le bouton “CLEAR”.
2. Tourner le bouton “OPEN” de 180° dans le sens
horaire pour ouvrir le couvercle.
Installation sur matériau de maçonnerie:
1. Utilisez le gabarit de montage pour positionner les
trous de sorte qu’ils soient le plus proche possible
du centre de la brique. Ne pas installer les vis
dans le mortier, ce qui affaiblirait le montage.
2. Utiliser le gabarit de montage pour percer 4 trous
àl’aided’unforetadaptéautypedemaçonnerie
(briqueoubéton)de3/16”ou5mm,etàune
profondeuraumoinssupérieurede¼”ou7mm
à la longueur de la vis. Retirer la poussière et les
débrisdechaquetrou.
3. Si vous utiliser le capteur d’alarme en option,
reportez-vous à la section E. Installation du
capteur d’alarme en option
4. Positionner le KeySafe sur les 4 trous et visser les
vis directement dans la brique. Note: vous devez
utiliserlesvispourmaçonneriefourniesavecles
modèles002045et002046,oulekitdexation
pourmaçonnerieouunéquivalent,pourmaintenir
lacertication.
5. Visserlesvisjusqu’àcequelestêtessoient
serréescontrelefondduKeySafe.Attentionde
ne pas trop serer les vis.
Note : Ne pas monter le P500 à moins de 15
cm (6’’), d’un angle du mur de maçonnerie.
Assurez-vous de minimiser tout espace entre
la base du P500 et la surface de maçonnerie, et
que les vis de xation soient positionnées dans
la brique même. Ne jamais positionner les vis de
maçonnerie dans les joints.
Installation sur matériau en bois:
1. Utiliser le gabarit de montage pour positionner
lestrousdefaçonàceque2visaumoinssoient
visséesdanslastructuredumurouunepartiede
bois massif.
2. Ilestrecommandédefairedespré-perçagespour
un montage en une fois du KeySafe. Utilisez le
gabaritdemontagepoureffectuer4pré-perçages
de 1” ou 25mm de profondeur, an utilisant une
mèche à bois de 1/16” or 2mm.
3. Si vous utiliser le capteur d’alarme en option,
reportez-vous à la section E. Installation du
capteur d’alarme en option.
4. Positionner le KeySafe sur les 4 trous et visser les
vis directement dans le mur.
5. Visserlesvisjusqu’àcequelestêtessoient
serréescontrelefondduKeySafe.Attentionde
ne pas trop serer les vis.
Note : Seule l’installation sur maçonnerie est
agréée pour la certication LPS1175.
D. Ouverture et fermeture de votre
KeySafe
1. Presser vers le bas le bouton “CLEAR”.
2. Saisir le code. Si vous saisissez un code
incorrect, presser vers le bas le bouton “CLEAR”
pourréinitialiserlesboutonsetsaisissezà
nouveau le code.
3. Tournez le bouton “OPEN” de 180° dans le
sens horaire pour ouvrir. Lorsque vous tournez
le bouton d’ouverture, les boutons seront
réinitialisés.Note: Le bouton d’ouverture est
conçu de telle sorte qu’il ne puisse pas être
forcé. Si un code incorrect est saisi et que
le bouton d’ouverture est forcé, celui-ci sera
débrayé du mécanisme de verrouillage et
tournera librement sans ouvrir le KeySafe.
Pour réinitialiser le bouton, le tourner à fond
dans le sens antihoraire jusqu’à sa position
“verrouillé”, où il sera de nouveau fonctionnel.
4. Pour re-verrouiller, refermer le couvercle du
KeySafe et tourner le bouton « OPEN » de 180°
dans le sens antihoraire jusqu’à sa position «
verrouillé».
E. Installation du capteur d’alarme
optionnel
1. Sivousavezachetélecapteurd’alarme
séparément,munissez-vousdupetitaimant
rond fourni avec le capteur. Coller la vignette
adhésiveaudosdel’aimant,retirerlapelliculede
protectiondel’adhésifetcollerl’aimantaufonddu
trouconformémentàlagureE.
2. Utiliser le gabarit de montage pour percer un trou
de 3/8” ou 10mm dans le mur, pour permettre le
passageducâbleverslesystèmedesécurité.
3. Insérezleslsducapteurd’alarmeàtraversle
troudesortequ’ilstraversentàl’intérieurdumur.
Poussez doucement le capteur d’alarme dans le
murjusqu’àcequ’ilafeurelasurfacedumur.
4. Connecter le capteur à votre système d’alarme,
conformémentauxinstructionsfourniesavec
votresystème.Sivousn’êtespasfamilier
avec votre système d’alarme, nous vous
recommandons de contacter l’entreprise qui l’a
installé,pourcongurercorrectementlecapteur.
5. Congurezvotrealarmepourprendreancompte
le capteur, puis ouvrez et fermez le KeySafe.
Vériezvotresystèmed’alarmepourvousassurer
que le capteur fonctionne correctement.
Pièces fournies avec le produit
KeySafe P500, Europe - 002045:
Kitdexationpour
maçonnerie
10102698G1-01
Outil de changement
de code
KeySafe P500 Europe avec détecteur
d’ouverture - 002046
Détecteurd’ouverture 10102706G1
Kitdexationpour
maçonnerie
10102698G1-01
Outil de changement
de code
Accessoires/Pièces de rechange
Désignation Référence
Capteur d’alarme 10102706G1
(Europe)
Cache de protection 10102726P1
Plaque de protection
du code
10102703G1
Kit de montage sur bois 10102699G1
Kit de montage sur
maçonnerie
10102698G1-01
Couvercle de logement
desclés
10102725P1
Limites de Garantie
UTC Fire & Security Americas Corporation, Inc.
(“UTCFS”)garantitqueceproduitseraexemptde
défautsdematériauetdefabricationpendantun
anàcompterdeladated’achat(Deuxanspour
l’Europe).Cettegarantieestlimitéeàlaréparation
ouauremplacementsurdécisiondeUTCFS.Cette
garantie ne couvre pas les situations telles que oubli
ducode,oucodemalconguré.Lesdommages
causésparunemodication,unabusouune
mauvaise utilisation, l’usure normale, une mauvaise
installation, application, stockage, ou les dommages
causésparlafauteoulanégligenced’untiersautre
que UTCFS, ne sont pas couverts. UTCFS ne sera
pasresponsabledescoûtsdemaind’œuvreliés
audémontageouàlaréinstallationdesproduits.
Leproduitréparéouremplacéestalorscouvert
conformémentauxtermesdecettegarantielimitée
pourlerestedelapériodedegarantieoupendant
90jours,sicettedernièrepériodeestpluslongue.
UTCFS NE DONNE AUCUNE AUTRE GARANTIE,
EXPLICITE OU IMPLICITE, DE QUALITE
MARCHANDE OU D’ADEQUATION A UN USAGE
PARTICULIER. EN AUCUN CAS UTCFS NE SERA
RESPONSABLE POUR PERTE D’UTILISATION,
PERTE DE BÉNÉFICES, VOL, DOMMAGES AUX
BIENS, DOMMAGES SPÉCIAUX, ACCESSOIRES
OU CONSÉCUTIFS. Pour obtenir des informations
surlaréparationouleremplacementsousles
termes de cette garantie, veuillez contacter votre
fournisseur.
SE
DK
4. Coloque la caja KeySafe en su posición e
introduzca los 4 tornillos directamente en los
agujeros hechos en el ladrillo. (Nota: Para
mantener la certicación de seguridad del
producto, debe utilizar los tornillos para
instalación en pared de ladrillo incluidos
con los modelos 002045 y 002046, el kit
para montaje en pared de ladrillo que
suministramos, o tornillos similares.)
5. Apriete los tornillos hasta que las cabezas de los
mismos queden ajustadas a la parte trasera de la
caja. Tenga cuidado de no apretar excesivamente
los tornillos.
Nota: No instale la caja P500 a menos de 15 cm
(6”) del borde de la pared o muro. Asegúrese
de que la parte posterior de la caja queda
totalmente a ras con la supercie y que los
tornillos están instalados en el ladrillo. No
coloque los tornillos en el mortero. Elimine todos
los espacios o huecos que pueda haber entre la
caja y la pared.
Instalación en madera:
1. Utilice la plantilla suministrada para ubicar los
agujeros de manera que al menos 2 tornillos se
coloquen en madera sólida.
2. Para que la caja KeySafe quede bien nivelada
es recomendable que se perforen unos agujeros
guía. Utilice la plantilla para taladrar 4 agujeros
guíade25mm(1”)deprofundidadconunabroca
de2mm(1/16”)paramadera.
3. Si utiliza el sensor de alarma opcional, consulte
la sección E: Instalación del sensor de alarma
opcional.
4. Coloque la caja KeySafe en su posición e
introduzca los 4 tornillos directamente en la
madera.
5. Apriete los tornillos hasta que las cabezas de los
mismos queden ajustadas a la parte trasera de la
caja. Tenga cuidado de no apretar excesivamente
los tornillos.
Nota: La certicación LPS1175 exige que la caja
se instale únicamente en pared de albañilería.
D. Apertura y cierre de su caja
KeySafe
1. Presione hacia abajo el botón CLEAR.
2. Introduzca la combinación. Si se equivoca al
pulsar algún botón, presione hacia abajo el botón
CLEAR y comience de nuevo a introducir la
combinación.
3. Gire la manilla OPEN media vuelta hacia la
derecha para abrir. Al girar la manilla se limpia
la combinación. Nota: La manilla OPEN está
diseñada para que no se pueda abrir la
cerradura forzando la manilla. Si se introduce
un código incorrecto y se fuerza la manilla,
ésta se soltará del mecanismo de cierre y
girará libre sin abrir la caja KeySafe. Para que
la manilla vuelva a funcionar correctamente,
se debe girar del todo hasta la posición de
cierre donde se enganchará otra vez con el
mecanismo.
4. Para cerrar la caja KeySafe cierre la tapa y gire
la manilla OPEN media vuelta hacia la izquierda
hasta que llegue a la posición de cerrada.
E. Instalación del sensor de alarma
opcional
1. Si p2-ha adquirido por separado el sensor de alarma,
localiceelimánredondopequeñoquevinocon
el sensor. Pegue la etiqueta adhesiva en la parte
traseradelimán,luegoquiteelpapeldelacinta
adhesivadelapartetraseradelimánypegueel
imándentrodelagujero,segúnseindicaenla
guraE.
2. Utilice la plantilla suministrada para taladrar un
agujerode10mm(3/8”)dediámetroenlapared,
de forma que puedan pasar los cables y así
conectarlos al sistema de alarma.
3. Inserteloscablesdelsensoratravésdelagujero.
Introduzca con cuidado el sensor de alarma en la
paredhastaquequedearasdelasupercie.
4. Conecte el sensor a su sistema de alarma según
las instrucciones del sistema de alarma. Si no
estáfamiliarizadoconsusistemadealarma,le
recomendamos que contacte con la empresa que
loinstalóparacongurarcorrectamenteelsensor.
5. Congurelaalarmaparaelsensoryluegoabra
y cierre la caja KeySafe. Compruebe su sistema
de alarma para asegurarse de que el sensor
funciona correctamente.
Partes incluidas
KeySafe P500, Europe 002045 incluye:
Kit de montaje en
pared
10102698G1
Herramienta para
cambiar eldigo
B. Test av din kombination
1. SetillattOPENhandtagetär,iCLOSED(stängd)
position. Om se till att handtaget är i CLOSED
(stängd)position.Tryckindekodernapådin
KeySafe, tryck bara dina koder. Tryck varje
knapp så att det klickar. Om du trycker fel, tryck
ner CLEAR knappen och börja om igen.
2. Vrid OPEN handtaget 180° för att ÖPPNA.
Om kombinationen är korrekt, kommer OPEN
handtaget att öppnas. Om inte, tryck på CLEAR
knappen. Se B. Att sätta din kombination.
C. Montering av KeySafe P500
1. Tryck ner CLEAR knappen.
2. Vrid OPEN handtaget medurs 180° för att öppna
låset.
Montering av KeySafe på murad vägg:
1. Använd monteringsmallen så att hålen blir så nära
mitten som möjligt. Skruva inte direkt i murad
vägg eftersom det kommer att göra att låset
kommer att sitta löst.
2. Använd monteringsmallen till att borra 4 hål,
använd en 3/16 eller 5 mm betong borr och borra
hålet 7 mm djupare än längden på skruven.
Rengör alla hål från damm etc.
3. Om tillvalet av alarm sensor, som hänvisas i E.
Montera då Alarm Sensor.
4. Placera KeySafe direkt mot de 4 hålen och
skruva fast skruvarna I väggen (OBS: Du
måste använda betongskruvarna som
medföljer modellerna 002.045 och 002.046,
alternativt betongmonteringssatsen, eller
motsvarande skruvar för att upprätthålla
säkerhetscertieringen).
5. Skruva fasts skruvar så att det faster direkt
mot insidan av KeySafe. Var försiktig dra inte
skruvarna för hårt.
Notera: och att betongskruvarna endast
monteras direkt i tegel. Montera aldrig skruvarna
i murbruket.
Montering av KeySafe på trä:
1. Använd monteringsmallen så att positionen på
minsttvåhålärxeradeochattskruvarnabiter
i väggen.
2. Det rekommenderas att borra hål för att
säkerställa en säker montering av KeySafe.
Använd monteringsmallen och borra 4 hål som
skall vara 1” eller 25mm djupare an skruvens
längd, använd en träborr som är 1/16” eller 2mm
3. Om tillvalet av alarm sensor, som hänvisas i E.
Montera då Alarm Sensor.
4. Placera KeySafe direkt mot de 4 hålen och skruva
fast i väggen.
5. Skruva fast skruvarna så att det faster direkt
mot insidan av KeySafe. Var försiktig så dra
skruvarna för hårt.
Notera: Endast montering i cement eller
stenvägg är godkänd med LPS1175 certiering.
D. öppna och stänga KeySafe
1. Tryck ner CLEAR knappen.
2. Tryck in din kombination. Om du trycker in fel
kombination, tryck ner CLEAR och börja om
ingen.
3. Vrid OPEN handtaget medurs 180° för att
öppna. När du öppnar handtaget nollställs
din kombination. Notera: handtaget OPEN
är designat så att det inte kan forceras
för att öppna låset. Om fel kod matas in
och handtaget tvingas med våld, kommer
handtaget att kopplas ur från låsmekanismen
och löpa fritt utan att kunna öppna KeySafe.
För att återställa handtaget, vrid tillbaka till
last position, där kommer handtaget att låsa
fast igen.
4. Att låsa, stäng locket och vrid OPEN handtaget
motsols 180° tillbaka till last position.
E. Tillval Alarm Sensor Installation
1. Om du köpt alarm sensor separat, ta fram en rund
magnet som följde med inköpet. Ta bort papper
kring magneten och fäst magneten i hål i KeySafe
se bild E.
2. Använd monteringsmallen för att borra ett hål,
3/8” eller 10mm genom väggen så att ledning kan
kopplas till alarmsystem.
3. Installera alarm sensor kabel genom hålet så att
kabeln kommer på insidan av väggen.
4. Koppla in kabeln från sensor till ditt alarmsystem
se(instruktionrörandedittalarm).Omduinte
är kunnig på hur ditt alarmsystem fungerar
rekommenderar vi att du tar kontakt med din
leverantör för assistans eller installation.
5. Installera/anslut sensorn i ditt alarm system,
öppna och stäng KeySafe. Kontrollera ditt
alarmsystem och se till att sensor fungerar
tillfredställande.


Produkt Specifikationer

Mærke: Kidde
Kategori: Vault
Model: ​Titanium 002047

Har du brug for hjælp?

Hvis du har brug for hjælp til Kidde ​Titanium 002047 stil et spørgsmål nedenfor, og andre brugere vil svare dig


Vault Kidde Manualer

Kidde

Kidde 001860 Manual

11 December 2024
Kidde

Kidde SupraSafe 1 Manual

11 December 2024
Kidde

Kidde SupraSafe 2HS Manual

11 December 2024
Kidde

Kidde 001170 Manual

11 December 2024
Kidde

Kidde 001015 Manual

11 December 2024
Kidde

Kidde 001287 Manual

11 December 2024
Kidde

Kidde 001267 Manual

11 December 2024
Kidde

Kidde 001166 Manual

15 August 2024

Vault Manualer

Nyeste Vault Manualer