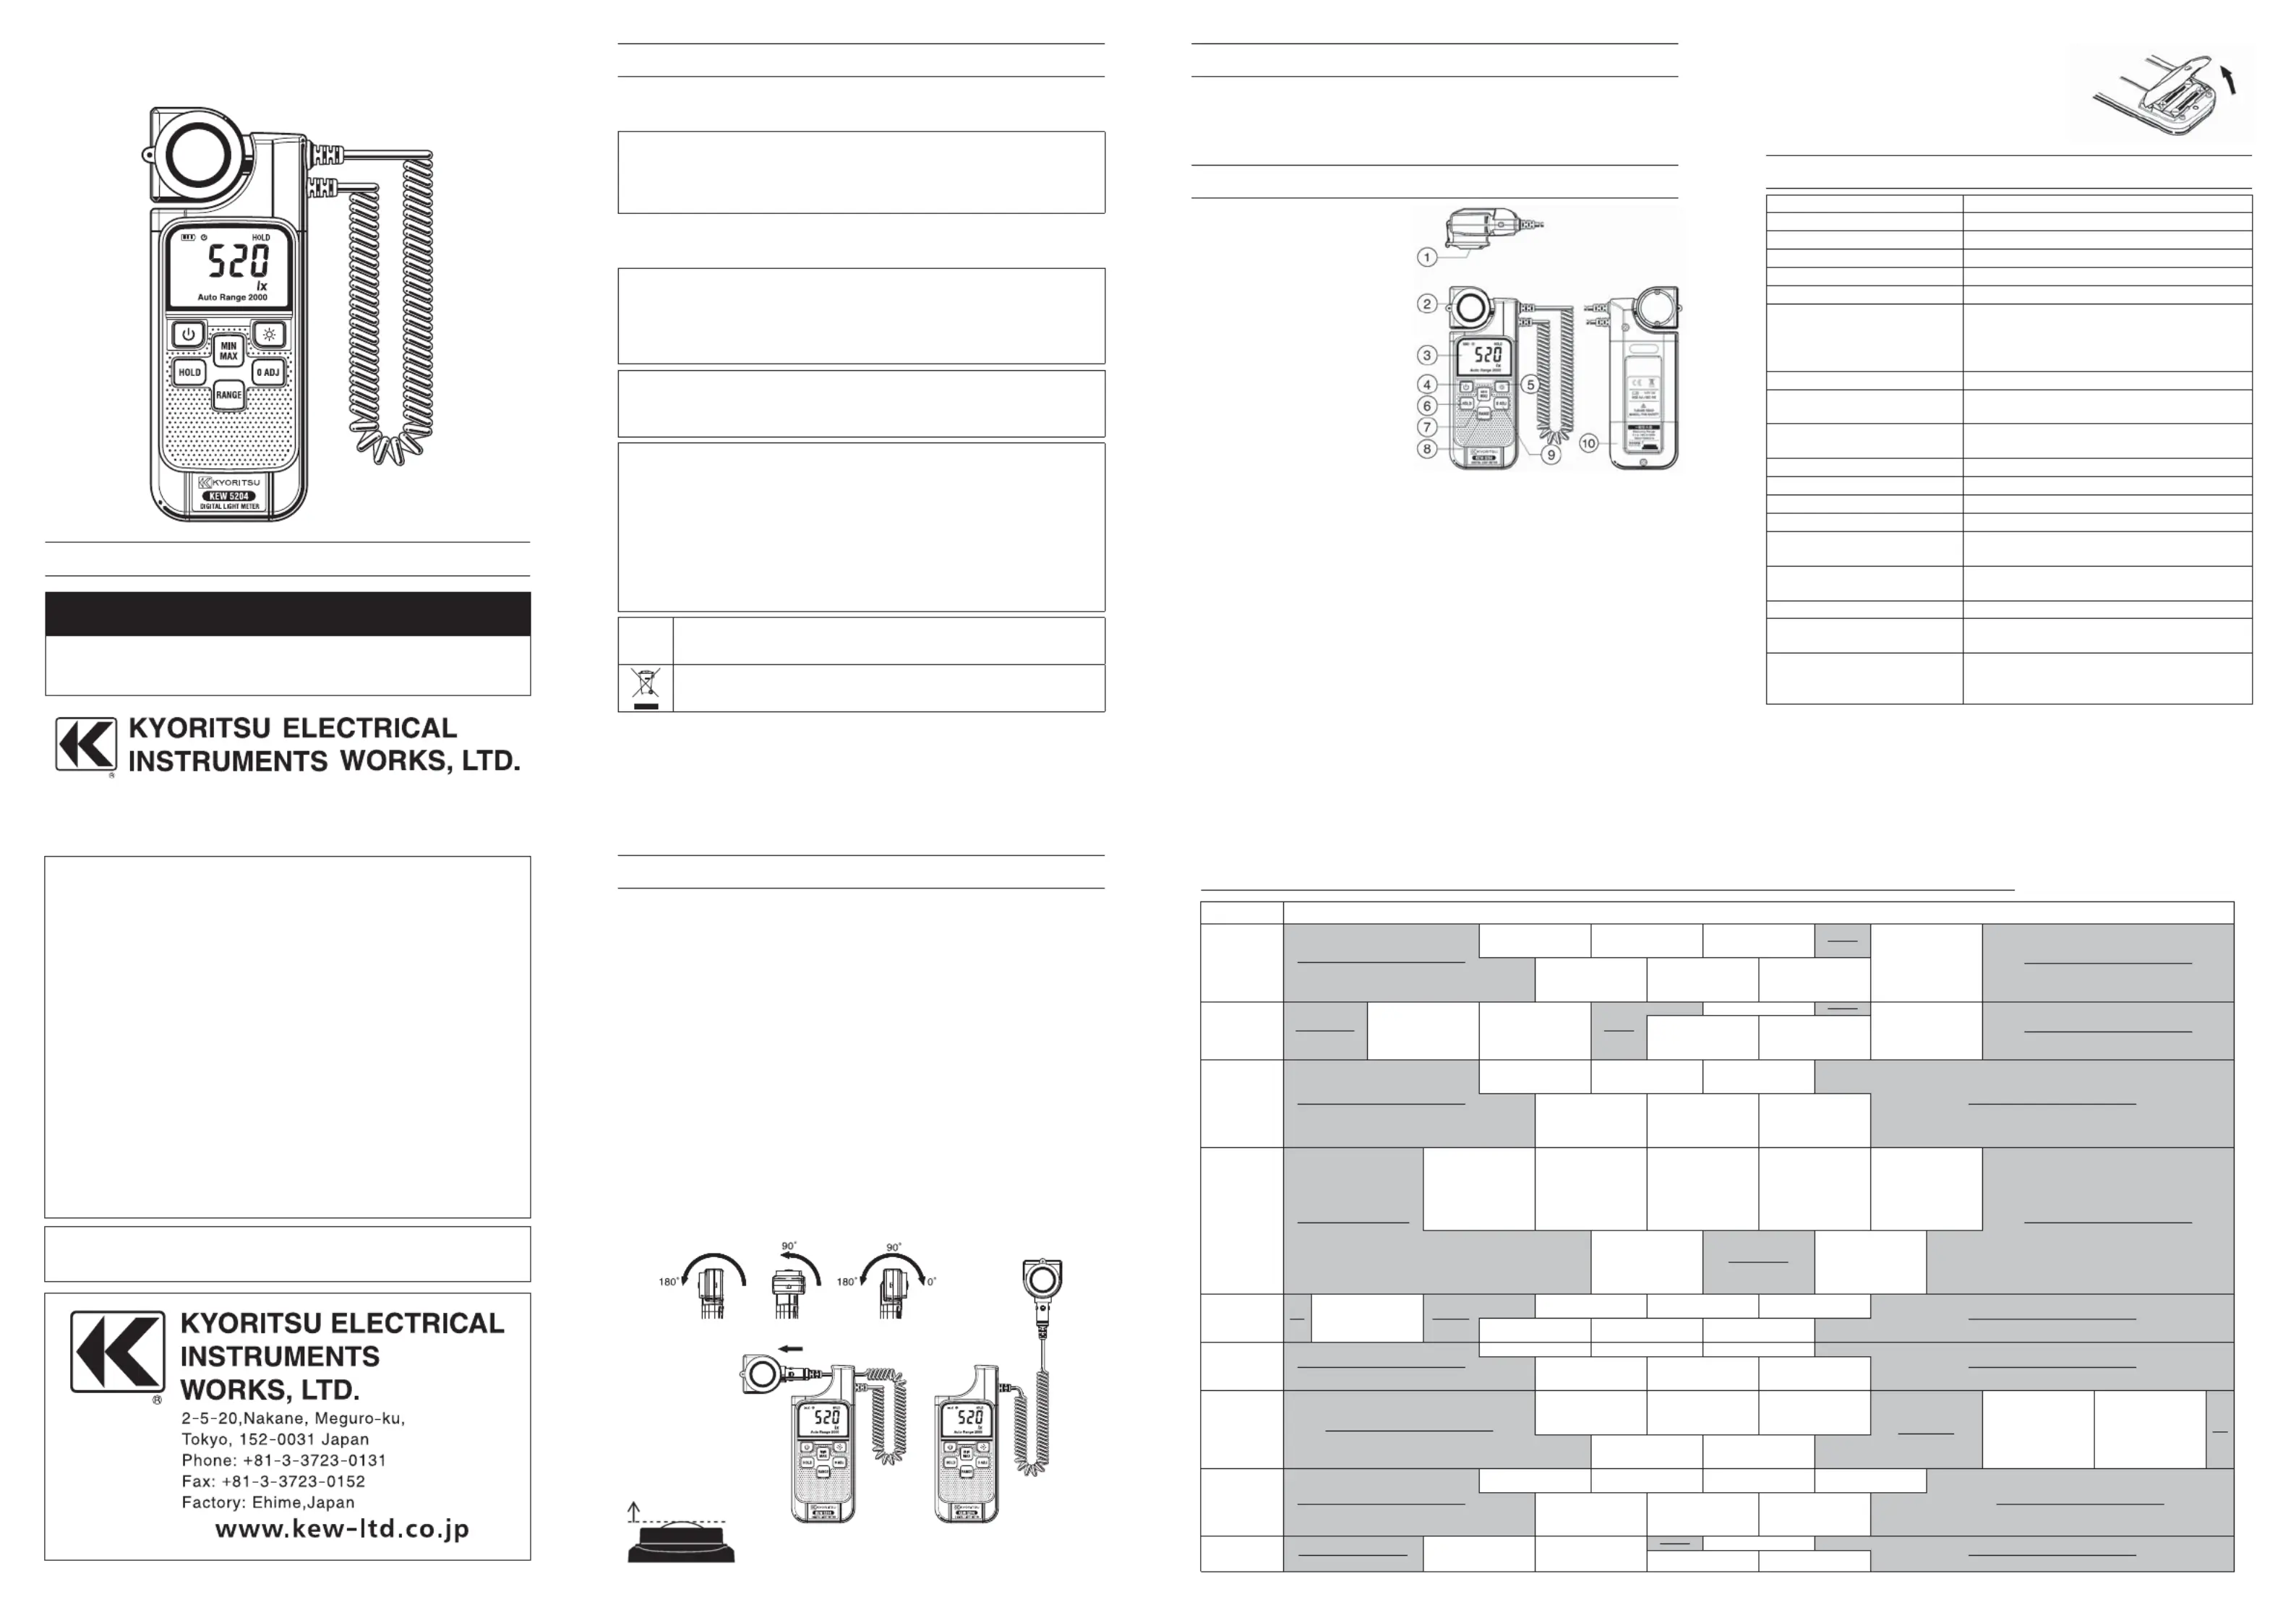
●Wide Range 0.1〜199900 lux
●Automatic Zero Adjust function
●Large LCD Display with Backlight
3. Name of Parts and Position/Operation
This is used to protect the
photocell from scratching and
c r e a t e c o m p l e t e d a r k
environment for the meter to
p e r f o r m d a r k c u r r e n t
Light Sensing Probe/Photocell
Push this button to turn on
the meter. Please push the
button again to turn it off. The
unit will automatically turn
itself off after 30 minutes if no
key operation. To disable the
automatic power off function,
turn the meter off, push and
keep holding button, then push power button to turn on.
Push this button to turn on and off the LCD backlight. The backlight will
be automatically off after 30 seconds to save battery power.
The user may hold the present and keep it on the LCD display by
Push this button to set the meter working under MAX/MIN mode. By
pushing this button, the user may swap the LCD reading among current,
maximum and minimum reading. Push and hold this key for 3 seconds
The user may use this button to select the preferred measuring or
automatically selected by the meter. The available ranges are: AUTO
200, 2000, 20000, 200000 lx
⑨0 ADJ button (Please refer to Measurement)
This instruction manual contains warnings and safety rules which must be
observed by the user to ensure safe operation of the instrument and to
retain it in safe condition.
● Read through and understand instructions contained in this manual
before starting using the instrument.
● Save and keep the manual handy to enable quick reference whenever
The symbol indicated on the instrument means that the user must refer
to related parts of the manual for safe operation of the instrument. Be sure
to carefully read the instructions following each symbol in this manual.
DANGER :is reserved for conditions and actions that are likely to
cause serious or fatal injury.
WARNING: is reserved for conditions and actions that can cause
CAUTION : is reserved for conditions and actions that can cause
minor injury or instrument damage.
● Do not install substitute parts or make any modification to the
instrument. Return the instrument to Kyoritsu or your distributor for
repair or re-calibration.
● Do not expose the instrument to the direct sun, extreme temperatures
This instrument isn't dust & water proofed. Keep away from dust and water.
● Be sure to set the Function Selector Switch to the "OFF" position after
use. When the instrument will not be used for a long period of time,
place it in storage after removing the batteries.
● Use a damp cloth and detergent for cleaning the instrument. Do not
use abrasives or solvents.
● The instrument should be calibrated once a year or so for the accurate
This symbo l is ma rked wh ere t he user must refe r to the
instruction manual so as not to cause personal injury or
This instrument satisfies the marking requirement defined in the
WEEE Directive. This symbol indicates separate collection for
electrical and electronic equipment.
When battery capacity segment is less
than one, the user should replace the
battery. The batter y cabinet can be
opened with a screw driver and two AA
type batteries should be installed.
Light detector Silicon photo diode
Measuring Range 0.0〜199,900 lx
Range 199.9/1,999/19,990/199,900 lx
Accuracy ±4%rdg±5dgt(23℃±2℃)
Angle deviation from cosine
Temperature characteristics
±5 % (at 23℃ reference and a range of 0 to 40℃)
Relative spectral sensitivity
Deviation from spectral luminous
Dimensions 169(L)x63(W)x37(D)mm
Power source R6(AA)(1.5V) x 2
0℃〜40℃,80%RH or less(without
-10℃〜60℃,70%RH or less(without
Continuous measuring time Approx. 80 hours
Please perform zero adjustment before measurement.
Press 0 ADJ button with the Lens Protecting Cover attached to the Light
"CAP-" will auto-appear on the LCD display. After "CAL-" appears, the
meter enters the automatic zero adjustment. When automatic zero
adjustment is completed, "CAL-" disappears and "0.0"appears. After
confirming the "0.0" display, remove the cap to start measuring.
IfERR1appears, check the cap to make sure it is on properly.
After the measurement has been completed, press the power button
again to turn off the power, and cover the light-detecting surface with
the cap for protecting against stray light.
Place the light sensing probe parallel to the measuring object and
measure it. At this time, please be careful that your own shadow does
not hit the sensing probe.
The light sensing probe can be fixed on the meter parallel or
perpendicular to the LCD Display. Or it may be detached from the unit to
fit the measuring requirement.
ADEQUATE LIGHT LEVELS FOR YOUR WORKING OR AT YOUR WORK AREAS.
3,000 2,000 1,500 1,000 750 500 300 200 150 100 75 50 30 20 15 10 7
Physiological examination
Important part of display,
Register, Packaging stand
Sample case Register Stair
Stair Important parts of garden
Hair dressing, Hair dyeing
Toilet inside the shop Passage
Kyoritsu reserves the rights to change specifications or designs described
in this manual without notice and without obligations.