Remove all tape and packing materials before using the oven. Dispose of all plastic bags after unpacking the oven.
Never allow children to play with packing materials.
You can download an installation manual at http://www.lg.com
IMPORTANT SAFETY INSTRUCTIONS
Read and follow all instructions before using the oven to prevent the risk of fire, electric shock, injury to
persons, or damage when using the oven. This guide does not cover all possible conditions that may occur.
For further assistance contact the service agent or manufacturer.
This is the safety alert symbol. This symbol alerts you to potential hazards that can kill or hurt you
and others. All safety messages will follow the safety alert symbol and either the word
“WARNING” or “CAUTION”. These words mean :
You may be killed or seriously injured if you do not follow instructions.
You may be injured or cause damage to the product if you do not follow instructions.
• The information in this manual should be followed exactly.
- Failure to do so could result in fire or electrical shock, causing property damage, personal injury or death.
• DO NOT put any weight on the oven door. Never allow anyone to climb, sit, stand or hang on
- The oven could be tipped and injury might result from contact with hot food or the oven itself.
• The electrical power must be shut off while the electrical connections are being made.
- Failure to do so can result in severe personal injury, death or electrical shock.
• Mounting screws must be used.
- Failure to do so can result in the oven falling out of the cabinet causing serious injury.
• Make sure the cabinets and wall coverings around the oven can withstand the temperature (up
to 95°C) generated by the oven.
• Fronts of nearby units up to at least 70°C.
- Discoloration, delamination or melting may occur.
• During installation, ensure that no persons can come into contact with live components.
• The oven must be installed by a qualified professional electrician, in accordance with the
corresponding regulations and standards.
• The oven is a heavy appliance and must be transported with great care.
• Before initial use, remove all packaging, both external and from inside the appliance.
• No modification may be made to the oven’s technical characteristics.
• The integrated cooking area or hotplates is/are provided with special connections. These may
only be attached to the appropriate corresponding connections of the same type.
This installation must be completed by a qualified installer or technician.
Proper installation is the responsibility of the installer and product failure due to improper installation is NOT
• Consumer: please read and keep these instructions for future reference and be sure to read the entire
OWNER’S MANUAL prior to use.
• Do not use the parts except for provided components when you install the product.
• Make sure the oven is flush with the front of the enclosure.
• A malfunction can occur if the steam oven is not correctly aligned. For correct functioning of the steam generator
please make sure that the steam oven is horizontally level.(On some models)
• When mounting into a built-in cabinet, decide the dimension of the built-in cabinet’s depth so that the offset
between door glass face and front surface of the left and right side furniture will be less than 1mm. The oven
must only be installed in an open cabinet or alcove and have the required ventilation clearances.
For correct ventilation, the ventilation opening of 50mm should be required between the back wall and the floor
of the installation cabinet, the ventilation gap of 5mm is required between the oven top rim and the furniture lower
rim, and between the oven both sides rim and the side cabinet, these openings must not be closed by any way.
So ensure that the sides are not touching the front edges of the housing.
3-wire circuit connection
The oven must be connected by a licensed specialist in
accordance with these instructions and in compliance with
local regulations. Make sure the voltage shown on the rating
label is the same as the power supply voltage in your home.
The oven must be connected to the power supply by means
of an all-pole disconnect switch with a minimum contact gap
of 3mm and must be connected to earthed socket by law. The
supply disconnect (isolation) switch shall be accessible after
The oven's components operate at 230 - 240 V / 16 A. Identify
the phase and neutral conductor on the supply lead before
making connection. Incorrect connection may damage the oven.
Connect the oven to the power supply.
- Connect the green and yellow ground wire to the right terminal pole, the live brown or red wire to the left terminal
pole, and the neutral blue or black wire to the center terminal pole.
Each of the functions has been factory checked before shipping. However, it is suggested that you verify the
operation of the oven once more. Refer to the Owner’s Manual. Follow the instructions for the basic check.
• Depending on the model, some of the following functions may not be available.
The initial signal sound is heard and startup animation or the clock appears in the display.
2. Check the operation of the Hot air mode.
Touch Start. The oven starts to preheat. Check the convection fan operation. Convection fan is in the back wall.
A chime sounds once preheating is complete. Touch STOP.
* Cooking compartment does not heat
Demo Mode will be on when the ("Demo or D") icon is shown in the display. When the demo mode on, the
appliance will not heat up.
Deactivate the mode before using the oven. Refer to the Owner's Manual to deactive the mode.
3. Check the operation of the Grilling mode.
Select Large grill, and then set the desired temperature: Low, Medium, or High.
Touch Start. The oven door must be closed to use the Grilling function. Touch STOP to cancel at any time.
4. Turn then oven light on and off to check the lights are in normal condition.
• A small amount of smoke and odor may be noticeable during the initial break-in period.
• If the oven does not operate properly see the Owner’s Manual for the troubleshooting list. The list includes
common occurrences that are not the result of defective workmanship or materials in this product. If the problem
occurs continuously, contact the dealer.
• Refer to the warranty in the Warranty Card for the LG toll-free service number and address.
OPERATION CHECKLISTPart 5
BUILT-IN ELECTRIC OVEN Installation Guide
(2 Wood Screws For Mounting)
Have two or more people lift the oven using the
handles on the sides of the oven.
To avoid injury, always wear safety gloves when you
move the appliance. Always be careful as cabinet
panels may have sharp edges.
Secure the oven to the cabinet mounts with the 2
wood screws provided as part of the final steps after
all electrical connections have been terminated at
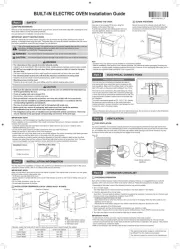
The first step of the installation is measure the current cutout dimensions and compare them to the cutout
dimensions shown below. Little or no cabinet work may be necessary.
Make sure the base is level and the front of the cabinet is square. If the cabinet base is not level, the oven glides
will tend to slide out when opening the door.
• To lift oven, use side holes of the oven.
• Kitchen cabinets in contact with the oven must be heat resistant up to 95°C, and fronts of nearby units up to at
• Do not install dishwasher under the oven.
• Do not install the product on the floor.
INSTALLATION DRAWINGS (FOR 24” SINGLE BUILT- IN OVEN)
If desired, create the holes with P and R to allow the power lines to pass through the cabinet.
[mm] Built-in Cabinet Under-sink Cabinet Product
Cutout Depth min. 556 min. 556 549
Cutout Width min. 560 min. 560 558
Cutout Height min. 590 min. 600 579
• Built-in Cabinet • Under-sink Cabinet • Product
P: Back of the kitchen cabinet
R: Side of the kitchen cabinet
This manual may contain images or content that may
be different from the model you purchased.
This manual is subject to revision by the manufacturer.
- (Australia only) This product must be installed by a professional installer.
- After the installation of the product in the customer premises, fully remove all product packaging (including any
expanded or moulded plastic packaging materials) and recycle or dispose of such packaging responsibly. Do not
dispose any expanded plastic packaging in the household bin.