Lorus NX04 Manual

Lorus Ur NX04

Læs gratis den danske manual til Lorus NX04 (2 sider) i kategorien Ur. Denne vejledning er vurderet som hjælpsom af 16 personer og har en gennemsnitlig bedømmelse på 4.6 stjerner ud af 8.5 anmeldelser. Har du et spørgsmål om Lorus NX04, eller vil du spørge andre brugere om produktet?

Side 1/2
I
NSTRUCTION
M
ANUAL
CAL. NX04 (RD9 SERIES)
NRENX04 05-00
CHARACT ERIST I C S
1 . T i m e / c a l e n d a r d i s p l a y :
A n a l o g u e d i s p l a y : H our, m inu t es a nd
seconds.
Di g i t a l d i sp l a y: H our, minutes, seconds,
dat e a nd d ay of the week .
F u l l y a u t o m a t i c c a l e n d a r : Ca l en d a r
adjusts automatically for odd and even months
includ ing February of leap years from t he
year 2000 to the end of 2050.
T i m e i n d i c a t i o n : Cha ng eover b et wee n
12- and 24- hour indicat ions is possibl e.
2. World t ime: The time of 27 cities in different
t i m e zo ne s t h r ou g h o u t t h e w o r l d c a n b e
displ ayed tog ether with the tim e difference
bet ween the sel ected city a nd you r area .
D a y l i g h t s a v i n g t i m e s e t t i n g
3 . S t o p wa t c h : M easu res up to 23 h our s, 5 9
m i n u t e s a n d 5 9 s e co n d s in 1/1 0 0 s e co n d
increments for the first hour and in 1-second
increm ent s t h ere af te r .
4 . R e g u l a r a l a r m : The reg ul ar a larm can be
set to ring on a 24- hour basis.
5. S i n g l e -t i m e a l a r m : The sing le-tim e alarm
can be set to ring only once at the designated
time. As it rings, it is automatically disengaged.
6 . D e m o n s t ra t i o n f u n c t i o n : Ea ch m ode is
displ ayed f or 2 seconds i n ord er.
7 . Illuminating light: The light evenly illuminates
the displ ay for ea sy viewing in t h e d ark .
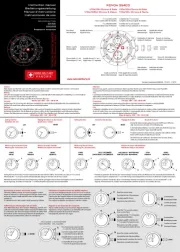
CROWN/B U T T ONS A N D D I S P L AYS
Ho ur Minu tes
B C
D
A
Seconds
Crow n
Second
hand
Dat e Da y
Minut e
hand
Ho u r
hand
W O R L D T I M E
m o d e
T I M E / C A L E N D A R
m o d e
A
A
A
By pressing button C in the TIME/CALEN DAR
mode, the SINGLE-TIME ALARM mode is shown.
W it h ea ch pre ss of bu t t on D in th e TIME/
CALENDAR mode, the displa y chang es over in
the f oll ow ing ord er.
HOW T O SET T HE T IME/CAL END AR
Before sett ing the anal ogue tim e, be su re to
set the d ig ital tim e.
DIGI T AL T IM E/C AL E NDA R S ET T IN G
Minut es
1. Press button “A to show the TIME/CALENDAR
m o de.
2. Press button A f or 2 to 3 seconds to show
the TIME/CAL EN DA R SETTIN G d ispla y.
* Th e wo r l d m ap an d a ci t y m a r k a p p ea r ,
and t he pa rt of t he m a p repr esenting t he
city fl ash es.
Once the time/calendar of your area is set in
t he TIM E/C A LEN DA R mo d e, t he t i m e s of
th e 2 7 cit ie s cove re d i n t h e W OR LD TIME
mod e wil l be set a utom a tical ly .
CB
A D
Da te Day
Ho ur Seconds
City m ark
N o t e : If t h e w a t ch is l e f t u n t ou ch e d in t he
WO RL D TI ME m od e, it w il l au t om at i-
cal l y r et ur n t o t he TIME/CA LEN DA R
mode in 1 t o 2 minut es.
T I M E / C A L E N D A R
m o d e
S I N G L E - T I M E
A L A R M m o d e
C
R E G U L A R A L A R M
m o d e S T O PW A T C H
m o d e
A
D
T i m e / c a l e n d a r
d i s p l a y
C a l e n d a r
d i s p l a y
B l a n k d i s p l a y
D
D
The sel ection of t he mod e can be m ade in the
foll owing order with each press of b utt on A.
4. Press b utton D t o set the fl ashing dig its/
se g m ent s.
* Before setting the tim e/cal end ar, be sure
to sel ect the cit y r epresent ing you r are a.
(For the city marks and cities they represent,
see Tim e d iff er ences)
* One dig it is ad vanced wit h e ach pr ess of
button D. Digits except seconds and 12-
/24-hour indication move quickly by keeping
bu tt on D pressed .
5 . A f t e r a l l t h e a d j u s t m e n t s a r e co m p l e t e d ,
pr e s s b u t t o n A t o r e t u r n t o t h e T I ME /
CALEN DAR m od e.
Se co nds se t t in g
Whe n the seconds d ig its a re fl ashing , press
butt on D in accorda nce with a tim e signal.
The seconds are reset to 00and start immediately.
W he n th e se cond s co un t a ny nu m b e r f r om
30 t o 5 9 a nd bu tt on D is pr essed , one
minute is added and the seconds are immediately
reset t o 00.
3. Selection of the digits/segments to be adjusted
(flashing) is made in the following order by
pressing but ton C.
12 -/ 24 -h o ur i ndi ca t i o n se t t i ng
Changeover between 12- and 24-hour indications
is made alternately with each press of button
D.
N o t e s :
1. When setting the hour dig its in the 12-hour
ind ica t io n, ch e ck t h at A M/P M is p ro per l y
set. Only PM m ark is displayed and there
is no indicat i on f or t he AM sett ing . In the
24-h our indicat ion, 24 is d ispla yed .
2. Once t he y ea r, mo nt h a nd d a t e h a ve bee n
set, the day of the week is set automatically.
3. If t he wat ch is l eft u nt ouched in the TIME/
CALENDAR SETTING display with the digits/
segments flashing, it will automatically return
t o t h e T I M E/ C A L E N D A R m o d e in 1 t o 2
m i nu t e s.
AN AL O G U E T IM E S ET T I N G
Cit y Seconds
→ → Hour
Year
12- /24- hour
indica tion
Dat e
Month
Minut es
Ho u r
hand
Crow n
a b
Second h and
a : N orm a l positio n
b : Ex te nded posit ion
Minut e
hand
1. Pul l out the crown when the second hand is
at t he 12 ocl ock posit ion.
2. Turn the crown to set the hour and minut e
hands to the time shown in the digital display.
* When setting the minute hand, advance it 4
to 5 minutes ahead of the desired time and
then turn it back to the exact minute.
3. Push the crown back in to the normal position
w he n t he se con d d ig i t s cou nt 0 0 in th e
dig it al displ ay .
A conv e nie nt wa y of usi ng t he T IM E/
CA LEN DAR mo de
When you travel around different time zones,
the t ime and cal endar of t he pla ce you visit
can easily be shown in the TIME/CALENDAR
m o de.
1. Press b ut t o n A f or 2 t o 3 se conds in t he
TIME/CALENDAR mode to show the TIME/
CALEN DAR SETTING displ ay.
2. Press “Drepeatedly to select the city representing
the pl ace y ou are visiting .
3. P r e ss bu t t on A t o re t u r n to t he TI M E/
CALENDAR mode, and then, adjust the hands
to the dig it al t im e.
HOW T O USE T H E WORLD T I M E
The times of 27 cities in different time zones
throughout the world can be displayed together
with the time difference between the selected
city and your ar ea.
D a y l i g h t s a v in g t i m e c a n be se t f or e a c h
city.
N o t e : To d ispla y th e tim es of t he cit ies cov-
ered in th e W ORL D TIME mod e pr op-
er l y , it is neces sar y t o sel ect t he cit y
representing your area and set the cor-
rect time in the TIME/CALENDAR mode.
(See HOW TO SET THE TIME/CAL-
EN DA R ”)
C
City m ark
B
DA
Day l ig h t saving
tim e ma rk
Tim e
dif fe rence
Sel ecte d
ar ea
( fl ash in g )
Time of th e sel ected a rea
1. Press button A to show the WORLD TIME
m o de.
2. Press button C or D to select the desired
city.
* With each press of button C and D, the
flashing segments of the map move rightward
and l eft wa rd , respect ivel y.
* If a s el ect ed t im e z one ha s no cit y m a rk
set f or t he w a tch , w il l b e
displa yed in pl ace of a cit y m ar k .
Displ a y i ng t he d ay li ght s a v in g t im e
1. Press button C or D to select the desired
city.
2. Press button A for 2 to 3 seconds to show
the DAYLIGHT SAVING TIME SETTING display.
* A fl ash ing DST m ar k appear s.
3. With each press of button D, the standard
time and daylight saving time of the selected
city are a lt ernat el y shown.
4. Pr es s b ut t on A t o r et u rn to t h e W O RL D
TIME m ode.
N o t e s :
1. When the daylig ht saving tim e is set for the
city selected in the TIME/CALENDAR mode,
the curr ent t im e is advanced by one h our.
2. If the watch is left untouched in the DAYLIGHT
SA V IN G T IM E S ETT IN G d i sp l a y w it h t h e
da y l i g h t sa vi n g t im e m a r k f l as hi ng , i t w il l
au t om a t ica l l y re t u rn t o t h e W O R LD TIM E
mode in 1 t o 2 minut es.
T im e di ff e r e n ce s
UTC = coord i n a t ed un i v ersa l ti me
C i t y
m a r k
C i t y
n a m e
Ho nol ul u
A n ch o r a g e
Lo s A ng el es
Denv er
Chi ca g o
New Y o rk
Caracas
Rio de Janei ro
Lo n d o n
Pa r i s
Cairo
Jer usa l em
Jed d a h
Teh r a n
Duba i
Ka bul
Ka rachi
De l hi
Dh a k a
Ya ng o n
Ba ng k o k
Ho n g Kong
Tokyo
A d el a i d e
Sydney
No uméa
We l l ing ton
U T C ± ( h o u r s )
[s t a n d a r d t i m e ]
U T C ± ( h o u r s )
d a y l i g h t
s a v i n g t i m e
[ ]
–11:00
–10:00
–09:00
–08:00
–07:00
–06:00
–05:00
–04:00
–03:00
–02:00
–01:00
+00:00
+00:00
+01:00
+02:00
+02:00
+03:00
+03:30
+04:00
+04:30
+05:00
+05:30
+06:00
+06:30
+07:00
+08:00
+09:00
+09:30
+10:00
+11:00
+12:00
–10:00
–09:00
–08:00
–07:00
–06:00
–05:00
–04:00
–03:00
–02:00
–01:00
+00:00
+01:00
+02:00
+03:00
+03:00
+04:00
+04:30
+05:00
+05:30
+06:00
+06:30
+07:00
+07:30
+08:00
+09:00
+10:00
+10:30
+11:00
+12:00
+13:00
* For t he time zones with * mark in the tabl e
above, will be displayed in place
of a cit y m ar k.
( 11)*
HNL
A NC
LA X
DEN
CHI
NY C
CCS
RIO
( 2)*
( 1)*
UTC
LON
PA R
C A I
JRS
JED
THR
DX B
KB L
KHI
DEL
DA C
RGN
BKK
HKG
TYO
A DL
SYD
NOU
WLG
St op wa t c h O p e r a t i on
Pr e s s b u t t o n A t o sh ow th e S TO P W A T CH
m o de.
Minut es
HOW TO USE T H E ST OP W ATCH
The stopwa tch can mea sure up to 23 h ours,
59 m inut es a nd 59 se conds in 1/10 0 second
increments for the first hour and in 1 second
increm ent s t h ere af te r .
* Even if t he STOPW ATCH m ode is chang ed
to another while the measurement is in progress,
it co nti nue s cou nti ng pr ope rl y . A ft er t he
stopwatch is used, however, be sure to reset
it as the battery energy is consumed enormously
to shorte n th e b at t ery l ife.
STOPWATCH mod e m a rk
CB
DA
Seconds 1/100 seconds
Accumulated elapsed time measurement
S t a r t S t o p
R e s t a r t
S t o p
R e s e t
C C
C C D
* Restart and stop of the stopwatch can be repeated
by pressing b ut ton C.
HOW TO SET THE REGULAR ALARM
REGULAR ALA RM
mod e ma rk
1 . Press buttonA to show the REGULAR ALARM
m o de.
2. Press button A for 2 to 3 seconds to show
the R EGULAR A LAR M SETTIN G d ispla y.
* The hour d ig its star t fl ashing .
3. Pre ss b ut ton C to sel ect t he di g it s to be
ad j u st ed (fl a shing ).
Minut esHo u r
A D
B C
Al ar m
m a rk
Minut esHo u r
4. Pr ess bu tt on D to set the dig it s.
* One dig i t is ad vanced w it h ea ch pr e ss of
t he b u tt o n. The d ig it s mo ve qu ic kl y b y
keepi ng th e b ut ton pr essed.
5. After all the adjustments are completed, press
button A to return to the REGULAR ALARM
m o de.
* Th e a la r m m a rk a ppe ar s and t he r eg u l ar
al ar m is a ut oma tica ll y eng ag ed .
HOW TO SET THE SINGLE-TIME ALARM
Desig nat ed al ar m t ime
CB
DA
N o t e s :
1. W hen the t ime f unction is displ ayed in the
24-hour indication, the alarm is also displayed
in t he 24-h ou r indicat ion.
2. When setting the hour dig it s in t he 12-hour
ind icat ion, ch eck t ha t AM / PM i s pr ope rl y
set. Only PM mark is displayed and there
is no indicat ion f or t he AM set ting . In t he
24-h our indicat ion, 24 is d ispla yed .
3. If the watch is left untouched in the REGULAR
A LA R M SETT IN G d is pl a y w i t h t h e d i g it s
fl ashing , it wil l a utom at ical ly ret urn to the
REGULAR A LARM mod e in 1 to 2 m inutes.
Engagement /disengagement of t he regular
al ar m a nd a la r m t e st
With each press of button C in the REGULAR
ALARM m ode, t he reg ul ar al arm is engag ed
and dise ng ag ed a lt erna tel y.
A t t he d esig na ted t im e, t he al ar m ring s f or
20 seconds and st ops. To stop it m anual l y,
press a ny of t he but tons.
Th e al a rm can b e t est ed by ke eping b ut ton
C pressed in the REGULAR ALARM m ode.
* Aft er the a larm is tested , press but ton C
ag a in t o e ng ag e or d iseng a g e th e r eg u l ar
a l ar m .
Sing l e -t im e
al ar m m ark
Cur rent
t im e
1. Press but ton C in t he TIME/CALEND AR
m o d e t o sh o w th e SIN GL E- TI ME A L A R M
m o de.
* If the watch is left untouched in the SINGLE-
TIME ALA RM mod e, it wil l au tom at icall y
ret ur n t o t h e TIME/CALEN DAR m ode in
20 to 3 0 seconds.
2. Press bu tt on C or D to set t h e d esir ed
al ar m tim e.
* One m i nu t e i s a d v an ce d or mo ve d ba c k
with each press of button “C” or D”, respectively.
Th e d i g i ts m o ve qu ic kl y b y k ee pi ng th e
respe ctive b ut tons presse d.
* The single-time alarm mark1-AL” is displayed
and th e a la rm is au tom at icall y eng ag ed .
The single-tim e alarm can be set to ring only
once at the desig nated tim e. As it rings, it is
au tom at ical l y d iseng a g ed.
The alarm time can be set in 1 minute increments
star ting from the cur rent tim e.
3. Pr e ss b u t t on A to r et u r n to t h e T IM E/
CALEN DAR m od e.
Th e al a rm ri ng s a t t he d esig nat ed t im e f or
20 seconds. To st op it m anu al ly, press a ny
of the b utt ons.
* The sig le-time alarm ring s differentl y from
the r eg ul ar al a rm .
To check the ala rm time you have set, press
bu t t on C in t h e TIM E/CA LEN D AR m od e
to show th e SIN GLE- TIME ALA RM mod e.
To cancel the alarm tim e you have set, press
b u t t o ns C a n d D a t th e sa m e ti m e or
press button C or D to set the alarm time
t o t h e c u r r e n t t im e in t h e SI N G L E - TI M E
ALA RM mod e.
DEMONSTRATION FUNCTION
1 . P r e ss b u t t o n D f o r 2 t o 3 se c o n d s i n t h e
TIME/CALENDAR mode to activate the demonstration
fu nct i o n.
2. The modes and displays a re shown for 2 seconds
a u t omat ica ll y in t he f ol lo w ing o rder.
Ti m e/ ca l en d ar
displ a y
WORLD
TIME mode
REGULAR
ALA RM
m o de
STOPWATCH
mode
3. To dea ctivate the demonstration function, press
a ny of t he b u tt o ns. The wa tch ret u rns t o t he
TIM E/CA LENDAR mode.
Bl ank
displ a y
Cal end ar
displ a y
NOT E ON U NUS U AL D ISPLAY
Wh il e in th e TIME/CA L E N D A R SET T ING disp l a y
with the digits flashing, all the segments of the display
wil l light up if b oth b uttons C a nd D are pressed
at the same t ime. This i s not a ma lf u nct io n. P ress
button A,C” orD to return to the TIME/CALENDAR
mo de, a nd then set the time /ca l enda r a g a in.
NE C ES S A R Y P R OCED URE A F T ER
BATTER Y C H A N GE
After the b attery is replaced with a new one or if a n
a b no rmal disp l a y (b r o k e n dig its, e t c.) a pp ears in
the dig it a l disp l a y , fo l lo w t he procedu re b elo w t o
reset the IC.
1. P r e ss a n d hol d t h e f o u r b u t t o ns a t t h e sa me
time for 2 t o 3 seco nds.
* 1 2 : 0 0 ' 0 0 " a . m . , Ja n . 1 , 200 0, S a t . w i l l b e
displayed and UTC is selected in the WORLD
TIME mo de.
2. Before u sing t h e wa t ch, set the t ime/cal enda r
a nd a l a rm.
LUMI B R I T E W A T C H
(d ial, hand s, bu t t on s , c a s e, b ez el ,
s t rap , et c.)
If yo ur watch is a LORUS LUM IBRITE watch, it
ha s fo l lo wing fea tures.
LORUS LUMIBRITE watches ab sorb and store light
ene rg y fro m na t u r a l and a rt i f i c i a l lig h t so u r c es
a n d e m it l i g h t i n t h e d a r k . T h ey a r e m a d e o f
environme nt a l ly f r i endly mat eri a l , a nd t herefo re,
are harmless to human being s and the environment.
With a ful l charg e, LORUS LUMIBRITE watches
glow in t he dark ho urs long er than conventional
lu mino u s wa tches o f t h is type. If ex p ose d t o a
lig ht o f mo re t ha n 500 l ux (i.e., the b right ness
of a typical o ffice) f or approxima t ely 10 minutes,
or direct su nlig ht fo r 2 minutes, they w il l g l ow
fo r ho u rs.
Since LORUS LUMIBRITE watches emit the light
they store, the b rightness will decrease g radually
o ve r t i me . T h e le n g t h of time t h ey wil l g l o w
may also differ slightly depending on such factors
as the brig htness of a nd distance from the light
so urce u sed t o charg e t h e wa tch.
LOR US L I T E
B
N o t e s :
1. W hen th e l ig h t b eg i ns to l o se i t s l u mina nce,
t hi s is a n indi c a t io n t h a t t h e b a t t e r y f o r th e
di g i t a l dis p l a y i s de p l e t e d. W e rec o mme n d
t h a t yo u c h a ng e t he b a t t ery b ef o re t h e w a t ch
itself stop s.
2. If t he lig ht is used continuously for a long time,
the b at tery l ife ma y b e l ess tha n t he sp e c if ied
period.
Press button “B in any mode. The electroluminescent
light evenly illumina tes the display for 3 seconds
for easy view ing in t he da rk .
V iV iD iG i
ViV iDiGi is a new typ e o f l iq u id crystal p a nel tha t
mak es possib le va rious colors a nd hig h cont rast .
Excellent lig ht reflection and transmissio n mak e
the di spl a y b rig ht a nd c l ear.
V a rious c o lo r op tions a re a va il a b le.
E it h e r t h e wh o l e p a n e l o r t h e di sp l a ye d da t a
only can b e ill uminat e d.
* F ea tures vary in dif f erent mo de l s.
BATTER Y C H A NGE
The minia t ure l i t hium b a t t eries SEIK O SR626SW,
MA XELL S R 6 2 6SW , S ONY S R 6 26S W , M a t su sh i t a
SR626SW o r EVEREADY 377 f or a nal o g u e disp l ay
and SEIKO SR41W, MAXELL SR41W, SONY SR41W
or EV EREADY 392 for dig ita l disp lay,which p o w er
your watch should last approximately 2 years. However,
beca use they a re inserted at the fa ct ory, t he a ctual
l if e o f t he b a t t eries o nce in you r p o ssessio n may
be less than the specified period. Be sure to replace
the b a tt e ries t o p revent a ny p o ssib le mal f unctio n
as soon as they run down. To replace the b a tteries,
we rec o mmend t a k ing t he w a t c h t o a l oca l w a t c h
repa ir sh o p.
N o t e s :
1. If t he alarm is used for more t han 10 seconds a
da y and / o r th e il l u mina t i n g l i g h t mo r e t h a n
once (for 3 seconds) a da y, the battery life ma y
b e l ess t han the sp e cified p erio d.
2. I f eit he r o f th e t wo b a t t er i es ru n s do w n, we
recommend that you replace both of the batteries.
CA R E OF YOU R L OR US WAT C H
B A T T E R Y
C A U T I ON
D o n ot exp ose t h e o l d bat t ery to fi re or
recha rg e i t . Keep i t a t a p l ace b eyo n d
the reach of children . If a chil d swallows
i t , c on s u l t a d o ct o r i m m ed i a t e l y .
W A T E R R E S I S T A N T
N o
i n di c a t i on
W A T E R
R ES I S TA N T
W A T E R
R ES I S TA N T
(5 0 M/ 5 BA R) *
Conditi o n
of use
Accidental
contact with
water, such
as splashes
and r a i n
Swi mm-
i n g a n d
taking a
shower
Ski n
div i n g
Scub a
div i n g
In d i ca -
ti on o n
the di a l /
ca se b a ck
NO NO NO NO
YES YES NO NO
YES NO NO NO
W A T E R
R ES I S TA N T
100 M/
10 BA R or
a b ov e
YES Y ES YES NO
()
*
* If you r w at c h is 20 0 M/ 20 BA R , 1 0 0 M/ 1 0
BAR or 50 M/5 BAR wa ter r e sist ant, it is so
indicat ed on th e d ial /case back.
Do not opera te the crown and b uttons when the
wat c h is w et .
If the wa t ch is ex p o sed t o salt water, rinse it in
fresh wa t er and t h en wipe it t horoug hly dry.
C a u t i o n :
Lea t her st ra p s a r e no t wa t e r r esista nt ex c e p t so
indica ted, even if the watch head is wa ter resistant.
A L L E R G I C R E A C T I O N
Because the case and band touch the skin directly,
it is impo rta nt to clean them reg ula rl y. If not,
sh i rt sl e eve s ma y b e st a ine d a n d th o se wi t h
delicate sk in ma y devel op a ra sh. Pl ea se wear
the wa t ch with some pl a y t o avo id any possib le
allergic reaction. If you develop a ra sh on your
wrist, st op wea ring a nd consu l t a p hysician.
M A G N E T I S M
Yo u r wa t ch wil l not b e a f fect e d b y mag netism
g e nerat ed b y h o usehold electric a p p lia nc es.
S H O C K S A N D V I BR A T I ON S
You r wat c h may b e worn fo r normal sports a c-
tivities, b ut be careful not to drop it or hit it on
ha rd surf a ces.
T E M P E R A T U R E
Your watch is preadjusted so that constant accuracy
ma y b e insured a t norma l tempera tu re.
W h e n y o u r L O R U S w a t c h r e q u i r e s r e p a i r o r
se r vic ing , p l ea s e see t h e enc l o sed W A R R A N TY /
G U A R A N T E E .
SER V I C E
Pri nted i n Chi n a


Produkt Specifikationer

Mærke: Lorus
Kategori: Ur
Model: NX04

Har du brug for hjælp?

Hvis du har brug for hjælp til Lorus NX04 stil et spørgsmål nedenfor, og andre brugere vil svare dig