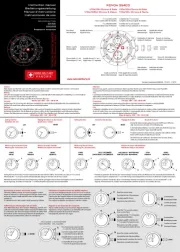
Lorus W110 Manual

Lorus Ur W110

Læs gratis den danske manual til Lorus W110 (4 sider) i kategorien Ur. Denne vejledning er vurderet som hjælpsom af 9 personer og har en gennemsnitlig bedømmelse på 3.6 stjerner ud af 5 anmeldelser. Har du et spørgsmål om Lorus W110, eller vil du spørge andre brugere om produktet?

Side 1/4
1
SPORTS
CHARACTE R I S T ICS
1. Time /c a le n da r disp la y : Hour, minutes,
seconds, month, date and day of the week.
A u t oma t i c ca l e n d a r : Calendar adjusts
automatically for odd and even months
except February of leap years.
T im e indi c a t i on : Changeover between
12- and 24-hour indications is possible.
2 . S t o p w a t c h : Measures up to 30 hours
with 1 1,000 second readout./
Split time measurement is available.
3 . C o u n t d o w n t i m e r : Up to 99 hours and
59 minutes can be set in minutes.
4 . 3 - c h a n n e l a l a r m : The alarm can be set
to ring at three different times a day.
H ou r ly t im e s ign a l: Can be set to ring
every hour on the hour.
5. Du al t im e: Time of a different time zone
can be set and displayed.
6 . Illumin atin g lig ht: The light illuminates
the display in the dark.
HOW TO S E T THE TIME/CALEND AR
1. Press button A to show the time/calendar
display.
2. Press button B to show the time/calendar
setting display. The second digits start
flashing.
3. Selection of the digits to be adjusted (flashing)
is made in the following order by pressing
button C.
HourSeconds
N o t e s :
1. When setting the hour digits in the 12-
hour indication, check that AM/PM is properly
set. Only P (PM) mark is displayed and
there is no indication for the AM setting.
In the 24-hour indication, 24 (24-hour
indication) mark is displayed.
Se c onds s ettin g
When the seconds digits are flashing, press
button D in accordance with a time signal.
The seconds are reset to “00” and start immediately.
When the seconds coun t any n umber from
30 to 59 and button D is pressed, one
minute is added and the seconds are immediately
reset to 00.
HOW TO USE THE STOPWAT C H
The stopwatch can measure up to 30 hours
in 1 1,000 seconds./
* Even if the stopwatch display is changed
to another while the measurement is in
progress, it continues counting properly.
After the stopwatch is used, however, be
sure to reset it as the battery energy is
consumed enormously to shorten the battery
life.
St opwa tc h O per ati on
S t a r t S t o p
R e s t a r t
S t o p
Accumulated elapsed time measurement
C C C
Press button A to show the stopwatch display.
CD
R e s e t
Accumulate repeatedly by
pressing button C.
2. If the watch is left untouched in the time/
calendar setting display with the digits
flashing, it will automatically return to the
time/calendar display in 2 minutes.
Seconds
MinutesHour
BUTTONS A ND DISPL AYS
Month
B
The selection of the display can be made in
the following order with each press of button
A.
Stopwatch
d i s p l a y
T i m e / c a l e n d a r
d i s p l a y
A
AA
T i m e r
d i s p l a y
AA
A l a r m
d i s p l a y
D u a l t i m e
d i s p l a y
Seconds
MinutesHour
BC
Month
P (PM)
mark
AD
Date
Day
C
D
A
B
Stopwatch
display
indicator
1/1,000 seconds
Hour Minutes Seconds
Hourly time
signal mark
P (PM)
mark Alarm mark
AD
C
Day
4. Press button D to set the flashing digits.
One digit is advanced with each press of
button D. Digits except seconds and 12-
/24-hour indication move quickly by keeping
button D pressed.
5. After all the adjustments are completed,
press button B to return to the time/
calendar display.
12-/24-hour
indication Date Month
Minutes
Date
Display
indicators
Alarm
channel
Display
indicators
I MNSTRUCTION ANUAL
CAL. W110 (RBQ SERIES)
CAL. W111 (RB8 SERIES)
NREW110C 11-99
Measurement between two competitors
Split time measurement
S t a r t
CD C D
S p l it
S p l i t r e l e a s e
S t o p R e s e t
D
Finish (First runner)
CD C D D
Finish (Second runner)
S t a r t
F i n i s h t i m e
of 2 n d
c o m p e t i t o r
R e s e tS t o p
Measurement and release of split time
can be repeated by pressing button D”.
F i n i s h
t i me of 1 s t
c o m p e t i t o r
HOW TO SET THE 3-CHANNEL
ALARM
1. In the alarm display, selection of the alarm
channel or hourly time signal to be engaged
or disengaged is made in the following order
by pressing button C.
E ngag e men t/d i sen g a geme n t o f the
ala rm a nd h our ly t im e sig n al
The alarm can be set to ring at three different
times a day. Set the three alarm channels
one by one to desired alarm times.
1. Press button A to show the alarm display.
2. Selection of the alarm channel to be set is
made in the following order by pressing
button C.
* The alarm cannot be set in the hourly
time signal display.
Channel 1 Channel 2
MinutesHour
3. By pressing button D to set the digits in
the alarm setting display, the alarm mark
is displayed and the alarm is automatically
engaged.
4. If the watch is left untouched in the alarm
setting display with the digits flashing, it
will automatically return to the alarm display
in 2 minutes.
N o t e s :
1. When the time function is displayed in the
24-hour indication, the alarm is also displayed
in the 24-hour indication.
2. When setting the hour digits in the 12-
hour indication, check that A (AM)/P
(PM) mark is correctly set. In the 24-hour
indication, 24 (24-hour indication) mark
is displayed.
2. [Alarm and hourly time signal engagement/
d i se n g a g e m e n t ]
With each press of button D, the alarm of
the selected channel or hourly time signal
is engaged and disengaged alternately.
* The alarm and hourly time signal can be
engaged and disengaged independently
of each other.
Indication of
the alarm
channel
Alarm/hourly
time signal
engaged
Alarm/hourly
time signal
disengaged
1
2
3
(Hourly time
signal)
The alarm rings at the designated time for
20 seconds and stops. To stop it manually,
press button A, B, C or D.
The alarm can be tested by keeping button
D pressed in the alarm display.
Hour
Hourly time
signal mark
Alarm mark
Alarm display
indicator
Alarm channel
HOW T O SET THE D UAL TIME
Time of a different time zone can be set and
displayed together with the time you have set
in HOW TO SET THE TIME/CALENDAR.
1. Press button A to show the dual time
display.
2. Press button B to show the dual time
setting display.
3. To set the digits, refer to HOW TO SET
THE TIME/CALENDAR.
1
B
AD
C
Minutes A (AM)/P
(PM) mark
A D
BC
Hour Minutes
A (AM)/P
(PM) mark
Dual time
display
indicator
Channel 3
Hourly time
signal display
3. Press button B to show the alarm setting
displa y. The hour digits (an d A/P
mark if the time is set in the 12-hour indication)
start flashing.
4. Press button C to select the digits to be
adjusted (flashing).
5. Press button D to set the digits. One
digit is advanced with each press of the
button. The digits move quickly by keeping
the button pressed.
6. After all the adjustments are completed,
press button B to return to the alarm
display.
* To set more than one alarm cha nnel,
follow the procedure above starting from
the step 2.
Channel 3
Hourly time
signal display
Channel 1 Channel 2


Produkt Specifikationer

Mærke: Lorus
Kategori: Ur
Model: W110

Har du brug for hjælp?

Hvis du har brug for hjælp til Lorus W110 stil et spørgsmål nedenfor, og andre brugere vil svare dig