Lorus W190 Manual

Lorus Ur W190

Læs gratis den danske manual til Lorus W190 (11 sider) i kategorien Ur. Denne vejledning er vurderet som hjælpsom af 46 personer og har en gennemsnitlig bedømmelse på 4.6 stjerner ud af 23.5 anmeldelser. Har du et spørgsmål om Lorus W190, eller vil du spørge andre brugere om produktet?

Side 1/11
C H A R A C T E R I S T I C S
1. T i m e /cal e n d a r d i s p l a y: Hour, minute,
seconds, date, day of the week and month.
2 . A u t o m a t i c c a l e n d a r a d j u s t m e n t : Cal-
end a r adj u st s a u t omatica l l y f or odd a nd
even months except February of leap years.
3 . T i m e i n d i c a t i o n : Chang eover b etw een
1 2 - h ou r a n d 2 4 - h o u r i n d i cat i ons is p o s -
si ble.
4 . S t op watch: 24-hour stopwatch with 1100-
second readout up to 40 m inutes and with
1-second r e a d ou t af t e r t he f i r s t 40 m in-
u t e s. Spl i t t i m e m e a su r e m e n t is a v a i l -
able.
5 . A l a r m : T h e a l a r m r i ng s a t the d e sig -
na ted hour a nd minut e with beep, be ep
for 30 seconds.
6. Hourl y t i m e s i g n a l : Can b e set to ring
every hour on the hour with a single beep.
7 . Illu minat ing light (exc ept Ca l. W140):
The lig ht evenly illuminat es the display in
the dar k.
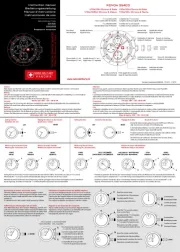
DISPL AY AND BUT TON OPERAT ION
INSTRUCTION MANUAL
CAL. W136 (RE4 SERIES)
CAL. W190 (RB7 SERIES)
CAL. Y736 (RB9 SERIES)
NREY736C 11-2000
CAL. W140 (RCM SERIES)
CAL. Y735 (RVT SERIES)
A
B
C
Hou r
Alar m mar kTime sig nal m ark
Day indica tor
Se cond
Minut e
Time sig nal m ark
Hou r
A C
B
Day indica tor *
Alar m mar k
EL bu t ton
* The design of the day indica tion differs d e-
pe nd ing on th e cal ibre.
Se cond
Minut e
[Cal. W140]
[Cal. W190 / Y735 / Y736]
[Cal. W136]
B
A
Minut e
Se cond
Hou r
C
Day indica tor
EL bu t ton
Alar m mar k
But t on B : Cal endar (month, date a nd day)
display in the time/calendar display.
Start/stop in the stopwatch func-
tion.
Selection of the dig its to be a d-
justed in the alarm setting func-
tion and t he tim e/ca l endar set-
ting fu nction.
But t on C : A l arm d i spl ay in t he t ime/c a l -
endar displ ay.
Split/Split relea se/R eset in the
st opw atch f u nction.
Set t ing t h e d i g i t s in t h e a l arm
set t i ng f unc t ion and t h e t ime/
ca l endar se tting fu nction.
Stopping t h e a l a r m in a ny d i s-
pla y.
Bu tton
B w hil e k eeping button C pressed:
En g a g em ent a nd d i seng a g em ent
of the al arm a nd the time sig na l.
Bu tton C wh ile keeping but ton B pr esse d:
Changeover of the calendar (month
and da te) displ ay.
Bu ttons B & C:
Al a r m t e s t i n t he t i m e / calendar
displ a y.
H O W T O S E T T H E D U A L C A L E N -
D A R D I S P L A Y
1 Press buttonB to show the calendar (month,
date, and day) display . The cale ndar dis-
pl a y i s s h o w n w h i l e but t o n B i s k e p t
pressed.
2 The m o n t h a nd t h e da t e ch a n g e pl a c e s
with each other with each press of butt on
C w hil e keeping bu tton B pressed.
B
C
B
C
* In the 12-hour indication,A (AM)/P (PM)
m a r k is d isp l a yed. In t h e 2 4-hou r i ndica-
tion, th ere is no indicat ion.
Mont h Day Dat e DayDat e Mont h
H OW T O U S E T H E S T O P W A T C H
A
B: Start /Stop
St opw atch
indicat or
Split indica t or St op indicat or
1/100 second
indicat or
C: Split/
Split release/
Reset
Minu t es Seconds 1/ 100 second
But ton A : Sel ection of t he displ ay.
The sel ection is m ade in the following order:
A
- - - - - - - - - - - - - - - - - - - - - - - - - - - -
- - - - - -
- - - - - -
- - - - - - - - - - - - - - - - - - - - - - - - - - - -
Press
button A
for 2 sec.
A
Alarm setting
Time/calendar display
Stopwatch display
Time/calendar setting
AA
Ti m e
si g na l
m a r k
1 Press b u t t o n A t o sho w t he stopw a t c h
dis play . (The st opw a tch ind ica tor s tart s
f las hi ng .)
The stopwatch can measure up to 24 hours
and is displayed in minutes, seconds, and
1/100 seco nds u p to 4 0 m inutes , a nd i n
hours, m inutes, and seconds after the first
40 minu tes. (The 1/100 second indicator
flashes during the first 40 minut es.)
Whe n t he m easurement is over 2 4 hour s,
t h e st o pw a t c h w i l l b e r e set t o 0 : 0 0 o o
and start counti ng a g ain.
2 Reset the d ig its t o 0 :00oo bef ore using
t h e s t o p w a t ch. W h e n t h e spl i t a n d t h e
stop w a t ch ind i cat ors a r e f l a shin g , p r ess
button B to check that the stop indicator
st arts fl ashing , and then press button C
twice to reset t he dig its to ze ro.
3 W h e n m e a su r i ng a l o ng period o f t i m e,
return the stopwatch to the t im e/calendar
displ a y afte r the stopwat ch start s to pre-
vent any possible mistak en oper ation.
* W hen button B or C is pres sed in t he
sto pwat ch dis play , a sing l e beep sou nds
to conf irm the oper ation.
S t a r t S t o p R e s t a r t R e s e tS t o p
B B B B C
S t a r t
B C B C
S p l i t
S p l i t
r e l e a s e
S t o p R e s e t
C
Finish (First runner)
BCBC C
Finish (Second runner)
S t a r t
F i n i s h t i m e
of 2 n d
c o m p e t i t o r
R e s e t
S t o p
F i n i s h
t i m e of 1 s t
c o m p e t i t o r
Accumulated elapsed time measurement
Split time measurement
**
** Restart and stop can be repeated by pressing
button B”.
**
** Measurement and release of split time can be
repeated by pressing button C”.
Measurement between two competitors
1 Press button A for 2 second s to a ctivate
the al arm setting funct ion. (The alarm set
indicat or sta rts flashi ng .)
2 Press button B to activat e the Hour or
Minute setting. The displa y changes in
the following order with each press of but-
ton B.
3 One dig it (fl ashing ) is advanced with each
press of b u t t o n C . The d i g its a r e a d -
vanced quickly by keeping buttonC pressed.
4 A f t er a l l t he adj ust m ent s a r e com p l eted,
press b u t t o n A t o r et u r n t o t h e t i m e /
ca l endar displ a y.
(The display returns direct ly to the t im e/
ca l endar d isplay and not to the t ime/cal-
endar se tting.)
B
A
B
C
Hou r Minute s
Alarm set ind icator
HOW T O S E T T H E A L A R M
A ( AM)
Hour setting
Minute sett ing
N o t e : When set ting the hour digits, be sure
to check tha t the A ( AM)/P (PM)
mark is cor rectl y set.
H O W T O E N G A G E A N D D I S E N G A G E
T H E AL A R M A N D T H E T I M E S I G N A L
A l a r m d i s p l a y
1 Press bu tton C in the tim e/cal endar dis-
play t o show the alarm display. The alarm
display is shown whil e bu tton C is ke pt
pressed.
B
C
Minu t es
Hou r
2 With each press of bu tton B w hile keep-
ing b u t t on C p r ess ed, t h e e ngag em ent
and diseng ag em ent of the a l a rm a nd the
tim e signal a re m ade as follow s:
A ( AM)
Alarm is eng aged.
Time signal is disengaged.
Time sig nal is eng aged.
Alarm is disengag ed.
Al arm and time
signal are eng aged.
Al arm and time signa l
are d isengag ed.
The al arm ring s at the designat ed time for 30
se cond s and st ops. H owe ve r, the alarm can
be stopped m a nu ally b y pressing b utton C
in any displ ay.
HOW T O S T OP T H E A L A R M
A L A R M T E S T
The alarm can be tested with a beeping sound
by pr essing bu ttons B a nd C at the same
tim e in t he t ime /cale nd ar d ispla y.
HOW TO SET T HE T IME/C ALEND AR
Ti m e/ca l end ar set ting
indicat or
1 Press buttonA to activate the time/calendar
setting function. (The time/calendar setting
indicator and the second digits start flashing.)
2 Selection of the digits to be adjusted (flash-
i ng ) i s m a d e i n t h e f o l l o w i ng o r d e r b y
pr essing b u tton B.
3 One dig it (fl ashing ) is advanced with each
pres s of b utt on C. ( The dig its ex cep t
second s are a dvanced quickly by k ee ping
but t on C pressed .)
S e c o n d s e t t i n g
Pre ss b u tton C in a ccord a nce w ith a
time sig nal . The seconds a r e r ese t t o
00 and start im m ediatel y.
W h e n t h e second s c o u n t a n y n u m b e r
from30” to59 and buttonC is pressed,
one m inu t e is a d d ed a nd t h e seco nds
are im m edi ate ly r eset t o 00.
4 A f t er a l l t he adj ust m ent s a r e com p l eted,
press b u t t o n A t o r et u r n t o t h e t i m e /
ca l endar displ a y.
Se co nd s Mi nu t e s M on thH o ur
Day Date
→ →
A
← ←
C
B


Produkt Specifikationer

Mærke: Lorus
Kategori: Ur
Model: W190

Har du brug for hjælp?

Hvis du har brug for hjælp til Lorus W190 stil et spørgsmål nedenfor, og andre brugere vil svare dig