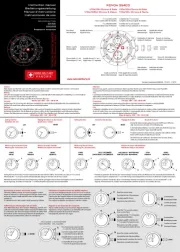
Lorus YK31 Manual

Lorus Ur YK31

Læs gratis den danske manual til Lorus YK31 (2 sider) i kategorien Ur. Denne vejledning er vurderet som hjælpsom af 7 personer og har en gennemsnitlig bedømmelse på 4.4 stjerner ud af 4 anmeldelser. Har du et spørgsmål om Lorus YK31, eller vil du spørge andre brugere om produktet?

Side 1/2
NREY922C 10-2010
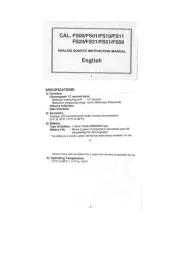
CAL. Y922, YK30, YK31, YK32, YK33, YK34
CAL. Z001, Z002, Z003 (R23 SERIES)
D I S P L AY A N D B U T T ON O P E R AT I ON
C H A R A C T E R I S T I C S
1. Time/calendar display: Hour, minute,
second, date, day of the week and month.
2. Automatic calendar adjustment: Calendar
adjusts aut omatically for odd and even
months except February of leap years.
3. Time indication: Changeover between 12-
hour and 24-hour indications is possible.
4. Stopwatch: 24-hour stopwatch with 1/100
second readout up to 40 minutes and with 1
second readout after the first 40 minutes.
Split time measurement is available.
5. Alarm: The alarm rings at the designated
hour and minute with beep, beep for 30
seconds.
6. Hourly time signal: Can be set to ring every
hour on the hour with a single beep.
7. Illuminating light (for Cal. YK30, YK31,
YK32, YK33, YK34 & Z001): The light evenly
illuminates the display in the dark.
Button B:
Calendar (month, date and day) display in
the time/calendar display.
Start/stop in the stopwatch function.
Selection of the digits to be adjusted in the
alarm se t t i n g f u n c t io n and t he t i m e /
calendar setting function.
Button C:
Alarm display in the time/calendar display.
Split/Split release/Reset in the stopwatch
function.
Setting the digits in the alarm setting function
and the time/calendar setting function.
Stopping the alarm in any display.
Button B while keeping Button C pressed:
Engagement and disengagement of the alarm
and the hourly time signal.
Button C while keeping Button B pressed:
Changeover of the calendar (month and date)
display.
Buttons B & C:
Alarm test in the time/calendar display.
H OW T O S E T T H E D U A L C A L EN D A R
D I S P L AY
1 Press Button B to show the calendar (month,
date, and day) display. The calendar display
is shown while Button B is kept pressed.
2 The month and the date change places with
each other with each press of Button C while
keeping Button B pressed.
* In the 12-hour indication, A (AM)/P” (PM)
mark is displayed. In the 24-hour indication,
there is no indication.
H OW T O U S E T H E S T OP WAT C H
1 Press Button A to show the stopwatch display.
(The stopwatch indicator starts flashing.)
The stopwatch can measure up to 24 hours
and is displayed in minutes,
seconds, and
1/100 seconds up to 40 minutes, and in
hours,
minutes, and seconds after the first
40 minutes. (The 1/100 second indicator
flashes during the first 40 minutes.)
When the measurement is over 24 hours, the
stopwatch will be reset to 0:00oo” and start
counting again.
2 Reset the digits to0:00oobefore using the
s t o p w a t c h . W h e n t h e s p l i t a n d t h e
stopwat ch indicators are flashing, press
Button B to check that the stop indicator
starts flashing, and then press Button C twice
to reset the digits to zero.
3 When measuring a long period of time, return
the stopwatch to the time/calendar display
after the stopwatch starts to prevent any
possible mistaken operation.
* When B u t t o n B or C i s p r e s se d i n t h e
stopwatch display, a single beep sounds
to confirm the operation.
Star t Stop Res t ar t
Stop
Reset
H OW T O S ET T H E A L A R M
Hour s et t ing Minut e s et t ing
1 Press Button A for 2 seconds to activate the
alarm setting funct i on. (T he ala rm set
indicator starts flashing.)
2 Press But ton B t o activate the Hour or
Minute setting. The display changes in the
following order with each press of Button B.
3 One digit (flashing) is advanced with each
press of Button C. The digits are advanced
quickly by keeping Button C pressed.
4 After all the adjustments are completed,
press Button A to return to the time/calendar
display.
(The display returns directly to the time/
cale ndar display and not t o the ti me/
calendar setting.)
C
CB
C
B
S t ar t
Fi nish t ime
of 1st
c om pet it o r
S t op Fi nish t ime
of 2nd
c om pet it o r
Reset
Measurem e n t be t ween t w o c o mpet it o rs
Fi ni sh (Fir s t r u nner )
Fi ni sh (Second r unner )
Note: When setting the hour digits, be sure to
check that the A (AM)/P(PM) mark is
correctly set.
[Cal. YK32 / Z001]
Hour
M in ut e
A
EL bu t t on
Hour ly t i me
s ignal mar k
Al ar m ma r k
Day indic at o r
Sec ond
EL bu t t on
C
B
[Cal. YK33]
[Cal. YK30 / YK31]
Hour
A
EL bu t t on
Hour ly t i me
s ignal mar k
AM /PM i nd icat or
12-hour /2 4 -h ou r i nd i cat i on
EL bu t t on
Al ar m ma r k
Day indic at o r
Sec ond
C
B
M in ut e
B
Al ar m /
Hou r ly t im e s ignal m ar k
Hour
A
Sec ond
C
M in ut e
Day indic at o r
[Cal. YK34]
Hour Second
M in ut e
EL bu t t on
A C
B
A
M in ut e
B
Hour
[Cal. Y922 / Z002 / Z003]
Hour ly t i me
s ignal mar k
Day indic at o r
Al ar m ma r k
C
Sec ond
Button A:
Selection of the display.
The selection is made in the following order:
Day
i nd ic at o r
Al ar m/ Hour ly t i me
s ignal mar k
AM /PM i nd icat or
A
A
T i me/c al endar d isplay Stopw atch d i splay
P r e s s
Bu t t on A
f or 2 s ec .
A
A
Al ar m s ett in gT i me/c al en dar s et t ing
B
C
M ont h
Day
B
C
Da t e Day
M ont h
Da t e
A
S t opw at c h
i nd ic at o r
St op indi c at o r
Sp li t i nd icat or
1/100 s econd
i nd ic at o r
B: St a r t /S t op
C: S plit /
Split releas e/
Reset
M in ut e S ec o nd 1/100 s econd
AC
Al ar m s et indic at or
B
Hour
M in ut e
A (AM)
S t ar t
Measurement and release of split time can be
repeated by pressing button C.
Split time measurement
B B CC C
Split S pl it
R el ea s e S t op R es et
Restart and stop of stopwatch can be repeated
by pressing button B.
Accumulated elapsed time measurement
B B B B C
B
LUE 10.8.18, 5:19 PMPage 1 Adobe


Produkt Specifikationer

Mærke: Lorus
Kategori: Ur
Model: YK31

Har du brug for hjælp?

Hvis du har brug for hjælp til Lorus YK31 stil et spørgsmål nedenfor, og andre brugere vil svare dig