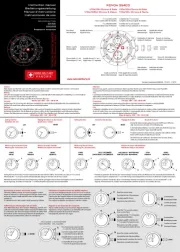
Lorus Z019 Manual

Lorus Ur Z019

Læs gratis den danske manual til Lorus Z019 (2 sider) i kategorien Ur. Denne vejledning er vurderet som hjælpsom af 82 personer og har en gennemsnitlig bedømmelse på 4.9 stjerner ud af 41.5 anmeldelser. Har du et spørgsmål om Lorus Z019, eller vil du spørge andre brugere om produktet?

Side 1/2
C H A R AC T E R I S T I C S
u Pedometer
• Range:0-999999steps
 Distancedisplay: 0-9999.99km/0-9999.99
miles
• Calorimeter:0-99999.9kcal
Duration: 0-1440 minutes (23 hours 59
minutes59seconds)
• Targetstepcount:Beepsuponcompletion
Personal calibration:Bodyweight,stride
length
• Pedometerinstrument:Accelerometer
uAutomatic calendar adjustmentbetween
2011and2099(year,month,day,hour,minute,
second)
u12/24-hour indication format
u Hourly chime
u Daylight saving time setting
u Stopwatch
Maximumrange: 23 hours 59 minutes 59
seconds
Splitintervalfunction(SPL)
uRecord archive functionwhichallowsusersto
storeupto30 entrieswhereeach individual
entr ycan berecalledfor evaluation. Users
mayalsochoosetodeleteindividualentries
orerasetheentirearchive.
uDaily and one-time alarm settings
u Low battery detection
u Key t one sett ings: U se rs may  ch oo se  t o
de activateth e ke y tone f unction  when
operatinginsituationsthatrequirelownoise
levels
• EL Backlight:3secduration
C L O C K
P E D O M E T E R
GENERAL OPERATIONS
1) AUTO-RETURN
• Whileinarchiveandalarmmode,ifnooperation
within2 minutes,the watchwillautomatically
returntohomescreen.
• Whilein settingmenu (digits flashing),if no
ope rat io n w it hin 2  m in ute s , the  w atch wi ll
automaticallyexitthesettingmenu.
2) DEFAULT SCREEN
Whenever enter ing daily recording and archive
mode, the last recordingswhen existed will show
first.
S1
S2
S4
S3
SEC O N DS DISPLAY*
NOTE:
• Ifthe watchis set to the12-hour indication
format,thePMsymbolwill appear onlyinthe
S1
S2
S4
S3
SEC O N DS DISPLAY*
REAL TIM E
[HH :MM]
ST EP C O U NT /CA L O R IE S/
DIST ANC E T R AVE L L ED/
ELAP SED TIM E
ACTIVATING PEDOMETER
1. PressS1tobeginrecordingyourmovement,and
pressagaintostoprecording.
 Theflashing indicatesthatthepedometer
isactive.
NOTE:
Ifno movement is registered on the pedometer
for5minutes,thepedometerwillbeautomatically
deactivatedtoreducebatteryconsumption.
KEEPING TRACK OF STEP COUNT, CALORIES BURNED,
DISTANCE AND ELAPSED TIME.
1. P r e s s  S 2  t o c y c l e t h r o u g h  t h e f o l l ow i n g
measurements:Step count,calories,distance
andelapsedtime.
2. Whenthepedometer is inactive,holdS2 for2
secondstoresetallcounters.
TROUBLESHOOTING
Q1 Why cant I set a target step count, unit, stride
length and/or weight?
A1
It is not allowed to set personal information
after step count activated. Please set up
correct personal information first before
step count, as it affects distance and
calories counting.
Q2 Why does the alarm cause my pedometer
to malfunction during operation?
A2 Step counting will stop when alarm or
countdown alarm rings.
Q3
The distance recorded on my pedometer
doesnt match at all. Is my pedometer
broken?
A3
The distance is calculated upon your
steps and stride length. Please check if
the correct stride length is set.
Q4 I noticed that the pedometer has the
tendency to register sudden increases in
step count, why is this?
A4
The pedometer may not be able to
regis ter movemen t w ith comple te
precision at all times, but it has a built in
function that allows it to try and account
for any discrepancies in its measurements
which is why you will notice certain spikes
in your recording.
Q5 The number of steps recorded doesnt seem
to be accurate at all.
A5
There are two possible causes for this
problem:
The pedometer is only intended for
measuring basic movements such as
walking and/or jogging. Therefore, it is
unlikely to produce reliable data when
measuring activi ties which invo lve
sprinting.
The pedometers operation is based on
principles of biomechanics, specifically
on how peoples arms behave during
movement. If your arms are moving
excessively during exercise then there
is a possibility that it may affect the
pedometers measurements.
afternoon.Ifthe‘PMsymbolisntvisible,itmeans
thewatchissettoAMtime/24hourtimeformat.
• Thewatchhasabuilt-incalendarwhichisfully
automatedw hichis capa bleof adjustingto
leapyears.
NREZ019 10-2012
CAL. Z019 (R 23 SERIES)
NOTE:
• Thevaluesthatappearonthesecondroware
actuallythecumulativesumfromall previous
recording sessions and will remainuntil the
pedometerisreset.
• Ifyouhavealreadysetadesignatedsumasyour
dailyobjective,thepedometerwillnotifyyouof
yourprogressinincrementsof10%andyouwill
hearabeepingsound.
 Thewatchwillproduceacontinuousbeeping
soundfor 20 seconds and the progress bar
will begin toflashuponcompletion ofyour
designatedobjective.Toproceed,simplypress
anybuttontostopthebeeping.
SETTING UP YOUR PEDOMETER
1. Inpedometermode,holdS4untilthenumber
displaystartsflashing.
2. PressS3tocyclethroughthefollowingvariables:
Targetstep count Unit (metric/imperial)
Stridelength Bodyweight
3. AdjustthevaluesofeachvariableusingS1&S2.
4. PressS4tosaveandexistsettingmenu.
D I S P L AY OV E R V I E W
DAT E
T IM E
But t on Prim ar y Func t ion
S1
Start/Stop
Stopwatch:Start/Pause
Pedometer:Start/Stoprecording
Menusetting:+value(Holdforrapid
increase)
S2
Reset
Stopwatch:Reset
Menusetting:-value(Holdforrapid
decrease)
S3
Mode
Modeselection
Menunavigation
S4
Enter/
ELbacklight
ELbacklight
Holdfor2seconds:Settingsmenu
Menuscreen:Saveandreturntothe
previousmenu
S1
S2
S4
S3
MODE SELECTION
The pe d ometer  wa tch prov ides 6 mode s o f
function. They are listed in the following order.
PressS3tocyclethrougheachmode.
Hold button S3 down for2 seconds to return to
thehomescreen.
DA ILY T ARGET PRO GR ESS BAR **
* S ECO NDS D I S P L AY :  W h e n  t h e : ” s y m bo l
is flashing, it is anindication of the seconds
passing.
** DAILY TARGET PROGRESS BAR:eachsegmentof
thebarrepresents10%progress.
BUTTON FUNCTIONS
S1 Alternatesbetweenstandardtimeanddaylight
savingtime
S2 Turnon/offhourlychime
S3 Modeselection
S4ELBlacklight,clocksettings
SETTING THE TIME AND DATE
1. Whilein clockmode,holdS4 for2 secondsor
untilnumbersstarttoflash.
2. PressS3tohighlighttheunityouwishtoadjust.
3. SetthevalueoftheselectedunitusingS1and
S2.
4. Onceyouvesetyourwatchtothecorrecttime,
pressS4tosaveyoursettings.
NREV019.indd 1 12/07/25 15:48
NOTE:
In archive mode, date will be displayed first, then
change to steps screen after 2 seconds. In steps
screen, press S2 to cycle through steps, calorie,
distance and time display.
In archive mode, pressing S4 will not activate EL
light.
S T O P W AT C H
S1
S2
S4
S3
USING THE STOPWATCH TO RECORD ELAPSED TIME
MEASURING SPLIT TIMES
S1 S1S1 S1 S2
S1 S2S2 S1 S2
S1 S1S2 S2 S2
S1
S1
S2
S2
S2
A L A R M & K E Y T O N E S E T T I N G S
SETTING AN ALARM
1. In alarm mode, press S4 till the digit flashes, then
release S4
2. Press S3 to switch between hour and minute
setting
3. In setting screen, press S1 or S2 to + / - value.
4. Press S4 to save and exit setting
TURNING ON / OFF ALARM
In alarm mode, press S2 to turn on / off alarm.
TURNING ON / OFF KEY TONE
In alarm mode, press S1 for 2 sec to turn on / off
key tone.
D A I LY R E C O R D I G N S
Daily recording screen displays ones sum data
of the day, including steps, calorie, distance, time
and % of daily objective completed.
S1
S2
S4
S3
Press S2 to cycle through steps, calorie, distance
and time.
NOTE:
The daily recording will be saved automatically
and reset by 00:00 (24-hour format) / 12:00am (12-
hour format).
A R C H I V E
USING YOUR STOPWATCH TO MAKE REAL TIME
COMPARISONS OF TWO FINISHES
T h i s w a t c h c o n t a i n s p r e c i s e e l e c t r o n i c
components. Never attempt to open the case or
remove the back cover.
• BATTERY
CAUTION
DO NOT EXPOSE THE OLD BATTERY TO FIRE OR
RECHARGEIT.KEEPITATAPLACEBEYONDTHE
REACH OF CHIL DREN. IF A CHILD SWALLOWS IT,
CONSULT A DOCTOR IMMEDIATELY.
• WATERRESISTANT
* If your watch is 200 M/20 BAR, 100 M/10 BAR or
50 M/5 BAR water resistant, it is so indicated on
the dial/case back.
• Donotoperate thebuttonswhen thewatchis
wet.
If thewatchis exposed to saltwater, rinse it in
fresh water and then wipe it thoroughly dry.
 Shouldyoundanywaterorcondensationinside
t he wat ch, imme diat e ly ha ve it che cked.
Water can corrode electric parts inside the
case.
CAUTION:
Leather straps are not wat er resistant except
so indicated, even if the watch head is water
resistant.
• ALLERGICREACTION
Because t h e case a nd b a nd t ouch t h e skin
directly, it is important to clean them regularly. If
not, shirt sleeves may be stained and those with
delicate skin may develop a rash. Please wear
the watch with some play to avoid any possible
allergic reaction. If you develop a rash on your
wrist, stop wearing and consult a physician.
• MAGNETISM
Your watch will be adversely affected by strong
magnetism. Keep it away from close contact with
magnetic objects.
SHOCKSANDVIBRATIONS
Yo u r wa t ch m ay be worn fo r nor m a l spo r t s
act ivities, but be careful not to drop it or hit it
on hard surfaces.
• TEMPERATURE
Your wa t ch is p r e a d justed so t h a t c o nst a nt
accuracy may be insured at normal temperature.
• CLEANING
Use only a soft cloth and clean water for clean-
ing your watch. Never use chemicals, as the
waterproof gasket will corrode.
Con d i tio n
of u s e Acc i d en t a l
con t a ct
wi t h wa ter,
s uch a s
s pla s h es
a n d r a in
Sw immin g
a n d t a ki n g
a sh o we r
Sk in
d i v i n g
Sc u ba
d i v i n g
Indication
on t he dial/
case back
N o
I nd ic a t i on
NO NO NO
YE S YE S NO N O
YE S YE S NO
NO NO NO
YE S
WA T E R
R E S I ST A N T
WA T E R
R E S I ST A N T
( 5 0 M / 5  B A R
)
NO
WA T E R
R E S I ST A N T
1 0 0M / 1 0 B A R 
or abo ve
(
(
YE S
C A R E O F Y O U R L O R U S WAT C H
P r i n t e d i n C h i n a
S E R V I C E
W h e n y o u r LO RU S w a t c h r e q u i r e s re p a i r o r
ser vicing, please see the enclosed WARRANTY/
GUARANTEE.
B AT T E R Y C H A N G E
1. Battery: CR2032
Battery life: Provided the average use of EL
backlight is 10 sec/day and the alarm tone
is active for 20sec/day, the battery life of the
pedometer watch may var y depending on
how often the pedometer function stays active
during the day.
8 hours/day=7 months
3 hours/day=16 months
2 hours/day=21 months
1 hour/day=32 months
1/2 hour/day=42 months
2. Be sure to replace the battery to prevent any
possible malfunction as soon as it runs down.
3. To replace the battery we recommend taking
the watch to a local watch repair shop.
NOTE:
If the alarm, EL backlight and pedometer function
are use d long e r t ha n t he p er io ds de scr ibe d
above , the batt e ry life may be le ss than t he
specified period.
After the batteries are replaced with new ones,
set the time/calendar and alarm.
S1
S2
S4
S3
1. Press S4 to browse forward the daily recording
data by date, and press S1 to browse backward.
2. Press S2 t o cycle t hrough ste ps / calorie /
distance / time display.
3. Hold S2 for 2 seconds to clear current recording
data. Hold S4 for 2 seconds to clear all recordings.
NREV019.indd 2 12/07/26 9:50


Produkt Specifikationer

Mærke: Lorus
Kategori: Ur
Model: Z019

Har du brug for hjælp?

Hvis du har brug for hjælp til Lorus Z019 stil et spørgsmål nedenfor, og andre brugere vil svare dig