Mackie 1604-VLZ Manual
Mackie
Blandekonsol
1604-VLZ
Læs gratis den danske manual til Mackie 1604-VLZ (1 sider) i kategorien Blandekonsol. Denne vejledning er vurderet som hjælpsom af 26 personer og har en gennemsnitlig bedømmelse på 5.0 stjerner ud af 13.5 anmeldelser. Har du et spørgsmål om Mackie 1604-VLZ, eller vil du spørge andre brugere om produktet?
Side 1/1

Ribbon cable plate
Remove screws (2 each side)
(use t attach bracket o pod)o t
Ribbon cable
Jacks
8x32 screws
supplied with this kit
(2 each side)
Re-install
two rear
rubber feet
VLZ4 and VLZ3: Remove
and replace these three
screws with the M3.5x6mm
silver screws (supplied
with this kit). VLZ Pro:
Remove and re-install
these three screws only!
16220 Wo Reod- d Road NE • Woodinville • WA • 98072 • USA
Phone: 425.487.4333 • Toll-free: 800.898.3211
Fax: 425.487.4337 • www.720trees.com
©2013 LOUD hnoloTec gies c. ri hts In All g reserved.
Part No. 820 6--03 00 . Rev E 07/13
Like us
Follow us
Watch our dang videos
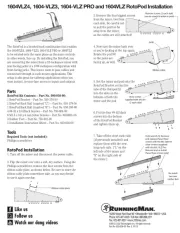
The RotoPod is a bracket/rack combination that enables
the 1604VLZ4, 1604-VLZ3, 1604-VLZ PRO or 1604VLZ
to be rotated onto the same plane as the main controls;
in other words, face up. By installing the RotoPod, you
are converting the mixer from a 10-rackspace mixer with
rear-facing jacks to a 10W-rackspace configuration with
front-facing jacks. This leaves room to pass cables and
connectors through in rack-mount applications. This
setup is also great for tabletop applications when you
want instant, in-your-face access to inputs and outputs.
Parts
RotoPod Kit Contents – Part No. 090-050-90:
1 RotoPod Bracket – Part No. 550-178-00
1 RotoPod Rack Rail (marked “L”) – Part No. 550-179-00
1 RotoPod Rack Rail (marked “R”) – Part No. 550-180-00
4 #8-32 x 1/4 Black Screws – Part No. 700-004-00
6 M3.5 x 0.6 x 6 mm Silver Screws – Part No. 0020991-06
2 Rubber Feet – Part No. 750-001-00
1 Installation Instruction Sheet – Part No. 820-036-00
Tools
Required Tools (not included):
Phillips screwdriver
RotoPod Installation
1. Turn off the mixer and disconnect the power cable.
2. Flip the mixer over onto a soft, dry surface. Using the
Phillips screwdriver, remove the four screws from the
ribbon cable plate, as shown below. Be sure to store the
ribbon cable plate somewhere safe, as you may decide
to use it again one day.
3. Remove the four biggest screws
from the mixer, two from
each side. Be careful not
to pull the pod too far
away from the mixer,
as the cables are still attached!
4. Now turn the mixer back over
so you’re looking at the top again.
Rotate the pod 90˚
so the jacks are
facing up, as well.
5. Set the mixer and pod onto the
RotoPod Bracket so that the
tabs of the Rotopod fit
into the slots on the
bottoms of both the
mixer and the pod.
6. Put the four #8-32 black
screws into the bottom
of the RotoPod Bracket
and tighten them up.
7. Take off the short rack rails
(if previously installed) and
replace them with the new,
long rack rails. [“L” on the
left side of the mixer and
“R” on the right side of
the mixer].
1604VLZ4, -1604 VLZ3, -1604 VLZ PRO and 1604VLZ RotoPod Insta atll ion
Produkt Specifikationer
Mærke: | Mackie |
Kategori: | Blandekonsol |
Model: | 1604-VLZ |
Har du brug for hjælp?
Hvis du har brug for hjælp til Mackie 1604-VLZ stil et spørgsmål nedenfor, og andre brugere vil svare dig
Blandekonsol Mackie Manualer
30 December 2025
18 August 2024
14 August 2024
5 August 2024
4 August 2024
4 August 2024
3 August 2024
1 August 2024
29 Juli 2024
28 Juli 2024
Blandekonsol Manualer
- Audio-Technica
- Dash
- Omnitronic
- Marquant
- Tascam
- Alto Professional
- RDL
- Redmond
- The T.mix
- Korona
- Power Dynamics
- Bestron
- Audiophony
- Radial Engineering
- Zelmer
Nyeste Blandekonsol Manualer
3 April 2025
27 Februar 2025
15 Januar 2025
15 Januar 2025
15 Januar 2025
11 Januar 2025
11 Januar 2025
11 Januar 2025
11 Januar 2025
10 Januar 2025