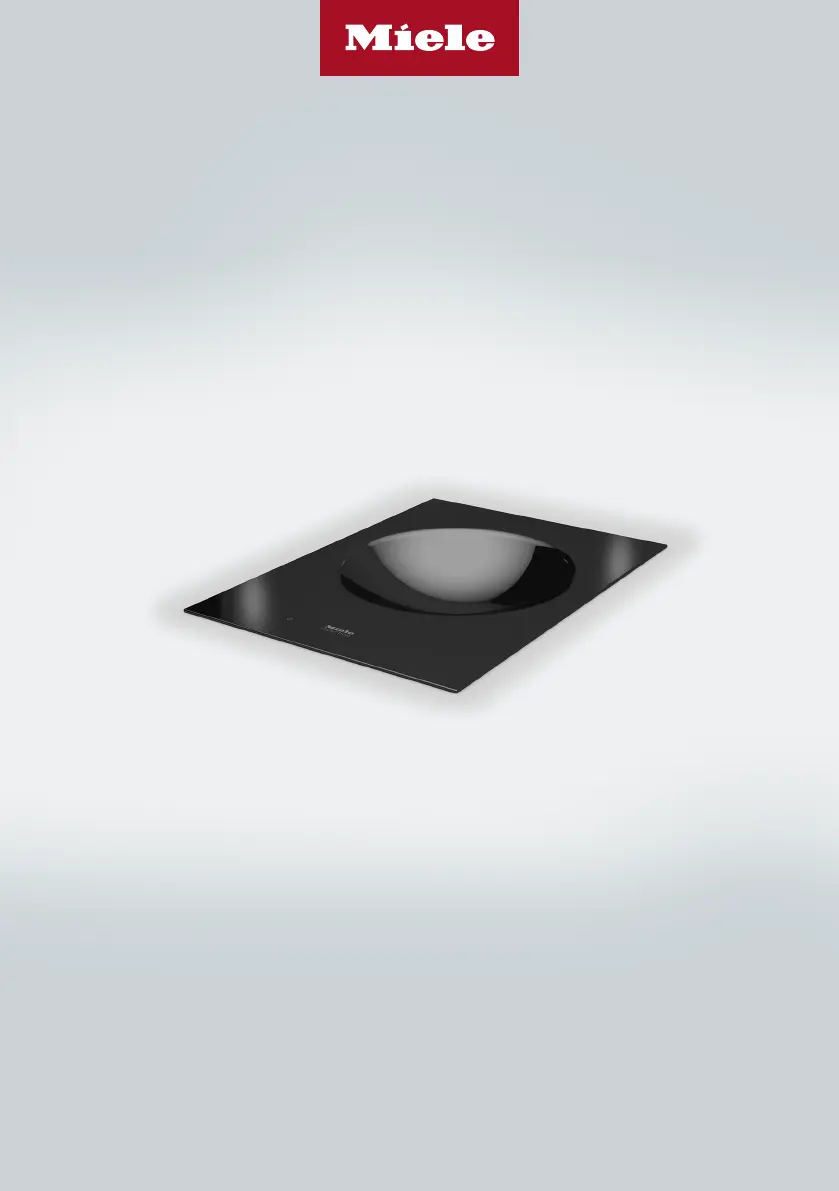
Miele CS 7611 FL Manual
Miele
Induktion kogeplade
CS 7611 FL
Læs gratis den danske manual til Miele CS 7611 FL (72 sider) i kategorien Induktion kogeplade. Denne vejledning er vurderet som hjælpsom af 23 personer og har en gennemsnitlig bedømmelse på 4.8 stjerner ud af 12 anmeldelser. Har du et spørgsmål om Miele CS 7611 FL, eller vil du spørge andre brugere om produktet?
Side 1/72

Operating and installation instructions
SmartLine induction wok
To prevent the risk of accidents or damage to the appliance, it is
essential to read these instructions before it is installed and used for
the first time.
en-AU, NZ M.-Nr. 10 883 161

Contents
2
Warning and Safety instructions.......................................................................... 4
Caring for the environment ................................................................................ 14
Overview............................................................................................................... 15
Wok burner............................................................................................................ 15
Controls / Indicators.............................................................................................. 16
Cooking zone data ................................................................................................ 17
Accessories supplied ............................................................................................ 18
Before using for the first time ............................................................................ 19
Cleaning the SmartLine appliance for the first time .............................................. 19
Switching on the SmartLine appliance for the first time ....................................... 19
Induction .............................................................................................................. 20
Operation.............................................................................................................. 22
Power level range .................................................................................................. 22
Operating principles .............................................................................................. 22
Switching on the wok ............................................................................................ 23
Setting the power level.......................................................................................... 23
Switching off.......................................................................................................... 23
Residual heat indicator.......................................................................................... 23
Setting the power level - extended power level range .......................................... 23
Auto heat-up ......................................................................................................... 24
Booster.................................................................................................................. 25
Keeping warm ....................................................................................................... 26
Timer..................................................................................................................... 27
Minute minder duration ......................................................................................... 27
Switching off a cooking zone automatically.......................................................... 28
Additional functions ............................................................................................ 29
Stop & Go.............................................................................................................. 29
Recall..................................................................................................................... 29
Wipe protection ..................................................................................................... 30
Demonstration mode............................................................................................. 30
Displaying the SmartLine appliance data.............................................................. 30
Safety features..................................................................................................... 31
System lock / Safety lock...................................................................................... 31
Safety switch-off ................................................................................................... 33
Overheating protection.......................................................................................... 34
Programming ....................................................................................................... 35

Contents
3
Cleaning and care ............................................................................................... 38
Problem solving guide ........................................................................................ 40
Optional accessories .......................................................................................... 44
Service.................................................................................................................. 45
Contact in case of fault ......................................................................................... 45
Data plate .............................................................................................................. 45
Warranty ................................................................................................................ 45
Installation............................................................................................................ 46
Safety instructions for installation ......................................................................... 46
Safety distances.................................................................................................... 47
Surface-mounted .................................................................................................. 49
Installation notes – surface-mounted.................................................................... 49
Worktop cut-out – surface-mounted..................................................................... 51
Spacer bars – surface-mounted............................................................................ 54
Installation dimensions– Surface-mounted.......................................................... 55
Installation – surface-mounted.............................................................................. 56
Flush-fit ................................................................................................................. 58
Installation notes – flush-fit ................................................................................... 58
Worktop cut-out – flush-fit .................................................................................... 60
Spacer bars – flush-fit ........................................................................................... 63
Installation dimensions–Flush ............................................................................. 64
Installation – flush-fit ............................................................................................. 65
Electrical connection ............................................................................................. 67

Warning and Safety instructions
4
This wok complies with all current local and national safety
requirements. However, inappropriate use can lead to personal
injury and damage to property.
Read the operating and installation instructions carefully before
using the wok. They contain important information on safety,
installation, use and maintenance of the appliance. This prevents
both personal injury and damage to the appliance.
In accordance with standard IEC 60335-1, Miele expressly and
strongly advises that you read and follow the instructions in
“Installation” and in “Warning and Safety instructions”.
Miele cannot be held liable for injury or damage caused by non-
compliance with these instructions.
Keep these instructions in a safe place and pass them on to any
future owner.

Warning and Safety instructions
5
Correct application
This wok burner is designed for domestic use and for use in
similar environments by guests in hotel or motel rooms, bed &
breakfasts and other typical living quarters. This does not include
common/shared facilities or commercial facilities within hotels,
motels or bed & breakfasts.
The wok burner is not suitable for outdoor use.
It is intended only to cook food and keep it warm. Any other use is
not supported by Miele and could be dangerous.
This appliance is not intended for use by persons (including
children) with reduced physical, sensory or mental capabilities, or
lack of experience and knowledge, unless they have been given
supervision or instruction concerning its use by a person responsible
for their safety, and are able to recognise the dangers of misuse.

Warning and Safety instructions
6
Safety with children
Young children must not be allowed to use this appliance.
Older children may only use the gas wok burner if its operation
has been clearly explained to them and they are able to use it safely.
They must be aware of the potential dangers caused by incorrect
operation.
Cleaning may only be carried out by older children under the
supervision of an adult.
Please supervise children in the vicinity of the wok burner and do
not let them play with it.
The appliance gets hot when in use and remains hot for a while
after being switched off. Keep children well away from the appliance
until it has cooled down and there is no danger of burning.
Danger of burning!
Do not store anything which might arouse a child's interest in
storage areas above or next to the wok burner. Otherwise children
could be tempted to climb onto the wok burner with the risk of
burning themselves.
Danger of burning and scalding! Turn the handles of pots and
pans on the cooktop to the side or the rear so that children cannot
pull them down and burn themselves.
Danger of suffocation! Whilst playing, children may become
entangled in packaging material (such as plastic wrapping) or pull it
over their head with the risk of suffocation. Keep packaging material
away from children.
Activate the system lock to ensure that children cannot switch on
the wok inadvertently. Use the safety lock when the wok is in use to
prevent children from altering the settings selected.

Warning and Safety instructions
7
Technical safety
Unauthorised installation, maintenance and repairs (including
removal of any cover) can cause considerable danger for the user.
Installation, maintenance and repairs must only be carried out by a
Miele authorised technician.
Damage to the wok burner can compromise your safety. Check
the appliance for visible signs of damage. Never use a damaged wok
burner.
Reliable and safe operation of this appliance can only be assured
if it has been connected to the mains electricity supply.
The wok must not be connected to the inverter of an autonomous
power supply, e.g. a solar power system. When the wok is
switched on, power surges could result in a safety switch-off. This
may damage the electronic unit.
The electrical safety of this appliance can only be guaranteed
when continuity is complete between it and an effective earthing
system which complies with local and national safety regulations. It
is most important that this basic safety requirement is present and
tested regularly and, where there is any doubt, the household wiring
system should be inspected by a qualified electrician.
Before connecting the appliance to the mains electricity supply,
ensure that the connection data on the data plate (voltage and
frequency) matches the mains electricity supply.
This data must correspond in order to avoid the risk of damage to
the appliance. Consult a qualified electrician if in any doubt.
Do not connect the appliance to the mains electricity supply by a
multi-socket adapter or an extension lead. These are a fire hazard
and do not guarantee the required safety of the appliance.
For safety reasons, this appliance may only be used after it has
been built in.

Warning and Safety instructions
8
This appliance must not be installed and operated in mobile
installations (e.g. on a ship).
Never open the casing of the wok burner.
Touching or tampering with electrical connections or components
and mechanical parts is highly dangerous to the user and can cause
operational faults.
The manufacturer's warranty will be invalidated if the appliance is
not repaired by a Miele authorised service technician.
Faulty components must only be replaced by genuine Miele spare
parts. The manufacturer can only guarantee the safety of the
appliance when Miele replacement parts are used.
The wok burner is not intended for use with an external timer
switch or a remote control system.
If the plug is removed from the connection cable or if the cable is
supplied without a plug, the wok must be connected to the electrical
supply by a suitably qualified electrician.
If the mains connection cable is damaged, it must be replaced
with a special mains connection cable, available from Miele, by a
Miele authorised service technician or suitably qualified and
competent electrician in order to avoid a hazard (see “Installation -
Electrical connection”).
During installation, maintenance and repair work, the wok must be
completely disconnected from the mains electricity supply. It is only
completely isolated from the electricity supply when:
– the main circuit breaker has been disconnected, or
– it is switched off at the wall socket and the plug is withdrawn from
the socket. Do not pull the mains connection cable but the mains
plug to disconnect your appliance from the mains electricity
supply.

Warning and Safety instructions
9
Danger of electric shock!
Do not use the wok if it is faulty, or if the ceramic surface is cracked,
chipped or damaged in any way. If you detect a fault during use
switch it off immediately. Disconnect the wok from the electricity
supply. Contact Miele.
If the wok burner is installed behind a furniture door, do not close
the door while the appliance is in operation. Heat and moisture
would build up behind a closed furniture door, potentially causing
damage to the appliance, the furniture unit and the flooring. Do not
close the door until the appliance has cooled down and the residual
heat indicators have gone out.
In areas which may be subject to infestation by cockroaches or
other vermin, pay particular attention to keeping the appliance and
its surroundings clean at all times. Any damage caused by
cockroaches or other vermin will not be covered by the warranty.
DO NOT MODIFY THIS APPLIANCE.

Warning and Safety instructions
10
Correct use
The wok gets hot when in use and remains hot for quite a while
after being switched off. There is a danger of burning until the
residual heat indicators go out.
Oil and fat can overheat and catch fire. Do not leave the wok
burner unattended when cooking with oil and fat. If it does ignite, do
not attempt to put the flames out with water.
Switch off the wok burner and use a suitable fire blanket, saucepan
lid, damp towel or similar to smother the flames.
The cooking process has to be supervised. A short term cooking
process has to be supervised continuously.
Flames could set the grease filters of a rangehood on fire. Do not
flambé under a rangehood.
Do not heat an empty pan.
Do not heat up food in closed containers e.g. tins or sealed jars
on the wok burner, as pressure can build up in the containers,
causing them to explode.
Do not cover the wok burner, e.g. with a cooktop cover, a cloth or
protective foil. The material could catch fire, shatter or melt if the
wok burner is switched on by mistake or if residual heat is still
present.
When the wok is switched on, either deliberately or by mistake, or
when there is residual heat present, there is a risk of any metal items
left on the wok heating up. Depending on the material, other items
left on the appliance could also melt or catch fire. Damp pan lids
might adhere to the ceramic surface and be difficult to dislodge. Do
not use the wok as a resting place for other items. Always switch off
the wok after use and do not rely on the pan detector.

Warning and Safety instructions
11
You could burn yourself on the hot wok. Protect your hands with
heat-resistant pot holders or gloves when using a hot wok. Do not let
them get wet or damp. This causes heat to transfer through the
material more quickly with the risk of scalding or burning yourself.
When using an electrical appliance, e.g. a hand-held food mixer,
near the wok burner, ensure that the cable of the electrical appliance
cannot come into contact with the hot wok burner. The insulation on
the cable could become damaged.
Grains of salt, sugar and sand (e.g. from cleaning vegetables) can
cause scratches if they get under pan bases. Make sure that the
ceramic surface is clean before placing pans on it.
Even a light object can cause damage in certain circumstances.
Do not drop anything on the ceramic surface.
Placing hot pans on the sensors and indicators could damage the
electronics underneath. Do not place hot pans on the sensors or
indicators.
Do not allow solid or liquid sugar, or pieces of plastic or aluminium
foil to get onto the wok when it is hot, as they can damage the
ceramic surface when it cools down. If this should occur, switch off
the wok immediately and scrape off all residues straight away using
a scraper blade suitable for use on glass. Wear oven gloves when
doing this. Allow the ceramic surface to cool down and then clean it
with a suitable ceramic cooktop cleaning agent.
Do not heat an empty wok as this can damage the ceramic glass.
Do not leave the wok unattended whilst it is being used.
Because induction heating works so quickly, the base of the pan
could heat up to the temperature at which oil or fat self-ignites within
a very short time. Do not leave the wok unattended whilst it is being
used.
Heat oil or fat for a maximum of one minute. Never use the
Booster function to heat oil or fat.

Warning and Safety instructions
12
For people fitted with a heart pacemaker: please note that the
area immediately surrounding the wok is electromagnetically
charged when it is switched on. It is very unlikely to affect a
pacemaker. However, if in any doubt, consult the manufacturer of
the pacemaker or your doctor.
When switched on, the electromagnetic field of the wok can
impair the function of magnetisable objects. Do not leave credit
cards, digital storage devices, pocket calculators, etc. in the
immediate vicinity of the wok.
Metal objects stored in a drawer under the wok can become hot if
the appliance is used intensively for a long time. Do not store any
metal items or utensils in a drawer under the wok.
The wok is fitted with a cooling fan. If a drawer is fitted directly
underneath the built-in wok, ensure that there is sufficient space
between the drawer and its contents and the underside of the wok in
order to ensure sufficient ventilation for the wok. Do not store
pointed or small items or paper in the drawer. They could get in
through the ventilation slots or be sucked into the casing by the fan
and damage the fan or impair cooling.
Only use the wok pan supplied with the appliance. For safety
reasons, other wok pans must not be used. Danger of burning (see
“Induction - Suitable cookware”).

Warning and Safety instructions
13
Cleaning and care
Do not use a steam cleaning appliance to clean this wok burner.
Pressurised steam could reach the electrical components and cause
a short circuit.
If the wok is built-in above a pyrolytic oven, do not use it during a
Pyrolytic cleaning programme as this could trigger the overheating
protection device on the wok (see “Safety features – Overheating
protection”).

Caring for the environment
14
Disposal of the packing
material
The transport and protective packaging
has been selected from materials which
are environmentally friendly for
disposal, and can normally be recycled.
Recycling the packaging reduces the
use of raw materials in the
manufacturing process and also
reduces the amount of waste in landfill
sites. Ensure that any plastic
wrappings, bags etc. are disposed of
safely and kept out of the reach of
babies and young children. Danger of
suffocation.
Disposing of your old
appliance
Electrical and electronic appliances
often contain valuable materials. They
also contain specific materials,
compounds and components, which
were essential for their correct function
and safety. These could be hazardous
to human health and to the environment
if disposed of with your domestic waste
or if handled incorrectly. Please do not,
therefore, dispose of your old appliance
with your household waste.
Please dispose of it at your local
community waste collection / recycling
centre for electrical and electronic
appliances. You are also responsible for
deleting any personal data that may be
stored on the appliance prior to
disposal. Please ensure that your old
appliance poses no risk to children
while being stored prior to disposal.

Overview
15
Wok burner
a
Wok basin
b
Controls / Indicators

Overview
16
Controls / Indicators
Sensor controls
a
Switching the wok on and off
b
Stop & Go
c
Wipe protection
d
Activating/Deactivating the keeping warm function
e
Numerical keybank
For setting power levels/minute minder and switch-off times
f
Automatic switch-off timer
g
Minute minder
Indicator lights
h
Automatic switch-off indicator light
i
Residual heat
j
Booster
k
Timer display
: to
:
Duration
System lock/Safety lock activated
Demonstration mode activated

Overview
17
Cooking zone data
Wok basin Øin cm Rating in watts for 230V
30.0 Normal
TwinBooster, level 1
TwinBooster, level 2
2400
2650
3000

Overview
18
Accessories supplied
The accessories supplied with your
appliance, as well as a range of optional
ones, are available to order from Miele
(see “Optional accessories”).
Wok pan CSWP 1450

Before using for the first time
19
Please stick the extra data plate for
the appliance supplied with this
documentation in the space provided
in the “Service” section of this
booklet. Alternatively, the additional
label can be stuck near the appliance
if the appliance markings are not
visible after installation.
Remove any protective wrapping and
stickers (except the data plate).
Cleaning the SmartLine
appliance for the first time
Before using for the first time, clean
the wok with a damp cloth only and
then wipe dry.
Switching on the SmartLine
appliance for the first time
The metal components have a
protective coating. Smells and possibly
some vapours may occur when the
SmartLine appliance is used for the first
time. The heating of the induction coils
also causes odours in the first few
hours of operation. This smell will be
less noticeable with each subsequent
use before dissipating completely.
The smell and any vapours given off do
not indicate a faulty connection or
appliance and they are not hazardous
to health.
Please note that the heating-up time
on induction woks is much shorter
than on conventional woks.

Induction
20
How it works
An induction coil is located under the
wok basin. When the wok is switched
on, this coil creates a magnetic field
which impacts directly on the base of
the pan and heats it up. The wok basin
itself is heated up indirectly by the heat
given off by the wok pan.
Induction heating only works when the
wok pan supplied is used on the wok.
The set power level flashes in the
numerical keybank
– if the wok is switched on without the
wok pan in place,
– if the wok pan is removed from the
wok whilst it is switched on.
If the wok pan is placed on the cooking
zone within 3minutes, the flashing
power level will go out and you can
continue as normal.
If the wok pan is not replaced, the wok
will switch itself off automatically after
3minutes.
Risk of burning due to hot items.
When the wok is switched on, either
deliberately or by mistake, or when
there is residual heat present, there
is a risk of any metal items left on the
wok heating up.
Do not use the wok as a resting
place for other items.
After use, switch the wok off with
the sensor control.

Induction
21
Noises
The following noises might occur in the
wok pan when the induction wok is in
operation:
On the higher power levels, the
appliance might buzz. This will
decrease or cease altogether when the
power level is reduced.
You might hear a clicking sound from
the electronic switches, especially on
lower power levels.
You might hear a whirring sound when
the cooling fan switches on. This
switches on to protect the electronics
when the wok is being used intensively.
The cooling fan may continue to run
after the appliance has been switched
off.
Suitable cookware
Risk of fire with unsuitable wok
pans.
If other woks are used, there is a risk
of fat or food overheating and
burning.
Only use the wok pan supplied with
the appliance.
The wok pan supplied has been
specially manufactured for use with
this wok.

Operation
22
Power level range
Cooking process Power
level
range
Keeping food warm, melting
chocolate
1-2
Warming food up 3-6
Stir-frying, e.g. Chinese dishes 7-9
Operating principles
This SmartLine appliance is equipped
with electronic sensor controls which
react to finger contact. For safety
reasons, in order to switch the
appliance on, the On/Off sensor
needs to be touched for a little longer
than the other sensors.
Each time you touch a sensor, an
audible tone sounds.
Only the printed On/Off symbol is
visible when the SmartLine appliance is
switched off. The other sensor controls
light up when the SmartLine appliance
is switched on.
Malfunction due to dirty and/or
covered sensor controls.
If the sensor controls are dirty or
covered this could cause them to fail
to react, to activate a function or
even to switch the appliance off
automatically (see “Safety features -
Safety switch-off”). Placing hot pans
on the sensor controls/indicators can
damage the electronic unit
underneath.
Keep the sensor controls and
indicators clean and do not place hot
pans or anything else on top of them.

Operation
23
Risk of fire due to overheated
food.
Unattended food can overheat and
ignite.
Do not leave the SmartLine
appliance unattended whilst it is
being used.
Please note that the heating-up time
is very short with induction heating.
Switching on the wok
Touch the sensor.
Further sensor controls will light up.
If no further entry is made, the wok will
switch itself off after a few seconds for
safety reasons.
Setting the power level
Permanent pan recognition is
activated as standard (see
“Programming”). When the wok is
switched on and you place a wok pan
on it, all the sensor controls for the
numerical keybank will light up.
Place the wok pan in position.
Touch the appropriate number sensor
control for the power level you want.
Switching off
To switch off the wok basin, touch
the0 sensor control on the numerical
keybank.
To switch off the wok, touch the
sensor control.
Residual heat indicator
If the SmartLine appliance is still hot,
the residual heat indicator will light up
after it has been switched off.
Depending on the temperature, a dot
will appear above power levels 1, 2 and
3.
The dots of the residual heat indicator
go out one after the other as the
SmartLine appliance cools down. The
last dot only goes out when the
SmartLine appliance is safe to touch.
Risk of burning due to hot
surfaces.
The surfaces will be hot after use.
Do not touch the surfaces while the
residual heat indicators are on.
Setting the power level -
extended power level range
Touch the numerical keybank in
between two number sensors.
The sensors in front of and after the
interim level will light up brighter than
the other sensors.
Example:
If you have set power level 7., the
numbers 7 and 8 will be brighter than
the other numbers.

Operation
24
Auto heat-up
When Auto heat-up has been activated,
the highest setting automatically
switches on and then switches to the
continued cooking setting which you
have previously selected. The heat-up
time depends on which continued
cooking setting has been chosen (see
chart).
Activating Auto heat-up
Touch the sensor for the continued
cooking setting you want until a tone
sounds and the sensor starts to
pulsate.
During the heat-up time (see chart), the
continued cooking setting selected will
pulsate.
With extended power levels (see
“Programming”) and a selected interim
power level, the sensors for the power
levels in front of and after the interim
power level will pulsate.
Changing the continued cooking
setting while heating up deactivates
Auto heat-up.
Deactivating Auto heat-up
Touch the sensor for the continued
cooking setting.
Or
Set a different power level.
Continued
cooking setting*
Heat-up time
[min:sec]
1 Approx. 0:15
1. Approx. 0:15
2 Approx. 0:15
2. Approx. 0:15
3 Approx. 0:25
3. Approx. 0:25
4 Approx. 0:50
4. Approx. 0:50
5 Approx. 2:00
5. Approx. 5:50
6 Approx. 5:50
6. Approx. 2:50
7 Approx. 2:50
7. Approx. 2:50
8 Approx. 2:50
8. Approx. 2:50
9 –
* The continued cooking settings with a dot
after the number are only available if the
power level range has been extended (see
“Programming”).

Operation
25
Booster
The wok is equipped with a
TwinBooster.
When activated, the power is boosted
for a maximum of 15minutes.
If the Booster function is switched on
when
– no power level has been selected,
the cooking zone will revert
automatically to level9 at the end of
the Booster time or if the Booster
function is switched off before this.
– a power level has been selected, the
cooking zone will revert automatically
to the power level selected at the end
of the Booster time or if the Booster
function is switched off before this.
Activating TwinBooster, level 1
Place the wok pan in position.
Select a power level if necessary.
Touch theB sensor control.
The indicator light for TwinBooster
level 1lights up.
Activating TwinBooster, level 2
Place the wok pan in position.
Select a power level if necessary.
Touch theB sensor control twice.
The indicator light for TwinBooster
level 2lights up.
Deactivating TwinBooster
Touch theB sensor control
repeatedly until the indicators go out.
or
Set a different power level.

Operation
26
Keeping warm
This function is for keeping food warm
which has just been cooked and is still
hot. It is not for reheating food that
has gone cold.
The maximum duration for keeping food
warm is 2hours.
– Only keep food warm in suitable
cookware (pots/pans). Cover the pot/
pan with a lid.
– Stir firm or viscous food (mashed
potatoes, stew) occasionally.
– Nutrients are lost when food is
cooked, and continue to diminish
when food is kept warm. The longer
food is kept warm for, the greater the
loss of nutrients. Try to keep food
warm for as short a time as possible.
Activating/Deactivating the keeping
warm function
Touch the sensor.

Timer
27
The SmartLine appliance has to be
switched on if you wish to use the timer.
A duration of between 1minute (:)
and 9hours 59minutes (:) can be
set.
Durations of up to 59minutes are
shown in minutes (00:59) and durations
of more than 60minutes are shown in
hours and minutes. Times are entered in
the order of hours, followed by minutes
in tens and then units.
Example:
59min = 00:59, entry: 5-9
80min = 1:20, entry: 1-2-0
After the first number has been entered,
the timer display will light up constantly.
After the second number has been
entered, the first number will move to
the left. After the third number has been
entered, the first and second numbers
will move to the left.
The timer can be used for the following
2 functions:
– For setting the minute minder
– For automatically switching off a
cooking zone/heating element/
Teppanyaki zone.
The functions can be used at the same
time. The shortest time is always
displayed and the sensor control
(minute minder) or the indicator light for
automatic switch-off pulsates.
Touch the or sensor control if you
want to show the times remaining
counting down in the background. If
more than one switch-off time is
programmed, touch the sensor
control repeatedly until the
corresponding indicator light pulsates.
Minute minder duration
The minute minder is set using the left
or front left numerical keybank
(depending on model).
Setting the minute minder
Touch the sensor.
The timer display will start to flash.
Select the time you require.
Changing the time set for the minute
minder
Touch the sensor.
Select the time you require.
Cancelling the minute minder
duration
Touch the sensor until:
appears in the timer display.

Timer
28
Switching off a cooking zone
automatically
You can set a time after which the
cooking zone will switch off
automatically.
The switch-off time is set with the
numerical keybank.
If the time programmed is longer than
the maximum operational time
allowed, the safety switch-off will
switch off the cooking zone after the
maximum permitted safety time has
elapsed (see “Safety features - Safety
switch-off”).
Select a power level.
Touch the sensor.
The indicator light will start to flash.
Set the required time.
Changing the switch-off time
Touch the sensor until the
indicator light flashes.
Set the required time.
Deleting the switch-off time
Touch the sensor until the
indicator light flashes.
Touch the 0sensor control on the
numerical keybank.

Additional functions
29
Stop & Go
The set power level is reduced to 1
when the Stop&Go function is
activated.
The power levels and timer settings
cannot be changed; the wok can only
be switched off. The minute minder,
switch-off, Booster and AutoBoost
times continue to run.
If the function is deactivated, the
appliance switches back to the power
level that was set last.
If the function is not deactivated within
1hour, the wok will switch off.
Activating / Deactivating
Touch the sensor.
Recall
If the SmartLine appliance is
accidentally switched off during use,
you can use this function to restore all
the settings. The SmartLine appliance
must be switched on again within
10seconds.
Switch the SmartLine appliance on
again.
The previously set power levels flash.
Press one of the flashing power level
indicators immediately.
The appliance will continue to operate
using the settings selected previously.

Additional functions
30
Wipe protection
You can lock the SmartLine appliance
sensor controls for 20seconds in
order, for example, to remove soiling.
The sensor control is not locked.
Activating
Touch the sensor.
The time counts down in the timer
display.
Deactivating
Touch the sensor control until the
timer display goes out.
Demonstration mode
This function enables the SmartLine
appliance to be demonstrated in
showrooms without heating up.
Activating/Deactivating the
demonstration mode
Switch the SmartLine appliance on.
Touch the 0sensor control on the
numerical keybank.
Then touch the0 and 2 sensors at
the same time for 6seconds.
In the timer display, flashes
alternately with (demonstration mode
activated) or (demonstration mode
deactivated) for a few seconds.
Displaying the SmartLine
appliance data
The model designation and software
version of the SmartLine appliance can
be displayed. To do this, there must not
be any pots or pans on the SmartLine
appliance.
Model designation
Switch the SmartLine appliance on.
Touch the 0sensor control on the
numerical keybank.
Then touch the 0 and 4 sensor
controls at the same time.
The timer display shows 2 numbers
flashing alternately:
flashes alternately with = CS 1234
(example only)
Software version
Switch the SmartLine appliance on.
Touch the 0sensor control on the
numerical keybank.
Then touch the 0 and 3 sensor
controls at the same time.
Numbers will appear in the timer
display:
: = software version

Safety features
31
System lock / Safety lock
The safety lock is deactivated if there
is an interruption to the power
supply.
Your SmartLine appliance is equipped
with a system lock and a safety lock to
prevent the appliance from being
switched on or any settings being
altered by mistake.
The system lock is activated while the
SmartLine appliance is switched off. If
the system lock is activated, the
appliance cannot be switched on and
the timer cannot be used. A set minute
minder time continues to count down.
The SmartLine appliance is
programmed so that the system lock
must be activated manually. It can be
programmed to be activated
automatically 5minutes after the
SmartLine appliance has been switched
off (see “Programming”).
The safety lock is activated while the
SmartLine appliance is switched on.
When the safety lock is activated, the
appliance can be operated only in a
limited way:
– Selected power levels cannot be
changed.
– A set minute minder time can be
modified.
– The SmartLine appliance can only be
switched off.
If an unavailable sensor control is
touched whilst the system lock or
safety lock is activated, will appear
in the timer display for a few seconds
and a tone will sound.
Activating the system lock
Touch the sensor for 6seconds.
The seconds can be seen counting
down in the timer display. When this
time has elapsed will appear in the
timer display. The system lock has been
activated.
Deactivating the system lock
Touch the sensor for 6seconds.
will appear briefly in the timer
display and then the seconds will count
down. The system lock is deactivated
once the time has elapsed.

Safety features
32
Activating the safety lock
Touch and hold the and
sensors at the same time for
6seconds.
The seconds can be seen counting
down in the timer display. When this
time has elapsed will appear in the
timer display. The safety lock is
activated.
Deactivating the safety lock
Touch and hold the and
sensors at the same time for
6seconds.
will appear briefly in the timer
display and then the seconds will count
down. The safety lock is deactivated
once the time has elapsed.

Safety features
33
Safety switch-off
Sensor controls are covered
Your SmartLine appliance will turn off
automatically if one or several of the
sensor controls remain covered for
longer than 10seconds, for example,
by finger contact, food boiling over, or
by an object such as an oven glove or a
tea towel. flashes briefly above the
sensor control and a tone will sound.
If you remove the obstruction and/or
clean the appliance, will go out and
the SmartLine appliance is ready for
use again.
Excessive operating time
The safety switch-off mechanism is
triggered automatically if the wok is
heated for an unusually long period of
time. This time depends on the power
level selected. Once exceeded, the heat
switches off and the residual heat
indicator appears. The wok can now be
used again as normal.
The SmartLine appliance is
programmed to safety setting 0 at the
factory. If required, you can set a
higher safety setting with a shorter
maximum operating time (see chart).
Power level* Maximum operating time
[h:min]
Safety setting
0** 1 2
1 10:00 8:00 5:00
1. 10:00 7:00 4:00
2/2. 5:00 4:00 3:00
3/3. 5:00 3:30 2:00
4/4. 4:00 2:00 1:30
5/5. 4:00 1:30 1:00
6/6. 4:00 1:00 00:30
7/7. 4:00 00:42 00:24
8 4:00 00:30 00:20
8. 4:00 00:30 00:18
9 1:00 00:24 00:10
* The power levels with a dot after the
number are only available if the power level
range has been extended (see “Power level
range”).
** Factory default setting

Safety features
34
Overheating protection
All the induction coils and cooling
elements for the electronics are fitted
with an overheating protection
mechanism. Before the induction coils
and/or cooling elements get too hot, the
overheating protection activates in one
of the following ways:
Induction coils
– Any Booster function in operation will
be switched off.
– The set power level is reduced.
– The cooking zone switches off
automatically. will flash alternately
with in the timer display.
You can use the cooking zone again as
usual when the fault message has gone
out.
Cooling elements
– Any Booster function in operation will
be switched off.
– The set power level is reduced.
– The cooking zone switches off
automatically.
The cooking zone can only be used
again as usual once the cooling
element has cooled down to a safe
level.
The overheating protection may be
triggered under the following
circumstances:
– The pot or pan being used is empty.
– Fat or oil being heated on a high
power level.
– Insufficient ventilation to the
underside of the cooktop.
– A hot cooking zone being switched
on after an interruption to the power
supply.
If, despite removing the cause, the
overheating protection mechanism
triggers again, contact Miele.

Programming
35
You can adapt the programming of the
SmartLine appliance to your personal
needs. Several settings can be altered
in succession.
After accessing the programming
mode, the symbol lights up and
appears in the timer display. After a few
seconds : (Programme 01) will flash
alternately with : (Code) in the timer
display.
Changing the programming
Calling up programming mode
With the SmartLine appliance
switched off, press and hold the
and sensor controls together until
the symbol lights up and
appears in the timer display.
Setting a programme
For a two-digit programme number
you need to first set the tens position.
Touch the sensor control
repeatedly until the programme
number you want appears in the
display, or touch the appropriate
number on the numerical keybank.
Setting the code
Touch the sensor control
repeatedly until the code number you
want appears in the display, or touch
the appropriate number on the
numerical keybank.
How to save the settings
While the programme is visible in the
display (e.g.:), touch the
sensor control until the indicators
go out.
How to avoid saving the settings
Touch the sensor until the
indicators go out.

Programming
36
Programme
1)
Code
2)
Settings
P:01 Demonstration mode C:00 Demonstration mode off
C:01
Demonstration mode on
3)
P:03 Factory settings C:00 Do not restore the factory settings
C:01 Restore factory settings
P:04 Number of power levels C:00 9 power levels
C:01
17 power levels
4)
P:06 Confirmation tone when a
sensor control is touched
C:00
Off
5)
C:01 Quiet
C:02 Medium
C:03 Loud
P:07 Audible tone for the timer C:00
Off
5)
C:01 Quiet
C:02 Medium
C:03 Loud
P:08 System lock C:00 System lock can only be activated
manually
C:01 System lock activated
automatically
P:09 Maximum operating time C:00 Safety setting 0
C:01 Safety setting 1
C:02 Safety setting 2
P:12 Sensor controls reaction
speed
C:00 Slow
C:01 Normal
C:02 Fast

Programming
37
Programme
1)
Code
2)
Settings
P:15 Permanent pan recognition C:00 Not active
C:01 Active
1)
Programmes not shown here have no allocation.
2)
The factory setting is shown in bold.
3)
After the SmartLine appliance has been switched on, appears in the timer display for a
few seconds.
4)
In the text and charts, the extended power levels are shown with a dot after the number.
5)
The confirmation tone of the On/Off sensorcontrol cannot be switched off.

Cleaning and care
38
Risk of burning due to hot
surfaces.
The surfaces will be hot after use.
Switch the wok off.
Allow the surfaces to cool down
before cleaning the wok.
Risk of damage due to moisture
ingress.
The steam from a steam cleaning
appliance could reach electrical
components and cause a short
circuit.
Do not use a steam cleaner to clean
the induction wok.
The use of unsuitable cleaning
agents can cause the surfaces to
discolour or alter. All surfaces are
susceptible to scratching.
Remove any residual cleaning agent
immediately.
Never use abrasive sponges or
cleaning agents.
Allow the SmartLine appliance to
cool down before cleaning.
Clean the SmartLine appliance and
accessories after each use.
Dry the SmartLine appliance
thoroughly every time after cleaning
to avoid limescale residue.
Unsuitable cleaning agents
To avoid damaging the surfaces of the
appliance, do not use:
– washing-up liquid,
– cleaning agents containing soda,
alkalines, ammonia, acids or
chlorides,
– cleaning agents containing descaling
agents,
– stain and rust removers,
– abrasive cleaning agents, e.g.
powder cleaners and cream cleaners,
– solvent-based cleaning agents,
– dishwasher cleaner,
– grill and oven cleaners,
– glass cleaning agents,
– hard, abrasive brushes or sponges
(e.g. pot scourers), or sponges which
have been previously used and still
contain abrasive cleaning agents,
– dirt erasers.

Cleaning and care
39
Risk of damage by pointed
objects.
The seal between the SmartLine
appliance and the worktop could
suffer damage.
Do not use pointed objects for
cleaning.
Do not use washing-up liquid to
clean the appliance. Using washing-
up liquid will not remove all soiling
and residues.
Cleaning with washing-up liquid can
result in an invisible film that can lead
to discolouration of the ceramic
glass. This discolouration cannot be
removed.
Clean the ceramic surface regularly
with a proprietary ceramic glass
cleaning agent.
Remove any coarse soiling with a
damp cloth and more stubborn
soiling with a glass scraper.
Then clean the ceramic glass surface
with the Miele ceramic and stainless
steel cooktop cleaner (see “Optional
accessories”) or with a proprietary
ceramic glass cleaner applied with
kitchen paper or a clean cloth. Do not
apply the cleaner while the cooktop is
still hot, as this can result in marking.
Please follow the cleaning agent
manufacturer's instructions.
Finally wipe the cooktop with a damp
cloth and dry it with a soft, dry cloth.
Residues can burn onto the cooktop
the next time it is used and cause
damage to the glass ceramic surface.
Ensure that all cleaner residues are
removed.
Spots caused by limescale, water
and aluminium residues (spots with a
metallic appearance) can be removed
using the Miele ceramic and stainless
steel cooktop cleaner.
Risk of burning due to hot
surfaces.
The surfaces get hot during use.
Wear oven gloves when removing
residues of sugar, plastic or
aluminium foil from a hot cooktop
with a glass scraper.
Should any sugar, plastic or
aluminium foil spill or fall onto a hot
cooking zone while it is in use, first
switch off the appliance.
Then carefully scrape off these
residues immediately whilst they are
still hot, using a shielded scraper
blade suitable for use on glass.
Afterwards, clean the glass ceramic
surface in its cooled state, as
described above.

Problem solving guide
40
With the help of the following guide, minor faults in the performance of the
appliance, some of which may result from incorrect operation, can be remedied
without contacting Miele. This will save you time and money because you won't
need a service call.
Please note that a call-out charge will be applied to unnecessary service visits
where the problem could have been rectified as described in these operating
instructions.
Problem Possible cause and remedy
The SmartLine
appliance cannot be
switched on.
There is no power to the SmartLine appliance.
Check if the circuit breaker has tripped. Contact
an electrician or Miele (for the minimum fuse
rating, see data plate).
There may be a technical fault.
Disconnect the SmartLine appliance from the
mains electricity supply for approx. 1 minute by
– switching off at the wall socket and withdrawing
the plug, or
– switching off the main circuit breaker or residual
current device.
If, after resetting the fuse in the mains fuse box or
the residual current protection device, the
SmartLine appliance will still not switch on,
contact a qualified electrician or Miele.
A smell and vapours are
given off when the new
wok is being used.
The metal components have a protective coating.
When the wok is used for the first time, this causes a
smell and possibly also vapour. The material of the
induction coils also emits odours in the first hours of
operation. This smell will be less noticeable with each
subsequent use before dissipating completely. The
smell and any vapours given off do not indicate a
faulty connection or appliance and they are not
hazardous to health.
The power level
selected is flashing.
The wok pan is not in position.
Place the wok pan in position.

Problem solving guide
41
Problem Possible cause and remedy
After the SmartLine
appliance has been
switched on or a sensor
control has been
touched, appears in
the timer display for a
few seconds.
The system lock or safety lock is activated.
Deactivate the system lock or safety lock (see
“Safety features - System lock / Safety lock”).
The SmartLine
appliance has switched
off automatically. When
the appliance is
switched back on,
appears above the On/
Off sensor control.
One or more of the sensor controls are covered, e.g.
by finger contact, food boiling over, or an object.
Clean off any dirt and/or remove the object (see
“Safety features – Safety switch-off”).
After the SmartLine
appliance has been
switched on, appears
briefly in the timer
display. The SmartLine
appliance does not heat
up.
The SmartLine appliance is in demonstration mode.
Touch the0 and 2 sensor controls at the same
time until flashes alternately with in the
timer display.
The wok has switched
itself off automatically.
It has been operated for too long.
Switch the wok back on (see “Safety features –
Safety switch off”).
The overheating protection mechanism has been
activated.
See “Safety features - Overheating protection”.
The Booster has
automatically switched
off early.
The overheating protection mechanism has been
activated.
See “Safety features - Overheating protection”.
A cooking zone is not
working in the usual
way on the power level
selected.
The overheating protection mechanism has been
activated.
See “Safety features - Overheating protection”.
An operating noise can
be heard after the
SmartLine appliance
has been switched off.
The cooling fan runs until the SmartLine appliance
has cooled down and then switches off
automatically.

Problem solving guide
42
Problem Possible cause and remedy
The sensor controls
show increased
sensitivity or fail to
react.
The sensitivity level of the sensor controls has
changed.
Make sure that there is no direct light (from the sun
or from an artificial source) falling onto the
SmartLine appliance. Also ensure the area
surrounding the SmartLine appliance is not too
dark.
Take any pans off the SmartLine appliance and
wipe away any food deposits.
Ensure that there is nothing covering the entire
SmartLine appliance or sensor controls.
Interrupt the power supply to the SmartLine
appliance for approx. 1minute.
If the problem persists after power is restored,
please contact Miele.
flashes alternately
with in the timer
display and a tone is
sounding.
The SmartLine appliance is connected incorrectly.
Disconnect the SmartLine appliance from the
mains.
Contact Miele.
1 and a number, e.g. 1-0
flash alternately with a 3
digit number in the
timer display.
Cooking zone fault
Interrupt the power supply to the SmartLine
appliance for approx. 1minute.
If the problem persists after power is restored,
please contact Miele.

Problem solving guide
43
Problem Possible cause and remedy
alternating with
numbers flashes in the
timer display.
The overheating protection mechanism has been
activated.
See “Safety features - Overheating protection”.
, or
The fan is blocked or defective.
Make sure it has not been blocked by something,
for example a fork. Remove the cause of the
blockage.
If this fault code continues to appear in the
display, contact Miele.
and other numbers
There is a fault in the electronic module.
Interrupt the power supply to the SmartLine
appliance for approx. 1minute.
If the problem persists after power is restored,
please contact Miele.

Optional accessories
44
Miele offers a range of useful
accessories, as well as cleaning and
conditioning products for your
appliance.
These products can be ordered from
the Miele online shop.
They can also be ordered directly from
Miele (see end of this booklet for
contact details).
Wok pan CSWP 1450
Cleaning and care products
Original Miele ceramic and stainless
steel cleaner 250ml
Removes heavy soiling, limescale
deposits and aluminium residues.
Original Miele all purpose microfibre
cloth
Removes finger marks and light soiling.

Service
45
Contact in case of fault
In the event of any faults which you cannot remedy yourself, please contact Miele.
Contact information for Miele can be found at the end of this booklet.
Please quote the model and serial number of your appliance when contacting
Miele. This information can be found on the data plate.
Data plate
Adhere the extra data plate supplied with the appliance in the space below. Make
sure that the model number matches the one specified on the back cover of these
operating and installation instructions.
Warranty
The manufacturer's warranty for this appliance is 2years.
For further information, please refer to your warranty booklet.

Installation
*INSTALLATION*
46
Safety instructions for installation
Risk of damage from incorrect installation.
Incorrect installation can cause damage to the SmartLine appliance.
The SmartLine appliance must only be installed by a suitably qualified and
competent person.
Risk of electric shock!
Incorrect connection to the power supply may result in an electric shock.
The SmartLine appliance must be connected to the electrical supply by a
qualified person only.
Damage from falling objects.
Take care not to damage the SmartLine appliance when fitting wall units or a
rangehood above it.
Fit the wall units and the rangehood before the SmartLine appliance.
The veneer or laminate coatings of worktops (or adjacent kitchen
units) must be treated with 100°C heat-resistant adhesive which will
not dissolve or distort. Any splashbacks must be of heat-resistant
material.
The SmartLine appliance must not be installed over a fridge,
fridge-freezer, freezer, dishwasher, washing machine, washer-dryer
or tumble dryer.
This SmartLine appliance must not be installed above ovens
unless these have a built-in cooling fan.
After installation, the mains connection cable of the SmartLine
appliance must not come into contact with any moving kitchen
component (e.g. a drawer) or be subject to mechanical loads which
could damage it.
Carefully observe the safety clearances listed on the following
pages.

Installation
*INSTALLATION*
47
Safety distances
Safety distance above the SmartLine
element
The safety distance specified by the
manufacturer of the cooker hood must
be maintained between the SmartLine
element and the cooker hood above it.
If combustible objects are installed
above the SmartLine element (e.g.
cabinets, utensil rail, etc.), a minimum
safety distance of 600mm must be
maintained.
When two or more SmartLine
elements which have different safety
distances are installed together
below a cooker hood, you should
observe the greatest specified safety
distance.

Installation
*INSTALLATION*
48
Safety distances to the sides and
back of the appliance
The SmartLine appliance should
preferably be installed with plenty of
space on the right and left.
The minimum distance specified
below must be observed between the
rear of the SmartLine element and a tall
unit or room wall.
The minimum distance, specified
below must be adhered to between one
side of the SmartLine element (right or
left) and a tall unit or room wall. A
minimum distance of 300mm must be
observed on the opposite side.
Minimum horizontal distance from the
back edge of the appliance to a
combustible surface:
50mm
Minimum distance on the right side
between the worktop cut-out and the
closest adjacent piece of furniture (e.g.
tall unit) or a room wall:
50mm.
Minimum distance on the left side
between the worktop cut-out and the
closest adjacent piece of furniture (e.g.
tall unit) or a room wall:
50mm.
Minimum safety distance underneath
the SmartLine appliance
To ensure proper ventilation of the
SmartLine appliance, a minimum safety
distance is required between the
SmartLine appliance and an oven,
interim shelf or drawer.
The minimum safety distance from the
lower edge of the SmartLine appliance
to
– the top edge of an oven: 15mm
– the top edge of an interim shelf:
15mm
– the top edge of a drawer: 5mm
– the base of a drawer: 75mm
Interim shelf
It is not necessary to fit an interim shelf
underneath the SmartLine appliance,
but one may be fitted if you wish.
Leave a gap of 10mm at the back of
the shelf to accommodate the mains
connection cable. We recommend a
gap at the front of the SmartLine
appliance of 20mm to ensure good
ventilation.

Installation
*INSTALLATION*
49
Surface-mounted
Installation notes –
surface-mounted
Sealing between the SmartLine
appliance and the worktop
The SmartLine appliance and
worktop may be damaged if the
appliance needs to be removed after
it has been sealed with a sealant.
Do not use any sealant between the
SmartLine appliance and the
worktop.
The sealing strip under the edge of
the top part of the appliance
provides a sufficient seal for the
worktop.
Tiled worktop
Grout lines and the hatched area
underneath the SmartLine appliance
frame must be smooth and even. If they
are not, the SmartLine appliance will
not sit flush with the worktop and the
sealing strip underneath the top part of
the appliance will not provide a good
seal between the appliance and the
worktop.
Sealing strip
Dismantling the SmartLine appliance
for service purposes may damage
the sealing strip underneath the edge
of the SmartLine appliance.
Always replace the sealing strip
before reinstalling the cooktop.

Installation
*INSTALLATION*
50
Installing several
SmartLine appliances
The gaps between the individual
SmartLine appliances must be sealed
with a silicone sealant that is heat-
resistant to at least 160°C. With flush-
fit installation, the gap between the
SmartLine appliance(s) and the worktop
must also be sealed with a silicone
sealant that is heat-resistant to at least
160°C.
After installation, the SmartLine
appliances must be easily accessible
from below, so that the bottom half of
the casing can be removed for
maintenance. If the SmartLine
appliances are not accessible from
below, the sealant must be removed so
that they can be removed.
Combination with a downdraft
extractor
If the SmartLine appliance is installed in
combination with a downdraft extractor,
the latter must be installed first.
Induction wok next to the downdraft
extractor
The induction wok can only be fitted on
the side of the downdraft extractor
opposite the exhaust connection.

Installation
*INSTALLATION*
51
Worktop cut-out – surface-mounted
B
500
+1
ß
R 4
B
10
0
10
Information for calculating the cut-out
The appliances overlap the worktop by 10mm.
When installing several appliances, a distance of 2mm must be observed between
the individual appliances.
Calculating cut-out dimensionB
1 appliance = width of the appliance minus 10mm on the right, minus 10mm on
the left
Several appliances = total width of the appliances plus 2mm distance between
the appliances, minus 10mm on the right, minus 10mm on the left.
Some examples are illustrated below.

Installation
*INSTALLATION*
52
Installation with a downdraft extractor
Sample combinations Numberxwidth [mm] Dimension
B
[mm]
Cooking
appliances
Downdraft
extractor
1 x 378 1 x 120
480
+1
2 x 378 1 x 120
860
+1
1x378
1x620
2 x 120
1224
+1
3 x 378 2 x 120
1362
+1
2x378
1x620
2 x 120
1604
+1
4 x 378 2 x 120
1742
+1
1 x 620 2 x 120
844
+1

Installation
*INSTALLATION*
53
Installation without a downdraft extractor
Sample combinations Numberxwidth [mm] DimensionB
[mm]
Cooking appliances
1 x 378
358
+1
2 x 378
738
+1
1x378
1x620
980
+1
3 x 378
1118
+1
2x378
1x620
1360
+1
4 x 378
1498
+1

Installation
*INSTALLATION*
54
Spacer bars – surface-mounted
When installing several SmartLine appliances, an additional spacer bar must be
fitted in between the individual appliances.
The clips supplied with the spacer bars are only required for installing a
CSDA700xFL.
Installing 3 appliances and 2 spacer bars

Installation
*INSTALLATION*
55
Installation dimensions– Surface-mounted
All dimensions in this instruction booklet are given in mm.
a
Front
b
Mains connection cable, L = 2000 mm

Installation
*INSTALLATION*
56
Installation – surface-mounted
Preparing the worktop
Create the worktop cut-out.
Remember to maintain the minimum
safety distances (see "Installation –
Safety distances").
Seal the cut surfaces of wooden
worktops with a suitable sealant to
avoid swelling caused by moisture.
The sealant must be heat-resistant.
Make sure the sealant does not
come into contact with the top
surface of the worktop.
Fitting the spacer bars
Use the middle screw holes if one of the
following SmartLine appliances is
installed to the right or left of the spacer
bar: CS7611, CS 7641, CS7101(-1),
CS7102(-1)
Wooden worktops
Position the spacer bars flush onto
the upper edge of the cut-out.
Secure the spacer bars with the
3.5x25mm wood screws supplied.
Granite and marble worktops
You will need heavy-duty double-
sided tape (not supplied) to secure the
spacer bars.
Stick the tape along the top edge of
the worktop cut-out.
Position the spacer bars flush onto
the upper edge of the cut-out.
Press the spacer bars firmly into
place.

Installation
*INSTALLATION*
57
Installing the SmartLine appliance
Stick the supplied sealing strip under
the edge of the SmartLine appliance.
Do not apply the sealing strip under
tension.
Feed the mains connection cable
down through the worktop cut-out.
Position the SmartLine appliance in
the worktop cut-out. When doing this,
make sure that the seal of the
appliance sits flush with the worktop
on all sides. This is important to
ensure an effective seal with the
worktop.
If the seal does not meet the worktop
correctly on the corners, carefully
scribe the corner radii (≤R4) with a
jigsaw.
Do not use any additional sealant
(e.g. silicone) on the SmartLine
appliance.
Connect the SmartLine appliance to
the mains electrical supply.
If required, connect the SmartLine
appliance to the gas supply (see
“Installation – Gas connection”).
Check that the SmartLine appliance
works.
Seal the gaps between the individual
appliances with a silicone sealant that
is heat-resistant to at least 160°C.
Unsuitable sealant can damage
natural stone.
For natural stone worktops and
natural stone tiles, only use silicone
sealant that is specially formulated
for natural stone. Please follow the
manufacturer's instructions.

Installation
*INSTALLATION*
59
Installing several
SmartLine appliances
The gaps between the individual
SmartLine appliances must be sealed
with a silicone sealant that is heat-
resistant to at least 160°C. With flush-
fit installation, the gap between the
SmartLine appliance(s) and the worktop
must also be sealed with a silicone
sealant that is heat-resistant to at least
160°C.
After installation, the SmartLine
appliances must be easily accessible
from below, so that the bottom half of
the casing can be removed for
maintenance. If the SmartLine
appliances are not accessible from
below, the sealant must be removed so
that they can be removed.
Combination with a downdraft
extractor
If the SmartLine appliance is installed in
combination with a downdraft extractor,
the latter must be installed first.
Induction wok next to the downdraft
extractor
The induction wok can only be fitted on
the side of the downdraft extractor
opposite the exhaust connection.

Installation
*INSTALLATION*
60
Worktop cut-out – flush-fit
B
A
524
500
+
1
+1
ß R 4
B
A
0 2
12
0
10
5,5
+
0,5 *
0 2
B
A
12
0
10
5,5
+
0,5 *
Natural stone worktop Wooden worktop
* 7
+
0.5
mm with CS7611FL
Information for calculating the cut-out
The appliances overlap the stepped cut-out by 10mm.
When installing several appliances, a distance of 2mm must be observed between
the individual appliances.
Calculating cut-out dimensionA
1 appliance = width of the appliance plus 2mm on the right, plus 2mm on the left.
Several appliances = total width of the appliances plus 2mm distance between
the appliances, plus 2mm on the right, plus 2mm on the left
Calculating cut-out dimensionB = cut-out dimension A minus 12mm on the right,
minus 12mm on the left.
Some examples are illustrated below.

Installation
*INSTALLATION*
61
Installation with a downdraft extractor
Sample combinations
Numberxwidth [mm]
DimensionA
[mm]
DimensionB
[mm]
Cooking
appliances
Downdraft
extractor
1 x 378 1 x 120
504
+1
480
+1
2 x 378 1 x 120
884
+1
860
+1
1x378
1x620
2 x 120
1248
+1
1224
+1
3 x 378 2 x 120
1386
+1
1362
+1
2x378
1x620
2 x 120
1628
+1
1604
+1
4 x 378 2 x 120
1766
+1
1742
+1
1 x 620 2 x 120
868
+1
844
+1

Installation
*INSTALLATION*
62
Installation without a downdraft extractor
Sample
combinations
Numberxwidth
[mm]
DimensionA
[mm]
DimensionB
[mm]
Cooking
appliances
1 x 378
382
+1
358
+1
2 x 378
762
+1
738
+1
1x378
1x620
1004
+1
980
+1
3 x 378
1142
+1
1118
+1
2x378
1x620
1384
+1
1360
+1
4 x 378
1522
+1
1498
+1

Installation
*INSTALLATION*
63
Spacer bars – flush-fit
When installing several SmartLine appliances, an additional spacer bar must be
fitted in between the individual appliances.
The clips supplied with the spacer bars are only required for installing a
CSDA700xFL.
Installing 3 appliances and 2 spacer bars

Installation
*INSTALLATION*
64
Installation dimensions–Flush
All dimensions in this instruction booklet are given in mm.
a
Front
b
Mains connection cable, L = 2000 mm
c
Stepped cut-out (for detailed illustrations, see “Installation – Worktop cut-out –
flush-fit”)
d
12mm wooden frame (not supplied, for detailed illustrations, see “Installation –
Worktop cut-out – flush-fit”)

Installation
*INSTALLATION*
66
Installing the SmartLine appliance
Stick the supplied sealing strip under
the edge of the SmartLine appliance.
Do not apply the sealing strip under
tension.
Feed the mains connection cable
down through the worktop cut-out.
Position the SmartLine appliance in
the worktop cut-out. When doing this,
make sure that the seal of the
appliance sits flush with the worktop
on all sides. This is important to
ensure an effective seal with the
worktop.
Connect the SmartLine appliance to
the mains electrical supply.
If required, connect the SmartLine
appliance to the gas supply (see
“Installation – Gas connection”).
Check that the SmartLine appliance
works.
Seal the gaps between the individual
SmartLine appliances and between
the appliances and the worktop with
a silicone sealant that is heat-
resistant to at least 160°C.
Unsuitable sealant can damage
natural stone.
For natural stone worktops and
natural stone tiles, only use silicone
sealant that is specially formulated
for natural stone. Please follow the
manufacturer's instructions.

Installation
*INSTALLATION*
67
Electrical connection
Risk of damage from incorrect
connection.
Incorrect installation, maintenance
and repairs can be dangerous to
users.
Miele cannot be held liable for
damage or injury (e.g. electric shock)
caused by unauthorised installation,
maintenance or repair work, or by an
inadequate or faulty on-site earthing
system.
This SmartLine appliance must be
connected to the electricity supply
by a qualified electrician.
The electrician must be familiar with
and comply with the national
regulations and any additional
regulations of the local electricity
provider.
After installation, ensure that all
electrical components are shielded
and cannot be accessed by users.
Total power output
See data plate.
Connection data
The connection data is given on the
data plate. Please ensure this
information matches the household
mains supply.
Residual current device
For extra safety, it is advisable to
protect the SmartLine appliance with a
suitable residual current device (RCD)
with a trip range of 30mA.
Disconnecting devices
It must be possible to disconnect the
SmartLine appliance from the mains at
all poles using disconnecting devices. A
contact distance of at least 3mm must
be observed in the switched-off state.
The disconnecting devices are
overcurrent protection devices and
residual current protection devices.

Installation
*INSTALLATION*
68
Replacing the mains connection
cable
Danger of electric shock!
Incorrect connection to the electricity
supply may result in an electric
shock.
The mains connection cable must
only be replaced in accordance with
current local and national safety
regulations.
When replacing the mains connection
cable, it must be replaced with cable
type H05VV-F by a Miele authorised
service technician or a suitably qualified
and competent electrician in order to
avoid a hazard. These cables are
available from Miele.

M.-Nr. 10 883 161 / 01en-AU, NZ
CS7611
Produkt Specifikationer
Mærke: | Miele |
Kategori: | Induktion kogeplade |
Model: | CS 7611 FL |
Vekselstrømsindgangsspænding: | 220 - 240 V |
Bredde: | 378 mm |
Dybde: | 520 mm |
Højde: | 129 mm |
Vægt: | 12000 g |
Produktfarve: | Sort |
Kontroltype: | Berøring |
Indbygget skærm: | Ja |
Ledningslængde: | 1.5 m |
Automatisk slukning: | Ja |
Timer: | Ja |
Placering af apparat: | Indbygget |
Installationsrum bredde: | 382 mm |
Installationsrum dybde: | 524 mm |
Børnesikring: | Ja |
Komfurtype: | Zone induktionskogeplade |
Overfladetype: | Keramisk |
Antal kogeplader / madlavningsområde: | 1 |
Antal elektriske kogeplader: | 1 |
Blus/kogeplade zone 1 strøm: | 2500 W |
Blus/kogeplade zone 1 type: | Ekstra stor |
Kogezone 1 form: | Rund |
Blus/kogeplade zone 1 position: | Central |
Blus/kogeplade zone 1 strømkilde: | Elektrisk |
Kontrolposition: | Top forside |
Nem at rengøre: | Ja |
Gryde detektering: | Ja |
Tilsluttet belastning (elektrisk): | 3000 W |
Blus/kogeplade zone 1 diameter: | 300 mm |
Restvarmeindikator: | Ja |
Tilsluttet belastning (gas): | - W |
Holde varm funktion: | Ja |
Boost funktion: | Ja |
Stor brænder/kogezone form: | Rund |
Stor kogeplade / madlavningsområde: | 2500 W |
Wokbrænder: | Ja |
Rammetype: | Rammeløs |
Stor kogeplade/kogezone, diameter: | 300 mm |
Wokbrændeposition: | Midten |
Rengøringslås: | Ja |
Har du brug for hjælp?
Hvis du har brug for hjælp til Miele CS 7611 FL stil et spørgsmål nedenfor, og andre brugere vil svare dig
Induktion kogeplade Miele Manualer
1 August 2024
1 August 2024
1 August 2024
1 August 2024
1 August 2024
1 August 2024
1 August 2024
1 August 2024
1 August 2024
1 August 2024
Induktion kogeplade Manualer
- Inventum
- Esperanza
- RoyaltyLine
- Orion
- Edy
- Siemens
- Samsung
- V-Zug
- Electrolux
- Springlane
- Etna
- Medion
- Atag
- Zanussi
- Home Electric
Nyeste Induktion kogeplade Manualer
19 Januar 2025
15 Januar 2025
15 Januar 2025
15 Januar 2025
12 Januar 2025
16 December 2024
26 August 2024
25 August 2024
25 August 2024
25 August 2024