Miele KWT 6834 SGS Manual
Læs gratis den danske manual til Miele KWT 6834 SGS (72 sider) i kategorien Køleskab. Denne vejledning er vurderet som hjælpsom af 28 personer og har en gennemsnitlig bedømmelse på 4.5 stjerner ud af 14.5 anmeldelser. Har du et spørgsmål om Miele KWT 6834 SGS, eller vil du spørge andre brugere om produktet?
Side 1/72

Operating and installation instructions
Wine conditioning unit
To avoid the risk of accidents or damage to the appliance it is essential
to read these instructions before it is installed and used for the first time.
en-GB M.-Nr. 10 439 010

Contents
2
Warning and Safety instructions.......................................................................... 5
Caring for the environment ................................................................................ 12
How to save energy............................................................................................. 13
Guide to the appliance........................................................................................ 14
Symbols................................................................................................................. 15
Accessories ......................................................................................................... 17
Accessories supplied ............................................................................................ 17
Optional accessories............................................................................................. 17
Switching on and off ........................................................................................... 18
Before using for the first time................................................................................ 18
Operating the wine conditioning unit .................................................................... 18
Switching on.....................................................................................................18
Switching off..................................................................................................... 19
Switching off for longer periods of time ................................................................ 19
Selecting further settings ................................................................................... 20
Safety lock ........................................................................................................ 20
Audible tones ................................................................................................... 21
Display brightness ............................................................................................ 22
The optimum temperature and air quality......................................................... 23
The optimum temperature..................................................................................... 23
Setting the temperature......................................................................................... 24
Temperature display .............................................................................................. 25
Air quality and humidity......................................................................................... 26
DynaCool (constant humidity) .......................................................................... 26
Air filtering with the Active AirClean filters............................................................. 27
Temperature and door alarm.............................................................................. 28
Feature lighting.................................................................................................... 30
Switching the feature lighting on and off............................................................... 30
Setting the brightness of the feature lighting ................................................... 30
Lighting duration of the feature lighting ...........................................................31
Storing wine bottles ............................................................................................ 32
Wooden shelves.................................................................................................... 32
Moving the wooden shelves.............................................................................33
Adjusting the wooden shelves .........................................................................33
Annotating wooden shelves ............................................................................. 34
Bottle presenter..................................................................................................... 34

Contents
3
Maximum capacity ................................................................................................ 35
SommelierSet ...................................................................................................... 36
Setting up the SommelierSet ................................................................................ 36
Fitting the runner covers .................................................................................. 36
Inserting the glassware holder ......................................................................... 36
Inserting the bottle holder ................................................................................ 36
Attaching the accessory box............................................................................ 37
Assembling the decanting rack........................................................................ 38
Inserting the deco shelf....................................................................................38
Additional bottle presenters .............................................................................38
Automatic defrosting .......................................................................................... 39
Cleaning and care ............................................................................................... 40
Cleaning agents..................................................................................................... 40
Before cleaning ..................................................................................................... 41
Cleaning the outer casing, the door, the interior and accessories ........................ 41
Cleaning the ventilation gaps................................................................................ 42
Cleaning the door seal .......................................................................................... 42
Cleaning the compressor and metal grille at the back of the appliance............... 42
Active AirClean filters ......................................................................................... 43
Replacing the Active AirClean filters ..................................................................... 43
Problem solving guide ........................................................................................ 45
Noises................................................................................................................... 50
Miele@home......................................................................................................... 51
After Sales / Guarantee....................................................................................... 53
Information for dealers ....................................................................................... 54
Demo mode ........................................................................................................ 54
Electrical connection .......................................................................................... 56
Installation............................................................................................................ 57
Location................................................................................................................. 57
Climate range ........................................................................................................ 57
Ventilation.............................................................................................................. 58
Fitting wall spacers supplied................................................................................. 58
Installation ............................................................................................................. 58
Niche floor ........................................................................................................ 58
Aligning the wine conditioning unit ....................................................................... 59

Contents
4
Door opening angle limiter .................................................................................... 59
Appliance dimensions ........................................................................................... 60
Dimensions when the door is opened................................................................... 60
Changing the door hinging................................................................................. 61

Warning and Safety instructions
5
This wine conditioning unit complies with all statutory safety re-
quirements. Please note that inappropriate use can lead to per-
sonal injury and damage to property.
To avoid the risk of accidents and damage to the appliance,
please read these instructions carefully before using it for the first
time. They contain important notes on installation, safety, use and
maintenance.
Miele cannot be held liable for non-compliance with these instruc-
tions.
Keep these instructions in a safe place and ensure that new users
are familiar with the contents. Pass them on to any future owner.
Glass breakage.
Danger of injury from broken glass.
If installed at altitudes above 1500 m there is a risk of the glass in
the door breaking because of changes in air pressure. Shards of
glass can cause severe injury if not handled with care.
Correct application
This wine conditioning unit is intended for use in domestic house-
holds and similar working and residential environments.
It is not intended for outdoor use.
The wine conditioning unit is intended for domestic use only for
storing wine.
It must not be used for any other purpose.

Warning and Safety instructions
6
The wine conditioning unit is not suitable for storing and keeping
cool medicines, blood plasma, laboratory preparations or other such
materials or products. Incorrect use of the wine conditioning unit for
such purposes can cause deterioration of the items stored. The wine
conditioning unit is not suitable for use in areas where there is a risk
of explosion.
Miele cannot be held liable for damage resulting from improper or in-
correct use of the appliance.
The wine conditioning unit can only be used by people with re-
duced physical, sensory or mental capabilities, or lack of experience
and knowledge, if they are supervised whilst using it, or have been
shown how to use it in a safe way and recognise and understand the
consequences of incorrect operation.
Safety with children
Children under 8 years of age must be kept away from the wine
conditioning unit unless they are constantly supervised.
Children 8 years and older may only use the wine conditioning unit
unsupervised if they have been shown how to use it safely and re-
cognise and understand the consequences of incorrect operation.
Children must not be allowed to clean or maintain the wine condi-
tioning unit unsupervised.
Please supervise children in the vicinity of the wine conditioning
unit and do not let them play with it.

Warning and Safety instructions
7
Danger of suffocation. Packaging, e.g. plastic wrappings, must be
kept out of the reach of babies and children. Whilst playing, children
could become entangled in packaging or pull it over their head and
suffocate.
Technical safety
The coolant system is tested for leaks. The wine conditioning unit
complies with statutory safety requirements and the appropriate EU
guidelines.
This wine conditioning unit contains the coolant Isobutane
(R600a), a natural gas which is environmentally friendly. Although it is
flammable, it does not damage the ozone layer and does not in-
crease the greenhouse effect.
The use of this coolant has, however, led to a slight increase in the
noise level of the appliance. In addition to the noise of the com-
pressor, you might be able to hear the coolant flowing around the
system. This is unavoidable, and does not have any adverse effect
on the performance of the appliance.
Care must be taken during the transportation and setting up of the
wine conditioning unit that no parts of the cooling system are dam-
aged. Leaking coolant can damage the eyes.
In the event of any damage:
– avoid naked flames or anything which creates a spark,
– disconnect the appliance from the mains electricity supply,
– ventilate the room where the wine conditioning unit is located for
several minutes, and
– contact the Miele Service Department.

Warning and Safety instructions
8
The more coolant there is in a wine conditioning unit, the larger
the room it should be installed in. In the event of a leakage, if the ap-
pliance is in a small room, there is the danger of combustible gases
building up. For every 8 g of coolant at least 1 m3 of room space is
required. The amount of coolant in the wine conditioning unit is
stated on the data plate inside the appliance.
To avoid the risk of damage to the wine conditioning unit, make
sure that the connection data (fuse rating, frequency and voltage) on
the data plate corresponds to the household supply.
Check that this is the case before connecting the wine conditioning
unit. Consult a qualified electrician if in any doubt.
The electrical safety of the wine conditioning unit can only be
guaranteed when correctly earthed. It is essential that this standard
safety requirement is met. If in any doubt please have the electrical
installation tested by a qualified electrician.
Reliable and safe operation of the wine conditioning unit can only
be assured if it has been connected to the mains electricity supply.
If the electrical connection cable is faulty it must only be replaced
by a Miele authorised service technician to protect the user from
danger.
Do not connect the wine conditioning unit to the mains electrical
supply by a multi-socket adapter or extension lead. These are a fire
hazard and do not guarantee the required safety of the appliance.
Do not use in a damp or wet environment (e.g. garage or utility
room). Moisture could reach live components or the electrical con-
nection and cause a short circuit.

Warning and Safety instructions
9
This wine conditioning unit must not be used in a non-stationary
location (e.g. on a ship).
Do not use a damaged wine conditioning unit. It could be danger-
ous. Check the wine conditioning unit for visible signs of damage.
The wine conditioning unit must be isolated from the electricity
supply during installation, maintenance and repair work.
Unauthorised installation, maintenance and repairs can cause
considerable danger for the user.
Installation, maintenance and repairs must only be carried out by a
Miele authorised technician.
While the wine conditioning unit is under guarantee, repairs should
only be undertaken by a Miele authorised service technician. Other-
wise the guarantee is invalidated.
Miele can only guarantee the safety of the appliance when genu-
ine original Miele replacement parts are used. Faulty components
must only be replaced by Miele spare parts.
Correct use
The wine conditioning unit is designed for use within a certain cli-
mate range (ambient temperatures), and should not be used outside
this range. The climate range for your wine conditioning unit is stated
on the data plate inside the appliance. Installing it in a room with too
low an ambient temperature, e.g. a garage, will lead to the wine con-
ditioning unit switching off for longer periods so that it cannot main-
tain the required temperature.
Do not cover or block the air vents as this could impair the effi-
ciency of the appliance, increase the electricity consumption and
could cause damage to the components.
If the wine conditioning unit is used for storing food which con-
tains fat or oil, make sure that it does not come into contact with
plastic components as any spillages of oil or fat could cause stress
cracks to the plastic and cause it to break or split.

Warning and Safety instructions
10
Do not store explosive materials in the wine conditioning unit or
any products containing propellants (e.g. spray cans). Electrical
components could cause flammable vapours to ignite. Danger of fire
and explosion.
Do not operate any electrical equipment (e.g. an electric ice cream
maker) inside the wine conditioning unit. Danger of sparking and ex-
plosion.
Only use genuine original Miele accessories and spare parts with
this appliance. Using accessories or spare parts from other manu-
facturers will invalidate the guarantee, and Miele cannot accept liab-
ility.
Cleaning and care
Do not use any oils or grease on the door seals, as these will
cause the seals to deteriorate and become porous with time.
Do not use a steam cleaning appliance to clean this wine condi-
tioning unit.
The steam could reach electrical components and cause a short cir-
cuit.
Sharp edged or pointed objects will damage the evaporator, caus-
ing irreversible damage to the wine conditioning unit. Do not use
sharp edged or pointed objects to
– remove frost and ice,
– remove labels, stickers etc.

Warning and Safety instructions
11
Transporting the appliance
Always transport the wine conditioning unit in an upright position
and in its original transport packaging to avoid damage in transit.
Danger of injury and damage. The wine conditioning unit is very
heavy and must be transported by two people.
Disposing of your old appliance
Before disposing of an old appliance, first make the door latch or
lock unusable.
This way you will prevent children from accidentally locking them-
selves in and endangering their lives.
Splashes of coolant can damage the eyes. Be careful not to dam-
age any part of the pipework whilst awaiting disposal, e.g. by
– puncturing the coolant channels in the condenser,
– bending any pipework, or
– scratching the surface coating.

Caring for the environment
12
Disposal of the packing mater-
ial
The packaging is designed to protect
the wine conditioning unit from damage
during transportation. The packaging
materials used are selected from mater-
ials which are environmentally friendly
for disposal and should be recycled.
Recycling the packaging reduces the
use of raw materials in the manufactur-
ing process and also reduces the
amount of waste in landfill sites.
Disposal of your old appliance
Electrical and electronic appliances of-
ten contain valuable materials. They
also contain materials which, if handled
or disposed of incorrectly, could be po-
tentially hazardous to human health and
to the environment. They are, however,
essential for the correct functioning of
your appliance. Please do not therefore
dispose of it with your household
waste.
Please dispose of it at your local com-
munity waste collection / recycling
centre.
Take care not to damage the pipework
at the back of it before or during trans-
portation to an authorised collection de-
pot.
In this way, coolant in the pipework and
oil in the compressor will be contained,
and will not leak into the environment.
Please ensure that your old appliance
presents no danger to children while
being stored awaiting disposal. See
"Warning and Safety instructions" for
more information.

How to save energy
13
Normal energy consump-
tion
Increased energy con-
sumption
Installation site /
Maintenance
In a ventilated room. In an enclosed, unventilated
room.
Protected from direct sun-
light.
In direct sunlight.
Not near to a heat source
(radiator, oven).
Near to a heat source (radi-
ator, oven).
Where the ideal ambient
room temperature is approx.
20°C.
Where there is a high ambi-
ent room temperature.
Ventilation gaps uncovered
and dusted regularly.
Ventilation gaps covered or
dusty.
Compressor and metal grille
(heat exchanger) at the back
of the appliance dusted at
least once a year.
Dust build-up on the com-
pressor and metal grille (heat
exchanger).
Temperature
setting
10 to 12°C The lower the temperature,
the higher the energy con-
sumption.
Use Wooden shelves arranged
as they were when the appli-
ance was delivered.
Only open the door when
necessary and for as short a
time as possible. Store wine
bottles in an organised way.
Frequent opening of the
door for long periods will
cause a loss of coldness.
The wine conditioning unit
works harder to cool down
and the compressor runs for
longer periods.
Do not over-fill the appliance
to allow air to circulate.
Poor air circulation will
cause a loss of coldness.

Guide to the appliance
14
Control panel
aFor switching the whole
wine conditioning unit on and off
bOptical interface
(for Service technicians only)
cFor selecting the upper, middle or
lower wine conditioning zone
dFor switching the DynaCool function
(constant humidity) on and off
eFor switching the feature lighting on
and off
fFor setting the temperature
( for colder)
gOK sensor for confirming a selection
hFor setting the temperature
( for warmer)
iSensor for accessing or leaving
settings mode
jFor switching off
the temperature or door alarm
kDisplay with temperature and sym-
bols (symbols only visible in settings
mode; see chart for an explanation of
the symbols)

Guide to the appliance
15
Symbols
Symbol Meaning Function
Safety lock To prevent inadvertent switching off and al-
tering of settings
Audible tones Choice of sensor tone and door alarm tone
Miele@home Only visible when a communication module
or communication stick is fitted and signed
on (see "Miele@home")
Demo mode
(only visible when
Demo mode is
switched on)
For switching off Demo mode
Display brightness set-
tings
For adjusting the brightness of the display
Active AirClean filters Lights up when the active charcoal filter
needs changing
Mains connection Confirms that the appliance is connected to
the electricity supply when it is not
switched on; flashes in the event of a
power cut
Alarm Lights up when there is a door alarm;
flashes when there is a temperature alarm,
power cut or a fault

Guide to the appliance
16
aLighting strip
(in all three wine conditioning zones)
bBottle presenter (Selector)*
cActive AirClean filter
(in all three wine conditioning zones)
dWooden shelves with labels
(FlexiFrames with Noteboard)
eControls for the upper, middle and
lower wine conditioning zones
fIsolator plates for thermal separation
of the different conditioning zones,
each with a decanting rack*
gGlasses holder*
hBottle holder (ConvinoBox)
with attached accessory box*
iIsolator strips for thermal separation
of the different conditioning zones
jSafety glass door with UV filter
kDeco shelf*
lIntegrated door handle
* The SommelierSet consists of:
Two extra bottle presenters, three
wooden shelves, (two decanting
racks, one deco shelf), trim for both
decanting racks, one glass holder, one
bottle holder, one accessory box and
four covers for the runners.

Accessories
17
Accessories supplied
Active AirClean filter
The active charcoal filters in the back
wall achieve optimum air quality by fil-
tering the incoming air.
The isstainless steel cleaning cloth
impregnated with stainless steel condi-
tioner for optimum cleaning and protec-
tion.
Chalk
Use the chalk to annotate the magnetic
strips on the wooden shelves to identify
your wines quickly and easily.
Optional accessories
A range of useful Miele accessories and
care products are available for your ap-
pliance.
Active AirClean filters
See "Accessories supplied".
Multi-purpose microfibre cloth
The microfibre cloth is suitable for re-
moving fingerprints and light soiling
from surfaces such as stainless steel,
glass, plastic and chrome without the
use of chemicals.
Stainless steel care
Each application of the stainless steel
conditioner (supplied in a bottle) forms
a water and dirt repellent protective
coating. It gently removes water marks,
fingerprints and other dirt for a uni-
formly shiny surface.
Accessories are available to order via
the Miele Webshop, from Miele dir-
ectly (see back cover for contact de-
tails) or from your Miele dealer.

Switching on and off
18
Before using for the first time
Packaging material
Remove all packaging material from
the inside of the appliance.
Protective foil
Stainless steel surfaces have a layer of
protective foil to prevent scratching dur-
ing transportation.
Do not remove the foil until the wine
conditioning unit has been positioned
in its final location. Start at one of the
top corners.
Cleaning and care
Please refer to the relevant instruc-
tions in "Cleaning and care".
Tip: We recommend treating stainless
steel surfaces with the Miele stainless
steel conditioning agent immediately
after removing the protective foil (see
"Accessories - Optional accessories").
Important. Each time it is used, the
Miele stainless steel conditioning
agent forms a water and dirt repellant
protective coating.
Clean the inside of the appliance and
the accessories.
Operating the wine condition-
ing unit
A light touch of the finger on the
sensors is all that is required to operate
this wine conditioning unit.
A tone will sound each time a sensor is
touched. You can deactivate this, if you
wish (see "Selecting further settings -
Audible tones").
Switching on
When the wine conditioning unit is con-
nected to the electrical supply, the
mains connection symbol will ap-
pear in the display after a short while.
Touch the On/Off sensor.
The mains connection symbol will
go out and the wine conditioning unit
will start to cool.
The sensors for the upper, middle and
the lower wine conditioning zones will
then appear in the control panel. The
selected zone will be highlighted yellow
and the temperature of the selected
zone will show in the display.
The first time the appliance is switched
on the sensors for the wine conditioning
zones and the Alarm symbol will
flash until the selected temperature has
been reached in the zones.

Switching on and off
19
As soon as the set temperature has
been reached, the sensor for the re-
spective wine conditioning zone will
light up constantly. The alarm symbol
will go out as soon as the set tem-
peratures have been reached in each
zone.
The interior lighting will come on when
the door is opened.
A different setting can be set for each
zone.
Touch the sensor for the wine condi-
tioning zone you want to adjust the
settings for.
The sensor that has been selected is
highlighted in yellow.
– You can now set the temperature,
and
– switch on the DynaCool function.
Please refer to the relevant section for
more information.
If you then select a different wine con-
ditioning zone, the settings for the pre-
viously selected zone will remain un-
changed.
Switching off
Touch the On/Off sensor.
If this does not work, the safety lock
is still activated.
The sensors for the two wine condition-
ing zones will then go out.
The temperature display will go out and
the mains connection symbol will
appear.
The interior lighting will go out and the
cooling process will be switched off.
Switching off for longer peri-
ods of time
If the wine conditioning unit is not going
to be used for a longer period of time,
e.g. whilst on holiday:
switch it off,
disconnect it from the mains,
clean it out, and
leave the door ajar to air the wine
conditioning unit and avoid odours
building up inside it.
If, during a long absence, the wine
conditioning unit is switched off but
not cleaned and the door left shut,
there is a danger of mould building
up inside the appliance.

Selecting further settings
20
Certain settings on the wine condition-
ing unit can only be selected in settings
mode.
The door alarm is automatically dis-
abled when the appliance is in set-
tings mode.
Safety lock
The safety lock can be activated to pre-
vent:
– the appliance being switched off by
mistake,
– the temperature being changed by
mistake,
– DynaCool being switched on by mis-
take,
– the feature lighting being switched on
by mistake.
Activating or deactivating the safety
lock
Touch the settings sensor.
All symbols available for selection will
appear in the display and the symbol
flashes.
Touch the OK sensor to confirm your
selection.
The last selected setting flashes and
the symbol lights up in the display.
By touching the or sensor, you
can now select whether the safety
lock is activated or deactivated:
0: the safety lock is deactivated
1: the safety lock is activated
Touch the OK sensor to confirm your
selection.
The selected setting is applied, the
symbol flashes.
Touch the settings sensor to leave
settings mode.
Otherwise the appliance exits set-
tings mode automatically after ap-
proximately one minute.
The symbol will appear in the display
when the lock is activated.

Selecting further settings
21
Audible tones
The wine conditioning unit has audible
tones such as the sensor tone and the
door and temperature alarms.
You can switch the sensor tone or the
door alarm tone on or off but you can-
not deactivate the temperature alarm.
There are four settings to choose from.
Option is set the factory, i.e. the3
sensor tone and the door alarm are
switched on.
Switching audible tones on/off
Touch the settings sensor.
All symbols available for selection will
appear in the display and the sym-
bol flashes.
Touch the sensors for setting the
temperature ( or ) repeatedly until
the symbol flashes.
Touch the OK sensor to confirm your
selection.
The last selected setting flashes and
the symbol lights up in the display.
By touching the or sensor you
can now select:
0: sensor tone off; door alarm off
1: sensor tone off; door alarm on
(after 4 minutes)
2: sensor tone off; door alarm on
(after 2 minutes)
3: sensor tone on; door alarm on
(after 2 minutes)
Touch the OK sensor to confirm your
selection.
The selected setting is applied, the
symbol flashes.
Touch the settings sensor to leave
settings mode.
Otherwise the appliance exits set-
tings mode automatically after ap-
proximately one minute.

Selecting further settings
22
Display brightness
The display brightness can be adjusted
to suit lighting conditions in the room.
The display brightness can be adjusted
in steps from to . The factory default1 3
setting is (maximum brightness).3
Altering the display brightness
Touch the settings sensor.
All symbols available for selection will
appear in the display and the sym-
bol flashes.
Touch the sensors for setting the
temperature ( or ) repeatedly until
the symbol flashes.
Touch the OK sensor to confirm your
selection.
The last selected setting flashes and
the symbol lights up in the display.
By touching the or sensor you
can now alter the brightness of the
display:
1: dimmest setting
2: medium setting
3: brightest setting.
Touch the OK sensor to confirm your
selection.
The selected setting is applied, the
symbol flashes.
Touch the settings sensor to leave
settings mode.
Otherwise the appliance exits set-
tings mode automatically after ap-
proximately one minute.

The optimum temperature and air quality
23
Wine keeps on maturing depending on
the surrounding conditions. The length
of time for which wine can be kept in
good condition will therefore depend
not only on the temperature but also on
the air quality.
The wine conditioning unit with its con-
stant ideal temperature, increased air
humidity and odour free atmosphere of-
fers the perfect conditions for storing
your wine.
It also guarantees a vibration-free envir-
onment (in contrast to a refrigerator) so
that the maturing process is not dis-
turbed.
The optimum temperature
Wine can be stored at a temperature
between 6 und 18 °C. If you are storing
white and red wines together, select a
temperature between 12 und 14 °C.
This is suitable for both white and red
wines. Red wine should be taken out of
the wine conditioning unit and opened
at least two hours before drinking to al-
low it to breathe and develop its aroma.
At too high a temperature (over 22°C)
wine matures too quickly, which pre-
vents the aromas from developing fur-
ther. Wine cannot mature fully at too
low a temperature (below 5°C).
Fluctuations in temperature put wine
under stress and interrupt the maturing
process. It is therefore very important to
maintain a constant temperature.
Type of wine Recommended
drinking temper-
ature
Light, fruity reds: +14 °C to +16 °C
Full-bodied reds: +18 °C
Rosé wines: +8 °C to +10 °C
Delicate, aromatic
whites:
+8 °C to +12 °C
Full-bodied or
sweet whites:
+12 °C to +14 °C
Champagne,
sparkling white
wines:
+6 °C to +10 °C
Tip: Store the wine 1 or 2°C cooler than
the recommended drinking temperature
as it warms up a little when poured into
the glass.
Tip: Full-bodied reds should be opened
for 2-3 hours before drinking to allow
the wine to breathe and develop its
aroma.

The optimum temperature and air quality
24
Safety device in case of low ambient
temperatures
The appliance is equipped with a safety
thermostat to protect your wine against
a sharp drop in temperature. If the ex-
ternal temperature should fall, a heater
element switches on automatically to
keep the temperature inside as constant
as possible. If the ambient temperature
continues to fall, the appliance switches
itself off automatically.
Isolator plates for thermal separation
The appliance has two fixed isolator
plates which divide the cabinet into
three different zones. This enables you
to store up to three different types of
wine at the same time, e.g. red wine,
white wine and Champagne.
The isolator strips on the inside of the
glass door prevent an exchange of heat
between the individual zones.
Setting the temperature
The temperature in the wine condition-
ing zones can be set independently of
one another.
Touch the sensor for the zone for
which you wish to change the tem-
perature, so that it is highlighted in
yellow.
The current temperature for the selec-
ted zone appears in the display.
Use the two sensors underneath the
display to set the temperature.
By touching the sensor
– the temperature will get colder
– the temperature will get warmer.

The optimum temperature and air quality
25
Touch the OK sensor to confirm your
selection
or
wait approximately 5 seconds after
the last touch of the sensor.
The temperature being set will flash in
the display.
The following information shows in the
display while the sensors are being
touched:
– Touching a sensor once: the last
temperature selected flashes.
– Each subsequent touch of the
sensor: adjusts the temperature
shown in 1°C steps.
– Leaving a finger on the sensor
changes the temperature continu-
ously.
A tone will sound (if the sensor tone
is switched on) when the lowest or
highest possible temperature is
reached.
Approximately 5 seconds after the last
time a sensor has been touched, the
actual temperature inside the appliance
is automatically shown.
When the temperature is altered, there
is a short delay until the temperature
selected is set.
The temperature display on the control
panel always shows the tem-actual
perature.
Temperature range
In all three zones it is possible to set
temperatures between 5 and 20°C.
Temperature display
In normal operation the temperature
display shows the actual temperature in
the zone.
If the temperature in one of the zones is
not within the range that the appliance
is able to display, dashes will light up in
the temperature display.
Depending on the ambient temperature
and the temperature setting, it can take
the appliance a few hours to reach the
temperature required and for this tem-
perature to then be shown as a con-
stant temperature in the display.

The optimum temperature and air quality
26
Air quality and humidity
A conventional refrigerator with its low
humidity level is not the best place to
store wine. It is very important to store
wine in an atmosphere with a high hu-
midity level so that the corks remain
moist on the outside. Low humidity
causes corks to dry out from the out-
side so they do not seal the bottles as
tightly. Wine should be stored lying
down to keep the corks moist from the
inside too. Air entering the bottle will in-
evitably spoil the wine.
Do introduce additional moisturenot
into the air, e.g. by placing a dish of
water in the appliance, as this will
lead to condensation on the interior
walls, which can cause corrosion
damage.
DynaCool (constant humidity)
DynaCool raises the relative humidity
inside the appliance. DynaCool also
distributes the humidity and the temper-
ature evenly around the interior so that
you can store all your wine under ex-
actly the same excellent conditions.
This will create a stable climate in the
cabinet which imitates that of a wine
cellar.
Switching on DynaCool
If you would like to use the wine condi-
tioning unit to store wine long term, we
recommend that you keep the
DynaCool function switched on.
Touch the sensor for switching the
DynaCool function on and off so that
it is highlighted in yellow.
Even if the DynaCool function has not
been switched on, the fans in the ap-
pliance will come on automatically
when the cooling system switches on
to ensure your wine is kept in the op-
timum climate.
The fans automatically switch off
when the door is open.

The optimum temperature and air quality
27
Switching off DynaCool
The appliance uses slightly more energy
and is a little noisier when the DynaCool
function is switched on. You can switch
it off now and then if you wish.
Touch the sensor for switching the
DynaCool function on and off so that
it is no longer highlighted in yellow.
Air filtering with the Active
AirClean filters
The Active AirClean filters achieve op-
timum air quality by filtering the incom-
ing air.
Fresh air from the room enters the ap-
pliance via the Active AirClean filters.
The fans (DynaCool function) then dis-
tribute the air evenly throughout the
cabinet.
Filtering the incoming air through the
Active AirClean filters ensures that all
the air entering the appliance is fresh
and free from dust and odours.
This also ensures your wine does not
absorb any unwanted odours through
the corks.
Replace the Active AirClean filters regu-
larly. The symbol will appear in the
display to remind you (see "Active
AirClean filters").

Temperature and door alarm
28
This wine conditioning unit is equipped
with an alarm system so that the tem-
perature cannot rise or fall unnoticed,
thus possibly damaging the wine.
Temperature alarm
If the temperature in one of the wine
conditioning zones rises or falls by a
certain amount, the sensor for that zone
will flash in the control panel and at the
same time the alarm symbol will
flash in the display.
An alarm will also sound.
Audible and visual signals will be activ-
ated, for example,
– when the wine conditioning unit is
switched on and the temperature in
one of the temperature zones differs
greatly from the set temperature,
– when too much warm ambient air
enters the cabinet when bottles are
being rearranged or taken out,
– when a large number of bottles are
stored for the first time,
– in the event of a power cut.
As soon as the cause of the alarm has
been rectified, the alarm will stop and
the alarm symbol will go out. The
sensor for the relevant zone will light up
constantly again.
Switching the temperature alarm off
early
If the noise disturbs you, you can
switch the alarm off if you wish.
Touch the sensor for switching off the
temperature alarm.
The alarm will stop.
The relevant wine conditioning zone will
continue to flash in the control panel
and the alarm symbol will continue
to flash in the display until the cause of
the alarm has been rectified.

Temperature and door alarm
29
Door alarm
The alarm will sound if the door is left
open for more than approx. two
minutes. The sensors for the wine con-
ditioning zones will flash in the control
panel. The alarm symbol will light up
in the display.
The alarm will stop when the door is
shut. The sensors for the wine condi-
tioning zones and the alarm symbol
will go out.
Switching the door alarm off early
If the noise disturbs you, you can
switch the alarm off if you wish.
Touch the sensor for switching off the
door alarm.
The alarm will stop.
The sensors for the wine conditioning
zone will continue to flash and the
alarm symbol will remain lit up until
you close the door.
If the audible tone does not sound in
the event of a door alarm, then the
audible tone has been switched off in
settings mode (see "Selecting further
settings - Audible tones").

Feature lighting
30
The interior lighting can be set to re-
main on when the door is closed so
your wines can be on display at all
times.
Each wine conditioning zone has its
own lighting strip so that all three zones
are illuminated.
Thanks to the use of LED lighting, the
wine will not be adversely affected by
heat or UV light.
Switching the feature lighting
on and off
Touch the On/Off sensor for the fea-
ture lighting so that it is highlighted in
yellow.
The interior lighting is now switched on,
even when the door is closed.
To switch the feature lighting off again:
Touch the On/Off sensor for the fea-
ture lighting so that it is no longer
highlighted in yellow.
The interior lighting is now switched off
when the appliance door is closed.
Setting the brightness of the feature
lighting
The brightness of the feature lighting
can be adjusted.
Touch the On/Off sensor for the fea-
ture lighting so that it is highlighted in
yellow.
Touch the sensor for the feature light-
ing again for approx. four seconds
until flashes in the display (after two
seconds will flash).
Use the and sensors for altering
the temperature to set the feature
lighting brightness. Touch and hold
the sensors. The brightness will im-
mediately start to adjust gradually up
or down.
By touching the sensor
– the lighting becomes dimmer
– the lighting becomes brighter.
Touch the OK sensor to confirm your
choice.
The selected brightness is saved and
the temperature reappears in the dis-
play.
As soon as the appliance door is
closed, the set brightness for the fea-
ture lighting takes effect. When the ap-
pliance door is opened, the interior
lighting returns to its normal level.

Feature lighting
31
Lighting duration of the feature light-
ing
The lighting duration for the feature
lighting is set to 30 minutes as stand-
ard.
The lighting duration can be set to 30,
60, 90 minutes up to 00 (unlimited). The
feature lighting will have the brightness
setting you have selected previously.
Open the appliance door.
Touch the On/Off sensor for the fea-
ture lighting so that it is highlighted in
yellow.
Touch the sensor for the feature light-
ing again for approx. two seconds
until flashes in the display.
Use the and sensors for altering
the temperature to set the feature
lighting duration.
The duration (in minutes) will flash in
the display.
By touching the sensor
– lighting duration is reduced by 30
minutes
– lighting duration is increased by 30
minutes.
Touch the OK sensor to confirm your
choice.
The selected lighting duration is saved
and the temperature reappears in the
display.
The lighting duration set starts anew
whenever the appliance door is opened
and closed.
Caution. Laser beam class 1M
Do not remove the lighting covers.
Should the covers be damaged or
need to be removed due to damage,
do not use optical instruments (mag-
nifying glass or similar) to look at the
lighting.

Storing wine bottles
32
Vibration and movement have a negat-
ive effect on the maturing process
which can affect the taste of the wine.
To avoid disturbing other bottles when
removing a bottle of wine, store bottles
of the same type beside each other on
the same shelf. Avoid stacking bottles
on top of one another on the wooden
shelves.
Always place the bottles lying down so
that the corks can be kept moist on the
inside and air is prevented from getting
into the bottles.
Danger of injury.
Take care that wine bottles do not fall
out of the appliance when you pull
out a wooden shelf. Wine bottles
could also become wedged in the
shelf above.
Wooden shelves
The wooden shelves are on telescopic
runners which can be pulled out to
make it easier to store and remove
bottles. There are two wooden shelves
on runners in the middle and lower
zones (the second and third shelf from
the top in each zone) which can be
pulled right out. The remaining wooden
shelves can be partially pulled out.
Please note that the uppermost run-
ners in each of the three zones are
only suitable for shallow wooden
shelves.

Storing wine bottles
33
Moving the wooden shelves
The wooden shelves can be removed
and replaced again if required.
Pull the wooden shelf out until it
stops, then lift it up and off the run-
ners. Hold onto the frame to do this.
If you require more room (e.g. to set
up the bottle presenter), cover the top
runners which are not now needed on
both sides with the covers supplied.
The thicker side of the cover should
point forwards. The covers are held in
position with magnets.
To replace the shelf, click it into place
on the extended runners. The mag-
netic strip should be pointing for-
wards.
Adjusting the wooden shelves
The slats in the wooden shelves can be
individually adjusted to suit, so that
every bottle is stored in perfect safety
regardless of shape or size.
Simply lift individual slats to move or
remove them from the wooden
shelves.
The slats in the decanter racks and in
the SommelierSet rack cannot be ad-
justed.

Storing wine bottles
34
Annotating wooden shelves
For quick and easy identification of the
wines being stored, you can annotate
the blackboard surface on the magnetic
strips on the wooden shelves.
Use the chalk supplied. You can write
directly on the magnetic strip or remove
it from the wooden shelf to do so:
Hold the magnetic strip by the sides
and pull it forwards. The magnetic
strip is held on the wooden shelf by
magnets.
Annotate the magnetic strip with the
chalk supplied and replace it on the
front of the wooden shelf.
The magnetic strip can be wiped
clean with a damp cloth.
Use clean water only to wipe the
magnetic strips. Do not use a
cleaning agent as this would dam-
age the blackboard surface on the
magnetic strips.
Bottle presenter
The bottle presenter can be used to
raise particular bottles so that they can
be viewed when the door is shut.
To set up the bottle presenter, the
wooden shelf above must be removed:
Remove the wooden shelf and fit the
side covers over the runners.
Position the bottle presenter at the
very front of the wooden shelf re-
quired and place the wine bottle on
the bottle presenter.
If desired, switch on the feature light-
ing (see "Feature lighting") to illumin-
ate the selected bottle.

Storing wine bottles
35
Maximum capacity
Up to 178 Bordeaux bottles (0.75 l ) can
be stored in the appliance, 46 in the up-
per zone, 46 the middle zone and 86 in
the lower zone.
The total of 178 bottles can only be
achieved by using all the wooden
shelves.
The decanting racks and the deco
shelf in the bottom of the appliance
are the exceptions as it is not advis-
able to place bottles neck to neck on
these.
The load-bearing capacity of each of
the wooden shelves is only 35 kg.
Do not stack bottles on the wooden
shelves.
Produkt Specifikationer
Mærke: | Miele |
Kategori: | Køleskab |
Model: | KWT 6834 SGS |
Vekselstrømsindgangsspænding: | 220-240 V |
Vekselstrømsindgangsfrekvens: | 50 Hz |
Bredde: | 700 mm |
Dybde: | 746 mm |
Højde: | 1920 mm |
Vægt: | 144000 g |
Kontroltype: | Berøring |
Lampe type: | LED |
Indbygget skærm: | Ja |
Strøm: | 10 A |
Ledningslængde: | 2.8 m |
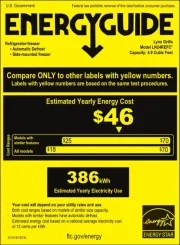
Årligt energiforbrug: | 206 kWh |
Placering af apparat: | Fritstående |
Indvendig belysning: | Ja |
Dørhængsel: | Højre |
Støjniveau: | 35 dB |
Dør farve: | Sort |
Energieffektivitetsskala: | A til G |
Støjemissionsklasse: | B |
Energieffektivitetsklasse: | G |
Klimaklasse: | SN-ST |
Åben dør alarm: | Ja |
Energiforbrug: | 0.493 kWh/24t |
Antal hylder: | 10 hylder |
Temperaturalarm: | Ja |
Låsning: | Ja |
Husets farve: | Rustfrit stål |
Indbygget fryser: | Ingen |
Lydalarmer: | Ja |
Indre farve: | Rustfrit stål |
Antal døre: | 1 dør(e) |
Flaskevolumen: | 178 flaske(r) |
Temperaturinterval (zone 1): | - °C |
Vinkøler nettokapacitet: | 502 L |
Antal temperaturzoner: | 3 |
Aflåsningstype: | Nøgle |
Har du brug for hjælp?
Hvis du har brug for hjælp til Miele KWT 6834 SGS stil et spørgsmål nedenfor, og andre brugere vil svare dig
Køleskab Miele Manualer
9 Juni 2025
9 Juni 2025
15 Januar 2025
13 Januar 2025
23 December 2024
23 December 2024
23 December 2024
23 December 2024
23 December 2024
23 December 2024
Køleskab Manualer
- Zanussi-Electrolux
- Kunft
- Foster
- Privileg
- MBM
- Hansa
- Fisher Paykel
- Moa
- DCS
- Landmark
- Bellini
- Scandomestic
- Luxor
- Matsui
- Turbo Air
Nyeste Køleskab Manualer
14 Juni 2025
14 Juni 2025
14 Juni 2025
14 Juni 2025
14 Juni 2025
14 Juni 2025
14 Juni 2025
14 Juni 2025
14 Juni 2025
14 Juni 2025