WIRELESS DUST CONTROL REMOTE AND ADAPTER
ADAPTADOR Y CONTROL REMOTO DE CONTROL ANTI-POLVO INALÁMBRICO
TELECOMMANDE ET ADAPTATEUR DE CONTROLE DE DEPOUSSIERAGE SANS FIL
IMPORTANT SAFETY INSTRUCTIONS
READ ALL SAFETY WARNINGS, INSTRUCTIONS,
ILLUSTRATIONS AND SPECIFICATIONS PROVIDED
WITH THIS POWER TOOL. Failure to follow all instructions listed below
may result in electric shock, re and/or serious injury. SAVE THESE
INSTRUCTIONS - THIS OPERATOR’S MANUAL CONTAINS IMPOR-
TANT SAFETY AND OPERATING INSTRUCTIONS.
• Chemical Burn Hazard. Keep coin cell battery away from children.
• Power tool plugs must match the outlet. Never modify the plug in any
way. Do not use any adapter plugs with earthed (grounded) power
tools. Unmodied plugs and matching outlets will reduce risk of electric
• Avoid body contact with earthed or grounded surfaces, such as
pipes, radiators, ranges and refrigerators. There is an increased risk
of electric shock if your body is earthed or grounded.
• Do not expose power tools to rain or wet conditions. Water entering
a power tool will increase the risk of electric shock.
• When operating a power tool outdoors, use an extension cord suitable
for outdoor use. Use of a cord suitable for outdoor use reduces the risk
• If operating a power tool in a damp location is unavoidable, use a
ground fault circuit interrupter (GFCI) protected supply. Use of an
GFCI reduces the risk of electric shock.
Chemical Burn Hazard. Keep batteries away from children.
UL Listing for Canada and U.S.
Adapter w/ Remote Cat. No. 0950-20 ......................................................
Volts ..............................................................................................120 AC
.....................................................................................................12
..........................................................................0951-20
.................................................................................CR2032
.............................................................. BGM11S/QOQ11
............................................................. Up to 100'
To reduce the risk of injury, always unplug tool before
changing or removing accessories. Only use acces-
sories specifically recommended for this tool. Others may be
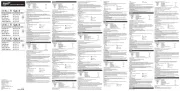
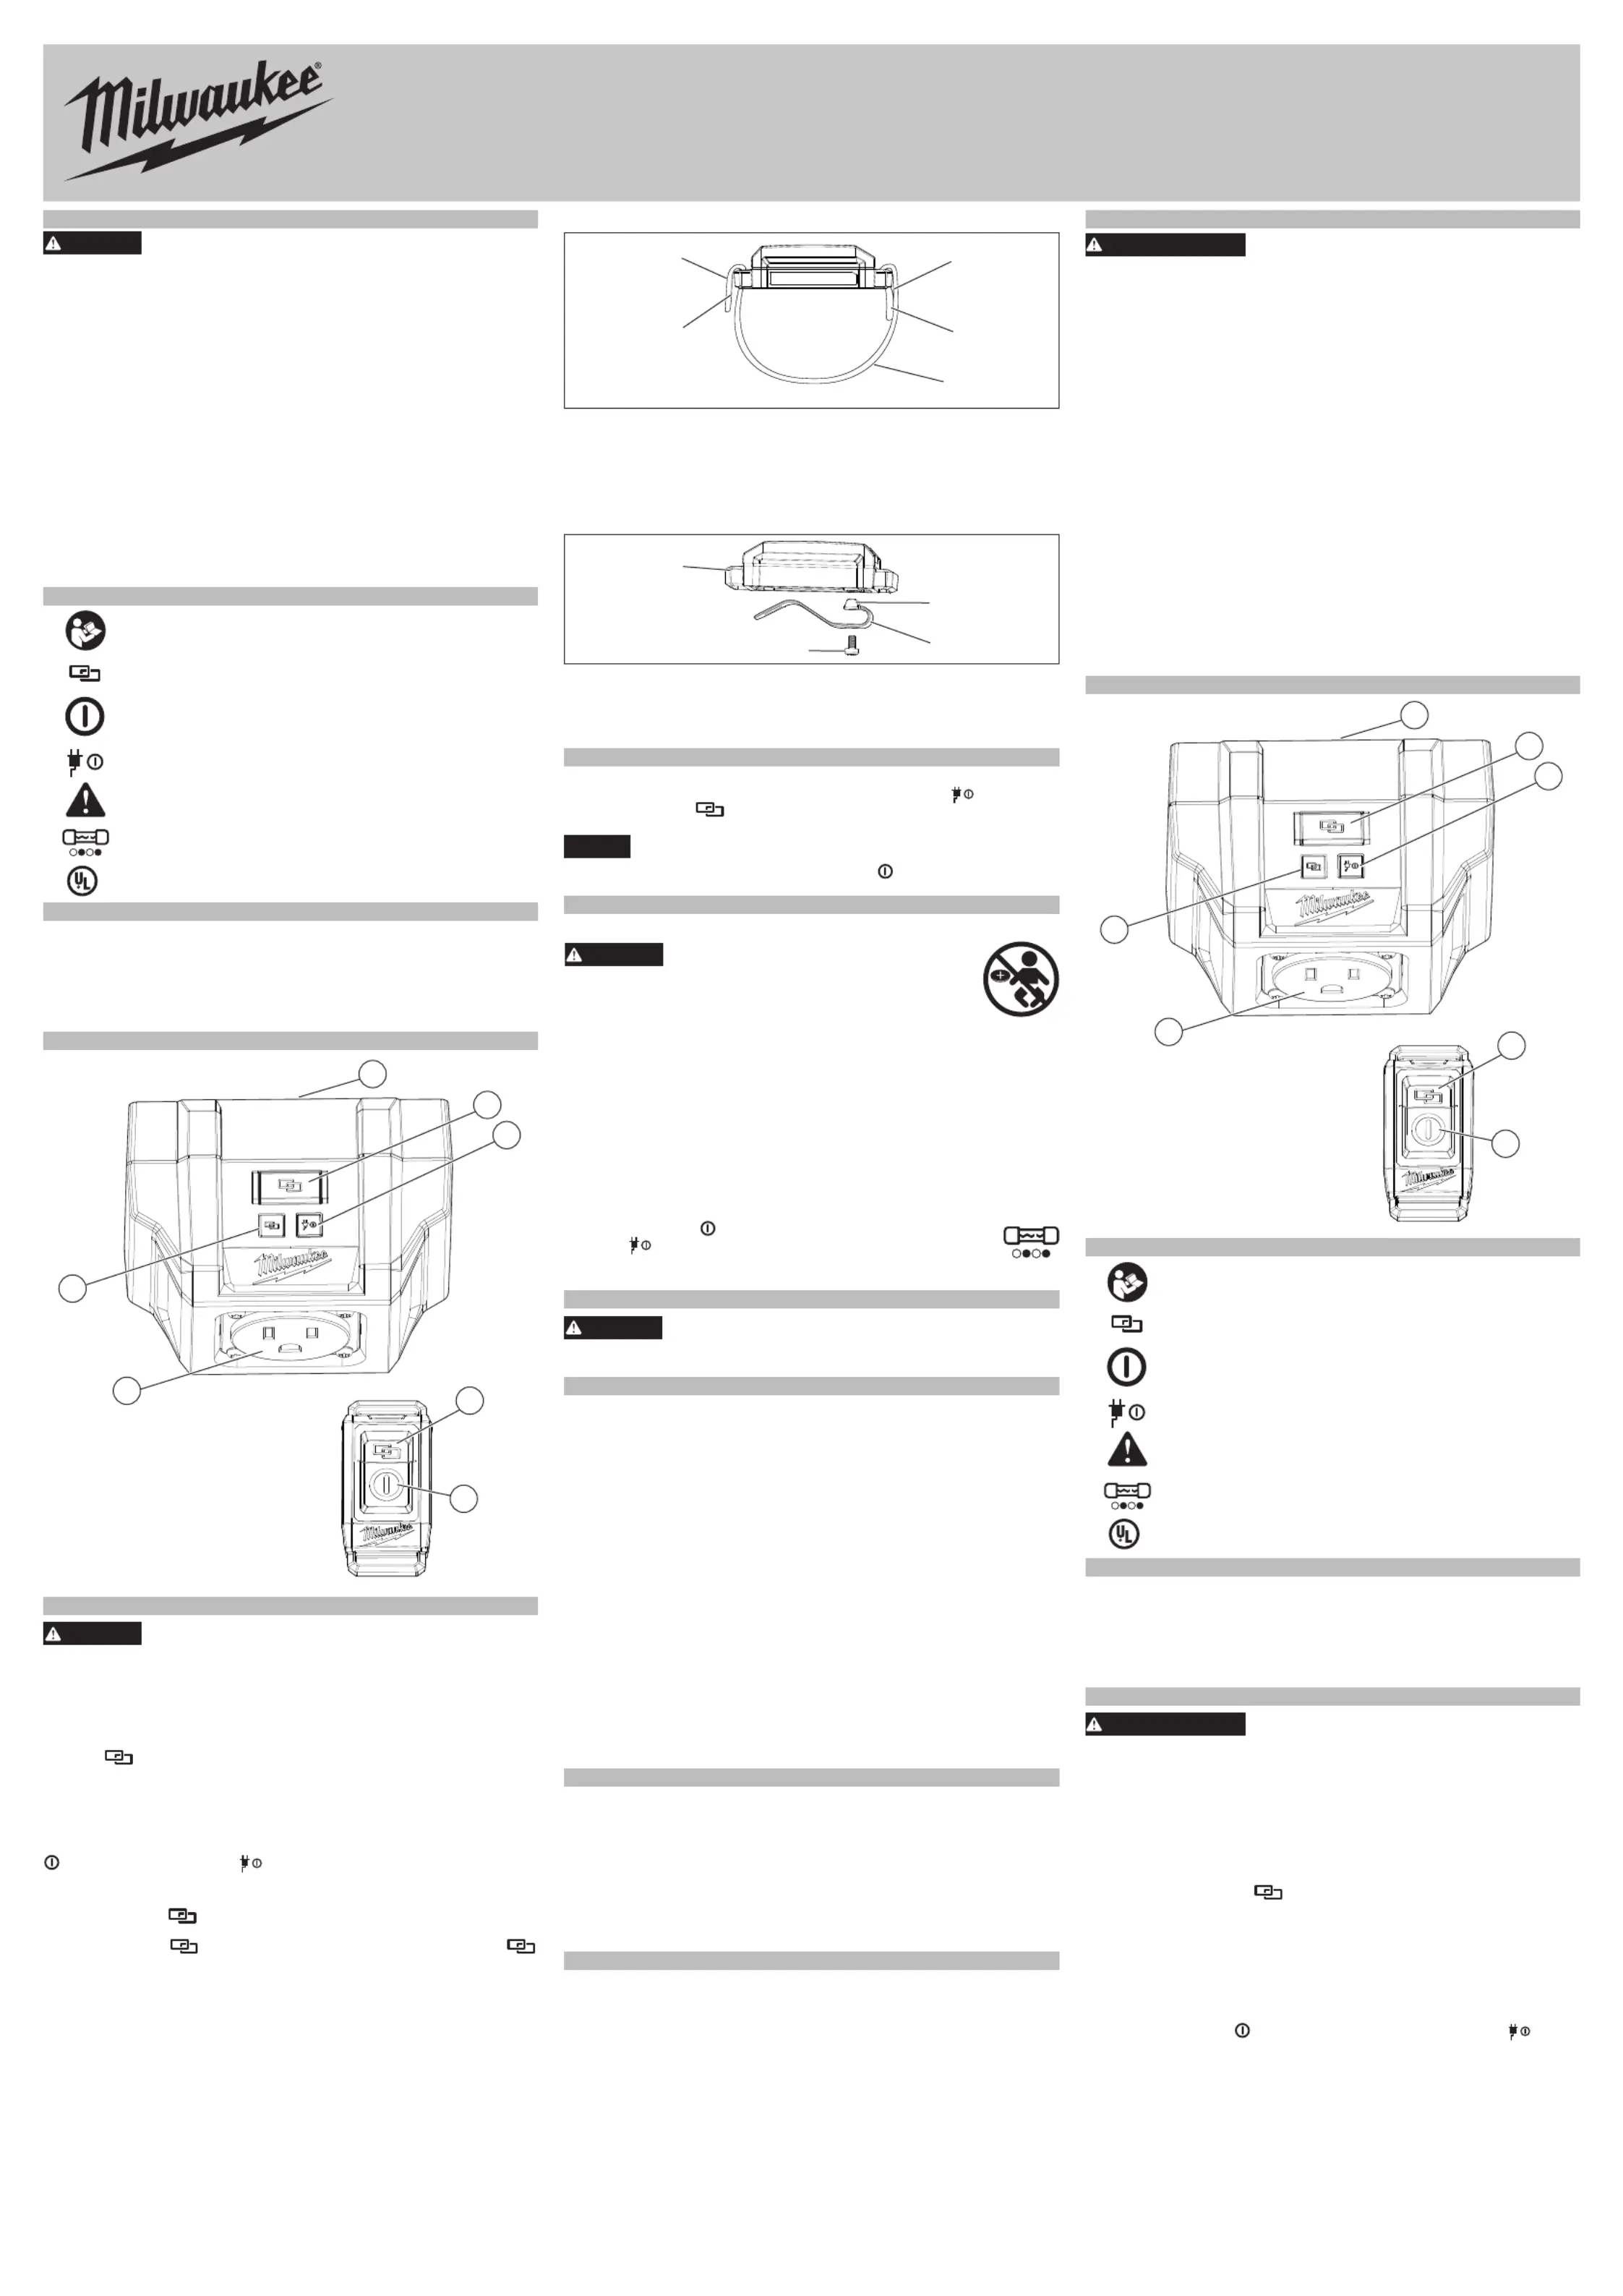
If remote is not connected to the adapter, pairing can be setup by:
1. Insert Adapter into an outlet. NOTE: To conrm the Adapter has power,
the power light indicator will light for 1 second.
2. Press button on the Adapter and the remote until both LED's begin
to ash. A steady green light on both Adapter and remote will conrm
that the unit is paired. NOTE: Remote needs to be within close proxim-
ity to ensure remote is receiving signal from the Adapter. This procedure
will time out in 30 seconds if tool is not paired and will enter standby
To conrm that the remote has paired with the Adapter successfully, press
button on remote and the button will light. Multiple remotes can be
1. Press and hold button on remote until the LED has a ashing red
2. Press and hold button on Adapter until the pairing indicator
LED has a ashing red light.
This procedure will time out in 30 seconds if remote and Adapter are not
paired. It will enter standby mode for user inactivity.
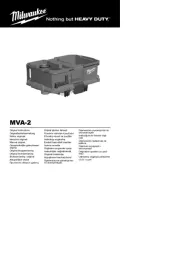
Remote strap installation:
1. Feed logo side of strap through inner side of remote housing.
2. Fold strap over and press rmly.
3. Feed tail end of strap through the outer side of remote housing.
4. Fold strap over and press rmly.
To adjust the length of the strap, release velcro and pull snug.
1. To remove the belt clip, remove the screw from the back of the remote.
2. Pull the belt clip away from the remote.
3. To the belt clip, line up the tabs on the clip with the notches oninstall
4. Insert the screw and tighten securely.
Use proper tools rated for this device. Others may be hazardous.
1. Insert Adapter into wall outlet. Conrm power indicator
2. Plug corded tool into Adapter outlet.
Do not use with a tool that requires input current greater than
12 A. It could result in damage to the adapter.
3. Using remote, press the power button tool. to turn ON/OFF
NOTE: Ensure tool being used is ON and fully operational.
Chemical Burn Hazard. This device contains
a lithium button/coin cell battery. A new or
used battery can cause severe internal burns and lead to
death in as little as 2 hours if swallowed or enters the body.
Always secure the battery cover. If it does not close se-
curely, stop using the device, remove the batteries, and keep it away
from children. If you think batteries may have been swallowed or
entered the body, seek immediate medical attention.
An internal battery is used on the remote to facilitate full functionality.
1. Remove strap or the screw on the belt clip.
2. Remove the screw and open the battery door.
3. Remove the old battery, keep it away from children, and dispose of it
4. Insert the new battery (3V CR2032), with the positive side facing up.
5. Close the battery door and tighten the screw securely.
6. Reattach the strap or screw with belt clip.
If the power button on the remote is pressed and the power
indicator starts ashing on the plug, there is an internal fuse
failure making the tool unusable. Please contact 1-800-SAWDUST
or visit milwaukeetool.com for service.
Use only recommended accessories. Others may be
For a complete listing of accessories, go online to www.milwaukeetool.
com or contact a distributor.
Pursuant to part 15.21 of the FCC Rules, you are cautioned that changes
or modications not expressly approved by the party responsible for com-
pliance could void your authority to operate the product.
NOTE: This equipment has been tested and found to comply with the
limits for a Class B digital device, pursuant to part 15 of the FCC Rules.
These limits are designed to provide reasonable protection against harmful
interference in a residential installation. This equipment generates, uses
and can radiate radio frequency energy and, if not installed and used in
accordance with the instructions, may cause harmful interference to radio
communications. However, there is no guarantee that interference will
not occur in a particular installation. If this equipment does cause harmful
interference to radio or television reception, which can be determined by
turning the equipment o and on, the user is encouraged to try to correct
the interference by one or more of the following measures:
• Reorient or relocate the receiving antenna.
• Increase the separation between the equipment and receiver.
• Connect the equipment into an outlet on a circuit dierent from that to
which the receiver is connected.
• Consult the dealer or an experienced radio/ TV technician for help.
This device complies with part 15 of the FCC Rules and ISED-Canada's
license exempt RSS standards. Operation is subject to the following two
conditions: 1) This device may not cause harmful interference, and 2) This
device must accept any interference received, including interference that
may cause undesired operation.
1-800-SAWDUST (1.800.729.3878)
Monday-Friday, 7:00 AM - 6:30 PM CST
or visit www.milwaukeetool.com
Contact Corporate After Sales Service Technical Support with technical,
service/repair, or warranty questions.
Email: metproductsupport@milwaukeetool.com
Become a Heavy Duty Club Member at www.milwaukeetool.com to receive
important notications regarding your tool purchases.
Milwaukee Tool (Canada) Ltd
Monday-Friday, 7:00 AM - 4:30 PM CST
or visit www.milwaukeetool.ca
DIRECTIVES DE SÉCURITÉ IMPORTANTES
LIRE TOUS LES AVERTISSEMENTS DE
SÉCURITÉ ET INSTRUCTIONS EN VOUS
RÉFÉRANT AUX ILLUSTRATIONS DES BULLETINS FOURNIS
AVEC LE PRÉSENT ÉQUIPEMENT. Ne pas suivre toutes les instruc-
tions énumérées ci-dessous, pourrait causer un choc électrique, un in-
cendie et/ou des blessures graves. SAUVEGARDEZ CES INSTRUC-
TIONS - LE PRÉSENT MANUEL DU PROPRIÉTAIRE CONTIENT
DES INSTRUCTIONS DE FONCTIONNEMENT ET DE SÉCURITÉ
• Risque de brû-lure chimique. Gardez la batterie des cellules de hors
de la portée des enfants.
• Les ches des outils électriques doivent correspondre à la prise
secteur utilisée. Ne jamais modier la che, de quelque façon que
ce soit. Ne jamais utiliser d'adaptateurs de che avec des outils mis
à la terre. Les ches et prises non modiées réduisent le risque de choc
• Éviter tout contact avec des surfaces mises à la terre comme des
tuyaux, des radiateurs, des cuisinières et des réfrigérateurs. Le risque
de choc électrique est accru lorsque le corps est mis à la terre.
• Ne pas exposer les outils électriques à l'eau ou l'humidité. La pénétra-
tion d’eau dans ces outils accroît le risque de choc électrique.
• Pour les travaux à l’extérieur, utiliser un cordon spécialement conçu à
cet eet. Utiliser un cordon conçu pour l'usage extérieur réduit les risques
• Si l’utilisation d’un outil électrique est inévitable dans un endroit
humide, utiliser une source d’alimentation munie d’un disjoncteur
de fuite de terre. L’utilisation d’un disjoncteur de fuite de terre réduit le
risque de choc électrique.
DESCRIPTION FONCTIONNELLE
1. Fiche mâle (non illustrée)
Lire le manuel d’utilisation
Risque de brû-lure chimique. Gardez la batterie des
cellules de hors de la portée des enfants.
Défaillance du fusible interne
UL Listing Mark pour Canada et États-unis
No de Cat. l’adaptateur avec télécommande 0950-20 ...........................
..............................................................................................120 CA
Ampéres ................................................................................................12
No de Cat. télécommande..........................................................0951-20
Type de batterie............................................................................CR2032
.............................................................. BGM11S/QOQ11
....................................... Jusqu’à 30,48m (100')
Pour minimiser les risques de blessures, dé-
branchez toujours l’outil avant d’y faire des
réglages, d’y attacher ou d’en enlever les accessoires. L’usage
d’accessoires autres que ceux qui sont spéciquement recommandés
pour cet outil peut comporter des risques.
Si la télécommande n’est pas connectée à l’adaptateur, il est possible de
congurer le couplage en suivant les étapes ci-dessous :
1. Brancher l’adaptateur à une prise. Pour conrmer queREMARQUE :
l’adaptateur a de l’alimentation, le témoin d’alimentation s’allumera
2. Appuyer sur le bouton de l’adaptateur et celui de la télécommande
jusqu’à ce que tous les deux témoins à DEL commencent à clignoter.
Un témoin en vert xe, sur l’adaptateur et la télécommande, vous lais-
sera savoir que l’unité est couplée. REMARQUE : Il faut que la télécom-
mande reste à une proximité immédiate, ceci an de garantir que la
télécommande puisse capter le signal de l’adaptateur. Cette procédure
sera interrompue après 30 secondes si l’outil n’est pas couplé et après,
passera en mode « veille » à cause de son inactivité.
Pour conrmer que la télécommande est bien couplée à l’adaptateur, ap-
de la télécommande et le bouton devra
s’allumer. Il est possible de coupler plusieurs télécommandes à un seul