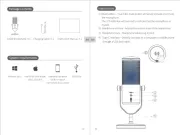
Neewer CM28 Manual


Læs gratis den danske manual til Neewer CM28 (1 sider) i kategorien Mikrofon. Denne vejledning er vurderet som hjælpsom af 61 personer og har en gennemsnitlig bedømmelse på 3.5 stjerner ud af 31 anmeldelser. Har du et spørgsmål om Neewer CM28, eller vil du spørge andre brugere om produktet?

Side 1/1
5V 2A
Thank y f in thi wi mou or oos ch g s reless icrophone!
① TX Channel Display: White when not conne te , greenc d
when connected.
② TX Battery Level Display.
③ Wireless Signal Strength Display.
④ RX Battery Level Display.
⑤ Volume Output Strength Display.
⑦ Output Mode Display: Mono (mixed output, combining
audio from both channels 1 and 2 on the l ft and ighte r
channels), Stereo (separate left and right hannel outpuc t,
with channel 1 on the left and channel 2 on the right), Ms
(mid-Side, safe track output with the right channel 6dB
lower than the left channel).
④ Display Screen
⑤ Audio OUT Port
⑥ Type-C Port
OUT
Transmitter x 2
Receiver x 1
Instruction
Manual x 1
Charging Case x 1
Product Overview
Package Contents
Product Illustration
Description of Functions
The NEEWER wireless microphone features 2.4G band adaptive
frequency hopping communication and digital wireless low
latency technology, ensuring high-quality audio and a stable
wireless connection.
1. This product is a precision electronic device. Please avoid
exposing it to water or accidentally dropping it.
2. If water accidentally enters the device, turn it off immediately,
shake off the water, and seek assistance from a qualified
professional.
3. If the product is not used for an extended period, it is
recommended to fully charge the battery once every three
months to maintain its performance.
4. Ensure that the battery in the product is not exposed to
sunlight, fire, or other high-temperature environments.
5. In case the TX/RX devices cannot be turned off, perform a
reset by pressing and holding the power button for 8 seconds.
USB Cable x 1
Camera Audio
Cable x 1OTG Adapter x 1
Windshield x 2
I iew ideal or erv f int s, rad o, or deo sh t vi record g, ebcasin w ting,
t and ieac g,hin var ous er appl ca oth i tions th t wia requ rei reless
sou ra ssnd t nsmi ion.
① External Microphone Jack
② Built-in Microphone
③ Type-C Port
④ Power and Connection Indicator
① Power Indicator ② Charging Port
⑤ Function Setting
Indicator
⑥ Power Button
⑦ Function Button
① Headphone Monitor Port
② Power Button
③ Function Button
ilt-Bu in Mi mnicrop e:hon O direc al or de soution f wi nd
A win hi i tcap ure.t ds eld s ialso suppl ed o d oise.reduce win n
1. Transmitter Functions:
How to Use
How to Use How to Use
How to Use
Product Specifications
Notes
Transmitter:
3. Display Functions:
2. Receiver Functions:
Receiver:
Charging Case:
w and o di tPo er Co ecnn ti n In ca or: A sol blueid light indi t ca es
th t th i nna e idev ce s co ected as es and fl h wh n n t ye o et
nnco ec ed.Tt he light wi h wh n th tt y ill as red e e ba er s w lo
and s o th iere n co ecnn tion.
nc o eFu ti n S ttin Ing di t The ligca or: blue ht wi in it tll re ma l o
indicate a e th t th n ti n foi nse ca cella o eature ac ve is ti .
R in i in wh n thiecord g s progress e s lig h ht flas es red. The
blue lig eht wi h whll as n bo se ca cellath noi n ti n o and
in f tirecord g unc ons .are ac veti
④ Power Button: Long press for 1 second to turn the
transmitter on/off.
⑤ Function Button: Press to toggle to noise cancellation. A
long 2-second press of this button will allow you to toggle
to the recording function (if available).
① Power Button: Press and hold for 1 second to turn the
receiver on/off.
② Function Button: Press to adjust volume, and long press to
switch output mode.
③ Audio OUT Port: Connect to a recording device ( for
example a camera).
④ Type-C Port: For charging and connecting to devices like
mobile phones/computers.
SET
1. Pairing:
If th X e T and i un o t is RX dev ces are able t es abl h a on, co ecnn ti
f e st ollow th eps belo paw to ir em: th
① TX (Transmitter):
While the transmitter is powered on, press and
hold both the power button and function button
simultaneously for 2 seconds. The indicator light
will flash rapidly (if there are 2 TXs, repeat this
operation), then move on to step 2.
② RX (Receiver):
With the receiver powered on, press and hold the
power button and function button simultaneously
for 2 seconds. The signal icon on the display will
start to flash.
SET
2. Installation and Use:
① Press and hold the power buttons of both the X and RXT
devices to turn on the power.
② Attach the TX transmitter
to a suitable place on your
clothing.
TX Transmitte RX Receiverr
④ Use the Camera Audio Cable to connect the Audio OUT port
on the RX receiver and the MIC input port on the camera.
⑤ Set the RX output volume to levels 2-3 and adjust the
camera recording volume lower to improve the signal-to-
noise ratio and prevent clipping distortion.
OUT
MIC
③ Attach the "RX receiver" to the camera.
SET
5. TX Built-in Recording Function:
Long press the SET button on the TX device for 2 seconds to
open or close the recording function. This function i only fos r
radio backup purposes, and the recording files will be
automatically saved or deleted in a loop.
Note: The storage space is approximately 4GB. Recordingcan
be exported using a Type-C data cable.
OUT
3. Using RX with a Smartphone:
Use a Type-C or Lightning/OTG adapter to connect the RX to
the Type-C port on your phone.
Note: For some Type-C phones, you may need to enable the
"OTG" function in the phone settings.
OUTOUT
4. Using RX with Other Devices:
① Use the Type-C/OTG adapter to connect the Type-C port
on the RX to the Type-C/USB port on your computer.
② Use a 3.5mm camera audio cable to connect the AUDIO
OUT port on the RX to the MIC port or LINE IN port on the
sound card.
Toxic Substances and Elements in the Product
Component
Names
Built-in
circuit board
Lead
"O" indicates that the content of toxic and hazardous
substances in all homogeneous components is below the
limit requirements specified in the SJ/T11364-2014 standard.
Note 1: Most of the components in this product are made of non
-toxic and non-hazardous materials. However, due to limitations
in global development, some components containing toxic and
hazardous substances or elements cannot be substituted.
Note 2: The reference guarantee of the environmental
protection utility period is dependent on the temperature and
other conditions during the normal operation of the product.
The EPUP (Environmental Protection Use Period) mark
signifies a period of ten years from the date of production. It
ensures that electronic information products containing
hazardous elements, under normal use conditions, will not
cause significant environmental pollution or serious damage
to individuals and property for a period of ten years.
* The product images used in this manual are for illustrative purposes
only. Please refer to the actual shape and color of the product.
* The company reserves the right to make improvements to the product
and modify the information provided without prior notice.
Product Model
Wireless Frequency Range
Modulation Method
Audio Frequency Response
Wireless Transmitting Power
Built-in Battery
Charging Input
CM28
2400—2483.5MHz
GFSK
30Hz—20KHz
≤10dBm
3.7V Lithium Polymer Battery
5V 500mA
Notes:
- Open the top lid of the charging box to activate the indicator and
check the remaining power.
- The charging box automatically enters charging mode when the
lid is closed.
- The battery capacity allows for two charging cycles for TX+TX+RX.
- The lid automatically opens when TX+RX is turned on, and the
charging box lid opens automatically when TX+RX is turned off.
⑧ Transmitter Recording Status Display: "REC" indicates
recording in progress (if available).
⑨ USB Connection Display: Shown when successfully
connected to a phone or computer via the "OTG audio
cable".
③ Wait for both of the TX and RX devices to stop
flashing which indicates that pairing has been
completed.
REC
-01- -02-
-03- -04-
-05- -06-
-07- -08-
-09- -10-
Mercur Cadmiuy m
Hexavalent
Chromium
PBB
PBB
Housing
Accessories
"X" indicates that the content of toxic and hazardous
substances in at least one homogeneous material of the
component exceeds the limit requirements specified in the
SJ/T11364-2014 standard.
TX/RX connection auto shuts down
after 5 minutes.
Operating Temperature
Storage Temperature
Energy Saving Mode
0℃—55℃
-20℃—55
(TX) 1.85"x1.02"x0.51"/47x26x13mm
(RX) 1.85"x1.14"x0.55"/47x29x14mm
Product Weight
Charging Case:
Charging Input
Built-in Battery
Product Specification
(TX) ≈0.63oz/18g / (RX) 0.74oz/21g
3. / u7V 2000mAh Lithi m Pol er Baym ttery
EN EN
EN EN
EN EN
EN EN
EN EN


Produkt Specifikationer

Mærke: Neewer
Kategori: Mikrofon
Model: CM28

Har du brug for hjælp?

Hvis du har brug for hjælp til Neewer CM28 stil et spørgsmål nedenfor, og andre brugere vil svare dig


Mikrofon Neewer Manualer

Neewer

Neewer KM20 Manual

17 August 2025
Neewer

Neewer VM11 Manual

14 Juni 2025
Neewer

Neewer KM23 Manual

13 Juni 2025
Neewer

Neewer KM22 Manual

4 Februar 2025
Neewer

Neewer CM27 Manual

4 Januar 2025
Neewer

Neewer CM24 Manual

4 September 2024
Neewer

Neewer CM20 Manual

3 September 2024
Neewer

Neewer CM28 Manual

3 September 2024
Neewer

Neewer NW002-1 Manual

3 September 2024

Mikrofon Manualer

Nyeste Mikrofon Manualer

AKG

AKG C 518 ML Manual

17 September 2025
Defender

Defender Forte GMC 300 Manual

17 September 2025
Defender

Defender Forte GMC 350 Manual

17 September 2025
Defender

Defender Ring GMC 150 Manual

16 September 2025
Defender

Defender Talky-139 Manual

16 September 2025
Defender

Defender Talky-138 Manual

16 September 2025
Defender

Defender Space GMC 550 Manual

16 September 2025