Maksymalna średnica grzanego naczynia
Wymiary rozłożonego palnika
Temperatura przechowywania
Przenośne urządzenie o ciśnieniu zasilania równym prężności par
skroplonego gazu węglowodorowego.
UWAGA! Używaj palnika jedynie z nabojami gazowymi z
gwintowanym złączem spełniające wymagania normy EN 417.
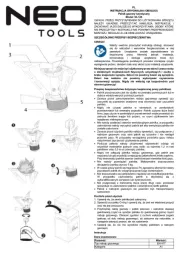
1. Wspornik palnika
2. Palnik
3. Płyta podstawy
4. Zawór regulujący moc palnika
5. Nakrętka
Wszystkie palniki przed wysłaniem zostały sprawdzone czy poprawnie
działają. W związku z tym głowica palnika może być delikatnie
zmatowiona – nie jest to wada produktu.
1. Przed rozpaleniem palnika upewnij się, że podstawka pod garnek jest
rozłożona.
2. Obracaj zawór regulacji mocy palnika o jedno lub dwa okręgi w
kierunku przeciwnym do ruchu wskazówek zegara, aż usłyszysz
wypływający gaz.
3. Po podpaleniu palnika używaj zaworu regulacji mocy palnika do
uzyskania odpowiedniego płomienia, płomień powinien mieć kolor
niebieski i pomarańczowy.
4. Po użyciu zakręć szczelnie zawór regulacji mocy palnika i zdemontuj
palnik po ostygnięciu.
Demontaż
1. Upewnij się że palnik został wystudzony oraz zawór regulacji mocy jest
zakręcony.
2. Należy odkręcić palnik w kierunku przeciwnym do ruchu wskazówek
zegara, aż do odłączenia go od naboju gazowego. Podczas obracania
może ulatniać się gaz.
3. Złóż wspornik garnka i włóż go do pudełka.
Konserwacja
Utrzymuj palnik w czystości. Wszelkie zabrudzenia należy usunąć
miękką, wilgotną szmatką.
EN
ORIGINAL MANUAL (OPERATING)
Tourist gas burner
Model: 63-128
CAUTION: BEFORE USING THE EQUIPMENT, READ THIS MANUAL
CAREFULLY AND KEEP IT FOR FUTURE REFERENCE. PERSONS
WHO HAVE NOT READ THIS MANUAL SHOULD NOT INSTALL,
ADJUST OR OPERATE THE DEVICE.
DETAILED SAFETY REGULATIONS
WARNING!
Please read the operating manual carefully, observe the
warnings and safety conditions contained in it. The device
has been designed for safe operation. Nevertheless:
installation, maintenance and operation of the device can
be dangerous. Following the procedures below will reduce
the risk of fire, personal injury, and installation time.
This equipment may not be used by children, persons with reduced
physical and mental abilities and persons unfamiliar with the equipment.
Children should not play with the equipment. Children without supervision
should not clean and maintain the equipment. Never put your hands
directly under the heating element!
Safety regulations for safe operation of the burner:
• The burner is intended for use outdoors or in well-ventilated rooms.
• Always before installing the gas cartridge, check that the seals are
properly seated and check the condition of the burner seals.
• Never use the torch in tents, confined spaces, or inside vehicles.
The burner consumes large amounts of oxygen, its use in confined
spaces can lead to carbon monoxide poisoning or fire, which makes
its use extremely dangerous.
• Do not cover the burner ventilation openings, if dirty, clean the
burner so that the burner ventilation is not disturbed
• Before using the burner always check that the connection with the
gas cartridge and the burner are tight and that there is no gas
leakage. In the event of a gas leak, stop using the burner
immediately.
• When burning, keep a sufficient distance from all combustible
materials and people: at least 1.2 m above the burner and 0.3 m
from the outside of the burner.
• Never disconnect the gas cartridge burner when the burner is hot or
with any source of ignition nearby. A small amount of gas is always
released when the burner is disassembled.
• Do not overload the burner. The maximum permissible load on the
burner is 5 kg.
• The burner heats up during operation. After the flame is
extinguished, allow the burner to cool down before disassembling it.
• It is forbidden to repair or modify the burner by yourself. In the event
of damage to the burner, contact a qualified service center or
distributor.
• Do not heat up at minimum power for long periods of time as this will
damage the burner and the burner's internal mesh.
• The burner with a gas cartridge should not be transported by plane.
Inspection before use
1. Make sure the burner valve is closed.
2. Check the O-ring to make sure it is in the correct position and not
damaged.
3. Hold the gas cartridge and the burner vertically and carefully align the
threaded portion on the bottom of the burner with the threaded top of
the gas cartridge. Turn clockwise (as viewed from bottom of gas
cartridge) until it stops naturally, then tighten firmly but not excessively.
4. Make sure there are no leaks between the burner and the gas
cartridge.
Instruction
Rated data:
Maximum diameter of the heated vessel
Dimensions of the unfolded burner
Portable device with a supply pressure equal to the vapor pressure
of a liquefied hydrocarbon gas.
WARNING! Use the torch only with gas cartridges with threaded
connection that meet the requirements of EN 417.
1. Burner support
2. Burner
3. Base plate
4. Burner power control valve
5. Nut
Before sending, all burners were checked for proper operation. As a
result, the burner head may be slightly tarnished - this is not a product
defect.
1. Before lighting the burner, make sure that the pot support is folded out.
2. Turn burner power control valve one or two circles counterclockwise
until you hear gas flowing.
3. After igniting the burner, use the burner power control valve to obtain a
suitable flame, the flame should be blue and orange.
4. After use, close the burner power control valve tightly and dismantle
the burner after cooling.
Disassembly
1. Make sure the burner has cooled down and the power control valve is
closed.
2. Unscrew the burner counterclockwise until it is detached from the gas
cartridge. Gas may escape when rotating.
3. Fold up the pot support and put it into the box.
Maintenance
Keep the burner clean. Any dirt should be removed with a soft, damp
cloth.