T k u for g the D6 Shan yo purchasin oundbar P. leas reae d t s r hi use manua carl ef y ull an keed p for fut e ref nce. ur ere
To reduce the k of ris ele rict c ck, do not ntle the uct sho disma prod and do not e the atus to n or st e. expos appar rai moi ur
No user-serviceabl pae rts inside.
Refer servicing to qualified personnel only
The htlig ning flash wit n an hi equil eraat l t e is intriangl ended to rt u to the nce of ated ale yo prese uninsul
dangerou vos lt e witag hin the product’s cen lo urs e that y be of suff nt it e to c stitute an ma icie magn ud on
electric shock to a n or perso persons.
I rtanmpo t! T s hi symbo alel rts u to d yo rea and
observ impoe rtant s d struct ns on the warning an in io unit
T s hi appliance is not int d for use by ns g c ) with d ys l s y or ntal ende perso (includin hildren reduce ph ica ensor me
capabil ieit s, or k of e lac experienc an knowledgd e, ess they have n unl bee give supern vis n or stio in ru ioct n c con erning
use of the ce by a n applian perso responsible for t r safety.hei
Childre shouln d be sed to ssupervi en ure that t y do not y with the he pla appliance.
1. To prevent possibl hearine g e, do not sten at damag li high
volum levele s for g t e s or a n h lon im period sudde hig volume level.
2. r e the vNeve us de ice uns rv dupe ise ! Switc
h off the vice r you e not g i n if not us g it de wheneve ar usin t, eve in only for
3. The nce is not intapplia ended to be ated by oper means of an ext l t r or s ate ote erna ime epar rem co ront l system.
4. the ly cIf supp ord is d, it st be d by the damage mu replace manufact r, its ure service nt or age similarly qual ieif d sons per
in order to d a hazavoi ard.
5. Befor opere at g t s stem, ck the in hi sy che vo aglt e o tf hi sys stem to see if it is ntide ical to the volt e oag f y r local ou
Important Safety Instruction
6. The it d not be un shoul impeded by covering the ve ilnt atio openinn g with it s s h as em uc newspaper t, able-cloths,
cu ainrt s etc. Make e tha tsur t her are e at st 20 cm of ace e d at lea sp abov an least 5 cm of e on each s e o the spac id f unit.
7. The atus appar must not be exposed to g or g d that drippin splashin an objects f d with s,such a vases, ille liquid s
must not be d on the atus.place appar
8. To preven ft ire or ck haz d, do not e t s n to ct asho ar expos hi equipme t dire he t, n, strai moi ure or st.du
9. Do not ate tloc hi uns it r y water nea an sources e.g. t s, bathtap ubs,
washing mac s or g hine swimmin pools.
E e thansur t you e the it on a plac un dry, st e surf e.abl ac
10. Do not ace tpl hi uns it c e to a st g etic f d.los ron magn iel
11. Do not ace the pl unit on a if r or ampl ie receiver.
12. Do not ace tpl hi uns it in a p dam area as the moistur wile l affect the life of ectric cel omponents.
13. Do not att pem t to c n the it with c ical s vents as t s ht e the f ishlea un hem ol hi mig damag in . W e with a c n, y ip lea dr
or s htly lig damp cloth.
14. W n he removing the powe plur g f m the l outle ro wal t, always pul direl ctly on the g, neplu
15. g on the ect etic Dependin el romagn waves used by a televisio broadcn ast, if a is t d on TV urne near this it e it is un whil
also on, line migs ht r on the LED appea TV. Ne heit r this unit nor the is TV ma unlf ct g you see such e k p thisionin . If lin s, ee
unit wel awal y f m the set.ro TV
16. The ns g is used to disc emai plu onn ct the vicede , the scdi onnected device should n ly remai readi operable.
Important Safety Instructions
1. Read these instructions. Keep these instructions. Follow all instructions. Heed all warnings.
2. Do not use this atus appar near water.
3. n ly with dr cloth.Clea on y
4. Do not ock y vent at n bl an il io opening Insts. all in accordan
ce with the manufact r's ure in rust ct ns.io
5. Do not inst l r any at s ce such as atal nea he our s radi ors, he erat s, stoves, or othe apparr atus c g if(in ludin ampl iers)
6 Protec. t the r c d f m powe or ro bein wag lked on or ncpi he pad rt ly at gicular plu s, conv nce receptac s or a the enie le t
point where they exi ft rom the apparatus.
7 Only use attac nts/access e. hme ori s s cif d by the ufact r.pe ie man ure
8. g this Unplu apparatus g durin lig ninht g storms or n used for g whe un lon periods of t e.im
9. Refer all servicing to if d serv e qual ie ic pe onars l. S vic g is d er in require when the apparatus s n ha bee damage in y way, an
for example, when the -s y c d or power uppl or plug is d, d has n s d or damage liqui bee pille obje hac ts ve f n into the alle
apparatus, the atus s appar ha been exposed to n or rai moisture, does not ate loper normal y, or s ha bee droppen d.
10. The AC g is used to sc eplu di onn ct the device the disc cted device s d n , onne houl remai readil operably e. In r to orde
disc conne t the atu fappar s rom the AC power compl elet y, the AC g muplu st be oved f m the AC outlrem ro
•ove the SRem oun bad r f m the carton ro an remod ve l ckal pa ing mat l f m the Seria ro oun bad r. Save the c g mat l, pa kin eria
if po iblss e, in case the S d oun bar ever dnee s to be s viced or t rteder ranspo . The l carton d pack g mat l is the origina an in eria
onl safe way y to cpa k y r S d ou oun bar to otect i f m e in t nsit.pr ro damag ra
•ove y Rem an de risc ptive ls or stick s on the f nt or top o the c e Do not ve y labe er ro f abin t. remo an labels or st keric s f m the ro
back or bottom o the c et.f abin
•P e y r S d lac ou oun bar o
n a level surface such as a t e, abl desk or s lhe f, conv nenie t to an AC outlet,out of ct s ht, dire unlig
an awad y f m s rces of excess aro ou he t, t, rdi du mos t, ist e, iur humid ty, or v at n.ibr io
•d the Unwin Line cord conne inct g the AC pter d extada an end it to its f l ul length.
This l is d with -skid rmode equippe non rubbe 'feet' to prevent the uprod ct f m mov g ro in when you ate the cont s. oper rol
These 'feet' e ar mad roe f m atnon-migr in rubbeg r mat l spec l feria ial y ormulated to av d oi le inav g any rks or st s on ma ain
y r f itou urn ure. However cert n types ai
of oil based f it e urn ur polishe d servatives, or c g s s mas, woo pre leanin pray y c seau
the rrubbe 'feet' to soften, d e an leav marks or a r res e on the f itrubbe idu urn ure To event y e to y. pr an damag our
f iturn ure we t s rongly rec d that you ommen pu harc se s l self esive felt d av e at mal -adh pa s, ailabl hardware t s ores an hod me
improvement center ever whery e, d an apply these s to the bottom o the pad f rubber fee bef ' t' ore you place the it.un
This s d r is des d to ate on l AC P r s rce For E e, it ks oun ba igne oper norma owe ou . urop wor only under SM 0V 0VPS 11 -24
Do not att pem t to ate the S d oper oun bar on any ot r r s cehe powe our . You could cause e to the damag
S d oun bar that is not covered by y r nty.ou warra
• This s d oun bar was es c ly dev d for LED/ D/P ape ial elope LC lasm TV : It's s d not be used in c at n with CR s houl ombin io TTV'
(C hodat e Ray T eub TV's) in r to av d e interforde oi imag erence.
• Safety and operating instruction manual should be retained for future reference.
• The apparatus should not be exposed to dripping, splashing or placed in a humid atmosphere such as a bathroom.
• Do not install the product in the following areas:
• Places exposed to direct sunlight or close to radiators.
• On top of other stereo equipment that radiate too much heat -Blocking ventilation or in a dusty area.
• Areas where there is constant vibration.
• Do not place near candles or other flames.
• Operate the product only as instructed in this manual.
• Before turning on the power for the first time, make sure the sound bar is plugged to power outlet.
• For safety reasons, do not remove any covers or attempt to gain access to the inside of the product. Refer any
servicing to qualified personnel.
• Do not attempt to remove any screws, or open the casing of the unit; there are no user serviceable parts inside.
Refer all servicing to qualified service personnel.
Place the s d oun ba horizor nt y on a flaall t surface such as a it or s ves d n i TV un hel an alig t centr ly with the n. al TV scree
A w s e space bet n the sllo om wee peaker d the l. ’t ce s e a can wal Don pla in id abinet or an a d s lwalle he f. F w t s ce ollo hi guidan
for best s d output d oun an goo aid rf w ar d the s d bar.lo oun oun
Version: 5.0 Range:up to 10m
Soundbar: 62H*73D*750 Lmm
Subwoofer: H360*W135*D210 mm
BT/AUX/HDMI(ARC)/OPTICAL/DOLBY
Soundbar assembly details
TREB+
AUX
OPT
I
C
AL
VOL+
VOL
-
BASS-
T
RE
B
-
MUSIC D
IA
L
OGUE
M
O
VI
E
PAIR DIS CO
N
NECT
IND
IC
A
T
O
RRE
S
ET
3
D
BA
S
S+
HDMI(A
RC)
B
LU
ET
O
OTH
MUTE
If you don’t feel confident to correctly and securely wall-mount the sound bar, Seek the assistance of an
experienced person of professional.Install the speaker on a vertical, fast, reinforced area of wall. For plaster walls, it is
recommended to screw into wall studs for greater security. For optimum performance, allow at least 25mm/1’’distance
between the sound bar and the TV.
Follow below steps to mount the sound bar on the wall
1: Paste 2 pieces of EVA f m oa (with es) on the two hol wall brackets aligning at the e hol position of wall brackets.
2: Remove 4 screws from the rear hous g of s d in oun bar, then insert the 4 sc ws over the l re wal bracket screw holes ngaligni
n the s(o ide of EVA f m past ), d t n fasten the scoa ed an he rews n. agai
3 c: Ac ording to the two hanging wall positions on the r orea f soundbar, c ate alibr and k the two mar hanging ackebr ts hole
position on the lwal. T n drhe ill two holes on the lwal , firstly insert two expansion stic scpla rews on the wall, then fasten the
ghangin sc ws into exre pansion screw holes.
EVA foam
w hithout oles
560±5mm
4: Then Paste the 2 pieces of EVA foam it(w hout holes) on the two wall brackets downward. Then ace the pl hollow cross in
the center of the bracket against the screws on the wall d an hang the sound r on the l fba wal inally.
Manufactured under license from Dolby Laboratories. Dolby,
Dolby Audio,and the double-D symbol are trademarks of
Audio input(Aux)Connection
1. Use either the buttons on the SoundBar or the "
" button on the remote to activate AUX mode.A green
LED indicator will indicate that AUX mode has been selected.
2.Playback functions (play/pause, tracks, pair) cannot be adjusted through the SoundBar remote when in
AUX mode.Others playback functions can be controlled from the buttons on the SoundBar.
Playing Audio via BT Connection
1. e eitUs her the butt s on the S dBar or the BLU TH" button on the on oun " ETOO remote to act ateiv BT emod .A B e LED lu
indicator l icate tha wil ind t BTmod hae s n s ected. bee el
2 ctivate the . A pairing funct n on r e of ot r io you phon he compatible ce devi an seled ct“ D6 ”
3. W n successfhe ull pairey d, u l yo wil hear a ton ane d the LED l stay onwil
4. The remote nt l inc s co ro lude BT mod playbae ck controls
• y r P g device Switc d o If ou airin he ff or l discManua onnected, the soun bad r l aut atic ly enter wil om al pairin mog de
•the c ected vice is switc d o or l disc If onn de he ff manua onnected the s d r , oun ba will aut atic ly enter g om al pairin
successfully connected device l be est swil re- abli he ond ce you re-enter wireless
range(10 meters). to c eonn ct to
other device s, repeat the above g stepspairin
• T e is no aut ati shuther om c down in pairin modg e. The s d oun ba wilr l n in g remai pairin mode even if no ice is dev
paired, so switch off if not in use
Pink: in USB mode Cyan: in HDMI(ARC) mode
3. When indicator light on, press INDICATOR button to turn off; when the indicator light off, press any button on the
remote control to turn on it.
1. Plug the power cord in and the LED will light up.
2. Press the BLUETOOTH/OPTICAL/AUX/HDMI(ARC) button on the remote control to switch the input mode
The indicator can change into 5 different colors, representing different input mode:
1. Plug the power cord of the soundbar into a wall outlet, it will automatically enter standby mode;
2. Press the STANDBY button on the soundbar or POWER button on the remote control to
turn the soundbar on. Make your selection of the desired input modes by pressing the BLUETOOTH
/OPTICAL/AUX/HDMI(ARC) button on the remote control or the standby button on the soundbar.
3. To turn off, press and hold the STANDBY button or POWER button on remote control for about 2 seconds,
the soundbar will enter standby mode, and then unplug it from the wall outlet.
Pl Dolby Digi l Plus via I ay ta HDM
Pl Dolby Digi l Plus via Opti lay ta ca
1. The soundbar supports HDMI (ARC) with audio return channel (ARC). You can hear the TV audio through your
soundbar by using a single HDMI cable. But on condition that your TV is ARC compliant.
2. Using a high speed HDMI cable, connect the HDMI (ARC) connector on the soundbar to the
HDMI (ARC) connector on the TV. The HDMI (ARC) connector on the TV might be labeled differently. For
details, see the user manual of your TV.
3. Press “HDMI(ARC)” button on the remote control or “STANDBY” button on soundbar to select HDMI (ARC) mode.
Different TV might be different setting, please refer to your TV .USER MANUAL
4. Use the volume buttons to adjust the volume to your requirements.
5. You can also change the audio settings by using the relevant buttons on the remote control.
6. When HDMI (ARC) is connected, TV sound setting in “sound output” mode should be set as <external Dolby or
Auto mode>, in addition, digital audio output mode should be set as <automatic> or <decoded output as Dolby>.
When the HDMI (ARC) cable is connected, the TV digital audio output is set as Dolby or Auto mode.
Then start playing music on the TV.
2. The TV is connected to a HDMI (ARC) port with sound bar. Different TVs might have different setup menus,
1. When connecting a device such as a TV/Set-top box/DVD/ game console with HDMI (ARC) cable, set the audio
output mode of the device to Dolby or Auto mode <digital HDMI (ARC) output>.
but the operation approach is the same.
3. If needs to connect TV box meanwhile, please firstly connect the HDMI (ARC) connector and paired to the soundbar.
Use this operating mode to play music from the optical digital input for example from a TV on your soundbar .
The TV must have an optical digital output. Use the optical cable supplied to make the connection.
• Connect the optical cable to the optical digital output of your TV.
• Then connect the optical cable to the optical digital input of your soundbar.
• Start playing on the TV.
Press the OPTICAL button on the remote control to select OPTICAL mode
• You can use the volume buttons to adjust the volume to your requirements.
• If you wish, you can change the audio settings using the relevant buttons on the remote control.
Another input source is selected.
The mute function is activated.
The volume of sound bar or TV/other device
The power cable of the unit is not
Input jacks on a playback device are connected.
If you play audio from TV through the sound bar,
make sure that the TV is muted.
The automatic volume adjustment function is
activated. To prevent excessive loudness, the
unit automatically controlls its volume within
a certain level when the unit is turned on.
Turn up the volume as required.
B etooth f ct n o the v e is not act ated, lu un io f de ic iv
not paired or connected correctly.
A device emitting electromagnetic waves
(such as a microwave oven, a wireless
device and so on) may be placed nearby.
Do not use this unit near devices that emit
Restart the sound bar and try pairing again. You have
not enabled the Bluetooth function of the device; see
the user manual of the device on how to enable the
funct n d ectly c ected the ce The ndio an corr onn devi . sou
bar is dy c cted with ot r Balrea onne an he luetooth device.
Disconnect the connected device, and then try again.
The unit is out of the operating range. Use the remote control within the operating range.
The batteries are weak. Replace with new batteries.
The remote control sensor of the sound bar
is exposed to direct sunlight or strong lighting.
Adjust the lighting angle or reposition the sound bar.
Make sure our product cannot be used in sunlight.
The unit is blocking the TV’s remote
Position the unit so that it does not obstruct the TV’s
When sound bar and TV or other devices are
connected by an audio cable through TV (ARC)
port output, Select the correct audio input and
output. Make sure the digital audio output setting
on the playback device to PCM format. Since the
output format of our sound bar is PCM, if it is used,
the decoding format of TV or other devices will be
Make sure that the power cable of the unit is
connected to an AC wall outlet securely.
Connect the input jack on the sound bar and
the output jack on the playback device.
Select an appropriate input source.
Cancel the mute function.
Increase the volume level on sound bar or
by remote control or on TV.
The sound bar is too close to another
digital or high-frequency device.
Move those devices away from the sound bar.
Bluetooth is not selected as the input source.
Select Bluetooth as the input source.
The unit is connected to a different Bluetooth
The it is too far y f m the B etooth un awa ro lu device.
Un-pair the Bluetooth e that is devic currently connected
and pair with the desired Bluetooth device.
Move the Bluetooth device closer to this unit.
The Bluetooth device that you are using
may not support the protocol.
Use a Bluetooth device that supports the protocol.
The connection profile registered in the
Bluetooth device may not be functioning
correctly for some reason.
Delete the connection profile in the Bluetooth
device and then connect the Bluetooth device to
PROBLEM/TROUBLE POSSIBLE CAUSE SOLUTION
The Bluetooth reception is poor.
Move the device closer to the sound bar,
or remove any obstacle between the device and
FCC Warning This device complies with part 15 of the FCC Rules. Operation is subject to the following two conditions:
(1) This device may not cause harmful interference, and (2) this device must accept any interference received, including
interference that may cause undesired operation. Note: This equipment has been tested and found to comply with the
for a Class B digital device, pursuant to part 15 of the FCC Rules. These limits are designed to provide reasonable
against harmful interference in a residential installation. This equipment generates, uses and can radiate radio frequency
energy and, if not installed and used in accordance with the instructions, may cause harmful interference to radio
However, there is no guarantee that interference will not occur in a particular installation.
If this equipment does cause harmful interference to radio or television reception, which can be determined by turning the
equipment off and on, the user is encouraged to try to correct the interference by one or more of the following measures:
—Reorient or relocate the receiving antenna.
—Increase the separation between the equipment and receiver.
—Connect the equipment into an outlet on a circuit different from that to which the receiver is connected.
—Consult the dealer or an experienced radio/TV technician for help.
Note: The Grantee is not responsible for any changes or modifications not expressly approved by the party responsible
for compliance. such modifications could void the user's authority to operate the equipment. The device has been
to meet general RF exposure requirement. To maintain compliance with FCC's RF exposure guidelines, the distance
at least 20 cm between the radiator and your body, and fully supported by the operating and installation configurations of
transmitter and its antenna(s).
IC Warning This device complies with Industry Canada license-exempt RSS standard(s).
Operation is subject to the following two conditions: (1) this device may not cause interference, and (2) this device must
any interference, including interference that may cause undesired operation of the device. Le présent appareil est
aux CNR d'Industrie Canada applicables aux appareils radio exempts de licence. L'exploitation est autorisée aux deux
conditions suivantes : (1) l'appareil ne doit pas produire de brouillage, et (2) l'utilisateur de l'appareil doit accepter tout
radioélectrique subi, même si le brouillage est susceptible d'en compromettre le fonctionnement. The device has been
to meet general RF exposure requirement. To maintain compliance with RSS-102 — Radio Frequency (RF) Exposure
this equipment should be installed and operated with a minimum distance of 20cm between the radiator and your body.
le dispositif de a été évalué à répondre général rf exposition exigence.pour maintenir la conformité avec les directives d
'exposition du RSS-102-Radio Fréquence (RF). ce matériel doit être installé et exploité à une distance minimale de 20 cm
le radiateur et votre corps.
1. When connecting a device such as a TV/Set-top box/ DVD/ game console with optical cable, set the
audio output mode of the device to Dolby or Auto mode (digital optical output).
2. Do not bend the optical cable, otherwise the cable inside will be damaged.
3. Sometimes users may hear an echo sound when connecting the soundbar to TV via optical cable. To eliminate the
echo effect, your TV speakers should be disabled. Refer to your TV's audio menu options to make the necessary
changes to the speaker settings.
Step lug 1: P the audio onnector in c to the audio input port on ano her main t unit
Step lign 2: A the arrows on he t two sti scker
Step wi lockwise 3: T st c about 20 degrees un til locks se curely
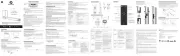
Overview of the Sound Bar main unit
1: LED Display 2: AUX 3: OPTICAL 4: HDMI(ARC) 5:USB(For urgrade only)
6: DC IN 7: SW OUTPUT 8: Standby 9: VOL- 10: VOL+
User manual (1) Setup Guide (1)
Manufactured under license from Dolby Laboratories. Dolby,
Dolby Audio,and the double-D symbol are trademarks of
The volume on the Bluetooth device may
Raise the volume on the Bluetooth device.
Bluetooth is not selected as the input source.
Select the Bluetooth as the input source.
P yla back on he device t has not been per ormedf .
Perform playback on the device.
The sound output on the Bluetooth
device may not be set to this unit.
Select this unit as the output device on
The connection to the Bluetooth device
Connect with the Bluetooth device one more time.
Move the Bluetooth device near this unit.
The unit may be too far away from the
Do not use this unit near device that emit
A device emitting electromagnetic waves
(such as a microwave oven, a wireless
device and so on) may be placed nearby.
PROBLEM/TROUBLE POSSIBLE CAUSE SOLUTION
1. Make sure that the user connected TV and
sound bar by a 19-core HD ARC cable.
2. The sound bar and TV are connected through
TV (ARC) port output; make sure that the TV is
3. Set the TV to HDMI ARC (CEC).
Set the audio output mode of TV to PCM format.
(Or refer to your TV user manual)
Incorrect HDMI cable is used causing no
signal to be sent to soundbar.
Incorrect input mode is selected.
1.Replace the OPTICAL cable with a new one
2. Set your TV audio output to PCM format.
(Pls refer to your TV user manual)
OPTICAL cable might be damaged and no
signal is received by the soundbar due to
a failed connection and incorrect operation
1. Turn off sound bar and subwoofer by removing
the AC plug from the socket.
2. Make sure that sound bar and subwoofer are
connected to the electricity power at the same time,
and switch on sound bar and subwoofer again.
3. Press and hold the subwoofer’s rear plate WPS
button to reset the connection, so that the sound bar
and subwoofer can be reconnected again.
Connection is not correct between