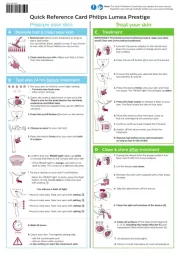
1. Unplug the device from the power outlet if you
have used it with the power adapter.
2. Let the device cool down.
3. Moisten the soft cloth supplied with a few drops
4. Take the attachment o the device.
5. Clean the light exit window of the device (A).
6. Clean all surfaces of the attachment (parts B,
C, D, E), including the metal reector (C) and
transparent lter of the bikini attachment (E).
7. Let all parts dry thoroughly.
8. Store in a dust-free place at room temperature.
D Clean & store after treatment
IMPORTANT: First nish section A (Remove hair & clean your skin)
and B (Test skin 24 hrs before treatment).
1. Connect the power adapter to the device and
plug into a power outlet or charge device and
2. Press the on/o button
3. Choose the setting you selected after the skin
test (section B, step 9).
4. Press the device rmly onto your skin and hold
it in place. The 'READY light' should light up .white
5. Press the ash button to release a ash on your
skin. The ash treats the skin in that spot.
6. Move the device to the next spot, close to,
but not overlapping the previous spot.
7. Continue until you have treated the full area.
8. Switch o the device when you nish the
9. Remove hair before every next treatment,
as long as hair is still visible.
1. Test your skin to nd the correct light setting.
- For every new body area
2. Select the correct attachment to test your skin.
There is one for the body (below the neckline),
underarms and bikini area.
The attachments supplied may vary for dierent
3. Press the on/o button
4. Choose an area for your skin test.
5. Press the device rmly onto your skin and hold
6. Conrm that the 'READY light' white lights up
to ensure that there is full contact with your skin.
- If the 'READY light' is , your skin is too orange
dark to treat. Try Lumea on a lighter body area.
7. Try each setting on your skin if comfortable:
- When the 'READY light' is white, press the ash
button on the handle to treat one spot once
• You will see a ash of light •
- Move to next area. Treat one spot with setting
- Move to next area. Treat one spot with setting
- Move to next area. Treat one spot with setting
- Move to next area. Treat one spot with setting
9. Check your skin. The highest setting that...
- still felt comfortable and
- did not show a skin reaction
... is the setting to start the treatment with.
B Test skin 24 hrs before treatment
1. Remove hair before every treatment as long as
You can either shave, epilate or wax. If you choose
to wax, wait 24 hours before you use Lumea.
2. Clean and dry your skin. Make sure that it is free
A Remove hair & clean your skin
Quick Reference Card Philips Lumea Prestige
Note: This Quick Reference Card does not replace the user manual.
Read the user manual carefully before you use Lumea Prestige.