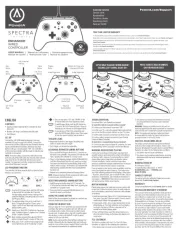
• Spectra Infinity Enhanced Wired Controller for Xbox
• Braided 10ft Snap-Lock Detachable USB cable
Connect the 10ft USB cable by plugging it into any
available USB port on your Xbox console. Connect the
other end to the Micro USB port on your PowerA Enhanced
Spectra Infinity Wired Controller. Hold down the Xbox
Button until your console powers “ON”. The controller’s
LED Connection Indicator will illuminate to indicate your
NOTE: To remove cable, squeeze two side buttons near
port and pull gently. USB cable also includes inline release
plug closer to end of cable that will disconnect when
needed. For player and controller assignment reference
your official Xbox user’s manual.
The controller has three separate light up Spectra Zones
1. To enter LED Program Mode, hold the LED button
on the back of the controller for 2 seconds.
The light piping around the top housing of the
controller will blink, indicating that you’re now in
2. The programmable Zone you’re in will flash 3
times. To toggle through the 3 Zones, press
“Right” on the D-Pad. Note that Zone One is the
3. Select one of the A/B/X/Y buttons to choose your
color: 5 shades of green 5 shades of red 5 shades
of blue 5 shades of yellow
4. Next, continue pressing the selected A/B/X/Y
button to toggle through 5 shades of that color.
5. Next, press “Left” on the D-Pad to program the
zone’s light effect, either “breathing” or solid.
6. You can also press “UP” and “DOWN” on the
D-Pad to select one of ten brightness levels.
7. To exit Program Mode, hold the LED button for
2 seconds. All 3 LED Zones will flash 3 times to
indicate you are now out of LED Program Mode.
8. To quickly turn off the LEDs completely, just
press the LED Program Button once. Press again
to turn the Spectra lighting feature back on.
• Adjust pull-distance of the triggers by sliding lock
switch on back to the left or right
• Each trigger can be adjusted separately
ASSIGNING ADVANCED GAMING BUTTONS
1. Press and hold the Program Button for 2-3 seconds on
the back of the controller. The program LED indicator will
flash, signaling the controller is in assign mode.
2. Press 1 of the following buttons (A/B/X/Y/RB/LB/RT/LT/
Left Stick Press/Right Stick Press/D-pad) to re-assign.
Then press the Advanced Gaming Button (AGR or AGL)
that you wish to assign. The Program LED indicator will
stop flashing, signaling the Advanced Gaming Button
3. Repeat for the remaining Advanced Gaming Button.
NOTE: Advanced Gaming Button assignments will remain
in memory even after disconnected.
RESETTING ADVANCED GAMING BUTTONS
1. Hold the program button down for 2-3 seconds. The
LED Connection Indicator will slowly flash, signaling the
controller is in program mode.
2. Press and hold the assigned AGR/AGL Button for 5
seconds to reset to no function.
Refer to Xbox documentation for details on functions and
features related to the Share button.
Once you plug the 3.5mm jack from your headset into the
controller, Dial will become active and LED will turn red
to indicate chat is muted. Press down on dial to mute/
unmute chat. To adjust volume, tap left or right to adjust
step by step, or press and hold left or right to adjust
volume to full up or full down.
NOTE: Audio controls within Xbox Settings will take first
priority, followed by the the Headset dial, and finally any
audio or mute controls on your headset. Refer to your Xbox
and headset documentation for additional details.
For current FAQs, visit PowerA.com/support
Q: Controller will not connect to Xbox console?
A: Confirm your Xbox console is powered “ON”.
A: Confirm your TV is set to the proper Video Input and that
you can see the Xbox console interface on your TV screen.
A: Confirm cable is properly connected to you Xbox console.
A: Confirm cable is properly connected to your PowerA
Enhanced Wired Controller.
Q: Controller is connected but has no function?
A: Confirm you are using the Player #1 controller. For more
troubleshooting refer to your Xbox console User Manual.
WARNING: READ BEFORE PLAYING
A very small percentage of individuals may experience
epileptic seizures when exposed to certain light patterns
or flashing lights. Exposure to certain patterns or while
playing video games, may induce an epileptic seizure
in these individuals. Certain conditions may induce
previously undetected epileptic symptoms even in persons
who have no history for prior seizures of epilepsy.
If you, or anyone in your family, have an epileptic condition,
consult your physician prior to playing. If you experience
any of the following symptoms while playing a video game
– dizziness, altered vision, eye or muscle twitches, loss of
awareness, disorientation, any involuntary movement, or
convulsions – IMMEDIATELY discontinue use and consult
with your physician before resuming play.
Playing video games can make your muscles, joints, skin
or eyes hurt. Follow these instructions to avoid problems
such as tendinitis, carpal tunnel syndrome, skin irritation
• Avoid excessive play. Take a 10 to 15 minute break every
hour, even if you don’t think you need it. Parents should
monitor their children for appropriate play.
• If your hands, wrists, arms or eyes become tired or sore
while playing, or if you feel symptoms such as tingling,
numbness, burning or stiffness, stop and rest for
several hours before playing again.
• If you continue to have any of the above symptoms or
other discomfort during or after play, stop playing and
This device complies with Part 15 of the FCC Rules.
Operation is subject to the following two conditions:
1. this device may not cause harmful interference, and
2. this device must accept any interference received,
including interference that may cause undesired
WARNING: Changes or modifications to this unit not
expressly approved by the party responsible for compliance
could void the user’s authority to operate the equipment.
NOTE: This equipment has been tested and found
to comply with the limits for Class B digital device,
pursuant to Part 15 of the FCC Rules.
CAN ICES-003(B)/NMB-003(B)
This device contains licence-exempt transmitter(s)/
receiver(s) that comply with Innovation, Science and
Economic Development Canada’s licence-exempt RSS(s).
Operation is subject to the following two conditions:
1. This device may not cause interference;
2. This device must accept any interference, including
interference that may cause undesired operation of
4 Corporate Way, Lake Zurich, IL 60047
ACCOBRANDS.com | POWERA.com
For support with your authentic PowerA accessories,
please visit PowerA.com/Support.
2-Year Limited Warranty: Visit PowerA.com for details.
AUSTRALIAN WARRANTY STATEMENT
This product comes with guarantees that cannot be
excluded under the Australian Consumer Law. You
are entitled to a replacement or refund for a major
failure and for compensation for any other reasonably
foreseeable loss or damage. You are also entitled
to have the goods repaired or replaced if the goods
fail to be of acceptable quality and the failure does
not amount to a major failure. If purchased within
Australia or New Zealand, this product comes with a
One-year warranty from date of purchase. Defects in
the product must have appeared within One year from
date of purchase, in order to claim the warranty. All
warranty claims must be facilitated back through the
retailer of purchase in accordance with the retailer’s
return policies and procedures. Any expenses incurred,
as a result of returning the product to the retailer of
purchase are the full responsibility of the consumer.
USER MANUAL | Manuel de l’utilisateur | Bedienungsanleitung
Manual de usuario | Manuale per l’uso | Manual do usuário
3-Way Trigger lock 3-Way Trigger lock
TAP OR HOLD TO ADJUST WIRED HEADSET
VOLUME (LEFT-DOWN, RIGHT-UP)
PRESS TO MUTE (RED) OR UNMUTE
TWO YEAR LIMITED WARRANTY
For warranty details or support with your authentic PowerA accessories, please visit PowerA.com/Support.
Beschränkte 2-Jahre-Garantie Informationen zur Garantie oder Unterstützung zu Ihrem PowerA-Originalzubehör finden Sie unter PowerA.com/Support.
Garantía limitada de dos años Si quieres más información sobre la garantía o necesitas ayuda con tus accesorios originales de PowerA, visita
Garantie limitée de deux ans Pour plus de détails sur la garantie ou pour obtenir une assistance pour vos accessoires PowerA d’origine, veuillez
consulter le site PowerA.com/Support.
Garanzia limitata di due anni Per i dettagli sulla garanzia o per richiedere assistenza per i tuoi accessori PowerA autentici, visita la pagina
Garantia limitada de dois anos Para mais informações sobre a garantia ou os acessórios originais da PowerA, visita PowerA.com/Support.