Rosieres RHG7310IN Manual

Rosieres Emhætte RHG7310IN

Læs gratis den danske manual til Rosieres RHG7310IN (11 sider) i kategorien Emhætte. Denne vejledning er vurderet som hjælpsom af 36 personer og har en gennemsnitlig bedømmelse på 4.6 stjerner ud af 18.5 anmeldelser. Har du et spørgsmål om Rosieres RHG7310IN, eller vil du spørge andre brugere om produktet?

Side 1/11
RHG527 - RHG529
RHG5210 - RHG7210
INSTRUCTIONS FOR INSTALLATION AND USE
MONTAGE- UND GEBRAUCHSANWEISUNG
INSTRUCTIONS POUR L'INSTALLATION ET L’UTILISATION
ISTRUZIONI PER L'INSTALLAZIONE E L’USO
INSTRUCCIONES PARA INSTALACIÓN Y USO
INSTRUÇÕES DE INSTALAÇÃO Y UTILIZAÇÃO
AANWIJZING VOOR GEBRUIK EN INSTALLATIE
ENGLISH
If the supply cord is damaged, it must be replaced by the manufacturer, its service agent or similarly qualified persons
in order to avoid a hazard.
DESCRIPTION
The appliance can be used in both the filtering and ducting version.
In the Filtering version (Fig. 1), the air and vapours conveyed by the appliance are depurated by charcoal filters
and recirculated around the room. ATTENTION: When using the filtering version, charcoal filters must be installed
(the charcoal filters are not supplied). In the Ducting version (Fig. 2), cooking vapours and odours are conveyed
straight outside by a disposal duct which passes through the wall. Use of charcoal filters is therefore unnecessary.
INSTALLATION
Before assembling, in order to manoeuvre the appliance more easily, take off the grease filters: at the handle,
push the stop inwards and pull the filter downwards (Fig. 3).
The following operations are essential for assembly: Cut a hole in the bottom of the pensile cupboard in
order to settle the appliance (Fig. 4). Set the power supply near the appliance. Prepare the air venting hole
if your appliance is to be installed in the ducting version.
To install the appliance, adjust the position of the clasping side springs by means of the proper screws (Fig.5),
according to the thickness of the bored panel to which it is going to be anchored. Insert the appliance in the
pensile cupboard and lock it by means of the side springs. Use the holes which have already been made in the
casing of the appliance to definitively fix it by means of additional 2 screws (Fig. 6).
Ducting version : connect the disposal duct to the air evacuation pipe of the hood. Use a flexible pipe and
lock it to the air evacuation pipe of the hood with a metal hose clamp (pipe and clamp are not provided). Make
the electrical connections.
Filtering version : connect an adequate pipe to the connecting flange of the appliance so that it conveys the air up
to the top of the pensile cupboard (pipe is not provided). Make the electrical connections.
OPERATION
Depending on the model, the unit is equipped with the following controls:
Controls (Fig. 7): A = LIGHT switch. B = MOTOR switch: position 0: motor off; position 1: motor on Ist speed. Position
2: motor on 2nd speed; position 3: motor on 3rd speed. C = Operating motor warning light.
Controls (Fig. 8): A B = LIGHT switch. = MOTOR switch: regulates motor operating speed by means of an electronic
speed variator. C = Operating motor warning light.
Particular care must be paid to the grease filters which must be periodically cleaned in relation to use (at
least once every two months). Remove the grease filters and wash them either by hand or in the dishwasher using
neutral detergent. To take off the grease filters: at the handle, push the stop inwards and pull the filter downwards
(Fig. 3).
When using the filtering version of the appliance, the charcoal filters must be changed according to use
(Fig. 9), usually every six months. Remove the filters rotating them and replace them rotating into the opposite
direction.
Lights:
- To replace the incandescence bulbs remove the grease filters as previously described (Fig.3) so as to be able
to access the inside of the appliance. Remove the fixture: apply a slight pressure on the 2 stops and at the
same time push the fixture downwards (Fig. 10). Unscrew the bulb and replace with another of the same type.
- If the halogen lamps need changing, slacken the ring nut in an anticlockwise direction and remove the bulb
itself (Fig. 11). Replace with a bulb of the same type. CAUTION: Do not handle glass bulb with bare hands.
In case the new halogen bulb does not light up once it is on, disconnect the apparatus for a few seconds.
- If the light spot is damaged, it must be replaced only by the manufacturer, its service agent or similarly qualified persons
in order to avoid a hazard.


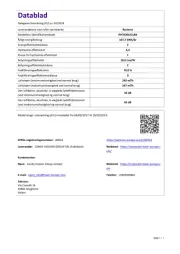
Produkt Specifikationer
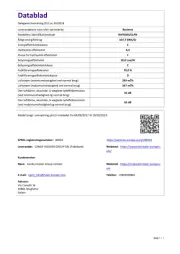
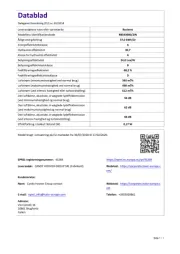
Mærke: Rosieres
Kategori: Emhætte
Model: RHG7310IN
Type: Indbygget
Bredde: 700 mm
Dybde: 285 mm
Højde: 245 mm
Vægt: 9200 g
Produktfarve: Rustfrit stål
Motoreffekt: - W
Pakkevægt: 10200 g
Pakkedybde: 340 mm
Pakkebredde: 785 mm
Pakkehøjde: 340 mm
Antal: 1
Lampetype: Halogen
Støjniveau: 67 dB
Luftstrøm: 295 m³/t
Energieffektivitetsklasse: E
Pæreeffekt: 20 W
Antal lyskilder: 2 pære(r )
Montering: Loft
Maksimal ekstraktionseffekt: 295 m³/t
Væske - dynamisk effektivitetsklasse: E
Lys - effektivitetsklasse: E
Fedt - filtrering effektivitetsklasse: D
Passende til rumtype: Køkken
Ventilator diameter: - mm

Har du brug for hjælp?

Hvis du har brug for hjælp til Rosieres RHG7310IN stil et spørgsmål nedenfor, og andre brugere vil svare dig


Emhætte Rosieres Manualer

Emhætte Manualer

Nyeste Emhætte Manualer