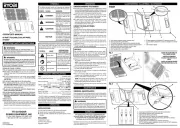
60 WATT FOLDABLE SOLAR PANEL
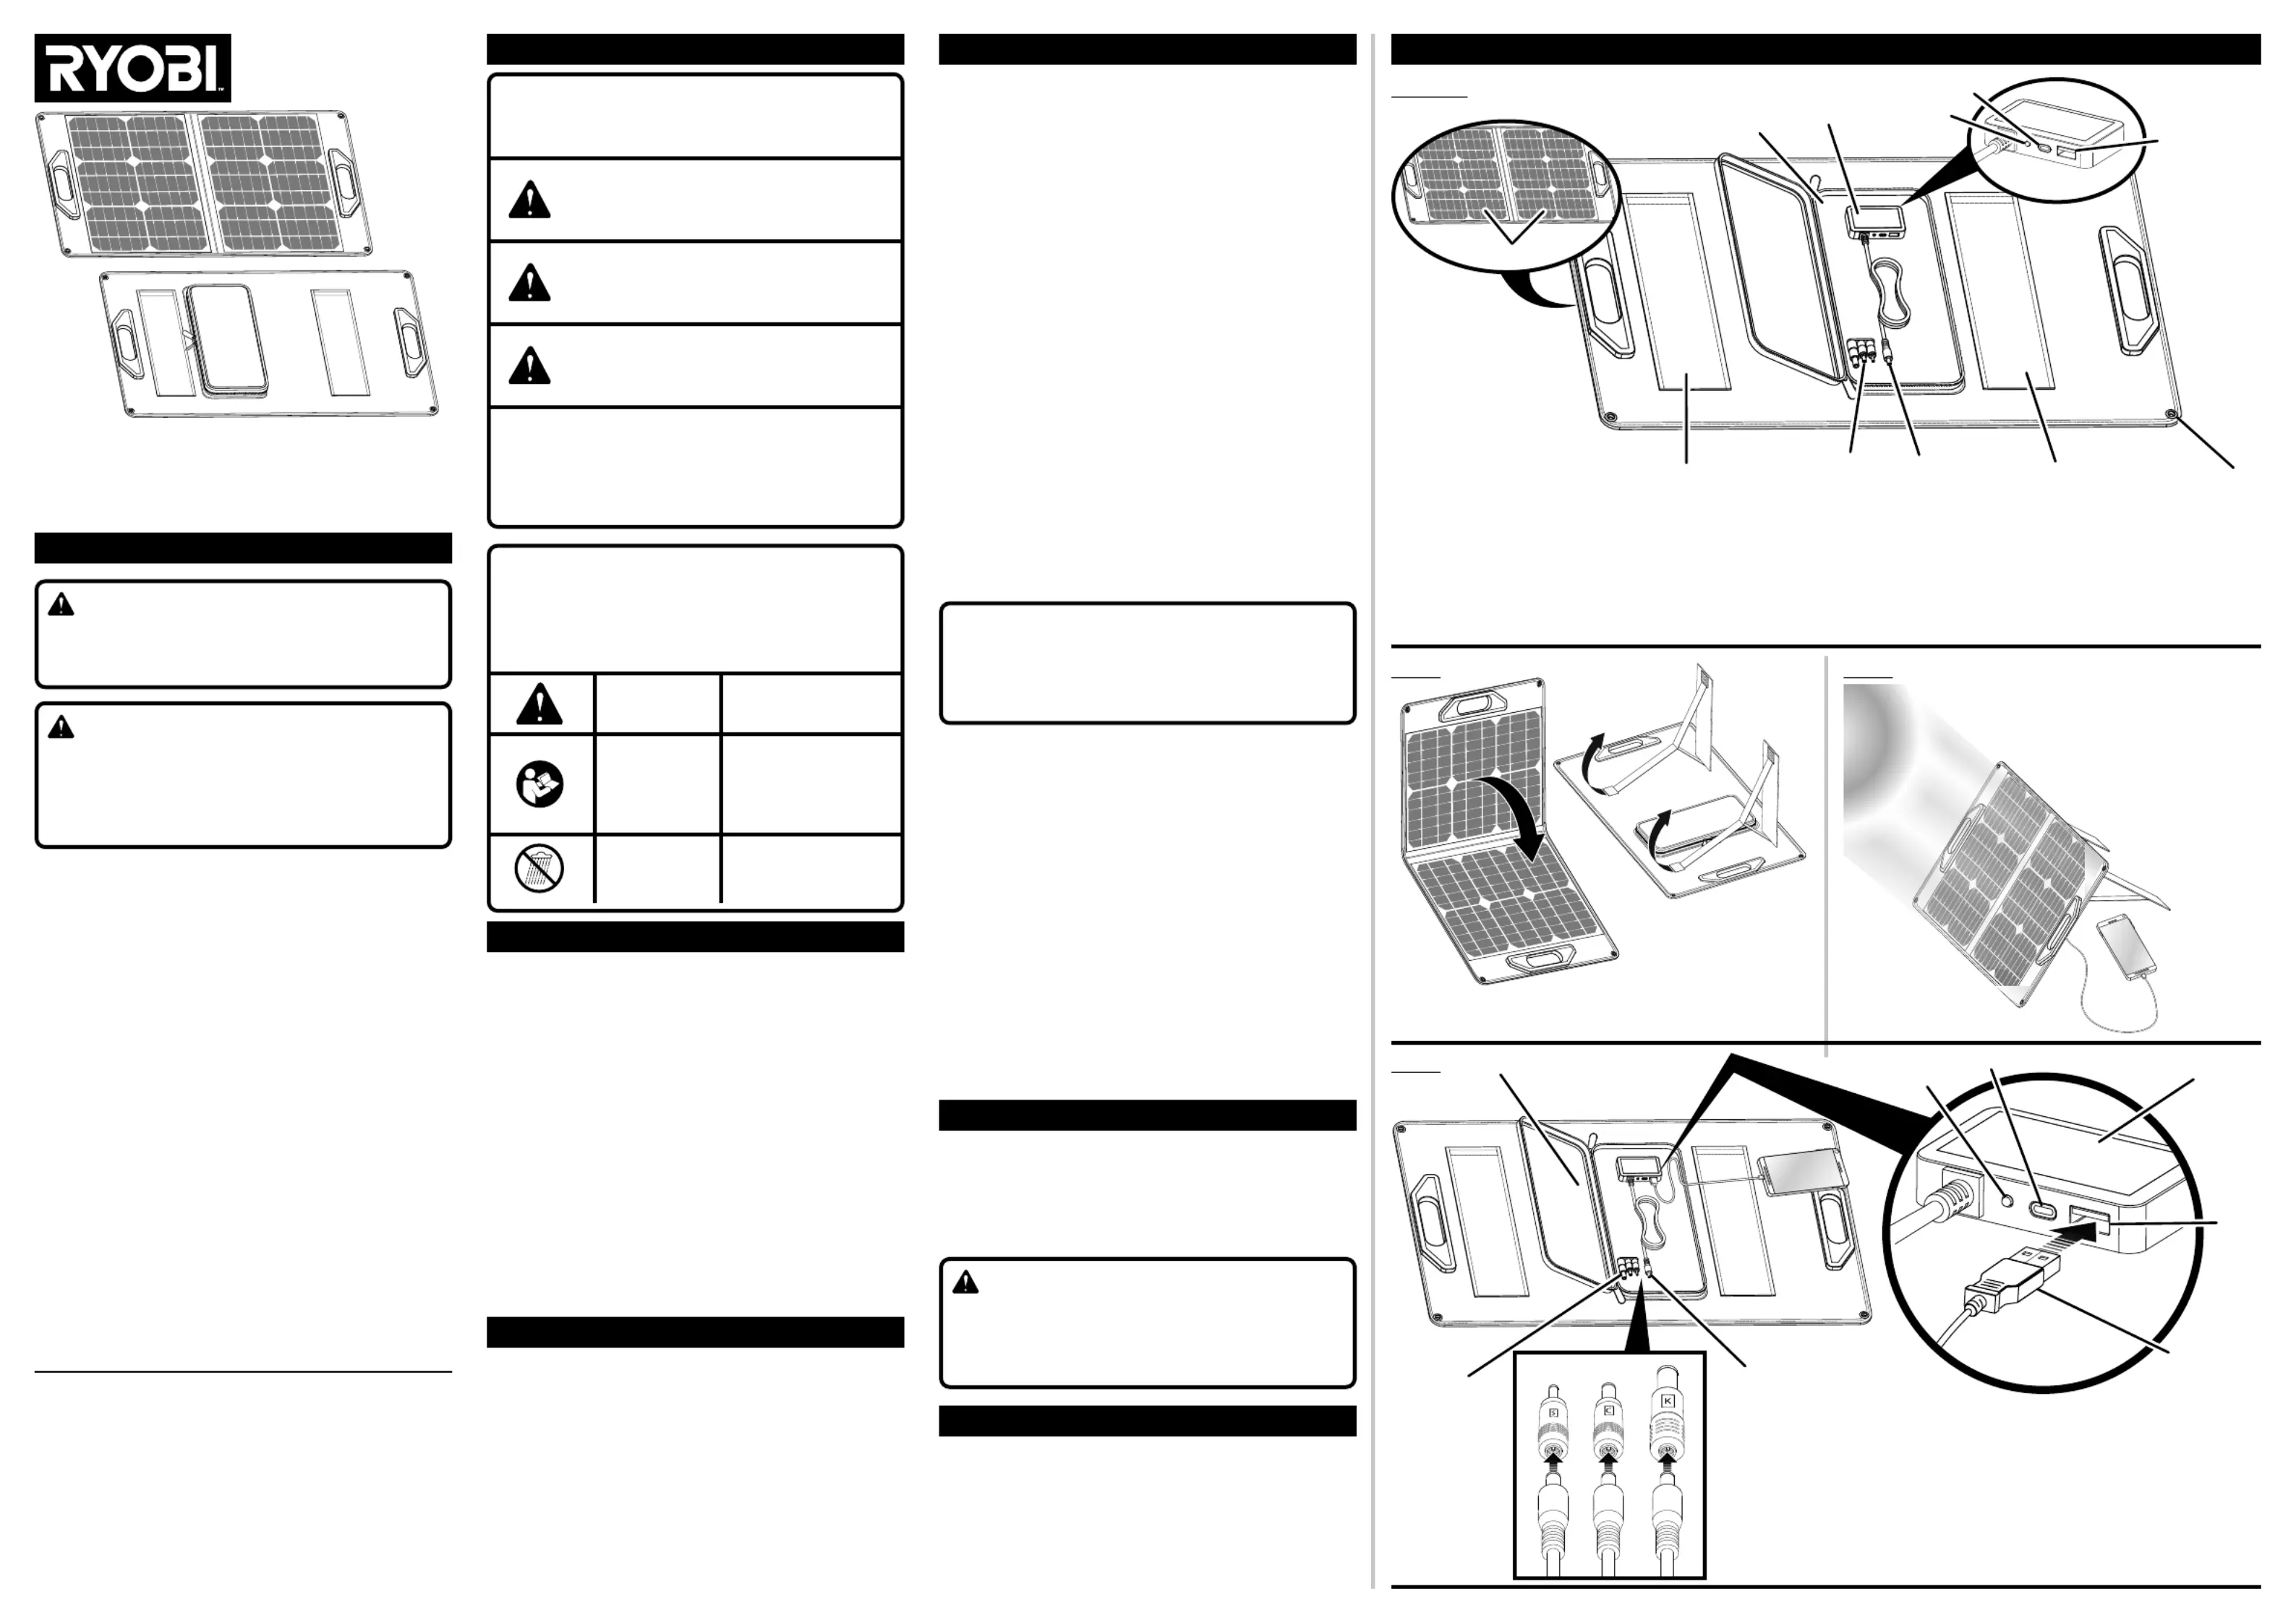
A - Storage pocket (pochette de rangement, bolsillo de almacenamiento)
B - Solar controller (contrôleur solaire, controlador solar)
C - USB-A port (port USB-A, puerto USB-A)
D - LED indicator (témoin DÉL indicator, LED de encendido indicador)
E - USB-A cable (not included) [câble USB-A (non inclus), cable USB-A (no incluye)]
F - USB-C port (port USB-C, puerto USB-C)
G - DC power plug (prise d’alimentation CC, enchufe de corriente CC)
H - MPPT DC input plug adapters (adaptateurs de prise d'entrée CC MPPT, adaptadores
de enchufe de entrada CC MPPT)
IMPORTANT SAFETY INSTRUCTIONS
READ AND UNDERSTAND ALL INSTRUCTIONS. Failure
to follow all instructions listed below may result in electric
shock, fire and/or serious injury.
To reduce the risk of injury, do not attempt to use this
product until you have read thoroughly and understand
completely this operator’s manual. Ensure compatibility
and fit before using this accessory. Do not use this acces-
sory if a part is damaged or missing.
Keep out of reach of children.
Do not expose the solar panel to rain or wet conditions.
Use only in a dry location. Do not allow any liquid to get
inside the solar panel. Do not submerge the solar panel in
As with all electrical devices, use caution when plugging/
unplugging other devices into this unit. Do not force plugs
Do not put foreign objects into the solar panel.
For optimal performance, only use the solar panel
with good light exposure. Avoid using the solar panel in
screened windows, tinted windows, windows with dividers,
and windows with obstructed views.
Do not use a solar panel that has been dropped, punc-
tured, or received a sharp blow.
Do not disassemble the solar components of the panel.
CAUTION – HOT SURFACES MAY BE PRESENT ON ALL
PARTS OF THIS PRODUCT – EXERCISE CAUTION WHEN
Save these instructions. Refer to them frequently and use
them to instruct others who may use this product. If you loan
someone this product, loan them these instructions also to
prevent misuse of the product and possible injury.
The following signal words and meanings are intended
to explain the levels of risk associated with this product.
Indicates a hazardous situ-
ation, which, if not avoided,
will result in death or seri-
Indicates a hazardous situ-
ation, which, if not avoided,
Indicates a hazardous situ-
ation, that, if not avoided,
may result in minor or mod-
(Without Safety Alert Sym-
bol) Indicates information
considered important, but
not related to a potential
injury (e.g. messages relat-
Some of the following symbols may be used on this prod-
uct. Please study them and learn their meaning. Proper
interpretation of these symbols will allow you to operate
the product better and safer.
Rain Symbol Do not expose to rain.
Watts 60 Watts (rated) .............................................................
USB-A Output Fast Charge 5V (3.4A), 9V (2.5A), .....................
USB-C Output PD 5V (3A), 9V (3A), .........................................
12V (3A), 15V (3A), 20V (2A) DC - 45W MAX.
.......................... USB-A 5V 1.7A MAX.,
9V 1.3A , 12V 1A DC + USB-C 5V 1.5A MAX. MAX. MAX.,
9V 1.5A , 12V 1.5A , 15V 1.5A DCMAX. MAX. MAX.
...........................................18V (3.4A) 59W MAX.
Barrel Plug Output 5.5 x 2.1mm, 3.3A ......................................
.......... S (3.5 x 1.35mm), C (5.5 x 2.5mm),
* This DC Output is unregulated. Do not plug barrel connector
into laptop, computer, or any other small electronic device. Use
only with devices that have a built in MPPT (Maximum Power
Point Tracking). Additional adaptors or connectors may be
required to plug into your device.
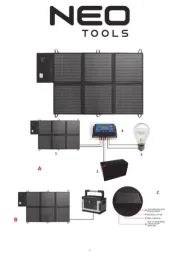
You may use this product for the following purposes:
Operating and charging USB-powered devices
Charge 18V + batteries with compatible power inverter/ONE
The solar panel’s charging performance is dependent on several
factors including geographic location, weather conditions, and
air quality. Changes in these factors can positively or negatively
impact the amount of charge provided by the panel.
The solar panel works by converting energy from direct
sunlight into electricity. The more direct sunlight the solar
panel receives, the more electricity it generates.
For best results, do not position the solar panel in areas
where sunlight is obstructed. Trees, awnings, overhangs,
and other objects that block or diffuse sunlight can reduce
the performance of the solar panel.
The solar panel can be used laying flat on the ground or level
surface, or it can be attached to a vertical surface using one
of the several hanging loops located around the edge of the
NOTE: The solar panel will produce the most energy when
the face of the panels is positioned to face directly towards
Release the hook-and-loop flap and unfold the solar panels.
Select a well-lit area to set up and use the solar panel for the
Spread the panels on a horizontal surface or suspend the
panels vertically using the hanging loops.
Be sure the solar panel is fastened securely when used
vertically. Damage can occur if the solar panel should
accidentally fall. Do not use the solar panel if it has been
dropped, punctured, or received a sharp blow.
Adjust the angle of the solar panel to face the angle of the
sun's rays for the best results.
NOTE: Overcast conditions can greatly reduce the perfor-
mance of the solar panels. Heavy clouds or fog may prevent
the solar panels from generating any power.
Once the solar panel begins to generate power, the LED on
the solar controller will illuminate.
Plug devices you want to power or charge into the USB ports
The fast charging USB ports support powering and/or
charging most compatible electronic devices such as cell
phones, most tablets, and power banks.
NOTE: The storage pocket provides a place to store a cell
phone or cables during use. Be sure to empty and close the
pocket before folding the solar panels for storage.
When finished, disconnect your devices and fold the solar
Avoid using solvents when cleaning plastic parts. Most plastics
are susceptible to damage from various types of commercial
solvents and may be damaged by their use. Use clean cloths
to remove dirt, dust, lubricant, grease, etc.
Do not at any time let brake fluids, gasoline, petroleum-
based products, penetrating lubricants, etc., come in con-
tact with plastic parts. Chemicals can damage, weaken or
destroy plastic which could result in serious personal injury.
This product has a Three-year Limited Warranty for
personal, family, or household use (90 days for business
or commercial use). For warranty details, visit www.
ryobitools.com or call (toll free) 1-800-525-2579.
Model/item number on product may have additional letters at the end.
These letters designate manufacturing information and should be pro-
vided when calling for service.
ILLUSTRATIONS / ILLUSTRÉES / ILUSTRADAS
P.O. Box 1288, Anderson, SC 29622, USA
1-800-525-2579 www.ryobitools.com
A - Solar controller (contrôleur solaire, controlador solar)
B - USB-A port (port USB-A, puerto USB-A)
C - LED indicator (témoin DÉL indicator, LED de encendido indicador)
D - Storage pocket (pochette de rangement, bolsillo de almacenamiento)
E - Hanging grommets (guide à suspension, ojal para colgar)
F - Solar panels (panneaux solaires, paneles solar)
G - USB-C port (port USB-C, puerto USB-C)
ADJUST THE SOLAR PANELS TO
SOLAIRES POUR FAIR FACE AU
AJUSTE LOS PANELES SOLARES
PARA QUE MIREN HACIA EL SOL
H - DC power plug (prise d’alimentation CC, enchufe de corriente CC)
I - DC plug adaptors (adaptateurs de prise CC, adaptadores de enchufe
J - Stand (support, soporte)