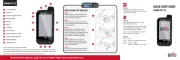
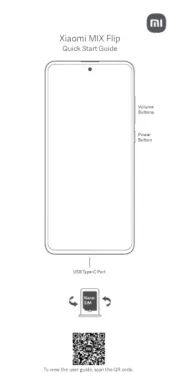
Device layout
GT-E1207Y
user manual
www.samsung.com
Printed in Korea
GH68-40453A Rev.1.1
English (SWA). 12/2013
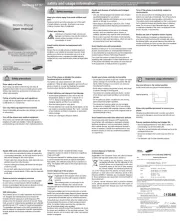
Some content may differ from your device depending on the region •
or service provider.
Third party services may be terminated or interrupted at any time, •
and Samsung makes no representation or warranty that any
content or service will remain available for any period of time.
This product includes certain free/open source software. The exact •
terms of the licences, disclaimers, acknowledgements and notices
are available on the Samsung’s website opensource.samsung.com.
Content (high quality content) that requires high CPU and RAM •
usage will affect the overall performance of the device. Applications
related to the content may not work properly depending on the
device’s specifications and the environment that it is used in.
1
2 7
3
6
5
8
9
4
1
Confirm button
From the Home screen,
access the Menu screen; In
the Menu screen, select the
highlighted menu option, or
confirm an input
The key might perform
differently, depending on
the region
2
Dial button
Make or answer a call; From
the Home screen, retrieve
recently dialled, missed, or
received numbers
3
Voicemail button
From the Home screen,
access voicemails (press
and hold)
4
Keypad lock button
From the Home screen, lock
or unlock the keypad (press
and hold)
5
Softkeys
Perform actions indicated at
the bottom of the display
6
Navigation button
From the Home screen,
access user-defined menus;
In the Menu screen, scroll
through menu options
Pre-defined menus might
differ, depending on the
service provider
7
Power button
Turn the device on or off
(press and hold); End a call;
In the Menu screen, cancel
an input and return to the
Home screen
8
Alphanumeric buttons
9
SIM card selection button
From the Home screen,
switch between networks
(press and hold)
Icon Description
No SIM card
No signal
Signal strength
1
Network searching
Battery power level
Call in progress
Call diverting activated
New text message (SMS)
New voicemail message
SOS message feature activated
Normal profile activated
Silent profile activated
Alarm activated
Roaming (outside of normal service area)
10:00
Current time
1. The icon may vary depending on the SIM card setting.
The device displays the following status indicators at the top
of the screen:
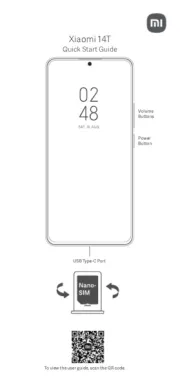
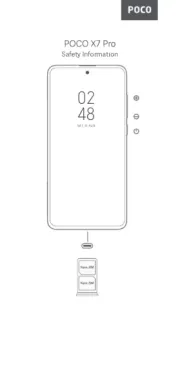
Installing the SIM cards and battery
Remove the back cover and insert the SIM cards.1.
Do not bend or twist the back cover excessively.
Doing so may damage the cover.
Insert the battery and replace the back cover.2.
Charging the battery
Plug the small end of the charger into the 1.
multipurpose jack of the device, and plug the large
end of the charger into an electric socket.
After fully charging, disconnect the device from the 2.
charger. First unplug the charger from the device,
and then unplug it from the electric socket.
Use only Samsung-approved chargers, •
batteries, and cables. Unapproved chargers
or cables can cause battery to explode or
damage the device.
Do not remove the battery before removing •
the charger. This may damage the device.
To save energy, unplug the charger when not
in use. The charger does not have a power
switch, so you must unplug the charger from the
electric socket when not in use to avoid wasting
power. The charger should remain close to
the electric socket and easily accessible while
charging.
Turning the device on or off
Turning the device on
Press and hold the Power button, and then enter the PIN
and press < >, if necessary.OK
Turning the device off
Press and hold the Power button.
If the battery is fully discharged or removed from
the device, the time and date will be reset.
Accessing menus
To access the device’s menus or options,
Press the
Navigation button Scroll to each menu.
Confirm button Launch a menu or an application.
< >Menu Open the Menu screen.
< >Back Return to the previous screen.
[ ] Close the menu or application and
return to the Home screen.
When you access a menu requiring the PIN2, •
you must enter the PIN2 supplied by the SIM
card. For details, contact your service provider.
Samsung is not responsible for any loss of •
passwords or private information or other
damage caused by illegal software.
Entering text
Changing the text input mode
Press [ ] Change to uppercase, lowercase,
or switch to number mode.
Press and hold [ ]
Switch between T9 and ABC
mode. Depending on the region,
users might be able to use an input
mode for specific language.
Press [ ] Switch to symbol mode.
Press and hold [ ] Select an input mode or change
the input language.
T9 mode
Press the appropriate alphanumeric buttons to enter 1.
an entire word.
When the word displays correctly, press [2. ] to insert 0
a space. If the word does not display, press the
Navigation button up or down to select an alternate
word.
ABC mode
Press an appropriate alphanumeric button until the
character appears on the display.
Sending and viewing messages
< Menu> →Messages
Sending messages
Press 1. Create message.
Press <2. > Options → Add recipients → Contact
list to open the phonebook.
Select a contact and press the <3. > Options → Add.
Or, enter a contact number.
Scroll down and enter a text message.4.
See “Entering text”.
Press <5. > Options → Send.
Viewing messages
Press and select a message to read.Inbox
Number mode
Press an appropriate alphanumeric button to enter a
number.
Symbol mode
Press an appropriate alphanumeric button to enter a
symbol.
Other features for text input
Press the
Navigation button Move the cursor.
Press < Delete a character one by one.Clear>
Press and hold
< >Clear Delete characters quickly.
Press [ Insert a space.0]
Press [ Enter punctuation marks.1]
Making or answering a call
To make a call, enter a phone number and press [• ].
To end a call, press [• ].
To call a recently dialled number, press [• ] to select a
number, and press [ ] again to dial the number.
To make a call using the phonebook, press <• Menu> →
Contacts Contact list →, select a contact and press [ ].
To answer an incoming call, press [• ].
Managing contacts
Save data, such as names, phone numbers and
personal information in the device memory or SIM card.
< Menu> →Contacts
Users can change the memory location
by pressing < > Menu → Contacts →
Management Save new contact to → and
selecting a memory location.
Adding new contacts
Press 1. a memory location (if Create contact →
necessary).
Enter contact information and press the Confirm 2.
button.
Editing contacts
Select a contact and press <1. > Options → Edit.
Edit items and press the Confirm button to save.2.
Deleting contacts
Select a contact and press < > Options → Delete.
Using the alarm
< Menu> →Alarms
Setting alarms
Select an empty alarm location.1.
Enter details and press <2. >.Save
Stopping alarms
When an alarm rings,
Press <• Confirm> to stop the alarm.
Press <• Snooze> to silence the alarm for the snooze
period.
Deactivating alarms
Select an item and press <1. >.Select
Set 2. to Alarm activation Off.
Listening to the FM radio
< Menu> →Applications → FM Radio
Activating the FM radio
Plug a headset into the device.1.
Press the Confirm button to turn on the FM radio.2.
Press <3. > to start automatic tuning.Yes
Users may be asked to start automatic tuning when
accessing the FM radio for the first time.
Control the FM radio using the following buttons:4.
Buttons Function
Confirm button Turn the FM radio on or off.
Navigation
button
Left/Right: Fine-tune the •
frequency; Search for the next
available station (press and hold).
Up/Down: Adjust the volume.•
Adding radio stations to the favourites list
Plug a headset into the device.1.
Press <2. > Options → Add to Favourites.
Assign a button and press <3. >.Select
Customising the device
Settings control how applications and functions operate.
Change them to customise the device. Appearances,
sound profiles, call actions, and many more can be
customised.
< Menu> →Settings
Menu Description
SIM cards
management Change the SIM card settings.
Profiles Change the alert type, ringtone,
volume, etc.
Display Alter wallpaper, theme, brightness,
etc.
Time and date Change the time and date of the
device.
Phone Change the device language, etc.
Applications Set application settings.
Security Set locks or change passwords.
Network Change network profiles settings.
Memory Clear memory or check memory
status.
Reset Reset the device.
Managing calendar
< Menu> →Calendar
Creating events
Press <1. > Options → Create.
Enter details of the event and press <2. > Options →
Save.
Viewing events
Select a date and press the Confirm button.
Managing SIM cards
The device supports dual SIM mode that allows the use
of two networks without changing the SIM card.
< Menu> →Settings → SIM cards
management
Activating SIM cards
Press 1. and select a SIM card.Network
Press 2. to activate the card.Change
Switching SIM cards automatically
Press 1. < > to select SIM auto switch →Change On.
Set starting and ending time to use each SIM card.2.
Changing names and icons of the SIM cards
Press 1. and select a SIM card.Register card
Change the name and icon of the card.2.
Your Device supports dual standby with two
different networks. You cannot make or answer
calls on both networks at the same time.
Activate the Smart dual SIM
Press 1. to activate the Smart Dual SIM always on
dual SIM feature.
Select an option and press <2. > Options → Save.
Adjusting the sound profiles
< Menu> →Settings → Profiles
To switch to another profile, select it from the list.
Changing the ringtone
Select a profile and press <1. > Options → Edit.
Press 2. Call ringtone.
Select a ringtone and press the Confirm button.3.
Changing the message alert tone
Select a profile and press <1. > Options → Edit.
Press 2. Message alert tone.
Select a tone and press the Confirm button.3.
Adjusting the volume of the ringtone
Select a profile and press <1. > Options → Edit.
Press 2. Volume Call alert →.
Adjust the volume and press <3. >.Save
Adjusting the volume of voice during a call
While a call is in progress, press the Navigation button
up or down to adjust the volume.
Using shortcuts
< Menu> →Settings → → Phone Shortcuts
Editing shortcuts
Select a Navigation button and press <1. > Options →
Change.
Select an application to assign and press <2. >.Save
Customising the Home screen
Customise the Home screen with applications, contacts,
calendar, and many more.
< Menu> →Settings → → Display Shortcuts
toolbar
Customising the shortcuts toolbar
Press <1. > Options → Edit.
Select items to add to the shortcuts toolbar and 2.
press < >.Save
New items can be added to empty spaces.
Using the SOS message feature
Send SOS messages to family or friends in an
emergency.
< Menu> →Messages → → Settings SOS
messages
Activating the SOS message feature
Press 1. < > to set Sending options →Change
Sending SOS On to .
Enter recipient and press the Confirm button.2.
Set the number of times to repeat the message.3.
Edit the SOS message (if necessary).4.
Press <5. > < >.Back →Yes
Sending SOS messages
With the keypad locked, press [1. ] four times to
send an SOS message to preset numbers.
To exit SOS mode, press [2. ].
Battery
Making fake calls
< Menu> →Settings → → Applications Call
→ Fake call
Activating the fake call feature
Set to Fake call hot key On.
Making fake calls
From the Home screen, press and hold the Navigation •
button down.
With the buttons locked, press the Navigation button down •
four times.
Using the torch
< Menu> →Applications → Torch light
Activating the torch
Press to activate the torch, or from the Home On
screen, press and hold the Navigation button up.
Deactivating the torch
Press to deactivate the torch.Off
Back cover SIM cards
To electric socket