1. This section is very important for safety. Read and
understand the following instructions fully and maintain
your instrument properly.
2. The instrument must be calibrated and inspected at
least once a year to maintain its safety and accuracy.
1) Applications: Testing the quality of diodes.
Set the function switch to the / / position.Ω
Select “ ” by pressing the SELECT button.
Apply the black test pins to the cathode of the diode
and the red test pin to the anode.
Make sure that the display shows a diode forward
After replacing the red and black test pins, connect
the red test pin to the cathode of the diode and
connect the black test pin to the anode.
Make sure display is the same as when the test lead
is not connected (OL indication).
Successful completion of steps
indicates that there is no problem with the
After measurement, release the red and black test
pins from the object measured.
1) Applications: Measuring the capacitance of low leakage
condenser such as film condenser.
Set the function switch to the position.
Apply the red and black test pins to a conductor to
Read the value on the display.
After measurement, release the red and black test
pins from the object measured.
Rep la ce b ot h of t he t wo ba tt e ri es in the ba t te ry
compartment with new ones.
Place the battery compartment cover and tighten the
• About the batteries when shipped from the factory
The batteries incorporated when shipped from the
factory are monitor batteries, so their service life may be
shorter than that of brand-new batteries. A monitor
battery is a type of battery used to check the functions of
and performance of the product.
Re mo v e t h e t w o f i x in g s c r e ws f ro m t h e b a t t er y
Slide the battery compartment cover downward to
1) Applications: Measuring the resistance of resistors and
Set the function switch to the / / position.Ω
Apply the red and black test pins to an object to
The reading is shown in the display.
After measurement, release the red and black test
pins from the object measured.
When the position of this instrument is changed
during DCA measurement, the display may fluctuate
Because the AC sensoring system of this instrument
is an average value system, an error in the measured
value will occur with waveforms other than sine
Ac cu rac y i s gua rante ed in AC A m eas ur eme nt
Measurement of an inverter power supply circuit may
The open voltage of the input terminals is almost the
same as the battery voltage.
If measurement is likely to be influenced by noise,
shield the object to measure with negative potential
( C O M ) . I f a f i n g e r t o uc h es a t es t p i n d u ri n g
measurement, measurement will be influenced by
the resistance in the human body, and that results in
Open circuit voltage: Approx. 0.78 V in 660 Ω range
Approx. 1.2 V in other range
Resistance cannot be measured when voltage is
Never apply voltage to the input terminals.
1. Make sure that no low battery indication appear in the
2. Never use meter if the meter or test leads are damaged
3. Check continuity of test leads.
Correct measurement may not be possible in areas
exposed to strong magnetic fields generated by electrical
equipment such as a transformer or large current path,
electromagnetic waves generated by wireless equipment,
or areas where electrostatic charges are generated.
This instrument may malfunction or may not be able to
take correct measurements with special waveforms such
as those produced by an inverter circuit.
Display in REL measurement
DCV: Vo l t a g e o f t h e b a t t e r y a n d D C c i r c u i t a re
ACV: Sine wave AC voltage, such as lighting voltage, is
Set the function switch to the “V” position and select
either DCV or ACV with the SELECT button.
Apply the red and black test pins to the circuit to
• For measurement of DCV, apply the black test pin to
the negative potential side of the circuit to measure
and the red test pin to the positive potential side.
• For measurement of ACV, apply the red and black
test pins to the circuit to measure.
The reading of voltage is shown on the display.
After measurement, release the red and black test
pins from the object measured.
Readings are unstable when test leads are opened.
Accuracy is guaranteed in the case of sine wave.
The frequencies where accuracy is guaranteed in the
ACV measurement are 40 ~ 100 Hz in the 660 mV
range and 40 ~ 400 Hz in other ranges.
Although the terminals to be measured are short-
circuited in the AC 660 mV and AC 6.6 V ranges, up
to 10 counts may remain in the AC 660 mV range
and up to 7 counts may remain in the AC 6.6 V
Measurement of an inverter power supply circuit may
660.0 Hz, 6.600 kHz, 66.00 kHz
20.0 % ~ 80.0 % at 50/60 Hz
To ensure the meter is used safely, be sure to observe the
instructions when using the instrument.
Never use meter on the electric circuits that Exceed 3.6 kVA.
Pay special attention when measuring voltages of AC 33
Vrms (46.7 V peak) or DC 70 V or more to avoid injury.
3. The clamp sensor provided with this instrument is
exclusively for low-voltage use. Perform clamp current
measurement with 600 V or less lines.
4. Never apply an input signal exceeding the maximum
Never use meter for measuring the line connected with
equipment (i.e. motors) that generates induced or surge
voltage since it may exceed the maximum allowable voltage.
Never use meter if the meter or test leads are damaged or broken.
7. Never use uncased meter.
Always keep your fingers behind the finger guards on the probe
1. The clamp sensor of this instrument is exclusively for low
voltage. Perform the clamp current measurement on a
2. Do not turn the function switch during measurement.
3. During measurement, do not hold the clamp sensor at
any point beyond the barrier.
4. To prevent electric shock, be sure to store the test probe
and test lead in their designated storage compartments.
1. Never apply an input signal exceeding the maximum
2. Do not turn the function switch during measurement.
3. Do not hold the test probe by a section closer to the test
pin side behind the finger guard.
Never apply voltage to the input terminals.
Never apply voltage to the input terminals.
When high resistance is measured, the displayed value
may fluctuate due to external induction.
SAFETY PRECAUTIONS Before use, read the following safety precautions.
This instruction manual explains how to safely use your new
PM33a digital multimeter with clamp sensor. Before use, please
read this manual thoroughly. After reading it, keep it together
with the product so you can refer to it when necessary.
Using this product in ways not specified in this manual may
damage its protection function.
Instructions given under the “ WARNING” and “ CAUTION”
headings must be followed to prevent accidental burns or
1-1 Explanation of Warning Symbols
The meanings of the symbols used in this manual and on the
Very important instruction for safe use.
The warning messages are intended to prevent accidents
to operating personnel such as burn and electrical shock.
The caution messages are intended to prevent damage to
: Direct current (DC) : Ground 〜:
: Capacitance : Resistance : FrequencyΩ Hz
: Continuity : Duty cycleDUTY
Double insulation (Protection Class II)
1-2 Warning Instruction for Safe Use
additional functions, as well as enabling measurement of small type
communication equipment, electrical home appliances, lighting
voltage and batteries of various types.
A current clamp sensor is also provided that can measure up to 100
A DC/AC, allowing measurement of the electric consumption of
equipment that uses an automotive battery or AC power supply. This
can be done by simply clamping a single line of electrical wiring in
the device being measured.
The inst rument is compac t and lig htweigh t and ha s been
designed in accordance with the safety standard EN 61010-1.
Provided with a current clamp sensor that can measure up to 100
The clamp sensor has a thin U-shaped sensor design that is 7 mm
thick. Also because the inclination angle of the sensor is variable
between 0 ° and 180 °, the display section of the main unit can be
adjusted to an easy-to-view angle.
Provided with RANGE hold, MAX/MIN hold, REL/ZERO and DATA
HOLD functions that are convenient for measurement.
When the Hz/DUTY measurement function is used during the
activation of the ACV/ACA function, the frequency and duty ratio
of the signals that are being measured can also be measured.
Provided with an Auto Power Off function (approx. 30 min.), which
The storable sections of the test leads and test probes use an
elastomeric material that is easy to wind and store.
[2] APPLICATION AND FEATURES
This instrument is a pocket-type digital multimeter with clamp sensor
designed for measurement of weak current circuits (CAT. II 600 V,
CAT. III 300 V). It plays an important role in circuitry analysis using
7-1 Warranty and Provision
Sanwa offers comprehensive warranty services to its end-users and
to its product resellers. Under Sanwa’s general warranty policy, each
instrument is warranted to be free from defects in workmanship or
material under normal use for the period of one (1) year from the
This warranty policy is valid within the country of purchase only, and
applied only to the product purchased from Sanwa authorized agent
Sanwa reserves the right to inspect all warranty claims to determine
the extent to which the warranty policy shall apply. This warranty
shall not apply to fuses, disposables batteries, or any product or
parts, which have been subject to one of the following causes:
1. A failure due to improper handling or use that deviates
from the instruction manual.
2. A failure due to inadequate repair or modification by
people other than Sanwa service personnel.
3. A failure due to causes not attributable to this product
such as fire, flood and other natural disaster.
4. Non-operation due to a discharged battery.
5. A failure or damage due to transportation, relocation or
dropping after the purchase.
Customers are asked to provide the following information when
1. Customer name, address, and contact information
2. Description of problem
3. Description of product configuration
6. Proof of Date-of-Purchase
7. Where you purchased the product
Please contact Sanwa authorized agent / distributor /
service provider, listed in our website, in your country with
above information. An instrument sent to Sanwa / agent /
distributor without those information will be returned to the
1) Prior to requesting repair, please check the following:
• Capacity and installation polarity of the built-in
• Continuity of the test leads.
8-1 General Specifications
CAT II: Primary electrical circuits in equipment connected to
an AC electrical outlet by a power cord.
CAT III: Pr im a ry e lec tr ica l circu it s o f he avy equ ip men t
connected directly to the distribution panel, and
feeders from the distribution panel to outlets.
8-2 Measurement Range and Accuracy
Accuracy assurance range: 23 ± 5 °C & less than 80 % R.H.
• Open voltage: Approx. 1.2 V
• Open voltage: Approx. 0.78 V
resistance of the resistor to
• Open voltage: Almost battery voltage
• Buzzer sounds at less than 30 Ω
• Open voltage: Approx. 1.2 V
after canceling display value
• Measurement range: 20 Hz
• Accuracy with input voltage
sensitivity of 10 ~ 600 Vrms
• 50/60 Hz rectangular wave,
after canceling display value
by the ZERO set function.
• Accuracy in the case of sin
Note: Correct measurement may not be possible in areas
exposed to strong magnetic fields generated by
electrical equipment such as a transformer or large
current path, electromagnetic waves generated by
wireless equipment, or areas where electrostatic
Ex.) Measurement of DC voltage (DCmV)
Range accuracy: 660 mV range … ± (1.1 %rdg±3dgt)
Error: ± (100.0 mV x 1.1 %±3dgt) = ±1.4
True value: 100.0 mV ± 1.4 mV (in a range of
3dgt in the 660 mV range corresponds to 0.3 mV.
Specifications and external appearance of the product
described above may be revised for modified without
2) Repair during the warranty period:
The failed meter will be repaired in accordance with the
conditions stipulated in “7-1 Warranty and Provision”.
3) Repair after the warranty period has expired:
In some cases, repair and transportation cost may
become higher than the price of the product. Please
contact Sanwa authorized agent / service provider in
advance. The minimum retention period of service
functional parts is 6 years after the discontinuation of
manufacture. This retention period is the repair warranty
period. Please note, however, if such functional parts
become unavailable for reasons of discontinuation of
manufacture, etc., the retention period may become
4) Precautions when sending the product to be repaired
To e n s u r e t h e s a f e t y o f t h e p r o d u c t d u r i n g
transportation, place the product in a box that is larger
than the product 5 times or more in volume and fill
cushion materials fully and then clearly mark “Repair
Product Enclosed” on the box surface. The cost of
sending and returning the product shall be borne by
http://www.sanwa-meter.co.jp
E-mail: exp_sales@sanwa-meter.co.jp
5-3 Frequency/DUTY Measurements (Hz / %)
5-8 Clamp Current Measurement (CLAMP A)
5-4 Resistance Measurement ( )Ω
5-7 Capacitance Measurement ( )
Note: AC voltage is regulated by rms, values of sinusoidal wave.
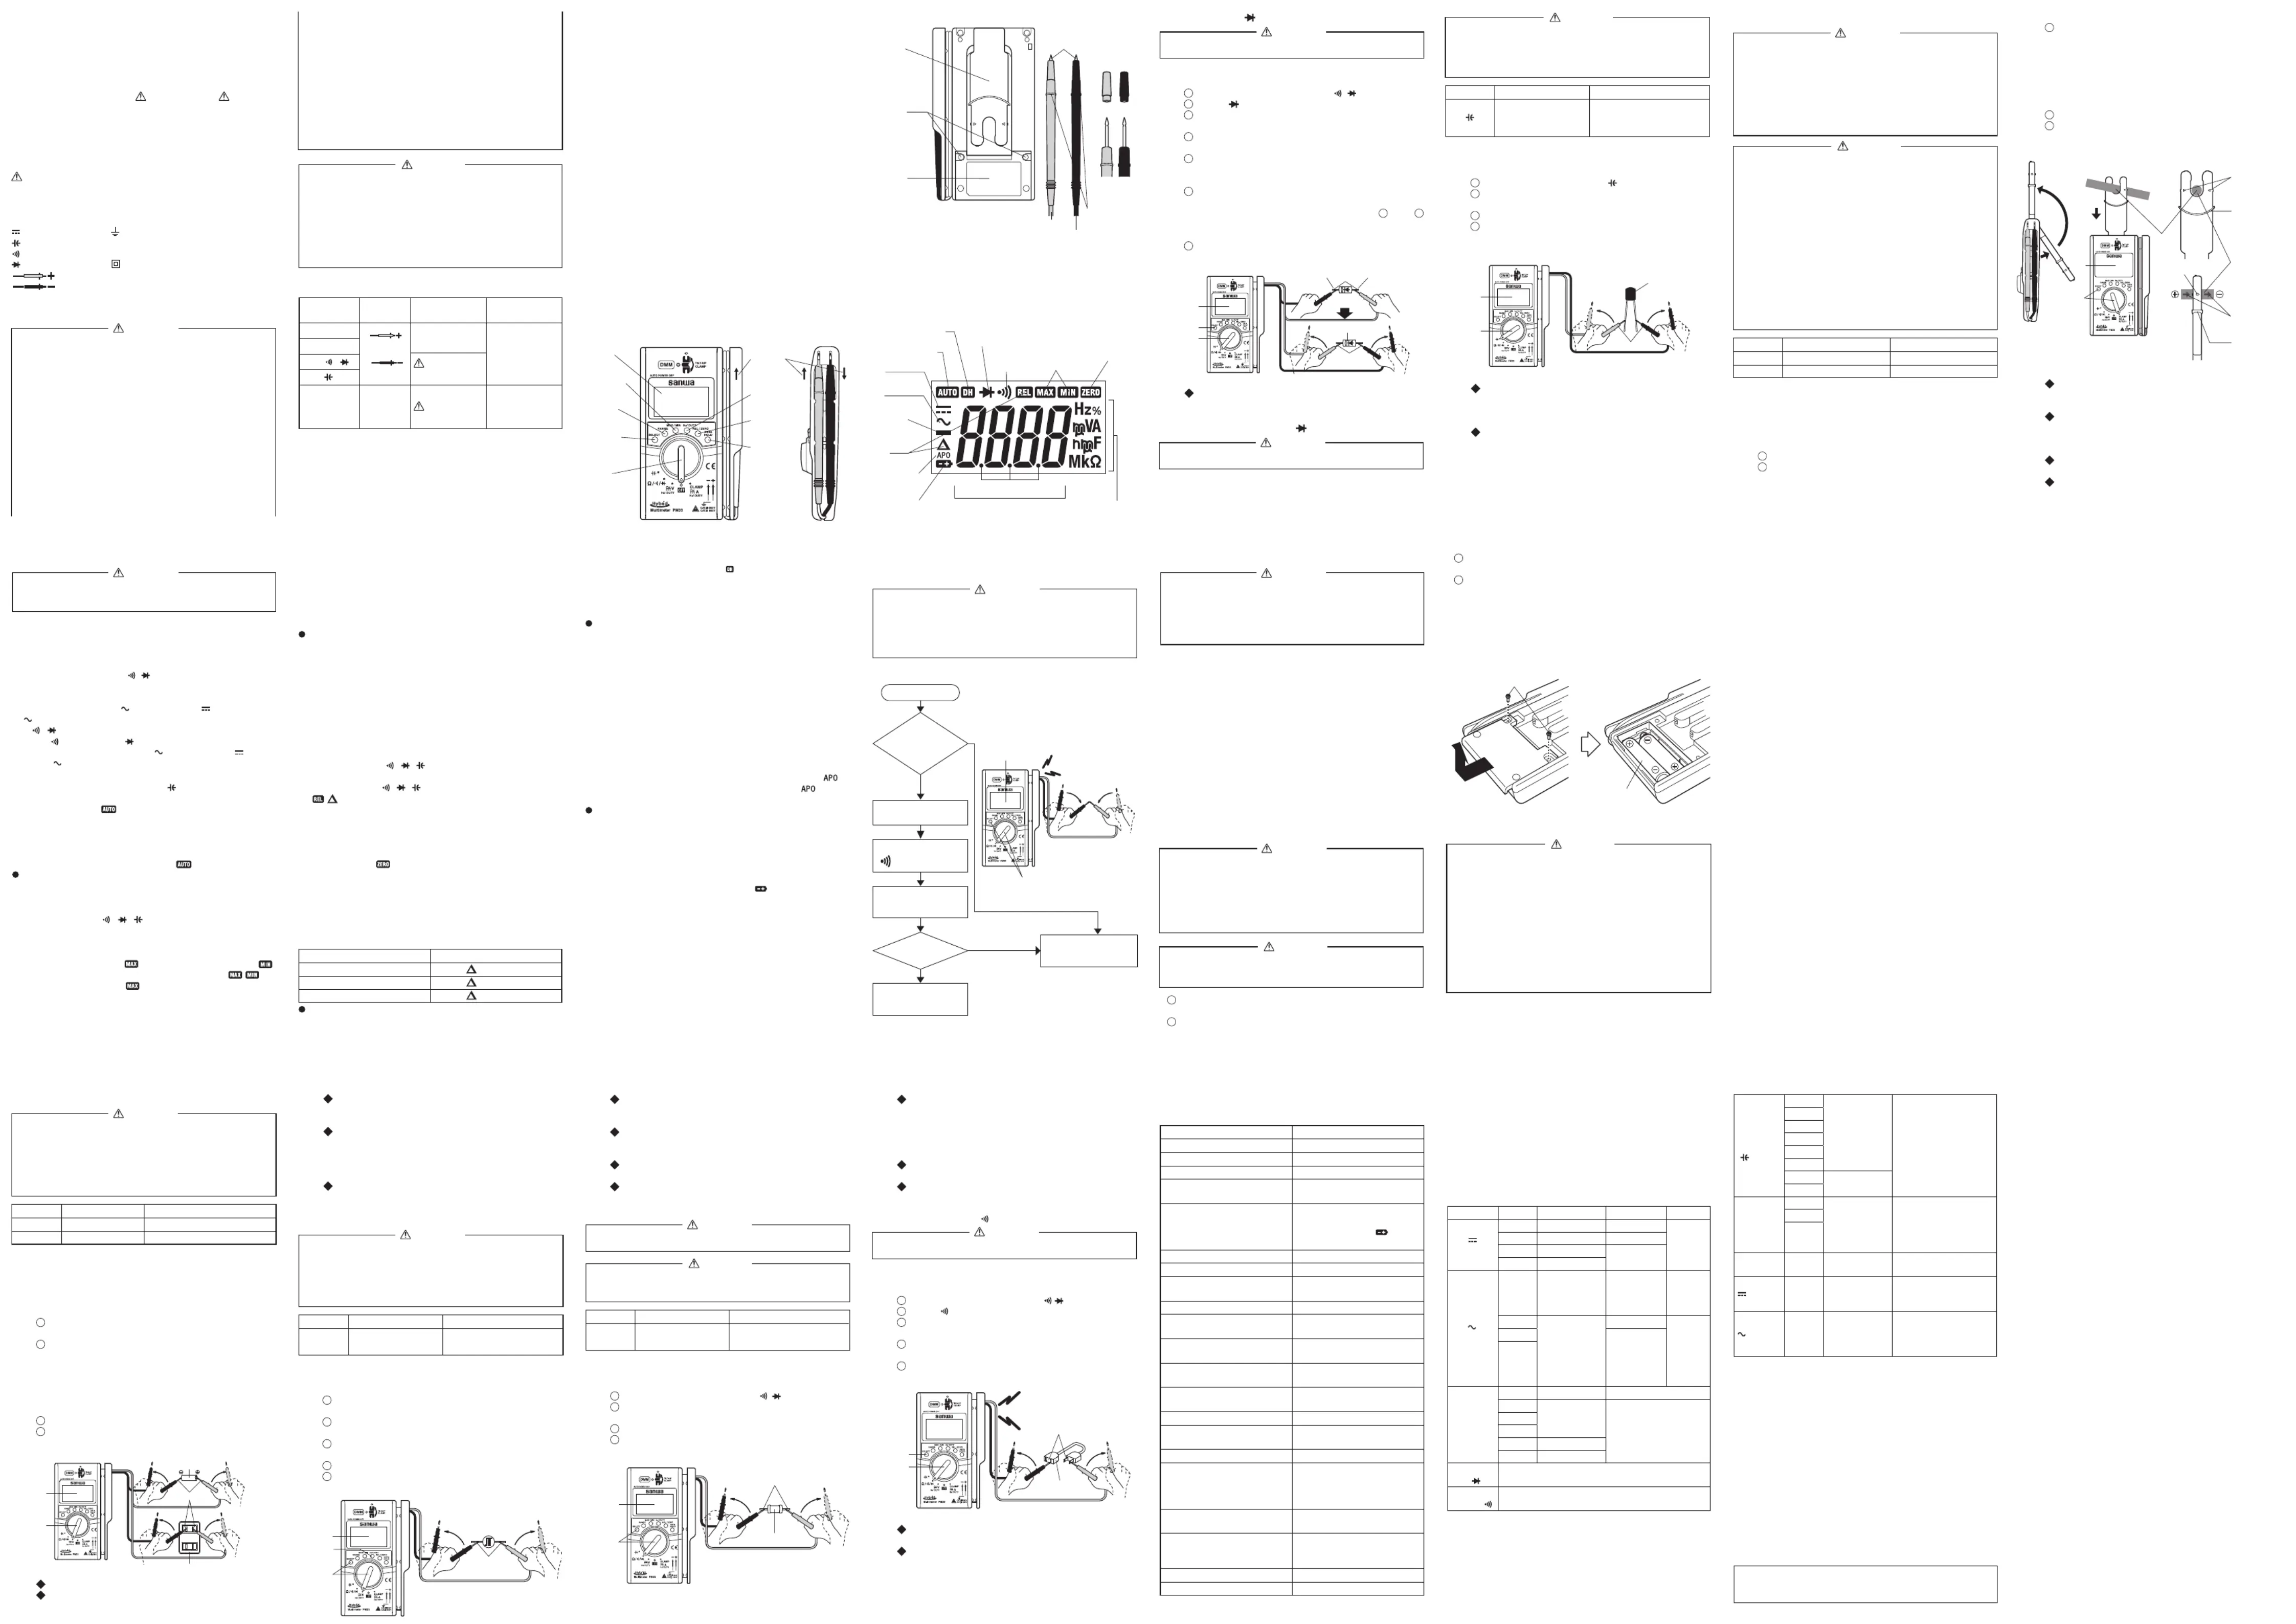
[3] NAME OF COMPONENT UNITS
Numerical indication Measurement
When canceling an operation, do not turn the function
switch during measurement.
[4] DESCRIPTION OF FUNCTIONS
4-1 Power Switch & Function Switch (All Functions):
Turn this switch to turn the power ON and OFF and to select
the measurement function.
4-2 SELECT Button (V · / / · CLAMP A positions):Ω
As this button is pressed, the function switches in the order of
• V position: AC voltage ( ) DC voltage ( ) AC voltage g g
• Ω Ω/ / position: Resistance measurement ( ) g Continuity
check ( ) Diode test ( ) Resistance measurement (g g Ω)
• CLAMP A position: AC current ( ) DC current ( ) AC g g
4-3 RANGE Button (DCV · ACV · · · Functions)Ω
Press this button to engage the manual mode and fix the
When the manual mode is engaged, each press of this button
changes the range. Select an appropriate range while
confirming the unit and the position of the decimal point on
the display. To restore the auto range, keep this button
depressed for more than 1 second (lit ).
T h i s b u t t o n c a n n o t b e u s e d w h e n i n H z / D U T Y
(DCV · ACV · · · · · DCA · ACA Functions):Ω
Press this button to enter the MAX/MIN mode. As this button
is pressed, the measurement range switches in the order of
the arrows ( ) as shown below.g
• MAX value indication (lit ) MIN value indication (lit ) g
g Current measurement value indication (blinking ) g
MAX value indication (lit )
Displays the maximum value of the values measured since
the engagement of the MAX/MIN mode.
Displays the minimum value of the values measured since the
engagement of the MAX/MIN mode.
• Current measurement value indication:
Holds in memory the maximum and minimum values while
displaying the current measurement value. Press this button to
confirm the maximum and minimum values by switching
between the MAX and MIN value indications.
To disengage the MAX/MIN mode , kee p thi s button
depressed for more than 1 second.
When the function or range is switched, the MAX/MIN mode
4-5 Hz/DUTY Button (ACV · ACA Functions):
P r e s s t h i s b u t t o n t o s w i t c h t h e m o d e t o H z / D U T Y
measurement. Each time this button is pressed when the ACV
or ACA function is selected, the mode switches in the order of
the arrows ( ) as shown below.g
ACV or ACA measurement Hz measurement DUTY g g
measurement ACV or ACA measurement.g
(DCV · ACV · · · · · DCA · ACA Functions):Ω
Press this button to enter the REL measurement mode when
the DCV, ACV, , , , , or ACA function is activated Ω
The measurement range will be fixed, and the displayed
value will be set to zero using the input value at the time of
pressing the button as the reference value. To cancel the REL
measurement, press this button again.
Pressing this button in the DCA mode sets the displayed
The value at the time the button is pressed will be canceled,
and the display will show 0.0 A.
To deactivate the ZERO set function, press the button again
and keep it depressed for more than 1 second.
Ex.) Display after the REL/ZERO button is pressed during
W h e n t h e f u nc ti on o r r an g e i s sw i t c h e d, t h e R E L
measurement or ZERO set will be canceled.
660.0 Ω, 6.600 k , 66.00 kΩ Ω,
660.0 k , 6.600 M , 66.0 MΩ Ω Ω
1) Applications: Measuring the frequency and duty of any
Set the function switch at the V position and press
the SELECT button to select ACV.
Press Hz/DUTY button to select the frequency (Hz)
measurement or DUTY ratio measurement.
Apply the red and black test pins to a conductor to
Read the value on the display.
After measurement, release the red and black test
pins from the object measured.
When the input terminal is not connected, the display
ma y f lu c tua t e a nd b e u nst a bl e . T hi s i s n o t a
The frequency measurement range is 20 Hz ~ 66
kHz. The input sensitivity with sine wave alternating
current is 10 ~ 600 Vrms.
Measurement of an inverter power supply circuit may
Measurement with DC-coupled input is not possible.
When the 6.600 nF or 66.00 nF range is used, use the
REL mode to set the values that remain on the
display to “0” (cancelled) before the measurement is
Readings are unstable because of stray capacitance
and the clamp sensor barrier when making measurements.
Be sure to disconnect the test pins from the circuit when
Before starting measurement, make sure that the function
a n d r a n g e a r e p r o p e r l y s e t i n a c c o r d a n c e w i t h t h e
Never use meter with wet hands or in a damp environment.
Neve r open th e in stru ment case exce pt w hen repl acin g
batteries. Do not attempt any alteration of original specifications.
To ensure safety and maintain accuracy, calibrate and
check the instrument at least once a year.
The instrument is for indoor use only.
660.0 mV, 6.600 V, 66.00 V, 600.0 V
660.0 mV, 6.600 V, 66.00 V, 600.0 V
1. Never apply an input signal exceeding the maximum
2. Be sure to disconnect the test pins from the circuit when
3. Always keep your fingers behind the finger guards on
the probe when making measurements.
[5] MEASUREMENT PROCEDURE
If there is no display, the batteries may be exhausted.
4-7 DATA HOLD Button (All Functions)
When this button is pressed, the will be lit in the display and
the value displayed at that time will be maintained. The
display will stay the same even if the measurement input
changes. Pressing this button again will cancel the DATA
HOLD mode and restore the measurement mode.
When the function or range is switched, the DATA HOLD
4-8 Auto Power Off (APO):
The power and display will be turned off automatically when
no switch or button operation is made for about 30 minutes
after the power was turned on.
When a button is pressed or the function switch is turned
during measurement, the time until the Auto Power Off will be
extended an additional 30 minutes. To wake up from the Auto
Power Off mode, press the button again. When returned, the
value at the time of the Auto Power Off will be displayed using
the DATA HOLD mode. To disable this function, turn th e
function switch while pressing any button (except the
SELECT or DATA HOLD button) to turn on the power ( lit ).
When the Auto Power Off mode is engaged, the is lit in
Although power consumption in the Auto Power Off mode
the is less than 1/100 of that of the turned-on status, be sure
to set the power switch to OFF as soon as measurement is
4-9 Low Battery Indication
When the built-in batteries are exhausted and the battery
voltage drops below about 2.3 V, the will appear in the
display. If this icon is lit, replace the batteries with new ones
Never apply voltage to the input terminals.
5-5 Checking Continuity ( )
1) Applications: Checking the continuity of wiring and
Set the function switch to the / / position.Ω
Select “ ” by pressing the SELECT button.
Apply the red and black test pins to a circuit or
conductor wire to measure.
The continuity can be judged by whether the buzzer
After measurement, release the red and black test
pins from the object measured.
The buzzer sounds when the resistance of the circuit
to be measured is less than approx. 30 Ω.
The open circuit voltage between the input terminals
Measurement Double integral method
Over ranging indication “OL” mark indication
Range selection Auto and manual ranges
batteries are exhausted (to
2.3 V or less) with lit or
Sampling rate Approx. 3 times/sec
Current measurement system
AC sensoring Average sensoring
Operating altitude <2000 m,
indoor use, pollution degree 2
temperature/humidity range
23 ± 5 °C, <80 % RH (without
5 ~ 40 °C, <80 % RH (without
Power supply Two LR03 alkaline batteries
Power off after approx. 30
minutes since last operation
Power consumption Approx. 7 mW TYP (at DCV)
Approx. 60 cm for both red
EN61010-1, EN61010-2-030, EN61010-
2-033, EN61010-2-032 CAT. III 300 V,
CAT. II 600 V, EN61010-031
EMC directive, RoHS directive
IEC61326(EMC), EN50581(RoHS)
Accessories Instruction manual
1. Discharge the capacitance before measurement.
2. This is not suitable for measurement of electrolytic
condenser such as a large leakage condenser.
3. It takes a while to measure large capacitance.
1. The measurable diameter of a conductor is 10 mm. Do
not force a cable with an outer diameter of more than 10
mm into the clamp sensor section. Also do not apply
external force to the clamp sensor section.
2. Make sure that the conductor to be measured is aligned
with the center of the arrows on the clamp sensor.
Otherwise, a measurement error will result.
3. Do not let this instrument come near a conductor in
which large c urre nt flo ws or pl ace i t on a strong
magnetic field. Such an environment may cause a
c u r r e n t v a l u e t o b e d i s p l a y e d e v e n t h o u g h n o
measurement is made (an error may occur). Since the
clamp sensor of this instrument is a U-shaped open-type
sensor, it is more susceptible to such an environment
compared than a closed-type sensor.
1. The panel and the case are not resistant to volatile
solvent and must not be cleaned with thinner or alcohol.
2. The panel and the case are not resistant to heat. Do not
place the instrument near heat-generating devices (such
3. Do not store the instrument, in a place where it may be
subjected to vibration or from where it may fall.
4. For storing the instrument, avoid hot, cold or humid
pl a ce s or pl a ces u nd e r di r ec t su nl i ght o r wh ere
condensation is anticipated.
5. W hen the instrument is not going to be used f or
extended time, be sure to remove the batteries.
6.600 nF, 66.00 nF, 660.0 nF,
6.600 μF, 66.00 μF, 660.0 μF
• ACA: No adjustment is necessary.
Align one line of the conductor to be measured with
the center of the arrows on the clamp sensor.
• DCA: Point the object to be measured in the same
direction as the current direction marking. If it is
pointed in the opposite direction, “–” will be
• ACA: The current direction o f the object to be
Read the measurement value in the display.
After measurement, remove the conductor from the
DCA: Measures the current consumption of devices
such as an automotive battery.
ACA: Measures the sine wave alternating current with
40 ~ 400 Hz frequency of power supply facilities.
Raise the clamp sensor from the rear of the main unit.
Set the function switch to the CLAMP A position,
and press the SELECT button to select DCA or ACA.
• DCA: Use the ZERO set function to set the display
value to “0.0 A” before measurement.
6-1 Maintenance and Inspection
• Has the appearance been damaged by falling?
• Is the test lead cord damaged?
• Is the core wire exposed at any place on the test
If the built-in fuse is blown, current measurement is
impossible. Make sure that the test leads are not cut,
referring to the section 5-1.
The manufacturer may conduct calibration and inspection.
For more information, please contact your dealer.
1. To avoid electric shock, do not remove the battery
com par tme nt cover whe n i npu t i s a ppl ied to the
measurement terminal and clamp sensor or when
measurement is being performed.
2. Be sure to confirm that the function switch is set to “OFF”
before replacing the batteries.
Set the batteries with their polarities facing in the correct
Removable test pin covers