Smartwares CL-1658 Manual


Læs gratis den danske manual til Smartwares CL-1658 (4 sider) i kategorien Clockradio. Denne vejledning er vurderet som hjælpsom af 31 personer og har en gennemsnitlig bedømmelse på 4.6 stjerner ud af 16 anmeldelser. Har du et spørgsmål om Smartwares CL-1658, eller vil du spørge andre brugere om produktet?

Side 1/4
EN Instruction Manual
NL Gebruiksaanwijzing
FR Mode d’emploi
DE Bedienungsanleitung
ES Manual de instrucciones
PT Manual de Instruções
IT Istruzioni per l’uso
SV Bruksanvisning
PL Instrukcja obsługi
CS Návod na použití
SK Návod na použitie
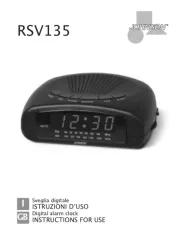
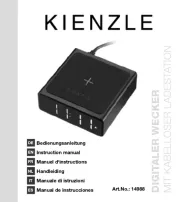
C l o c k r a d i o
PLL FM Radio - USB charging port CL-1658
1
7
8 10
162 4 53
PARTS DESCRIPTION / ONDERDELENBESCHRIJVING / DESCRIPTION DES PIÈCES /
TEILEBESCHREIBUNG / DESCRIPCIÓN DE LAS PIEZAS / DESCRIÇÃO DOS
COMPONENTES / DESCRIZIONE DELLE PARTI / BESKRIVNING AV DELAR /
OPIS CZĘŚCI / POPIS SOUČÁSTÍ / POPIS SÚČASTÍ
9
11 12 13
14
Smartwares Europe
Postbus 3189, 5003 DD Tilburg,
The Netherlands
ENInstruction manual
SAFETY
By ignoring the safety instructions the
manufacturer cannot be held responsible for
the damage.
If the supply cord is damaged, it must be
replaced by the manufacturer, its service
agent or similarly qualified persons in order to
avoid a hazard.
Never move the appliance by pulling the cord
and make sure the cord cannot become
entangled.
The appliance must be placed on a stable,
level surface.
The user must not leave the device
unattended while it is connected to the supply.
This appliance is only to be used for
household purposes and only for the purpose
it is made for.
This appliance shall not be used by children
aged less than 8 years. This appliance can be
used by children aged from 8 years and above
and persons with reduced physical, sensory or
mental capabilities or lack of experience and
knowledge if they have been given
supervision or instruction concerning use of
the appliance in a safe way and understand
the hazards involved. Children shall not play
with the appliance. Keep the appliance and its
cord out of reach of children aged less than 8
years. Cleaning and user maintenance shall
not be made by children unless older than 8
and supervised.
To protect yourself against an electric shock,
do not immerse the cord, plug or appliance in
the water or any other liquid.
Within an equilateral triangle, is used to
indicate that a specific component shall be
replaced only by the component specified in
that documentation for safety reason.
LIGHTNING FLASH WITH
ARROWHEAD SYMBOL - within an
equilateral triangle, is intended to alert the
user to the presence of uninsulated
dangerous voltage within the products
enclosure that may be of sufficient magnitude
to constitute a risk of electric shock to
persons.
The mains plug is used as the disconnect
device and it shall remain readily operable. To
completely disconnect the power input, the
Mains plug of the apparatus must be
disconnected from the mains completely. The
mains plug should not be obstructed or should
be easily accessible during intended use.
PARTS DESCRIPTION
1. Arrow buttons
2. Volume button (VOL)
3. Radio/Sleep button
4. Snooze button
5. Set button
6. Alarm button (AL 1.2)
7. Alarm 1 LED (A1)
8. Alarm 2 LED (A2)
9. Sleep LED (SL)
10. Radio memory LED (MEM)
11. DC jack
12. Battery compartment
13. Antenna
14. USB charging port
BEFORE THE FIRST USE
This unit is equipped with a battery backup system, which requires a
battery (not included). Place the battery in the battery compartment
and make sure that the + and – battery terminals correspond with the
symbols in the battery compartment. If an AC power failure occurs, the
clock will automatically switch to the battery power and the internal
clock memory will continue running (note that the display is switched
off and the radio won’t operate). When the AC power resumes, the
unit automatically switches back to the AC power and will return to
normal operation.
USE
Setting the time
Press the SET button, the hour digits will start flashing. Press the
arrow buttons to set the current hour (hold to advance rapidly).
Press SET again, the minute digits will start flashing. Press the arrow
buttons to set the current minute (hold to advance rapidly).
Press SET again, the display will show “24Hr” and flash. Press the
arrow buttons to select “12Hr” or “24H” time format.
Press SET again, the display shows “05” and flashes. Press the arrow
buttons to select your snooze duration time from 5 to 60 minutes.
Press SET again to exit the setting mode. If no key is pressed for 10
seconds then the device will exit automatically.
Setting and using the alarm
Press the AL 1.2 button once, the A1 LED and the hour digits flash.
Press the arrow buttons to set the hour for Alarm 1 (hold to advance
rapidly).
Press the AL 1.2 button again to adjust the minutes. Press the arrow
buttons to set the minutes for alarm 1. (hold to advance rapidly).
Press AL 1.2 again, the screen displays “OFF” (alarm off). To select a
waking sound, press the arrow buttons to select :
rd = wake-by-radio
bu = wake-by-buzzer
OFF = alarm off
Press AL 1.2 again, the A2 LED and the hour digits will flash. Press the
arrow buttons to set the alarm 2’s hours. Repeat the previous steps to
set alarm 2.
Press AL 1.2 again to exit alarm setting mode. When wake-by-radio or
wake-by-buzzer is selected, the related alarm is turned on, indicated by
appearance of the A1 and/or the A2 LED on the left side of the display.
When alarm 1 or alarm 2 is sounding, press the snooze button once to
silence the alarm. The alarm will come on again after the set snooze
duration time.
To stop the alarm, press the RADIO/SLEEP button or the AL1.2 button
once. The alarm will be reset, and will come on again the next day.
Listening to the radio
To turn on the radio, press the RADIO/SLEEP button once, the display
shows “ON” and then the radio frequency readings in Mhz.
Press the arrow buttons to tune the radio to a desired station. Press and
hold the arrow buttons to scan for the next clear station.
To adjust the volume, press VOL once, the display shows “L07”, press
the arrow buttons to adjust volume from L01 (minimum) to L15
(maximum)
Press the SNOOZE button to turn off the radio.
This clock radio features a total of 10 preset memories of FM stations.
These allow you to preset your favorite stations and access them quickly.
Turn on the radio and select a radio station you like to memorize.
Press and hold the SET button until “MEM” LED appears and “01”
flashes. Press SET once to store Memory 1.
Press the arrow buttons to select another station you like to memorize.
Then press and hold SET until the “MEM” LED appears and “01” flashes.
Press the right arrow button once, “02” appears. Press SET once to store
Memory 02.
Repeat these steps to preset memories 3 through 10.
Press the SET button to browse through your preset radio-stations
To edit a preset station, select another station and then repeat the
previous steps. This overrides the original settings.
Using the sleep timer
During radio playback, press the RADIO/SLEEP button twice to enter the
sleep mode. The SL notification LED will appear and the sleep time
“05” (5 minutes) will flash on the display.
Press the RADIO/SLEEP button again as needed to adjust the sleep
timer from 5,15, 30, 45, 60, 75, 90 or OFF.
When the display changes back to show the time, press the RADIO/
SLEEP twice to show the sleep time remaining.
To turn off the radio before the sleep time has elapsed, press the
SNOOZE button once.
Dimming the Display
Press the SNOOZE button to adjust the brightness (low / high / off) of the
LED display. This can only be done when the radio is off.
USB charging
Connect the charging cable of your mobile phone to the USB port at the
back of the unit, then connect the other end to your mobile phone. The
clock radio will charge the mobile phone automatically.
Make sure the original adapter enclosed with your clock radio (5V 1.2A)
is being used to power your clock radio. Using other adapters may not
charge your phone.
The USB port provides slower charging and it will longer to charge your
mobile phone. It is not possible to charge your notebook or tablet.
CLEANING AND MAINTENANCE
Clean the appliance with a damp cloth. Never use harsh and abrasive
cleaners, scouring pad or steel wool, which damages the device.
Never immerse the electrical device in water or any other liquid. The
device is not dishwasher proof.
ENVIRONMENT
This appliance should not be put into the domestic garbage at the end of
its durability, but must be offered at a central point for the recycling of
electric and electronic domestic appliances. This symbol on the appliance,
instruction manual and packaging puts your attention to this important
issue. The materials used in this appliance can be recycled. By recycling
of used domestic appliances you contribute an important push to the
protection of our environment. Ask your local authorities for information
regarding the point of recollection.
Support
You can find all available information and spare parts at service.tristar.eu!
DECLARATION OF CONFORMITY
Hereby, Smartwares Europe declares that the radio equipment type
CL-1658 is in compliance with Directive 2014/53/EU
The full text of the EU declaration of conformity is available at the following
internet address: www.smartwares.eu/doc
NL Gebruiksaanwijzing
VEILIGHEID
Als u de veiligheidsinstructies negeert, kan de
fabrikant niet verantwoordelijk worden
gehouden voor de mogelijke schade.
Als het netsnoer beschadigd is, moet het
worden vervangen door de fabrikant, de
onderhoudsmonteur van de fabrikant of door
personen met een soortgelijke kwalificatie om
gevaar te voorkomen.
Verplaats het apparaat nooit door aan het snoer
te trekken en zorg dat het snoer niet in de war
kan raken.
Het apparaat moet op een stabiele, vlakke
ondergrond worden geplaatst.
De gebruiker mag het apparaat niet onbeheerd
achterlaten wanneer de stekker zich in het
stopcontact bevindt.
Dit apparaat is uitsluitend voor huishoudelijk
gebruik en voor het doel waar het voor bestemd
is.
Dit apparaat mag niet worden gebruikt door
kinderen jonger dan 8 jaar. Dit apparaat kan
worden gebruikt door kinderen vanaf 8 jaar en
door personen met verminderde lichamelijke,
zintuiglijke of geestelijke vermogens of gebrek
aan de benodigde ervaring en kennis indien ze
onder toezicht staan of instructies krijgen over
hoe het apparaat op een veilige manier kan
worden gebruikt alsook de gevaren begrijpen
die met het gebruik samenhangen. Kinderen
mogen niet met het apparaat spelen. Houd het
apparaat en het netsnoer buiten bereik van
kinderen jonger dan 8 jaar. Laat reiniging en
onderhoud niet door kinderen uitvoeren, tenzij
ze ouder zijn dan 8 jaar en onder toezicht staan.
Dompel het snoer, de stekker of het apparaat
niet onder in water of andere vloeistoffen om
elektrische schokken te voorkomen.
UITROEPTEKEN - in een gelijkbenige
driehoek - wordt gebruikt om aan te geven dat
een specifiek onderdeel om veiligheidsredenen
alleen mag worden vervangen door het
onderdeel dat in de documentatie is
gespecificeerd.
LICHTFLITS MET PIJLSYMBOOL - in
een gelijkbenige driehoek - wordt bedoeld als
waarschuwing voor de aanwezigheid van
ongeïsoleerde gevaarlijke voltage in de
productbehuizing die sterk genoeg is om een
risico van elektrische schok te vormen voor
personen.
De stekker moeten worden gebruikt om het
apparaat van de stroom los te koppelen. Zorg
dat u hier altijd bij kunt. Als u de stroomtoevoer
volledig wilt onderbreken, moet u de stekker
van het apparaat verwijderen uit het
stopcontact. De stekker moet niet worden
geblokkeerd en eenvoudig toegankelijk zijn
tijdens het gebruik van het apparaat.
BESCHRIJVING VAN ONDERDELEN
1. Pijltjestoetsen
2. Volume knop (VOL)
3. Radio/Sleep knop
4. Snooze knop
5. Set knop
6. Alarm knop (AL 1.2)
7. Alarm 1 led (A1)
8. Alarm 2 led (A2)
9. Sleep led (SL)
10. Radiogeheugen led (MEM)
11. DC-aansluiting
12. Batterijcompartiment
13. Antenne
14. USB oplaadaansluiting
VOOR HET EERSTE GEBRUIK
Dit apparaat is uitgerust met een batterij-backup-systeem. Het apparaat
vereist een batterij (niet inbegrepen). Plaats de batterij in het
batterijcompartiment. Zorg ervoor dat de batterijpolen (+/-)
overeenkomen met de symbolen in het batterijcompartiment. Indien een
stroomstoring optreedt, zal de klok automatisch overschakelen naar
batterijstroom en het interne klokgeheugen blijven functioneren (de
display wordt uitgeschakeld en de radio zal niet werken). Indien de
stroomstoring voorbij is, zal het apparaat automatisch overschakelen
naar netstroom en terugkeren naar normaal bedrijf.
GEBRUIK
De tijd instellen
Druk op de knop SET en de cijfers voor de uren gaan knipperen. Druk op
de pijltjestoetsen om het huidige uur in te stellen (vasthouden om snel
vooruit te gaan).
Druk nogmaals op SET en de cijfertjes voor de minuten gaan knipperen.
Druk op de pijltjestoetsen om de huidige minuut in te stellen (vasthouden
om snel vooruit te gaan).
Druk nogmaals op SET en de display toont knipperend “24Hr” [24 uur].
Druk op de pijltjestoetsen om de tijdweergave “12Hr” [12 uur] of
“24H” [24 uur] te kiezen.
Druk nogmaals op SET en de display toont knipperend “05”. Druk op de
pijltjestoetsen om de sluimertijd tussen 5 en 60 minuten in te stellen.
Druk weer op SET om de instelmodus te verlaten. Als 10 seconden geen
toets wordt ingedrukt, schakelt het apparaat automatisch uit.
De wekker instellen en gebruiken
Druk eenmaal op de knop AL 1.2, de A1 led en de cijfers voor de uren
gaan knipperen. Druk op de pijltjestoetsen om de uren voor Alarm 1 in te
stellen (vasthouden om snel vooruit te gaan).
Druk nogmaals op de knop AL 1.2 om de minuten in te stellen. Druk op
de pijltjestoetsen om de minuten voor alarm 1 in te stellen (vasthouden
om snel vooruit te gaan).
Druk nogmaals op AL 1.2 en het scherm toont “OFF” (alarm
uitgeschakeld). Gebruik de pijltjestoetsen om een wektoon in te stllen. U
kunt kiezen uit:
rd = wekken met radio
bu = wekken met een zoemer
OFF = alarm uit
Druk nogmaals op AL 1.2 en de A2 led en de cijfers voor de uren gaan
knipperen. Druk op de pijltjestoetsen om de uren voor alarm 2 in te
stellen Herhaal de bovenstaande stappen voor het instellen van alarm 2.
Druk weer op AL 1.2 om de alarminstelmodus te verlaten. Als wekken
door radio of wekken door zoemer is gekozen, wordt het betreffende
alarm ingeschakeld. Dit wordt aangegeven door het verschijnen van de
A1 en/of de A2 led links op de display.
Druk als alarm 1 of alarm 2 klinkt eenmaal op de sluimerknop om het
alarm te laten ophouden. Het alarm zal na de ingestelde sluimertijd weer
afgaan.
Druk om het alarm te stoppen eenmaal op de knop RADIO/SLEEP of de
knop AL1.2. Het alarm wordt opnieuw ingesteld en zal de volgende dag
weer afgaan.
Naar de radio luisteren
Druk om de radio in te schakelen eenmaal op de knop RADIO/SLEEP.
De display toont “ON” [aan] en vervolgens de radiofrequenties in mHz.
Druk op de pijltjestoetsen om de radio op het gewenste station af te
stellen. Druk op de pijltjestoetsen en houd deze ingedrukt om naar het
volgende duidelijke station te scannen.
druk om het volume aan te passen eenmaal op VOL, de display toont
"L07", druk op de pijltjestoetsen om het volume tussen L01 (minimum) en
L15 (maximum) in te stellen.
Druk op de knop SNOOZE om de radio uit te schakelen.
Deze wekkerradio heeft een geheugen voor in totaal 10 vooraf
ingestelde FM-stations. Hiermee kunt u uw favoriete stations vooraf
instellen voor snelle toegang.
Zet de radio aan en kies een radiostation dat u in het geheugen wilt
opslaan.
Druk op de knop SET en houd deze ingedrukt tot de led “MEM”
verschijnt en “01” knippert. Druk eenmaal op SET om Memory 1 op te
slaan.
Druk op de pijltjestoetsen om een ander station te kiezen dat u in het
geheugen wilt opslaan. Druk dan op de knop SET en houd deze
ingedrukt tot de led “MEM” verschijnt en “01” knippert. Druk eenmaal op
de rechter pijltjestoets en “02” verschijnt. Druk eenmaal op SET om
Memory 02 op te slaan.
Herhaal deze stappen voor het vooraf instellen van geheugens 3 t/m 10.
Druk op de knop SET om uw vooraf ingestelde radiostations te
doorlopen.
Kies om een vooraf ingesteld station te wijzigen een ander station en
herhaal de bovenstaande stappen. Dit overschrijft de oorspronkelijke
instellingen.
De slaaptimer gebruiken
Druk terwijl de radio speelt tweemaal op de knop RADIO/SLEEP om de
slaapmodus te openen. De SL indicatieled verschijnt en de slaaptijd
“05” (5 minuten) knippert op de display.
Druk nogmaals op de knop RADIO/SLEEP voor zover nodig om de
slaaptimer op 5,15, 30, 45, 60, 75, 90 of OFF [uit] te zetten.
Druk als de display weer de tijd weergeeft tweemaal op RADIO/SLEEP
om de resterende slaaptijd te zien.
Druk om de radio uit te schakelen voordat de slaaptijd is verstreken
eenmaal op de knop SNOOZE.
Het display dimmen
Druk op de SNOOZE knop om de helderheid (laag / hoog / uit) ven het
LED display aan te passen. Dit kunt u alleen doen als de radio is
uitgeschakeld.
Opladen via USB
Sluit de oplaadkabel van uw mobiele telefoon aan op de USB-poort aan
de achterkant van het apparaat en sluit het andere uiteinde aan op uw
mobiele telefoon. De klokradio laadt de mobiele telefoon automatisch op.
Zorg ervoor dat de originele adapter die bij uw wekkerradio is geleverd
(5V 1,2A) wordt gebruikt om uw klokradio van stroom te voorzien. Bij
gebruik van andere adapters wordt uw telefoon mogelijk niet opgeladen.
Het opladen via de USB-poort zal langzamer verlopen en het zal langer
duren om uw mobiele telefoon op te laden. Het is niet mogelijk om uw
notebook of tablet op te laden.
REINIGING EN ONDERHOUD
Reinig het apparaat met een vochtige doek. Gebruik nooit agressieve of
schurende reinigingsmiddelen, schuursponzen of staalwol; dit beschadigt
het apparaat.
Dompel het apparaat nooit onder in water of andere vloeistoffen. Het
apparaat is niet vaatwasserbestendig.
MILIEU
Het apparaat mag niet worden weggegooid met het huisvuil na
beëindiging van de nuttige levensduur, maar moet worden ingeleverd op
een centraal punt voor de recycling van elektrische en elektrische
huishoudelijke apparaten. Dit symbool op het apparaat, in de
instructiehandleiding en op de verpakking vestigt de aandacht op dit
belangrijke punt. De materialen die in dit apparaat zijn gebruikt kunnen
worden gerecycled. Door gebruikte huishoudelijke apparaten te recyclen,
draagt u in belangrijke mate bij aan de bescherming van ons milieu. Vraag
uw plaatselijke autoriteiten om inlichtingen over het inzamelpunt.
Support
U kunt alle beschikbare informatie en reserveonderdelen vinden op
service.tristar.eu!
CONFORMITEITSVERKLARING
Hierbij verklaart, Smartwares Europe, dat het type radioapparatuur
CL-1658 conform is met Richtlijn 2014/53/EU.
De volledige tekst van de EU-verklaring van conformiteit is beschikbaar op
het volgende internetadres: www.smartwares.eu/doc
FRManuel d'instructions
SÉCURITÉ
Si vous ignorez les consignes de sécurité, le
fabricant ne peut être tenu pour responsable
des dommages.
Si le cordon d'alimentation est endommagé, il
doit être remplacé par le fabricant, son
réparateur ou des personnes qualifiées afin
d'éviter tout risque.
Ne déplacez jamais l'appareil en tirant sur le
cordon et veillez à ce que celui-ci ne s'enroule
pas.
L'appareil doit être posé sur une surface stable
et nivelée.
Ne laissez jamais le dispositif sans surveillance
s'il est connecté à l'alimentation.
Cet appareil est uniquement destiné à des
utilisations domestiques et seulement dans le
but pour lequel il est fabriqué.
Cet appareil ne doit pas être utilisé par des
enfants de moins de 8 ans. Cet appareil peut
être utilisé par des enfants de 8 ans ou plus et
des personnes présentant un handicap
physique, sensoriel ou mental voire ne
disposant pas des connaissances et de
l'expérience nécessaires en cas de surveillance
ou d'instructions sur l'usage de cet appareil en
toute sécurité et de compréhension des risques
impliqués. Les enfants ne doivent pas jouer
avec l'appareil. Maintenez l'appareil et son
cordon d'alimentation hors de portée des
enfants de moins de 8 ans. Le nettoyage et la
maintenance utilisateur ne doivent pas être
confiés à des enfants sauf s'ils ont 8 ans ou
plus et sont sous surveillance.
Afin de vous éviter un choc électrique,
n'immergez pas le cordon, la prise ou l'appareil
dans de l'eau ou autre liquide.
POINT D'EXCLAMATION - Dans un
triangle équilatéral, il est utilisé pour indiquer
qu'un composant spécifique peut uniquement
être remplacé par le composant spécifié dans
cette documentation pour une raison de
sécurité.
ÉCLAIR AVEC SYMBOLE DE FLÈCHE -
Dans un triangle équilatéral, il est destiné à
avertir l'utilisateur de la présence de tension
dangereuse non-isolée à l'intérieur du boîtier du
produit qui peut être de magnitude suffisante
pour constituer un risque d'électrocution.
La prise secteur est utilisée comme dispositif de
déconnexion et doit rester facilement
accessible. Pour entièrement couper
l'alimentation, la prise secteur de l'appareil doit
être complètement débranchée. Rien ne doit
obstruer l'accès à la prise secteur, qui doit
rester facilement accessible durant l'utilisation
de l'appareil.
DESCRIPTION DES PIÈCES
1. Boutons fléchés
2. Bouton de volume (VOL)
3. Bouton radio /mise en veille
4. Bouton rappel d'alarme
5. Bouton de réglage
6. Bouton d'alarme (AL 1.2)
7. LED d'alarme 1 (A1)
8. LED d'alarme 2 (A2)
9. LED de mise en veille (SL)
10. LED de mémoire radio (MEM)
11. Prise CC
12. Compartiment de pile
13. Antenna
14. Port de rechargement USB
AVANT LA PREMIÈRE UTILISATION
Cette unité bénéficie d'un système de batterie de secours nécessitant
une pile (non fournie). Placez la pile dans son compartiment et assurez-
vous que les bornes + et – de la pile correspondent aux symboles du
compartiment de pile. En cas de défaillance du secteur, l'horloge passe
automatiquement sur l'alimentation de secours et la mémoire d'horloge
interne continue de fonctionner (notez que l'affichage s'éteint et la radio
ne fonctionne pas). Dès que le courant est revenu, l'unité restaure
automatiquement l'alimentation secteur et reprend son fonctionnement
normal.
UTILISATION
Réglage de l’heure
Appuyez sur le bouton RÉGLER et les chiffres de l'heure commencent à
clignoter. Appuyez sur les boutons fléchés pour régler l'heure actuelle
(maintenez pour avancer rapidement).
Appuyez à nouveau sur RÉGLER et les chiffres des minutes
commencent à clignoter. Appuyez sur les boutons fléchés pour régler la
minute actuelle (maintenez pour avancer rapidement).
Appuyez à nouveau sur RÉGLER et l'affichage indique “24Hr” en
clignotant. Appuyez sur les boutons fléchés pour sélectionner le format
de l'heure “12Hr” ou “24H”.
Appuyez à nouveau sur RÉGLER et l'affichage indique “05” en
clignotant. Appuyez sur les boutons fléchés pour sélectionner la durée
du rappel d'alarme, de 5 à 60 minutes.
Appuyez à nouveau sur RÉGLER pour sortir du mode réglage. En
l'absence de pression sur une touche pendant 10 secondes, l'appareil
sort automatiquement.
Réglage et usage de l'alarme
Appuyez une fois sur le bouton AL 1.2 et la LED A1 ainsi que les chiffres
de l'heure clignotent. Appuyez sur les boutons fléchés pour régler l'heure
de l'Alarme 1 (maintenez pour avancer rapidement).
Appuyez sur le bouton AL 1.2 à nouveau pour régler les minutes.
Appuyez sur les boutons fléchés pour régler les minutes de l'alarme 1.
(maintenez pour avancer rapidement).
Appuyez sur le bouton AL 1.2 à nouveau et l'écran affiche “OFF” (alarme
désactivée). Pour sélectionner une tonalité de réveil, appuyez sur les
boutons fléchés pour sélectionner:
rd = réveil par radio
bu = réveil par buzzer
OFF = alarme désactivée
Appuyez sur le bouton AL 1.2 à nouveau et la LED A2 ainsi que les
chiffres de l'heure clignotent. Appuyez sur les boutons fléchés pour
régler les heures de l'alarme 2. Répétez les étapes précédentes pour
régler l'alarme 2.
Appuyez à nouveau sur AL 1.2 pour sortir du mode réglage d'alarme. Si
un réveil par radio ou buzzer est sélectionné, l'alarme associée est
activée, indiquée par l'apparition de la LED A1 ou A2 sur la gauche de
l'affichage.
Si l'alarme 1 ou l'alarme 2 retentit, appuyez sur le bouton de rappel
d'alarme pour couper l'alarme. L'alarme reprend après la durée réglée du
rappel d'alarme.
Pour arrêter l'alarme, appuyez sur le bouton RADIO/MISE EN VEILLE ou
AL1.2. L'alarme se réinitialise et se répète le jour suivant.
Écouter la radio
Pour mettre la radio, appuyez une fois sur le bouton RADIO/MISE EN
VEILLE. L'affichage indique “ON” et la lecture de la fréquence radio en
Mhz.
Appuyez sur les boutons fléchés pour régler la radio sur la station
voulue. Appuyez sur les boutons fléchés sans relâcher pour rechercher
la station audible suivante.
Pour ajuster le volume, appuyez une fois sur VOL. L'affichage indique
“L07”. Appuyez sur les boutons fléchés pour régler le volume entre L01
(minimum) et L15(maximum)
Appuyez sur le bouton RAPPEL D'ALARME pour couper la radio.
Ce radioréveil propose un total de 10 stations FM préréglées en
mémoire. Vous pouvez donc prédéfinir vos stations préférées et y
accéder rapidement.
Allumez la radio et sélectionnez une station de radio que vous appréciez
pour la mémoriser.
Appuyez sur le bouton RÉGLER sans le relâcher jusqu'à ce que la LED
“MEM” s'affiche et que “01” clignote. Appuyez sur le bouton RÉGLER
pour enregistrer la Mémoire 1.
Appuyez sur les boutons fléchés pour sélectionner une autre station à
mémoriser. Appuyez alors sur le bouton RÉGLER sans le relâcher
jusqu'à ce que la LED “MEM” s'affiche et que “01” clignote. Appuyez sur
le bouton fléché droite une fois pour que “02” s'affiche. Appuyez sur le
bouton RÉGLER pour enregistrer la Mémoire 02.
Répétez ces étapes pour prérégler les mémoires 3 à 10.
Appuyez sur le bouton RÉGLER pour parcourir vos stations préréglées.
Pour modifier une station préréglée, sélectionnez une autre station puis
répétez les étapes précédentes. Vous écrasez ainsi les réglages
d'origine.
Usage du minuteur de veille
Durant la lecture de la radio, appuyez deux fois sur le bouton RADIO/
MISE EN VEILLE pour accéder au mode veille. La LED de notification
SL s'affiche et le délai de veille “05” (5 minutes) clignote à l'écran.
Appuyez à nouveau sur le bouton RADIO/MISE EN VEILLE selon les
besoins pour ajuster le minuteur de veille sur 5, 15, 30, 45, 60, 75, 90 ou
OFF.
Dès que l'écran reprend l'affichage de l'heure, appuyez deux fois sur le
bouton RADIO/MISE EN VEILLE pour afficher le temps de veille restant.
Pour arrêter la radio avant l'écoulement du délai de veille, appuyez une
fois sur le bouton RAPPEL D'ALARME.
Atténuation de l'affichage
Appuyez sur le bouton RAPPEL D'ALARME pour ajuster la luminosité
(Basse / Haute / Arrêt) de l'affichage LED. C'est uniquement possible
avec la radio arrêtée.
Charge USB
Connectez le câble de charge de votre portable sur le port USB au dos
de l'unité puis connectez l'autre bout à votre portable. Le radioréveil
charge automatiquement le portable.
Assurez-vous que l'adaptateur d'origine joint avec votre radioréveil (5V
1,2A) est utilisé pour alimenter votre radioréveil. L'usage d'adaptateurs
différents ne chargera pas votre téléphone.
Le port USB assure une charge plus lente et le temps de charge de votre
portable sera donc plus long. Il est impossible de charger votre
ordinateur portable ou tablette.
NETTOYAGE ET ENTRETIEN
Nettoyez l'appareil avec un chiffon humide. N'utilisez pas de produits
nettoyants agressifs ou abrasifs, de tampons à récurer ou de laine de
verre, ceux-ci pourraient endommager l'appareil.
N'immergez jamais l'appareil dans l'eau ni aucun autre liquide. L'appareil
ne peut pas être nettoyé en lave-vaisselle.
ENVIRONNEMENT
Cet appareil ne doit pas être jeté dans les ordures ménagères à la fin de
sa vie, mais doit être remis à un endroit centralisé de recyclage des
appareils électriques et électroniques. Le symbole sur l'appareil, le mode
d’emploi et l'emballage, attire votre attention sur ce point important. Les
matériaux utilisés dans cet appareil peuvent être recyclés. En recyclant
les appareils domestiques, vous contribuez de façon importante à la
protection de notre environnement. Consultez les autorités locales pour
obtenir des informations concernant le point de collecte.
Support
Vous pouvez trouver toutes les informations et pièces de rechange sur
service.tristar.eu!
DÉCLARATION DE CONFORMITÉ
Le soussigné, Smartwares Europe, déclare que l'équipement
radioélectrique du type CL-1658 est conforme à la directive 2014/53/UE.
Le texte complet de la déclaration de conformité est disponible à l'adresse
internet suivante: www.smartwares.eu/doc
DE Bedienungsanleitung
SICHERHEIT
Beim Ignorieren der Sicherheitshinweise kann
der Hersteller nicht für Schäden haftbar
gemacht werden.
Ist das Netzkabel beschädigt, muss es vom
Hersteller, dem Kundendienst oder ähnlich
qualifizierten Personen ersetzt werden, um
Gefahren zu vermeiden.
Bewegen Sie das Gerät niemals durch Ziehen
am Kabel, und stellen Sie sicher, dass sich das
Kabel nicht verwickeln kann.
Das Gerät muss auf einer ebenen, stabilen
Fläche platziert werden.
Das Gerät darf nicht unbeaufsichtigt bleiben,
während es an einer Stromquelle
angeschlossen ist.
Dieses Gerät darf nur für den
Haushaltsgebrauch und nur für den Zweck
benutzt werden, für den es hergestellt wurde.
Dieses Gerät darf nicht von Kindern unter 8
Jahren verwendet werden. Dieses Gerät darf
von Kindern ab 8 Jahren und von Personen mit
eingeschränkten körperlichen, sensorischen
oder geistigen Fähigkeiten oder einem Mangel
an Erfahrung und Kenntnissen verwendet
werden, sofern diese Personen beaufsichtigt
oder über den sicheren Gebrauch des Geräts
unterrichtet wurden und die damit verbundenen
Gefahren verstanden haben. Kinder dürfen mit
dem Gerät nicht spielen. Halten Sie das Gerät
und sein Anschlusskabel außerhalb der
Reichweite von Kindern unter 8 Jahren.
Reinigungs- und Wartungsarbeiten dürfen nicht
von Kindern vorgenommen werden, es sei
denn, sie sind älter als 8 und werden
beaufsichtigt.
Tauchen Sie zum Schutz vor einem
Stromschlag das Kabel, den Stecker oder das
Gerät niemals in Wasser oder sonstige
Flüssigkeiten.
Das AUSRUFEZEICHEN im
gleichseitigen Dreieck weist darauf hin, dass
eine bestimmte Komponente aus
Sicherheitsgründen nur durch die Komponente
ersetzt werden darf, die in der Dokumentation
spezifiziert ist.
Der BLITZ MIT DEM PFEIL im
gleichseitigen Dreieck weist den Benutzer auf
freiliegende gefährliche Spannung im Gehäuse
des Geräts hin, die hoch genug ist, einen
Stromschlag zu verursachen.
Der Netzstecker dient zum Trennen des Geräts
vom Stromnetz und muss jederzeit frei
zugänglich sein. Zum vollständigen Trennen
des Netzeingangs muss der Netzstecker des
Geräts aus der Steckdose gezogen werden.
Der Netzstecker sollte nicht blockiert werden,
sondern muss beim bestimmungsgemäßen
Gebrauch jederzeit frei zugänglich sein.
TEILEBESCHREIBUNG
1. Pfeiltasten
2. Lautstärketaste (VOL)
3. Radio-/Einschlaftaste
4. Schlummertaste
5. Einstellungstaste
6. Alarmtaste (AL 1.2)
7. Alarm 1-LED (A1)
8. Alarm 2-LED (A2)
9. Schlaf-LED (SL)
10. Radiospeicher-LED (MEM)
11. DC-Buchse
12. Batteriefach
13. Antenne
14. USB-Ladeanschluss
VOR DEM ERSTEN GEBRAUCH
Dieses Gerät verfügt über ein Batteriepufferungssystem; es benötigt
eine Batterie (nicht im Lieferumfang). Setzen Sie die Batterie in das
Batteriefach ein und vergewissern Sie sich, dass die + und -
Batterieanschlüsse mit den Symbolen im Batteriefach übereinstimmen.
Tritt ein Stromausfall ein, schaltet die Uhr automatisch auf
Batteriebetrieb um und der interne Uhrenspeicher läuft weiter (beachten
Sie, dass die Anzeige abgeschaltet wird und das Radio nicht mehr
funktioniert). Wenn die Stromversorgung wieder vorhanden ist, schaltet
das Gerät wieder automatisch auf die Stromversorgung um und läuft
normal weiter.
GEBRAUCH
Einstellung der Zeit
Drücken Sie die SET-Taste; nun beginnen die Stundenziffern zu blinken.
Drücken Sie auf die Pfeiltasten, um die aktuelle Stunde einzustellen
(festhalten, um den Vorgang zu beschleunigen).
Drücken Sie erneut auf SET; nun beginnen die Minutenziffern zu
blinken. Drücken Sie auf die Pfeiltasten, um die aktuelle Minute
einzustellen (festhalten, um den Vorgang zu beschleunigen).
Drücken Sie erneut auf SET; auf der Anzeige erscheint nun blinkend
“24Hr”. Drücken Sie auf die Pfeiltasten, um das “12Hr” oder “24Hr”
Zeitformat einzustellen.
Drücken Sie erneut auf SET; auf der Anzeige erscheint nun blinkend
“05”. Drücken Sie auf die Pfeiltasten, um Ihre Schlummerdauer von 5 bis
60 Minuten einzustellen.
Drücken Sie erneut auf SET, um den Einstellmodus zu verlassen. Wird
10 Sekunden lang keine Taste gedrückt, beendet das Gerät den
Einstellmodus automatisch.
Einstellung und Verwendung des Alarms
Drücken Sie ein Mal auf die AL 1.2-Taste; die A1-LED und die
Stundenziffern blinken. Drücken Sie auf die Pfeiltasten, um die Stunde
für Alarm 1 einzustellen (festhalten, um den Vorgang zu beschleunigen).
Drücken Sie erneut auf die AL 1.2-Taste, um die Minuten einzustellen.
Drücken Sie auf die Pfeiltasten, um die Minuten für Alarm 1 einzustellen.
(festhalten, um den Vorgang zu beschleunigen).
Drücken Sie erneut auf AL 1.2; auf dem Bildschirm erscheint
“OFF” (Alarm aus). Um einen Weckton zu wählen, drücken Sie auf die
Pfeiltasten. Sie können wählen zwischen :
rd = durch Radio wecken
bu = durch Summer wecken
OFF = Alarm aus
Drücken Sie erneut auf AL 1.2; die A2-LED und die Stundenziffern
blinken nun. Drücken Sie auf die Pfeiltasten, um die Stunden für Alarm 2
einzustellen. Wiederholen Sie die vorherigen Schritte, um Alarm 2
einzustellen.
Drücken Sie erneut auf AL 1.2, um den Alarm-Einstellmodus zu
verlassen. Wird Wecken durch Radio oder Wecken durch Summer
gewählt, wird der entsprechende Alarm eingeschaltet; dies wird durch
das Aufleuchten der A1- und/oder A2-LED auf der linken Seite der
Anzeige signalisiert.
Wenn Alarm 1 oder Alarm 2 ertönt, drücken Sie ein Mal auf die
Schlummertaste, um den Alarm stummzuschalten. Der Alarm schaltet
nach der eingestellten Schlummerdauer wieder ein.
Um den Alarm zu stoppen, drücken Sie ein Mal auf die RADIO/SLEEP-
Taste oder die AL1.2-Taste. Der Alarm wird zurückgesetzt und ertönt
erst wieder am nächsten Tag.
Radio hören
Um das Radio einzuschalten, drücken Sie ein Mal auf die RADIO/
SLEEP-Taste. Auf der Anzeige erscheint “ON” und dann erscheinen die
Radiofrequenz-Werte in MHz.
Drücken Sie auf die Pfeiltasten, um das Radio auf die gewünschte
Station einzustellen. Drücken und halten Sie die Pfeiltasten, um die
nächste klare Station zu suchen.
Um die Lautstärke einzustellen, drücken Sie ein Mal auf VOL. Auf der
Anzeige erscheint “L07”. Drücken Sie auf die Pfeiltasten um die
Lautstärke von L01 (minimal) bis L15 (maximal) einzustellen.
Drücken Sie auf die SNOOZE-Taste, um das Radio auszuschalten.
Dieses Uhrenradio verfügt über insgesamt 10
Voreinstellungsspeicherplätze für FM-Stationen. Hiermit können Sie Ihre
Lieblingsstationen voreinstellen und schnell auf diese zugreifen.
Schalten Sie das Radio ein und wählen Sie eine Radiostation, die Sie
abspeichern möchten.
Drücken und halten Sie die SET-Taste, bis die “MEM” LED erscheint
und “01” blinkt. Drücken Sie ein Mal auf SET, um Speicherplatz 1
abzuspeichern.
Drücken Sie auf die Pfeiltasten, um eine weitere Station zu wählen, die
Sie abspeichern möchten. Drücken und halten Sie dann SET, bis die
“MEM”-LED erscheint und “01” blinkt. Drücken Sie ein Mal auf die rechte
Pfeiltaste; es erscheint “02”. Drücken Sie ein Mal auf SET, um
Speicherplatz 02 abzuspeichern.
Wiederholen Sie diese Schritte, um die Speicherplätze 3 bis 10 zu
belegen.
Drücken Sie auf die SET-Taste, um durch Ihre voreingestellten
Radiostationen zu "blättern".
Um eine voreingestellte Station zu bearbeiten, wählen Sie eine andere
Station und wiederholen Sie dann die vorherigen Schritte. Dadurch
werden die ursprünglichen Einstellungen überschrieben.
Verwendung des Einschlaf-Timers
Drücken Sie während der Radiowiedergabe zwei Mal auf die RADIO/
SLEEP-Taste, um den Einschlafmodus aufzurufen. Es erscheint die SL-
Benachrichtigungs-LED, und die Einschlafzeit “05” (5 Minuten) blinkt auf
der Anzeige.
Drücken Sie bei Bedarf erneut auf die RADIO/SLEEP-Taste, um den
Einschlaf-Timer zwischen 5, 15, 30, 45, 60, 75, 90 oder OFF
einzustellen.
Wenn die Anzeige wieder auf die Uhrzeit wechselt, drücken Sie zwei
Mal auf die RADIO/SLEEP-Taste, um die verbleibende Einschlafzeit
anzeigen zu lassen.
Um das Radio auszuschalten, bevor die Einschlafzeit abgelaufen ist,
drücken Sie ein Mal auf die SNOOZE-Taste.
Abdunkeln der Anzeige
Drücken Sie auf die SNOOZE-Taste, um die Helligkeit (gering / hoch /
aus) der LED-Anzeige einzustellen. Dies kann nur durchgeführt werden,
wenn das Radio aus ist.
Laden über USB
Verbinden Sie das Ladekabel Ihres Mobiltelefons mit dem USB-
Anschluss auf der Rückseite des Geräts. Verbinden Sie anschließend
das andere Ende mit Ihrem Mobiltelefon. Der Radiowecker lädt das
Mobiltelefon automatisch.
Stellen Sie sicher, dass der beim Radiowecker enthaltene Original-
Adapter (5V 1,2A) für die Stromversorgung Ihres Radioweckers
verwendet wird. Die Verwendung anderer Adapter kann dazu führen,
dass Ihr Telefon nicht geladen wird.
Über den USB-Anschluss wir Ihr Telefon langsamer geladen und es
kann länger dauern, bis es aufgeladen ist. Es ist nicht möglich, Ihr
Notebook oder Tablet zu laden.
REINIGUNG UND PFLEGE
Reinigen Sie das Gerät mit einem feuchten Tuch. Verwenden Sie
niemals scharfe oder scheuernde Reiniger, Topfreiniger oder Stahlwolle.
Dies würde das Gerät beschädigen.
Tauchen Sie das Gerät niemals in Wasser oder andere Flüssigkeiten.
Das Gerät in nicht spülmaschinenfest.
UMWELT
Dieses Gerät darf am Ende seiner Lebenszeit nicht im Hausmüll entsorgt
werden, sondern muss an einer Sammelstelle für das Recyceln von
elektrischen und elektronischen Haushaltsgeräten abgegeben werden.
Das Symbol auf dem Gerät, in der Bedienungsanleitung und auf der
Verpackung macht Sie auf dieses wichtige Thema aufmerksam. Die in
diesem Gerät verwendeten Materialien können recycelt werden. Durch
das Recyceln gebrauchter Haushaltsgeräte leisten Sie einen wichtigen
Beitrag zum Umweltschutz. Fragen Sie Ihre örtliche Behörde nach
Informationen über eine Sammelstelle.
Support
Sämtliche Informationen und Ersatzteile finden Sie unter service.tristar.eu!
KONFORMITÄTSERKLÄRUNG
Hiermit erklärt Smartwares Europe dass der Funkanlagentyp CL-1658 der
Richtlinie 2014/53/EU entspricht.
Der vollständige Text der EU-Konformitätserklärung ist unter folgender
Internetadresse abrufbar: www.smartwares.eu/doc
ESManual de instrucciones
SEGURIDAD
Si ignora las instrucciones de seguridad,
eximirá al fabricante de toda responsabilidad
por posibles daños.
Si el cable de alimentación está dañado,
corresponde al fabricante, al representante o a
una persona de cualificación similar su
reemplazo para evitar peligros.
Nunca mueva el aparato tirando del cable y
asegúrese de que no se pueda enredar con el
cable.
El aparato debe colocarse sobre una superficie
estable y nivelada.
El usuario no debe dejar el dispositivo sin
supervisión mientras esté conectado a la
alimentación.
Este aparato se debe utilizar únicamente para
el uso doméstico y sólo para las funciones para
las que se ha diseñado.
Este aparato no debe ser utilizado por niños
menores de 8 años. Este aparato puede ser
utilizado por niños a partir de los 8 años y por
personas con capacidades físicas, sensoriales
o mentales reducidas, o que no tengan
experiencia ni conocimientos, sin son
supervisados o instruidos en el uso del aparato
de forma segura y entienden los riesgos
implicados. Los niños no pueden jugar con el
aparato. Mantenga el aparato y el cable fuera
del alcance de los niños menores de 8 años.
Los niños no podrán realizar la limpieza ni el
mantenimiento reservado al usuario a menos
que tengan más de 8 años y cuenten con
supervisión.
Para protegerse contra una descarga eléctrica,
no sumerja el cable, el enchufe ni el aparato en
el agua o cualquier otro líquido.
SIGNO DE EXCLAMACION - dentro de
un triángulo equilátero, se utiliza para indicar
que un componente específico debe sustituirse
únicamente por el componente indicado en la
documentación por razones de seguridad.
SÍMBOLO DEL RAYO CON UNA
FLECHA - dentro de un triángulo equilátero,
indica al usuario que la caja del sistema puede
contener una tensión sin aislar de magnitud
suficiente para constituir un riesgo de descarga
eléctrica.
El enchufe de red se utiliza para desconectar el
dispositivo y debe poder accionarse fácilmente.
Para desconectar completamente la entrada de
alimentación, el enchufe de red del aparato
debe desconectarse de la red eléctrica. El
enchufe de red no deberá obstruirse o deberá
permanecer fácilmente accesible durante el
uso previsto.
DESCRIPCIÓN DE LOS COMPONENTES
1. Botones de flecha
2. Botón de volumen (VOL)
3. Botón Radio/Reposo
4. Botón Repetición de alarma
5. Botón Ajuste
6. Botón de alarma (AL 1.2)
7. LED de alarma 1 (A1)
8. LED de alarma 2 (A2)
9. LED de reposo (SL)
10. LED de memoria de radio (MEM)
11. Toma CC
12. Compartimento de la pila
13. Antena
14. Puerto de carga USB
ANTES DEL PRIMER USO
Esta unidad está equipada con un sistema de respaldo con pila. Es
necesaria una pila (no incluida). Coloque la pila en el compartimento de
las pilas y asegúrese de que los terminales de la pila + y –
correspondan con los símbolos en el compartimento de las pilas. Si se
produce un fallo de alimentación de CA, el reloj pasará
automáticamente a alimentación por pila y la memoria interna del reloj
seguirá funcionando (tenga en cuenta que la pantalla se apaga y la
radio no funcionará). Cuando se reanude la alimentación de CA, la
unidad pasa automáticamente a alimentación de CA y vuelve al
funcionamiento normal.
USO
Ajuste de la hora
Pulse el botón AJUSTE, los dígitos de la hora empezarán a parpadear.
Pulse los botones de flecha para ajustar la hora actual (mantenga para
avanzar rápidamente).
Pulse AJUSTE de nuevo, los dígitos de los minutos empezarán a
parpadear. Pulse los botones de flecha para ajustar el minuto actual
(mantenga para avanzar rápidamente).
Pulse AJUSTE de nuevo, la pantalla mostrará “24Hr” y parpadeará.
Pulse los botones de flecha para seleccionar el formato de “12Hr” o
“24H” horas.
Pulse AJUSTE de nuevo, la pantalla muestra “05” y parpadea. Pulse los
botones de flecha para seleccionar el tiempo de duración de la
repetición de alarma de 5 a 60 minutos.
Pulse AJUSTE de nuevo para salir del modo de ajuste. Si no se pulsa
ninguna tecla durante 10 segundos, el dispositivo saldrá
automáticamente.
Ajuste y uso de la alarma
Pulse el botón AL 1.2 una vez, el LED A1 y los dígitos de la hora
parpadean. Pulse los botones de flecha para ajustar la hora para la
Alarma 1 (mantenga para avanzar rápidamente).
Pulse el botón AL 1.2 de nuevo para ajustar los minutos. Pulse los
botones de flecha para ajustar los minutos para la alarma 1 (mantenga
para avanzar rápidamente).
Pulse AL 1.2 de nuevo, la pantalla muestra “OFF” (alarma desactivada).
Para seleccionar un sonido para despertar, pulse los botones de flecha
para seleccionar:
rd = despertar con radio
bu = despertar con timbre
OFF = alarma desactivada
Pulse AL 1.2 de nuevo, el LED A2 y los dígitos de la hora parpadearán.
Pulse los botones de flecha para ajustar la hora para la alarma 2. Repita
los pasos anteriores para ajustar la alarma 2.
Pulse AL 1.2 de nuevo para salir del modo de ajuste de alarma. Cuando
se ha seleccionado despertar con radio o despertar con timbre, la
alarma relacionada se activa, lo cual se indica mediante la aparición del
LED A1 y/o A2 LED en el lado izquierdo de la pantalla.
Cuando esté sonando la alarma 1 ó 2, pulse el botón de repetición de
alarma una vez para silenciar la alarma. La alarma volverá a activarse
tras el tiempo de duración de repetición de alarma ajustado.
Para detener la alarma, pulse el botón RADIO/REPOSO o el botón
AL1.2 una vez. La alarma se restablecerá y volverá a activarse el día
siguiente.
Escuchar la radio
Para encender la radio, pulse una vez el botón RADIO/REPOSO, la
pantalla muestra “ON” y las lecturas de radiofrecuencia en Mhz.
Pulse los botones de flecha para sintonizar la radio en una emisora
deseada. Pulse y mantenga los botones de flecha para buscar la
siguiente emisora recibida con claridad.
Para ajustar el volumen, pulse VOL una vez, la pantalla muestra “L07”,
pulse y mantenga los botones de flecha para ajustar el volumen de L01
(mínimo) a L15 (máximo)
Presione el botón REPETICIÓN DE ALARMA para apagar la radio.
Este radio reloj dispone de un total de 10 memorias de presintonías de
emisoras FM. Esto le permite presintonizar sus emisoras favoritas y
acceder a ellas rápidamente.
Encienda la radio y seleccione una emisora de radio que desee
memorizar.
Pulse y mantenga pulsado AJUSTE hasta que el LED “MEM” aparezca
y “01” parpadee. Pulse AJUSTE una vez para almacenar la Memoria 1.
Pulse los botones de flecha para seleccionar otra emisora que quiera
memorizar. A continuación, pulse y mantenga pulsado AJUSTE hasta
que el LED “MEM” aparezca y “01” parpadee. Pulse una vez el botón de
flecha derecha, aparece “02”. Pulse AJUSTE una vez para almacenar la
Memoria 02.
Repita estos pasos para presintonizar las memorias 3 a 10.
Pulse el botón AJUSTE para desplazarse por las emisoras de radio
presintonizadas.
Para editar una emisora presintonizada, seleccione otra emisora y repita
los pasos anteriores. Esto anula los ajustes originales.
Uso del temporizador de reposo
Durante la reproducción de radio, pulse el botón RADIO/REPOSO dos
veces para acceder al modo de reposo. El LED de notificación SL
aparecerá y el tiempo de reposo “05” (5 minutos) parpadeará en la
pantalla.
Pulse de nuevo el botón RADIO/REPOSO según sea necesario para
ajustar el temporizador de reposo entre 5,15, 30, 45, 60, 75, 90 u OFF.
Cuando la pantalla vuelva a mostrar la hora, pulse dos veces el botón
RADIO/REPOSO para mostrar el tiempo de reposo restante.
Para apagar la radio antes de que haya transcurrido el tiempo de
reposo, pulse una vez el botón REPETICIÓN DE ALARMA.
Atenuación de la pantalla
Pulse el botón REPETICIÓN DE ALARMA para ajustar el brillo (Bajo /
Alto / Apagado) de la pantalla LED. Esto solo puede hacerse cuando la
radio está apagada.
Carga USB
Conecte el cable de carga de su teléfono móvil al puerto USB de la
parte posterior de la unidad, posteriormente conecte el otro extremo a
su teléfono móvil. La radio reloj cargará el teléfono móvil
automáticamente.
Asegúrese de utilizar el adaptador original incluido con su radio reloj (5V
1,2A) para alimentar la radio reloj. El uso de otros adaptadores puede
no cargar su teléfono.
El puerto USB proporciona una carga más lenta y tardará más en cargar
su teléfono móvil. No es posible cargar un portátil o una tableta.
LIMPIEZA Y MANTENIMIENTO
Limpie el aparato con un paño húmedo. No utilice productos de limpieza
abrasivos o fuertes, estropajos o lana metálica porque se podría dañar
el aparato.
No sumerja nunca el aparato en agua o cualquier otro líquido. El
aparato no se puede lavar en el lavavajillas.
MEDIO AMBIENTE
Una vez finalizada la durabilidad de este equipo, no debe desecharse
junto con la basura doméstica; debe llevarse a un punto central de
reciclaje de equipos domésticos eléctricos y electrónicos. Este símbolo
del equipo, el manual de instrucciones y el embalaje captan su atención
acerca de la importancia de este asunto. Los materiales utilizados en este
equipo son reciclables. Al reciclar equipos domésticos usados, contribuye
enormemente a la protección del medio ambiente. Pida información sobre
los puntos de recogida a sus entidades locales.
Soporte
¡Puede encontrar toda la información y recambios en service.tristar.eu!
DECLARACIÓN DE CONFORMIDAD
Por la presente, Smartwares Europe, declara que el tipo de equipo
radioeléctrico CL-1658 es conforme con la Directiva 2014/53/UE.
El texto completo de la declaración de conformidad de la UE se encuentra
disponible en la siguiente dirección de Internet: www.smartwares.eu/doc
PTManual de Instruções
SEGURANÇA
O fabricante não pode ser responsabilizado por
quaisquer danos se ignorar as instruções de
segurança.
Se o cabo de alimentação estiver danificado,
deve ser substituído pelo fabricante, o seu
representante de assistência técnica ou alguém
com qualificações semelhantes para evitar
perigos.
Nunca desloque o aparelho puxando pelo cabo
e certifique-se de que este nunca fica preso.
O aparelho deve ser colocado numa superfície
plana e estável.
O utilizador não deve abandonar o aparelho
enquanto este estiver ligado à alimentação.
Este aparelho destina-se apenas a utilização
doméstica e para os fins para os quais foi
concebido.
Este aparelho não deve ser utilizado por
crianças com idades compreendidas entre
menos de 8 anos. Este aparelho pode ser
utilizado por crianças com mais de 8 anos e por
pessoas com capacidades físicas, sensoriais
ou mentais reduzidas, assim como com falta de
experiência e conhecimentos, caso sejam
supervisionadas ou instruídas sobre como
utilizar o aparelho de modo seguro e
compreendam os riscos envolvidos. As
crianças não devem brincar com o aparelho.
Mantenha o aparelho e respetivo cabo fora do
alcance de crianças com idade inferior a 8
anos. A limpeza e manutenção não devem ser
realizadas por crianças a não ser que tenham
mais de 8 anos e sejam supervisionadas.
Para se proteger contra choques elétricos, não
mergulhe o cabo, a ficha nem o aparelho em
água ou qualquer outro líquido.
PONTO DE EXCLAMAÇÃO - dentro de
um triângulo equilateral, é utilizado para indicar
que um componente específico deve ser
substituído apenas pelo componente
especificado nessa documentação, por motivos
de segurança.
RELÂMPAGO COM SÍMBOLO COM
PONTA DE SETA - dentro de um triângulo
equilateral, destina-se a alertar o utilizador para
a presença de tensão perigosa não isolada no
compartimento dos produtos, que poderá ter
uma magnitude suficiente para constituir um
risco de choque eléctrico para as pessoas.
A ficha de alimentação serve como aparelho de
desconexão e deve estar sempre pronta a ser
utilizada. Para cortar completamente a entrada
de energia, a ficha do aparelho deve ser
desligada da fonte de alimentação. A ficha de
alimentação não deve ser obstruída ou deve
estar facilmente acessível durante a utilização
pretendida.
DESCRIÇÃO DAS PEÇAS
1. Botões de set
2. Botão de volume (VOL)
3. Botão de rádio/dormir
4. Botão de suspensão
5. Botão de configuração
6. Botão de alarme (AL 1.2)
7. LED do alarme 1 (A1)
8. LED do alarme 2 (A2)
9. LED de suspensão (SL)
10. LED da memória de rádio (MEM)
11. Tomada de CC
12. Compartimento das pilhas
13. Antena
14. Porta de carregamento USB
ANTES DA PRIMEIRA UTILIZAÇÃO
Esta unidade está equipada com um sistema de pilha de reserva, que
requer uma pilha (não incluída). Coloque a pilha no compartimento para
a pilha e certifique-se que os terminais + e - da pilha correspondem aos
símbolos no compartimento da pilha. Se ocorrer uma falha de energia
CA, o relógio irá mudar automaticamente para alimentação por pilhas e
a memória do relógio interno irá continuar a funcionar (note que o visor
é desligado e o rádio não funcionará). Quando a alimentação CA for
retomada, a unidade muda automaticamente para a alimentação CA e
retoma o funcionamento normal.
UTILIZAÇÃO
Definição das horas
Prima o botão SET novamente, o dígito das horas irá começar a piscar.
Prima os botões de seta para configurar a hora atual (mantenha
premido para avançar rapidamente).
Prima SET novamente, o dígito dos minutos irá começar a piscar. Prima
os botões de seta para configurar a minutos atual (mantenha premido
para avançar rapidamente).
Prima SET novamente, o visor irá apresentar “24Hr” e piscará. Prima os
botões de seta para selecionar o formato das horas entre “12Hr” ou
“24H”.
Prima SET novamente, o visor apresenta “05” e pisca. Prima os botões
de seta para selecionar a duração da suspensão de 5 a 60 minutos.
Prima SET novamente para sair do modo de configuração. Se não for
premida qualquer tecla durante 10 segundos, o dispositivo irá
abandonar este modo automaticamente.
Configurar e utilizar o alarme
Prima o botão AL 1.2 uma vez, o LED A1 e o dígito das horas piscam.
Prima os botões de seta para definir a hora para Alarme 1 (manter
premido para avançar rapidamente).
Prima novamente o botão AL 1.2 para ajustar os minutos. Prima os
botões de seta para configurar os minutos para o alarme 1. (mantenha
premido para avançar rapidamente).
Prima novamente AL 1.2, o ecrã apresenta “OFF” (alarme desligado).
Para selecionar um som de despertar, prima os botões de seta para
selecionar:
rd = acordar com o rádio
bu = acordar com sinal sonoro
OFF = alarme desligado
Prima novamente o botão AL 1.2, o LED A2 e o dígito das horas
piscam. Prima os botões de seta para configurar as horas para o alarme
2. Repita o passo anterior para configurar o alarme 2.
Prima novamente o botão AL 1.2 para sair do modo de configuração do
alarme. Ao selecionar acordar com o rádio ou acordar com sinal sonoro,
o alarme relacionado é ativado, o que é indicado pela apresentação do
LED de A1 e/ou A2 no lado esquerdo do visor.
Quando soar o alarme 1 ou 2, prima o botão de suspensão uma vez
para silenciar o alarme. O alarme irá ativar-se novamente após terminar
o tempo de duração da suspensão.
Para parar o alarme, prima o botão RADIO/SLEEP ou o botão AL1.2
uma vez. O alarme será restabelecido e irá ativar-se novamente no dia
seguinte.
Ouvir rádio
Para ligar o rádio, prima o botão RADIO/SLEEP uma vez, o visor
apresenta “ON” e as leituras de frequência de rádio em Mhz.
Prima os botões de seta para sintonizar o rádio para a estação
pretendida. Prima e mantenha os botões de seta premidos para
procurar a estação nítida seguinte.
Para ajustar o volume, prima VOL uma vez, o visor apresenta “L07”,
prima os botões de seta para ajustar o volume de L01 (mínimo) para
L15 (máximo)
Prima o botão SNOOZE para desligar o rádio.
Este rádio despertador possui um total de 10 memórias predefinidas de
estações FM. Estas permitem-lhe predefinir as suas estações favoritas
e aceder às mesmas rapidamente.
Ligue o rádio e selecione uma estação de rádio que gostaria de
memorizar.
Prima e mantenha o botão SET premido até aparecer o LED “MEM” e
“01” começar a piscar. Prima SET uma vez para guardar Memória 1.
Prima os botões de seta para selecionar outra estação que gostaria de
memorizar. Depois prima e mantenha SET premido até aparecer o LED
“MEM” e “01” começar a piscar. Prima o botão de seta direito uma vez,
aparece “02”. Prima SET uma vez para guardar Memória 02.
Repita estes passos para predefinir as memórias 3 a 10.
Prima o botão SET para pesquisar as suas estações de rádio
predefinidas
Para editar uma estação predefinida, selecione uma outra estação e
repita os passos anteriores. Isto irá substituir as definições originais.
Utilizar o temporizador de suspensão
Durante a reprodução de rádio, prima o botão RADIO/SLEEP duas
vezes para aceder ao modo de suspensão. O LED de notificação SL irá
aparecer e o tempo de suspensão “05” (5 minutos) irá piscar no visor.
Prima novamente o botão RADIO/SLEEP, conforme necessário para
ajustar o temporizador de 5, 15, 30, 45, 60, 75, 90 ou OFF (desligado).
Assim que visor voltar a mostrar as horas, prima RADIO/SLEEP duas
vezes para mostrar o tempo de suspensão restante.
Para desligar o rádio antes de o tempo de suspensão ter terminado,
prima novamente o botão SNOOZE.
Alterar a luminosidade do visor
Prima novamente o botão SNOOZE para ajustar o brilho (baixo / alto /
desligado) do visor LED. Isto só pode ser feito com o rádio desligado.
Carregamento USB
Ligue o cabo de carregamento do seu telemóvel à porta USB na parte
de trás da unidade e, depois, ligue a outra extremidade ao seu
telemóvel. O rádio despertador irá carregar o telemóvel
automaticamente.
Certifique-se de que o adaptador original fornecido com o seu rádio
despertador (5 V, 1,2 A) está a ser utilizado para ligar o despertador à
corrente elétrica. Se utilizar outros adaptadores, poderá não poder
carregar o seu telefone.
A porta USB faculta um carregamento mais lento e irá demorar mais
tempo a carregar o seu telemóvel. Não é possível carregar o seu
computador portátil ou o seu tablet.
LIMPEZA E MANUTENÇÃO
Limpe o aparelho com um pano húmido. Nunca use produtos de
limpeza agressivos e abrasivos, esfregões de metal ou palha de aço,
que danifica o dispositivo.
Nunca mergulhe o aparelho na água ou noutro líquido. O aparelho não
é adequado para a máquina de lavar louça.
AMBIENTE
Este equipamento não deve ser colocado no lixo doméstico no final da
sua vida útil, mas antes entregue num centro de reciclagem de
equipamento doméstico elétrico e eletrónico. Este símbolo no
equipamento, o manual de instruções e a embalagem chamam a atenção
para esta questão importante. Os materiais usados neste equipamento
podem ser reciclados. Ao reciclar eletrodomésticos usados estará a
contribuir de forma significativa para proteger o nosso ambiente. Informe-
se sobre os pontos de recolha junto das entidades locais.
Assistência
Encontra todas as informações e peças de substituição em
service.tristar.eu!
DECLARAÇÃO DE CONFORMIDADE
O(a) abaixo assinado(a) Smartwares Europe declara que o presente tipo
de equipamento de rádio CL-1658 está em conformidade com a Diretiva
2014/53/UE.
O texto completo da declaração de conformidade UE está disponível no
seguinte endereço da internet: www.smartwares.eu/doc
PLInstrukcje użytkowania
BEZPIECZEŃSTWO
Producent nie ponosi odpowiedzialności za
uszkodzenia w przypadku nieprzestrzegania
instrukcji bezpieczeństwa.
W przypadku uszkodzenia kabla zasilania, aby
uniknąć zagrożenia, musi on być wymieniony
przez producenta, jego agenta serwisowego lub
osoby o podobnych kwalifikacjach.
Nie wolno przesuwać urządzenia, ciągnąć za
przewód ani dopuszczać do zaplątania kabla.
Urządzenie należy umieścić na stabilnej i
wypoziomowanej powierzchni.
Nigdy nie należy zostawiać włączonego
urządzenia bez nadzoru.
Urządzenie przeznaczone jest tylko do
eksploatacji w gospodarstwie domowym, w
sposób zgodny z jego przeznaczeniem.
Dzieci poniżej 8 roku życia nie mogą używać
tego urządzenia. Zurządzenia mogą korzystać
dzieci wwieku od 8 lat oraz osoby
oograniczonych możliwościach fizycznych,
sensorycznych ipsychicznych bądź
nieposiadające odpowiedniej wiedzy
idoświadczenia, pod warunkiem, że są
nadzorowane lub otrzymały instrukcje
dotyczące bezpiecznego używania urządzenia,
atakże rozumieją związane ztym zagrożenia.
Dzieciom nie wolno bawić się urządzeniem.
Urządzenie oraz dołączony do niego kabel
należy przechowywać poza zasięgiem dzieci,
które nie ukończyły 8 lat. Czyszczenia
ikonserwacji nie powinny wykonywać dzieci
chyba, że ukończyły 8 lat iznajdują się pod
nadzorem osoby dorosłej.
Aby uniknąć porażenia prądem elektrycznym,
nie należy zanurzać przewodu, wtyczki ani
urządzenia w wodzie bądź w innej cieczy.


Produkt Specifikationer

Mærke: Smartwares
Kategori: Clockradio
Model: CL-1658

Har du brug for hjælp?

Hvis du har brug for hjælp til Smartwares CL-1658 stil et spørgsmål nedenfor, og andre brugere vil svare dig


Clockradio Smartwares Manualer

Clockradio Manualer

Nyeste Clockradio Manualer