©2005 Sony Corporation Printed in Japan
電気製品は安全のための注意事項を守らないと、火災や人身事故にな
この取扱説明書には、事故を防ぐための重要な注意事項と製品の取り扱いかたを示し
ています。 製品を安全にお使いください。お読この取扱説明書をよくお読みのうえ、
みになったあとは、いつでも見られるところに必ず保管してください。
ソニー製品は安全に充分配慮して設計されています。しかし、まちがった
使いかたをすると、火災などにより人身事故になることがあり危険です。
ご購入いただいた特約店、またはソニー業務用商品に関するお問い合わ
取扱説明書では、次のような表示をしています。表示の内容をよく理解
この表示の注意事項を守らないと、感電やその他の事故
によりけがをしたり周辺の家財に損害を与えたりするこ
脚を閉じたまま取り付けると、転倒してビデオカメラを破損したり
制限重量を超えると、三脚が倒れたりしてけがの原因となることが
各ロックつまみやレバーおよび脚ロックレバー、カメラネジなどの
締めつけが弱いと、ずれたりはずれたりして、ビデオカメラの破損
落としたり、液体がかかったりしないようにていねいに扱ってくださ
直射日光の当たるところや暖房器具のそばなど温度の高いところや、湿
リモートプラグは、まっすぐに抜き差ししてください。無理に抜き差し
必要以上に強くクランプを締め付けないでください。破損の原因になり
必ずティルトストッパーを確実にしめて固定してください。また、雲台に
ビデオカメラを搭載後にアクセサリーなどを取り付けないでください。雲
使い終わったら、 ビデオカメラをはずし、 脚を収納し、 リモコンに1 2 3
無理な力が加わらないように注意して、パンハンドルをたたんでくださ
ビデオカメラを取り付けたままで、持ち歩かないでください。
汚れたら、やわらかい布に中性洗剤溶液を含ませてふいてから、乾いた
海岸など、潮風の当たる所で使用した後は、乾いた布でよくふいてくだ
ステーを取りはずした状態では使用しないでください。
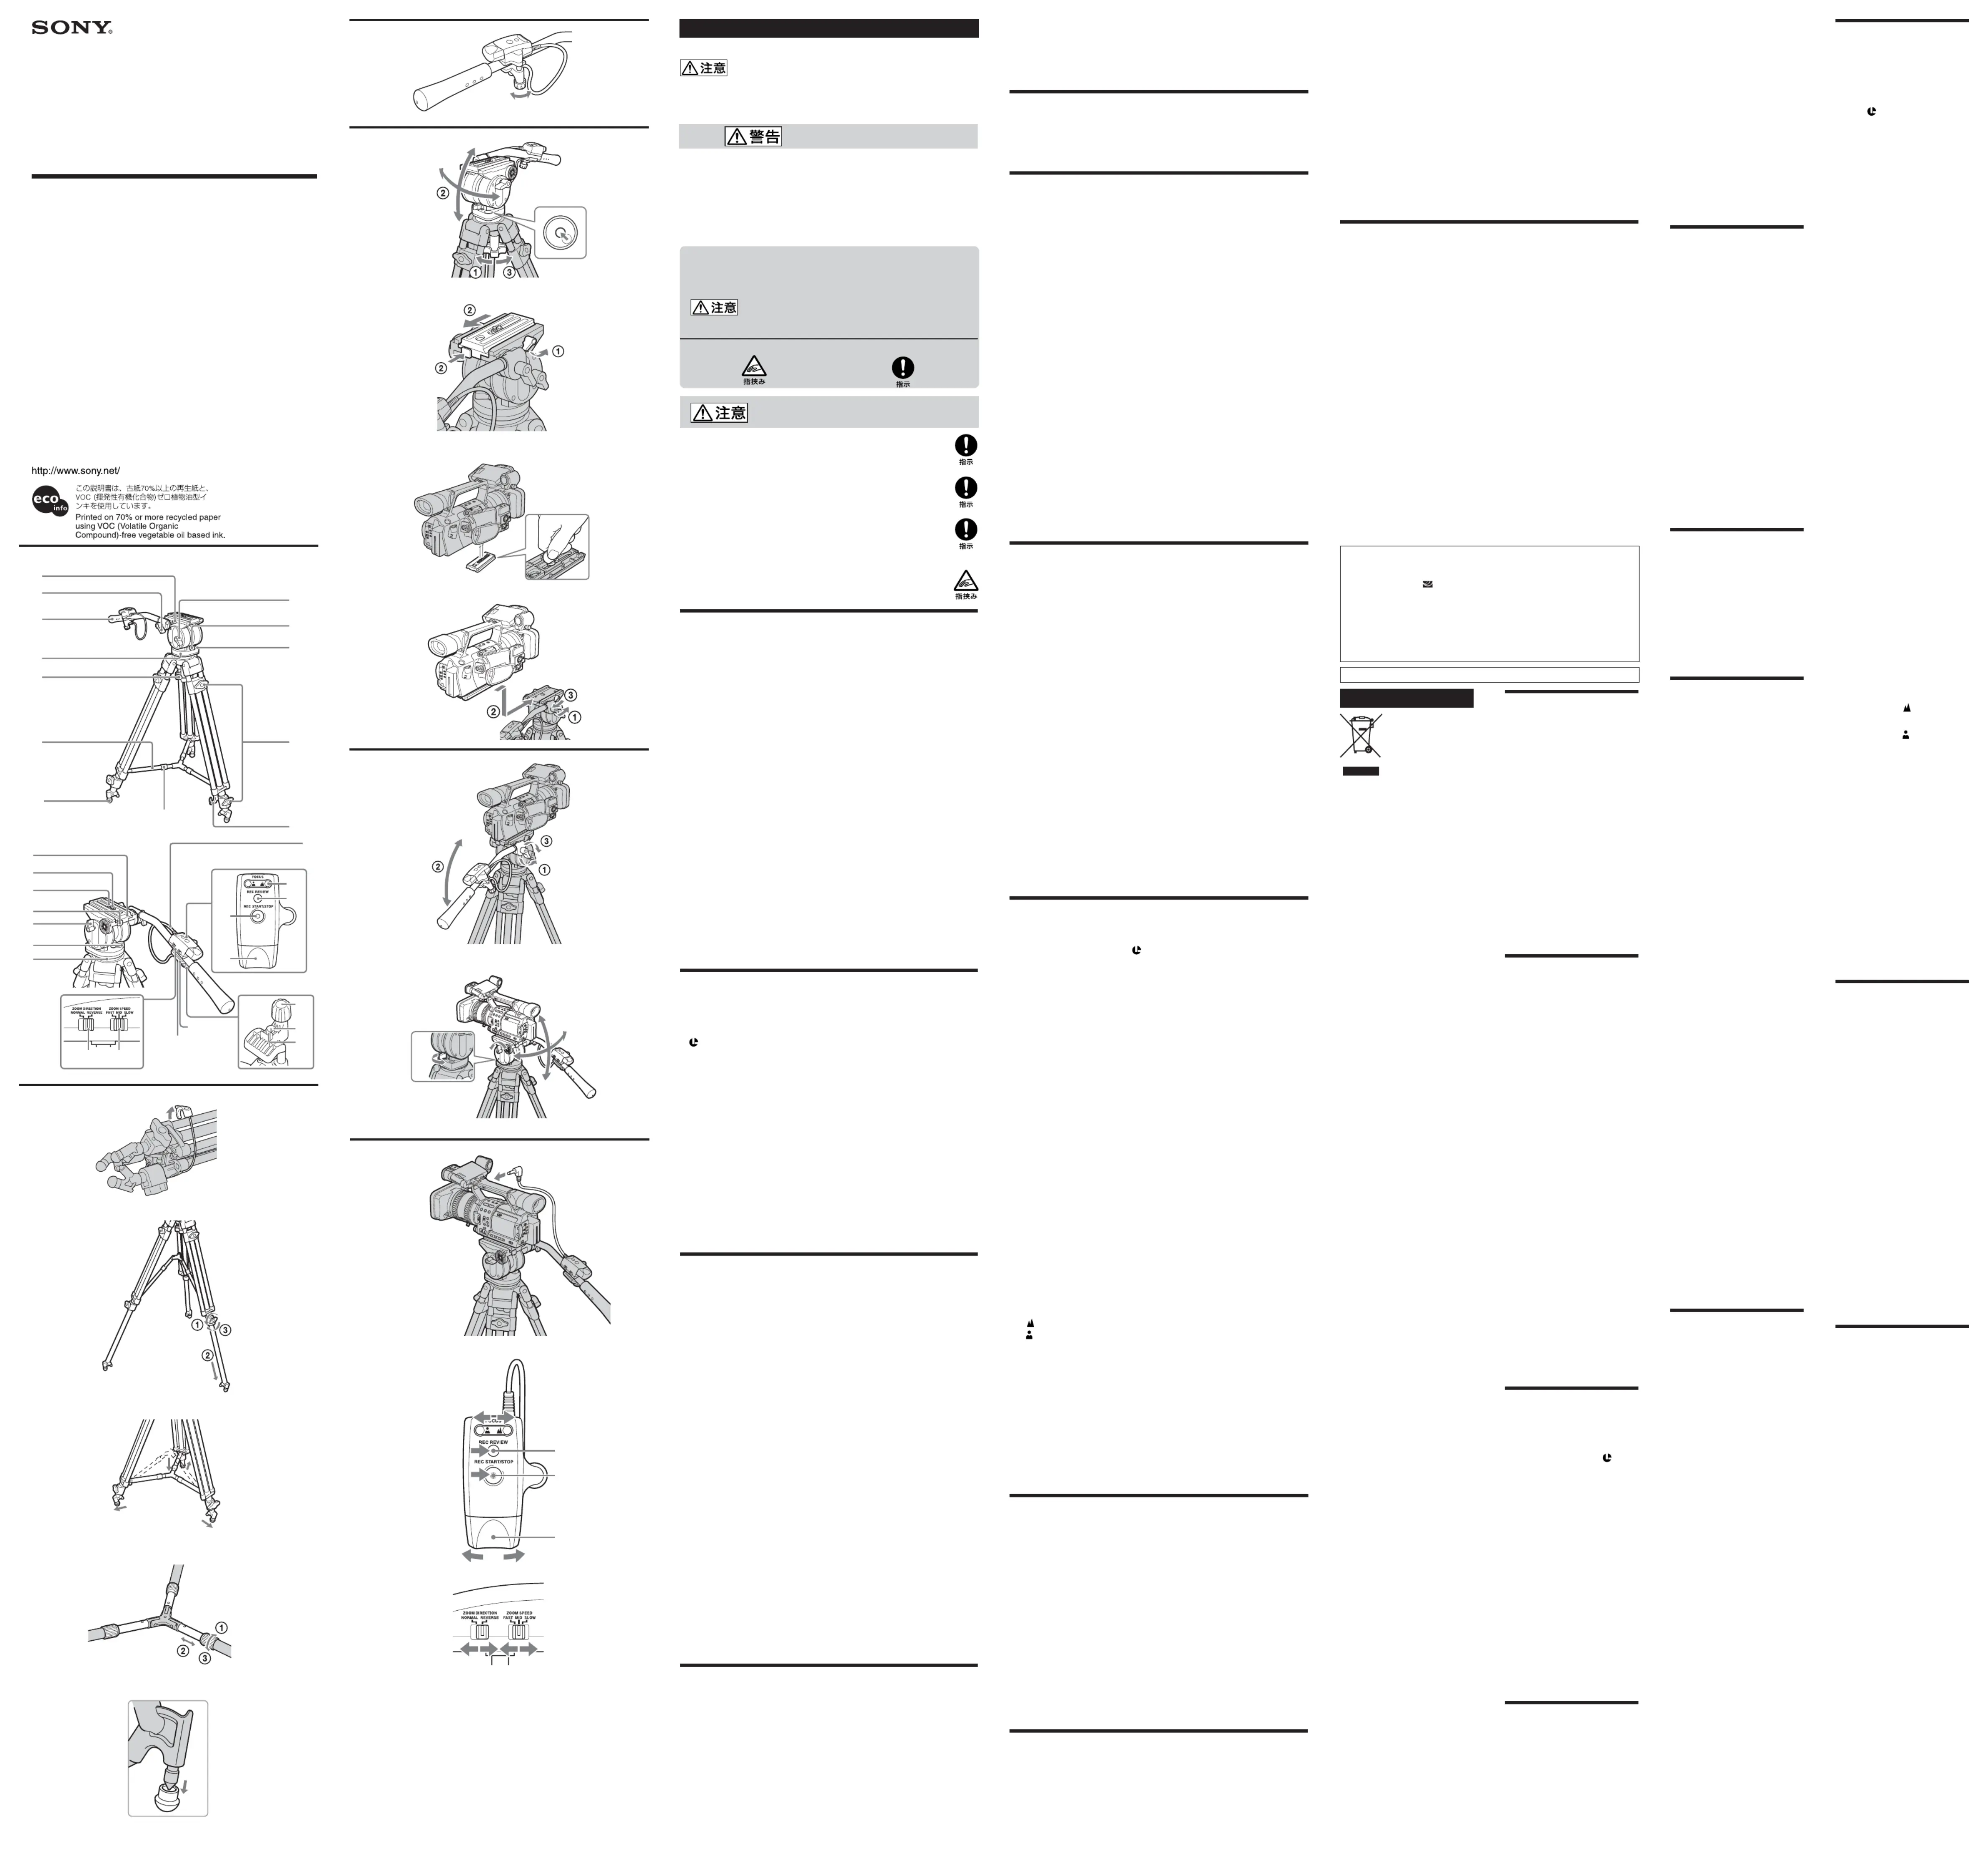
この三脚は、ビデオカメラなどにお使いいただける、リモコン機能付き三
クランプを使い、三脚のパンハンドルに取り付けて操作することができ
ズーム方向切り換えスイッチにより、ズームレバーのズーム方向を切り
ズームスピード切り換えスイッチにより、ズームスピードを
ボールレベラー方式ですので、正確な水平出しがすばやくできます。
油圧式パンハンドルですので、パンニング/ティルティングを滑らかに
カウンターバランス機能により、ティルト角に合わせて安定したバラン
ワンタッチスライド式プレートですので、重心のかたよりのないバラン
伸縮可能タイプのステーですので、傾斜地などでも脚の傾きや幅を自在
はじめは、上側の脚ロックレバーをゆるめて脚を引き出し、固定しま
ステーに無理な力を加えないようにしてください。破損する恐れがあ
(全国どこからでも市内通話料金でご利用いただけます)
This symbol on the product or on
its packaging indicates that this
product shall not be treated as
household waste. Instead it shall be
handed over to the applicable take-
back scheme for the recycling of
electrical and electronic equipment.
By ensuring this product is
disposed of correctly, you will help
prevent potential negative
consequences for the environment
and human health, which could
inappropriate waste handling of
this product. The recycling of
materials will help to conserve
natural resources. For more
detailed information about
recycling of this product, please
contact your local Sony office or
visit Sony Europe’s web site for
For the customers in Europe
This product with the CE marking
complies with the EMC Directive
(89/336/EEC) issued by the
Commission of the European
Compliance with this directive
implies conformity to the following
• EN55103-1: Electromagnetic
• EN55103-2: Electromagnetic
Susceptibility (Immunity)
This product is intended for use in
the following Electromagnetic
Environment(s): E1 (residential), E2
(commercial and light industrial),
E3 (urban outdoors), and E4
(controlled EMC environment, ex.
THIS DEVICE COMPLIES WITH
PART 15 OF THE FCC RULES.
OPERATION IS SUBJECT TO THE
FOLLOWING TWO CONDITIONS:
(2) THIS DEVICE MUST ACCEPT
You are cautioned that any changes
or modifications not expressly
approved in this manual could void
your authority to operate this
This equipment has been tested and
found to comply with the limits for
a Class B digital device, pursuant to
Part 15 of the FCC Rules. These
limits are designed to provide
reasonable protection against
harmful interference in a residential
installation. This equipment
generates, uses, and can radiate
radio frequency energy and, if not
installed and used in accordance
with the instructions, may cause
harmful interference to radio
communications. However, there is
no guarantee that interference will
not occur in a particular
installation. If this equipment does
cause harmful interference to radio
or television reception, which can
be determined by turning the
equipment off and on, the user is
encouraged to try to correct the
interference by one or more of the
– Reorient or relocate the receiving
– Increase the separation between
the equipment and receiver.
– Connect the equipment into an
outlet on a circuit different from
that to which the receiver is
– Consult the dealer or an
experienced radio/TV technician
For the customers in Canada
This Class B digital apparatus
complies with Canadian ICES-003.
Attaching the video camera before
opening the legs may cause the
tripod to fall damaging the video
camera or injuring yourself and
Exceeding the load limit may cause
the tripod to fall and cause injury.
Tighten the lock parts (lock
knob, lever, leg lock lever
and camera mounting screw
Failure to properly tighten them
may cause parts to shift position or
come loose damaging the video
camera or injuring yourself and
Take care when opening and
Otherwise you might pinch your
fingers or suffer other unforeseen
• Be sure not to drop the Remote
Commander or spill liquid on it.
• Do not leave the Remote
Commander in direct sunlight,
near heaters, or in locations with
• When inserting or pulling the
Remote plug, be sure to do so in a
straight line. Performing this
operation forcibly may damage
either the remote plug or the unit
• Do not overly tighten the cramp.
Doing so may cause damage.
Attaching and removing the
Tighten and lock the tilt lock lever
firmly. Do not attach accessories to
the tripod head after mounting the
video camera on the mounting
head as this may cause the tripod
head to incline and damage the
After using the tripod, 1 remove
the video camera, 2 close the legs,
and 3 fold away the pan handle
taking care not to apply any excess
force to the Remote Commander.
Never carry the tripod with the
• Clean the tripod with a soft cloth
lightly moistened with a mild
• After using the tripod at a
location subject to sea breezes, be
sure to wipe it clean with a dry
Do not use the tripod without
The VCT-PG11RMB is a remote
control tripod for video camera.
• The RM-1BP Remote Commander
can be connected to a Sony video
camera equipped with a LANC
• It can be operated by attaching it
to the pan handle on the tripod
using the cramp provided.
• The zoom direction of the zoom
lever can be switched using the
ZOOM DIRECTION change over
• The zoom speed can be switched
to one of three levels using the
• A ball-level for quick and easy
• The oil-cylinder pan handle
permits smooth panning and
• Use the counterbalance function
to automatically adjust stable
balance depending on tilt angle.
• The one-touch slide plate
provides proper balance easily.
• The stays for flexible adjustment
of leg width and inclination even
9Tilt torque changeover lever
15 Camera mouonting screw
17 Plate detaching button
19 Pan torque changeover lever
27 ZOOM SPEED change over
automatically returns back
2Adjust and lock the length
Do with the upper leg lock
levers first, then the lower ones.
1Loosen the leg lock lever.
2Adjust the length of the leg.
3Tighten the leg lock lever to
If unnecessary force is exerted
on the stay, it may be damaged.
4Adjust the length of the
1Loosen the stay lock screws.
2Adjust the length of the
3Tighten the stay lock screws.
Remove the rubber guard from the
If the spike may damage the floor,
1Rotate the cramp knob on
counterclockwise as far as
required to insert the pan
2Align the center of the pan
• The weight of the video camera
that you can attach is less than 5
Do not attach the video camera
• The HDR-FX1/HVR-Z1 can be
attached to the camera plate with
the VCT-FXA (shoulder brace).
1Install the battery pack and
2To make the camera level.
1Unlock the ball level lock
bubble in the level moves
3Lock the ball level lock
3Detach the camera plate of
1Loosen the plate lock lever.
2Pull the camera plate out
the camera plate with the
holes on the bottom of the
video camera, and tighten
the camera mounting screw
camera is securely fastened
5Mount the video camera on
1Make sure that the plate lock
2Slide the camera plate while
pressing the plate detaching
button until it clicks, then
camera is securely fastened
3Lock the plate lock lever.
• When the video camera is
attached, be sure not to touch the
leg lock lever on the tripod.
• Do not tilt the video camera while
the plate lock lever is loose. If you
do so, the video camera may fall
1Adjusting the position of
1 Loosen the pan handle lock
2 Adjust the position of the
3 Tighten and lock the pan
2Using the pan handle with
1Loosen the pan handle lock
2Turn the pan handle to a
3Tighten and lock the pan
3To attach the pan handle to
Attach the pan handle in a
position that enables the tilt
Loosen the pan lock lever and
adjust the position of the video
handle, then tighten the pan
Loosen the tilt lock lever and
adjust the position of the video
handle, then tighten the tilt lock
There are two panning/tilting
torque positions (weak (-) and
strong (+)). Change to suit
• Do not use the pan lock lever or
tilt lock lever to adjust panning or
tilting resistance. Doing so may
• Be sure to loosen the lock lever
before panning or tilting the video
床に傷をつける恐れのある場合は使わないでください。
1リモコンのクランプツマミを反時計まわりにまわし、パンハンドルを
2三脚のパンハンドルの中心をクランプのV溝に合わせ、クランプツマ
制限重量を超えるビデオカメラは取り付けないでください。
2水準器の中の気泡が黒い円に入るように、雲台の角度を調整する。
2プレート着脱ボタンを押しながらカメラプレートを抜き取る。
4カメラプレートのビデオボスとカメラネジを、それぞれビデオカメラ
の穴に合わせカメラネジをしっかりと締め、がたつきがないことを確
1プレートロックレバーがゆるんでいることを確認する。
2プレート着脱ボタンを押しながら「カチッ」と音がするまで差し込
ビデオカメラを取り付けた状態では、脚ロックレバーに触れないように
プレートロックレバーをゆるめた状態で、ティルティングは行なわない
ティルトストッパーが固定できる位置で取り付けてください。
パンハンドル固定ネジをゆるめ取りはずし、取り付け部分を回転させ
パンストッパーをゆるめ、パンハンドルを左右方向の任意の位置に動
ティルトストッパーをゆるめ、パンハンドルを上下方向の任意の位置
パンニングおよびティルティングのトルクは、弱(−)と強(+)の
ありますので、撮影に応じて切り換えを行なってください。
パンストッパーやティルトストッパーをトルクの重さ調節には絶対に使
確実にストッパーをゆるめてから、パンニング/ティルティングをして
お手持ちのビデオカメラの取扱説明書も合わせてお読みください。
詳しくはお使いになる機器の取扱説明書をご覧ください。
撮影が始まります。もう一度を押すと、撮影が止まります。(スタン
1ズーム方向切り換えスイッチでズーム方向を選択します。
時計まわり テレ側(望遠) :被写体が大きく写ります。
反時計まわり ワイド側(広角) :被写体が小さく写ります。
時計まわり ワイド側(広角) :被写体が小さく写ります。
反時計まわり テレ側(望遠) :被写体が大きく写ります。
お手持ちの機器の種類によっては、ズームスピード切り換えスイッチ
と、ズームレバーをまわす量によって、早くズームさせることができ
ズームレバーをまわす量にかかわりなく一番遅いスピードでズーム
ズームレバーをまわす量に応じて、早くズームします。(
ズームレバーをまわす量に応じて、より早くズームします。(
ビデオカメラのフォーカススイッチを「手動」に切り換え、
最後にテープを停止させた部分が、ビデオカメラの液晶画面に数秒間
タンを押しても画面が出ないことがありますが、故障ではありません。
リモートプラグは、リモートプラグホルダーに差し込んでおいてくださ
2付属のキャリングケースの内側にある保護カバーを取りはずし、リモ
3パンハンドル固定ネジをゆるめて、パンハンドルをたたむ
長さがちがうままたたむと、脚を破損することがあります。
6ステーをたたんで脚を閉じてから、最後の脚を閉じる
パンハンドルをたたむとき、リモコンに無理な力が加わらないようにし
付属のキャリングケースに収納するとき、リモコンに無理な力が加わら
仕様および外観は、改良のため予告なく変更することがあります。
この製品には保証書が添付されていますので、お買い上げの際、お受け
所定事項の記入および記載内容をお確かめのうえ、大切に保存してくだ
この取扱説明書をもう一度ご覧になってお調べください。
ご購入いただいた特約店、またはソニー業務用商品に関するお問い合わせ
保証書の記載内容に基づいて修理させていただきます。詳しくは保証書を
修理によって機能が維持できる場合は、ご要望により有償修理させていた
Refer to the operating instructions
of the video camera for further
1Be sure the video camera is
turned off, then insert the
remote plug straight into
2Setting the video camera to
instructions of the unit used
with the Remote Commander
3Press the REC START/STOP
button to start recording.
Press it again to stop recording.
1Select the zoom direction
2Rotate the zoom lever of the
Tele side (for telephoto):
Wide side (for wide-angle):
Wide side (for wide-angle):
Tele side (for telephoto):
accelerated by using the ZOOM
together with the amount the
camera zooms at the slowest
depending on how much the
zoom lever is rotated. (4
camera zooms even faster,
depending on how much the
zoom lever is rotated. (8
5Focusing the video camera
Switch the focus switch of the
video camera to “Manual” and
press the FOCUS button on the
camera focuses on the subject
camera focuses on the subject
While in standby mode, press
The last several seconds of
recorded images before the
played on the LCD screen, and
then the video camera will
• You cannot record still images
with the Remote Commander.
standard have been mixed on the
same tape, an image may not
appear on the screen when the
REC REVIEW button is pressed. It
When not using the remote
Attach the remote plug into the
1Remove the video camera.
carrying case, and cover the
it. Fix it firmly with the
3Loosen the pan handle lock
4Loosen the each leg lock
5Tighten the lock levers and
Adjust the three stays to the
If the stay lengths are not all
the same, the legs may be
6Close the legs and shorten
7Lock the legs with the leg
1Pull out the leg holder from
• When folding away the pan
handle, do not apply any excess
force to the Remote Commander.
• When storing away into the
supplied carrying case, do not
apply any excess force to the
(27 7/8 inches) (Legs spread)
(32 3/8 inches) (Legs closed)
Approx. 380 mm (15 inches)
Approx. 4.7 kg (10 lb 6 oz)
switch, ZOOM SPEED change
(2 1/2 3 1/4 4 1/4 inches)× ×
Set of printed documentation
Design and specifications are
subject to change without notice.