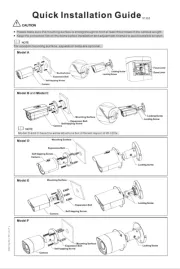
Speco Technologies HLED31D7W Manual


Læs gratis den danske manual til Speco Technologies HLED31D7W (2 sider) i kategorien Overvågningskamera. Denne vejledning er vurderet som hjælpsom af 46 personer og har en gennemsnitlig bedømmelse på 4.7 stjerner ud af 23.5 anmeldelser. Har du et spørgsmål om Speco Technologies HLED31D7W, eller vil du spørge andre brugere om produktet?

Side 1/2
NOTES:
1. Do not install the camera outdoors.
2. Choose a location for the camera which is free o
f
moisture and vibration.
3. Be careful not to scratch the camera lens or dome
cover.
4. Do not operate camera beyond listed temperature
(-49°F~122°F)
5. Handle with care. Dropping it can cause serious
damage to the camera.
6. Avoid any direct sun light into the lens.
7. To avoid shorting or damaging the camera, use
only power supplies which meet the listed
specifications (12VDC / 24VAC Dual voltage, 1A)
FEATURE
1. 650 TVL High Resolution Image
2. Smart DNR technology; reduces noise in low light.
3. 75’ range visible in total darkness with 24pcs of IR
LEDs. (Indoor).
4. This camera is flexible to install with its 3-axis
camera construction, this allows for the camera to
be mounted to ceiling, wall or slope surfaces.
5. True Day/Night, camera changes function based
on illumination, IR illuminators in dark (option)
6. 8 individual privacy zones
7. DWDR (Digital Wide Dynamic Range)
8. Multi function: High Light Mask, Lens Shading
Compensation, Smart Motion Detection
9. Smart IR: Objects can be clearly identified due to
the function that decreases screen saturation o
f
objects within a short distance when the IRs are
active.
10. Multi-language OSD.
11. 12VDC / 24VAC Dual Voltage operation.
HOW TO INSTALL
1. Opening the dome
Push in the latch button and pull back dome.
(Remove the protection sheet after installation is
completed).
2. Removing the dome
Lift the dome. W hen you push the latch button, it is
unlocked and you can lift the dome.
3. Camera installation
a. Mount the camera set with the supplied screws on
ceiling or wall.
It is recommended to utilize the supplied screws.
<Ceiling mount>
<Wall mount>
b. Please refer to Section 4 for details on Camera angl
e
adjustments
c. Lens adjustment (Vari-focal Lens only)
After opening the LED cover,
By turning the Tele-
Wide” knob, you ca
n
access a range of foca
l
lengths within specifie
d
limits.
Once the focal length i
s
determined, turn the
Near-Far” knob to se
t
the focus for the desire
d
scene.
d. Re-assemble the camera.
4. Camera angle adjustment
a. Pan adjustment: Turn the disk of camera and the
n
adjust direction to the right or left (-180˚ to 180˚)
b. Tilt adjustment: Turn the camera holder (shown
below) to adjust the direction up or down (6˚ to
90˚)
c. Roll adjustment: Rotate the camera holder (-178˚
to 178˚)
<Caution> If the camera is adjusted beyond the
angle limit, it may cause damage to the camera.
ASSEMBLY
DIMENSION
SPECIFICATION
Model No.
HLE D31D7B
HLE D31D7W
HLE D31D1B
HLE D31D1W
Image Sensor 1/3" COLOR SONY SUPER HAD CCD II
Effective Pixel 768(H) x 494(V ) Pixel
Cell Size
6.35
(H) x 7.4
(V )
Scanning S ystem 2 : 1 Interlace
Sync. Type Internal
Resolution 650 TV-Line
S/N 52dB or More(A GC OFF)
Video Output 1.0 V p-p(Sync. Negative) Termination 75
Min. Illumination
0.01Lux(F/1.2)
0Lux (75’ R ange with 24pcs LED) - Indoor
Gamma γ = 0.45 typ.(0.2 ~ 1.0)
OS D Yes(Multi Language)
W hite Balance ATW(2,50K ~ 9,500°K )/MANUAL/A WC
Shutter Speed 1/60 ~ 1/100,000sec
Sense up Auto(Selectable limit 2X~1024X)/FIXED/OFF
Backlight OFF/BLC/HLC/DWDR
AGC LO W/MIDDLE /HIGH/OFF
DNR(3D) AUTO/LO W/MIDD LE /HIGH/O FF
Motion Detection ON/OF F(4 Zone)
Privacy Zone ON/OFF(8 Zone)
Mirror ON/OF F
Day & Night AUTO, COLOR, B/W
LED Brightness 24pcs, Smart IR
Blemish
Compensation
AUTO/OFF
Lens f = 3.6mm f = 2.8 ~ 12mm
Power Supply 12V DC / 24VAC Dual Voltage
Current Consumption Max. 600mA (at 12V DC / 24VAC)
Operation Temp. -49°F~122°F
Dimension Ø130.8(W) x 96(H) mm
Weight 14.5 oz
The specification is subject to change without any prior
notice to improve the quality.
FUNCTION SETTING
1. How to use the jog lever
SET : Used to access the menu and confirm
selection.
UP, DOWN : Used to move the cursor to up or
down.
LEFT, RIGHT : Used to move the cursor to left
or right and change the value.
EXT-VIDEO : Additional video output terminal for
test monitor during installation.
DEBUG PORT : It is used for upgrading the product
function and after-sales services.
HLED31D1B, HLED31D1W
HLED31D7B, HLED31D7W
ROTATION
U
D
R
L
LED COVER
DISK
CAMERA
HOLDER
DOME COVER ASS’Y
CAMERA
MODULE ASS’Y
SCREW
HARNESS
LED COVER
ASS’Y
SCREW
CONTROL PCB ASS’Y
PUSH BUTTON
DISK
BASE
CABLE
Ø109
48.1
101
Ø130.8
Ø100
Protection sheet
LATCH BUTTON
<Ceiling mount>
<Wall mount>
SCREW TP1
3.5X20 2EA
SCREW TP1
3.5X20 2EA
<Ceiling mount>
<Wall mount>
SCREW TP1
3.5X20 2EA
SCREW TP1
3.5X20 2EA


Produkt Specifikationer

Mærke: Speco Technologies
Kategori: Overvågningskamera
Model: HLED31D7W

Har du brug for hjælp?

Hvis du har brug for hjælp til Speco Technologies HLED31D7W stil et spørgsmål nedenfor, og andre brugere vil svare dig