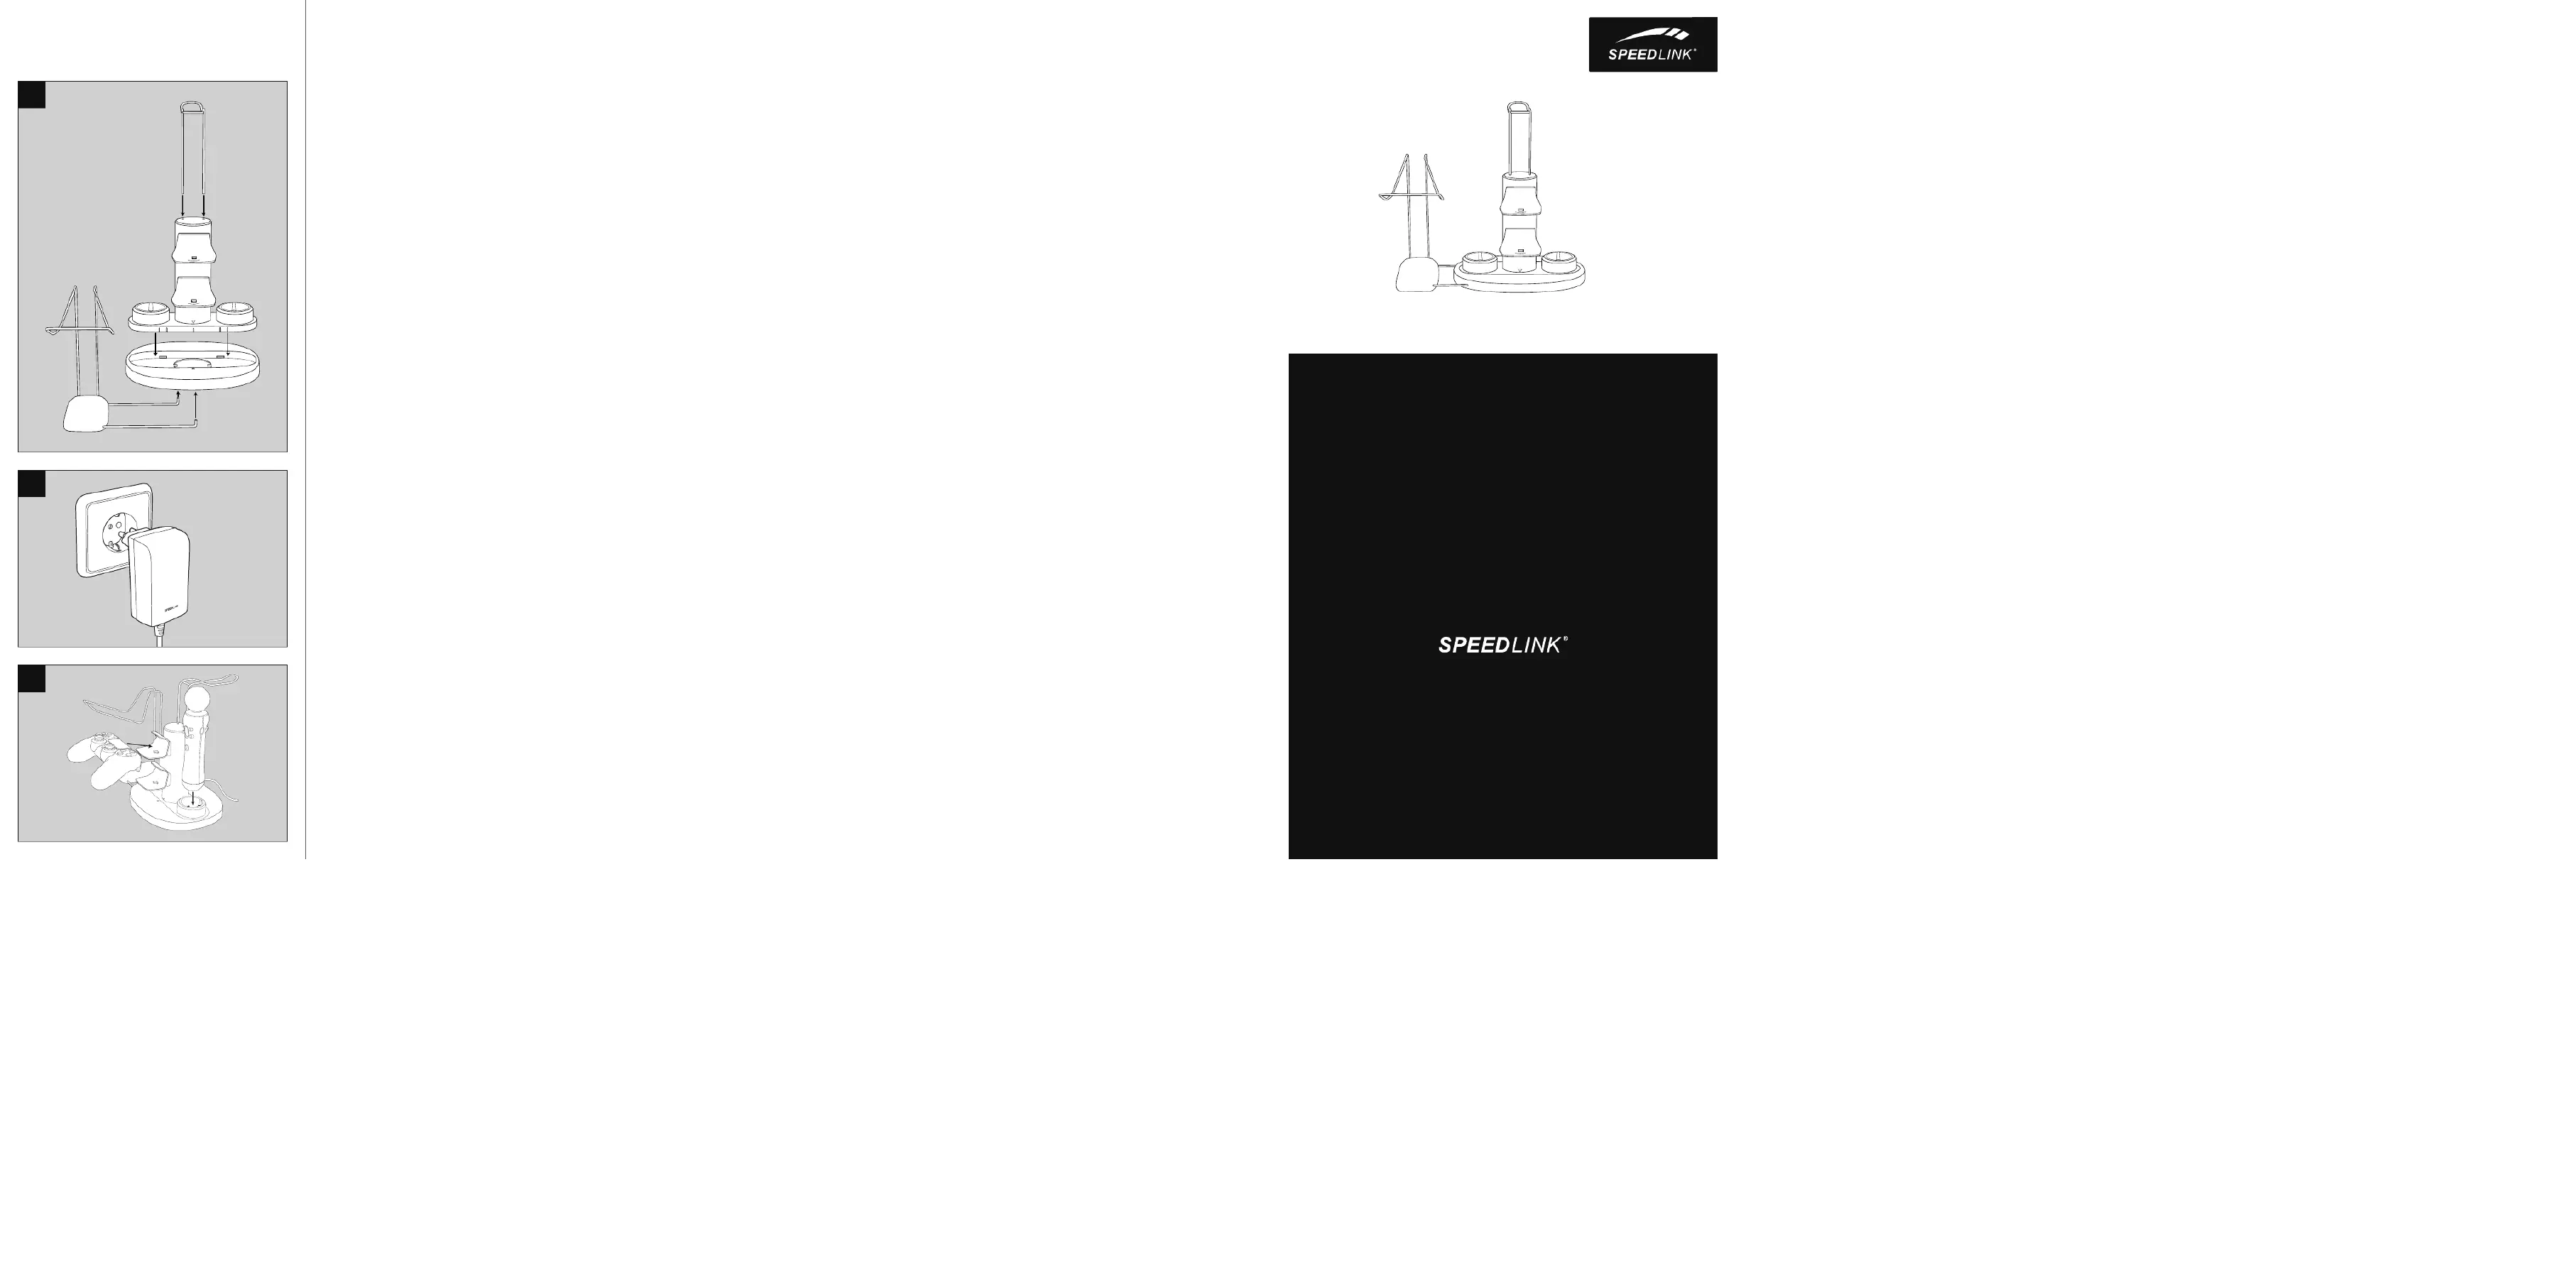
1. Τοποθετήστε το ταμπλό φόρτισης
από επάνω στο πόδι βάση και αφήστε
το να κουμπώσει. Το μικρό βέλος
στο πόδι πρέπει τότε να δείχνει στο
βέλος στο ταμπλό φόρτισης. Κατόπιν
εισαγάγετε τα μεταλλικά κλιπ της
βάσης ακουστικών από επάνω στις δύο
οπές του σταθμού φόρτισης. Πρέπει
να βρίσκονται απέναντι από τις βάσεις
φόρτισης χειριστηρίου. Η μεταλλική
βάση για τα γυαλιά PS-VR πρέπει να
εισαχθεί από κάτω στο πόδι βάση.
2. Συνδέστε το σταθμό φόρτισης μέσω
του περιεχόμενου τροφοδοτικού με μια
πρίζα (100-240V AC 50/ 60Hz).
3. Για τη φόρτιση εισαγάγετε τα Gamepad
PS4* στις διαφανείς στηρίξεις. Τα
χειριστήρια PS-Move τοποθετούνται
στις δύο υποδοχές φόρτισης.
1. Nastrčte nabíjecí plošinu shora na
stojan a nechte ji zaskočit. Malá šipka
na podstavci přitom musí ukazovat
na šipku na nabíjecí plošině. Kovovou
sponu držáku headsetu zastrčte shora
do dvou otvorů v nabíjecí stanici. Měla
by ležet naproti nabíjecím držákům
controlleru. Kovový držák na brýle PS-
VR zastrčte zespodu do stojanu.
2. Zapojte nabíjecí stanici pomocí
dodávaného síťového adaptéru do
zásuvky (100-240V AC 50/60Hz).
3. Své PS4 * gamepady zastrčte pro
nabíjení do průhledných držáků. PS-
Move-Controller se postaví do dvou
1. Introduza a plataforma de
carregamento pela parte superior
sobre o suporte e deixe que encaixe
no lugar. A pequena seta no suporte
tem de coincidir com a seta na
plataforma. Introduza o clipe metálico
do suporte do auscultador nos dois
orifícios superiores da estação de
carregamento. Deverá ficar na frente
dos suportes do controlador. O suporte
metálico para os óculos PS-VR é
encaixado a partir de baixo no suporte.
2. Ligue a estação de carregamento
na tomada utilizando a fonte de
alimentação fornecida (100-240 V AC
3. Ligue o gamepad da PS4* nos suportes
transparentes para carregar. Os
controladores de movimento da PS
são depositados nas duas bandejas de
1. Sæt ladeplatformen på foden oppefra,
og lad den klikke på plads. Den lille
pil på foden skal pege mod pilen på
ladeplatformen. Headset-holderens
metalklemmer stikkes ind i de to huller
på ladestationen fra oven. Den skal
være over for controller-ladeholderne.
Metalholderen til PS-VR-brillen sættes
2. Forbind ladestationen via den
medfølgende strømforsyning med en
stikkontakt (100-240V AC, 50/60Hz).
3. Sæt dine PS4*-gamepads ind i de
transparente holdere til opladning.
PS-Move-controllerne stilles i de to
1. Placera laddningsplattformen
uppifrån på stativet och se till att
den hakar fast. Den lilla pilen på
stativets fot måste peka på pilen
på laddningsplattformen. Headset-
hållarens metallklämma stoppar man
sedan in uppifrån i laddningsstationens
båda hål. Den ska vara placerad mitt
emot controller-laddningshållaren.
Metallhållaren för PS-VR-glasögonen
stoppar man in underifrån i stativets
2. Koppla ihop laddningsstationen via den
medföljande nätdelen med stickuttaget
3. Placera dina PS4*-gamepads i de
genomskinliga hållarna för att ladda.
PS-move-controllerna ställs i de två
1. Sett inn lasteplattformen ovenfra og
ned på foten, og se til at den smekker
i lås. Den lille pilen på foten skal
peke på pilen på ladeplattformen
når dette gjøres. Metallklemmen
på hodetelefonsettet stikker du
deretter ovenfra og inn i de to hulene
på ladestasjonen. De skal da ligge
overfor controller-laderholderne.
Stikk metallholderen for PS-VR-brillen
2. Koble ladestasjonen til stikkontakten
via den medleverte nettdelen
3. Stikk dine PS4*-gamepads inn i de
transparente holderne for opplading.
PS-move-controllerne stilles i de to
1. Introduceți platforma de încărcare, din
partea de sus, în piciorul de susținere
până când se fixează. Săgeata de
pe picior trebuie să coincidă cu
săgeata de pe platforma de încărcare.
Introduceți clemele metalice ale
suportului căștilor, din partea de
sus, în cele două orificii ale stației
de încărcare. Acestea trebuie să se
afle vizavi de suportul de încărcare
al controllerului. Introduceți suportul
metalic al ochelarilor VR ai PS, din
partea de jos, în piciorul de susținere.
2. Conectați stația de încărcare la
priză (100-240V AC 50/ 60Hz) prin
intermediul sursei de alimentare
3. Pentru a-l încărca, introduceți
gamepad-ul PS4* în suportul
transparent. PS Move Controllere
se pun în cele două suporturi de
1. Postolje za punjenje odozgo nataknite
na podnožje sve dok ne klikne. Malena
strelica na podnožju mora se pritom
podudarati sa strelicom na postolju
za punjenje. Metalnu kopču nosača
slušalica zatim odozgo umetnite u
dvije rupe u stanici za punjenje. Ona
treba stajati nasuprot nosača za
punjenje upravljača. Metalni nosač za
PS-VR naočale nataknite odostraga na
2. Stanicu za punjenje spojite na mrežu
pomoću priloženog mrežnog adaptera
3. Svoje PS4* gamepads za punjenje
stavite u prozirne nosače. PS Move
upravljači stavljaju se u dva nosača za
1. Platformu za punjenje umetnite odozgo
na stopicu dok ne uklopi. Pritom mala
strelica na stopici mora biti okrenuta
prema strelici na platformi za punjenje.
Potom odozgo umetnite metalnu
stezaljku držača slušalica u dve rupice
punjača. Treba biti nasuprot držača
za punjenje kontrolera. Metalni držač
za naočare PS-VR umetnite odozdo u
2. Punjač putem priloženog izvora
napajanja spojite s utičnicom (100-
3. Umetnite PS4* kontrolere u providne
držače kako bi se napunili. Kontroleri
PS-Move se stavljaju u dva ležaja za
1. Ploščad za polnjenje nataknite na nogo
od zgoraj in jo pustite, da se zaskoči.
Majhna puščica na nogi mora pri
tem kazati proti puščici na ploščadi
za polnjenje. Kovinsko spono držala
za slušalke nato od zgoraj vtaknite v
luknji na polnilni postaji. Nameščena
mora biti nasproti držalom za polnjenje
upravljalnikov. Kovinsko držalo za
očala VR PS vtaknite od spodaj v nogo.
2. Polnilno postajo s priloženim
napajalnikom priključite v vtičnico
3. Upravljalnike PS4* za polnjenje
postavite v prozorna držala. Krmilnika
PS Move postavite v skledi za
VREADY – 4-IN-1 CHARGING STATION