Techno Line WS 9252 Manual


Læs gratis den danske manual til Techno Line WS 9252 (6 sider) i kategorien Vejrstation. Denne vejledning er vurderet som hjælpsom af 24 personer og har en gennemsnitlig bedømmelse på 4.3 stjerner ud af 12.5 anmeldelser. Har du et spørgsmål om Techno Line WS 9252, eller vil du spørge andre brugere om produktet?

Side 1/6
Please read the instructions carefully and keep the manual well for future reference.
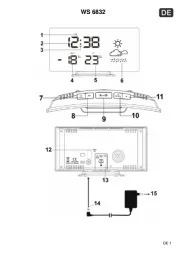
1. Remove the battery door of the main unit and transmitter.
2. Install 2 new AA size batteries for both main unit and transmitter, according to the polarity mark on
the battery compartment.
3. Replace the battery door.
4. After the batteries are installed, all LCD segment will be shown.
5. Press the “RESET” key of main unit first, and press the “RESET” key of transmitter.
6. It will automatically receive 433 MHz signal from transmitter for channel test in 8 seconds.
7. After 5 minutes channel test, it will turn to RC signal reception automatically.
8. Radio controlled function, the current time & date automatically synchronized with the time signal
transmitted from Germany(DCF77).
1. The unit can operate up to 3 remote transmitters.
2. Position the unit and transmitter within the effect transmission range: 50 meters in usual ive
circumstances.
3. In some cases, you may not receive the signal immediately, you can reset the unit and transmitter
again as described above.
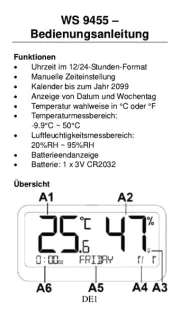
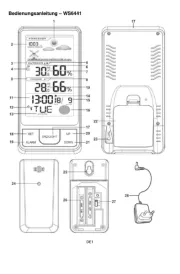
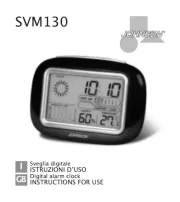
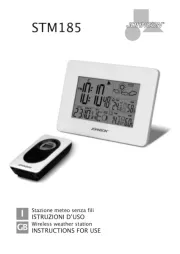
1. LCD display
- Display of the time, alarm time, outdoor & indoor temperature & humidity and weather forecast.
2. SNOOZE / LIGHT key
- Press it to turn on backlight for 5 seconds.
- When the alarm is sounding, press it to stop the current alarm and activate snooze.
3. ALARM SET key
- Press it to display alarm time for 5 seconds. During alarm time displayed, press it to turn on/
off alarm function.
- Press and hold it for 3 seconds to enter alarm setting mode.
- In alarm setting mode, press it to step the setting item, and press it to save and exit the setting.
4. CH/+ key
- In normal mode, Press it to select channel 1 to channel 3.
- Press and hold it for 3 seconds to turn to channel auto-change mode. Press it again to return to
normal mode.
- In setting mode, press it to adjust the value of the flashing digit upwards. And press it without
releasing to speed up the setting.
5. MEM/- key
- In normal mode, press it to check the max./min. indoor and outdoor temperature record for 5
seconds.
- Press and hold it for 3 seconds to delete the max./min. temperature record.
- In setting mode, press it to adjust the value of the flashing digit downwards. And press it without
releasing to speed up the setting.
6. DISPLAY SET key
- In normal mode, press and hold it for 3 seconds to enter time setting mode.
- ime setting mode, press it to step the setting item, and press and hold it for 3 seconds to save and In t
exit the setting.
7. °C/°F slide switch
- Select temperature unit between °C/°F.
8. SENSOR key
- Press it to start 433 MHz channel test for main unit & transmitter.
- During the channel test, press and hold it for 3 seconds to manual turn off.
9. RCC key
- Press it to manual receive RC signal.
- During the RC reception, press and hold it for 3 seconds to turn off synchronisation.
10. RESET key
- In case of m -function, press it by using a metal wire to reset all the values. al
11. Battery door
1. LED indicator
- Flashes when the remote unit transmitting a reading.
- Display of the channel, temperature and humidity.
2.LCD display
3. CHANNEL slide switch
- Assign the transmitter to Channel 1, 2 or 3.
4. RESET key
- Press it to reset the transmitter.
5. Wall-mounting holder
- Use it to support the transmitter on the wall.
6. Battery compartment
The signal indicator flashing means time signals are being received. If the RC weather station receives
signal successfully, a sync-time symbol “ ” appears on the LCD. The unit has already received the
time signal. Otherwise, the signal strength symbol will disappear from the LCD display.
You may press “RCC” key to receive the time signal manually. The receive mode will be off
automatically after 6-16 minutes. Receive mode consumes more battery power that may reduce
battery lifetime.
The weather station has been programmed to automatically switch when daylight saving time is in
effect. Your weather station will display “DST” on the LCD during the summer.
If the weather station does not receive the time signal successfully, you can set the time manually. As
soon as the transmitter is received again, the clock will automatically synchronize with the received
time.
1. In normal mode, press and hold “DISPLAY SET” key for 3 seconds until the Hour format digit
flashing.
2. Press - “+” / ” key to select 12/24 hour format.
3. Press “DISPLAY SET” key again to step the setting item to Hour with the Hour digit flashing.


Produkt Specifikationer

Mærke: Techno Line
Kategori: Vejrstation
Model: WS 9252

Har du brug for hjælp?

Hvis du har brug for hjælp til Techno Line WS 9252 stil et spørgsmål nedenfor, og andre brugere vil svare dig