Techno Line WT 643 Manual


Læs gratis den danske manual til Techno Line WT 643 (7 sider) i kategorien Vejrstation. Denne vejledning er vurderet som hjælpsom af 8 personer og har en gennemsnitlig bedømmelse på 4.8 stjerner ud af 4.5 anmeldelser. Har du et spørgsmål om Techno Line WT 643, eller vil du spørge andre brugere om produktet?

Side 1/7
WT643 Weather Station
Instruction Manual
The weather station desk clock combines the following functions:
Time with Projection – Alarm – Calendar – Indoor and Outdoor Temperature
Indoor and Outdoor Humidity – Weather Forecast
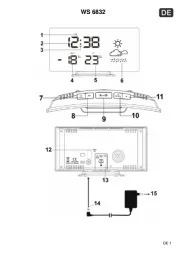
1. “MODE” button
2. “MIN / MAX” button
3. “▲ °C & F button ° ”
4. button “▼”
5. “SET / ALARM” button
6. “CHANNEL” button
7. BATTERY COMPARTMENT
8. AC/DC ADAPTER JACK
9. TIME PROJECTION FOCUS
10. CRYSTAL WEATHER FORECASTER
11. “SNOOZE / LIGHT” buttonButtons :
Getting started
Due to the heavy power consumption of the unit it is strongly recommended to
use the A/C adapter at all times.
1. Install the A/C adapter into the AC/DC ADAPTER JACK (8) hole
2. Install 3 x ‘AAAsize batteries by sliding open the BATTERY
COMPARTMENT (7). Replace battery compartment door when finished.
See battery warnings below
3. When batteries are in use, the symbol of the battery will be shown on the
clock face when the batteries are low and need replacing.
4. The batteries in the unit will keep the time and other details working if and
when the A/C adapter is removed.
NOTE: If only batteries are being used one can illuminate the clock face for a
period of 20 seconds when the “ SNOOZE / LIGHT” button (11) is pressed.
When required, the unit can be reset to default setting by removing batteries
and / or A/C adapter and re-installing them.
The preset language is English (EN) after reset or after installation of batteries
and the date is Thursday (TH), 2009 January 1.
To set time:
1. Press and hold “SET / ALARM” button (5) for 2 seconds and the HOUR digits
will flash. Press C & F button (3) or button (4) to change “▲ ° ° ” “▼”
the
HOUR setting.
2. Press “SET / ALARM” button (5) again and the MINUTE digits will flash.
Press C & F button (3) or button (4) to change the “▲ ° ° ” “▼”
MINUTE setting.
3. Press “SET / ALARM button (5) again to change the date/month month/date
setting. Press C & F button (3) or button (4) to change. “▲ ° ° ” “▼”
4. Press “SET / ALARM” button (5) again and the LANGUAGE digits will flash.
Press C & F button (3) or button (4) to change the “▲ ° ° ” “▼”
LANGUAGE
setting. (*See below for language settings)
5. Press “SET / ALARM button (5) again and the YEAR digits will flash.
Press C & F button (3) or button (4) to change the YEAR “▲ ° ° ” ▼”
setting.
6. Press “SET / ALARM button (5) again and the MONTH digits will flash.
Press C & F button (3) or button (4) to change the MONTH “▲ ° ° ” ▼”
setting.
7. Press “SET / ALARM button (5) again and the DATE digits will flash.
Press C & F button (3) or button (4) to change the DATE “▲ ° ° ” ▼”
setting.
8. Press “SET / ALARM button (5) again to change between 24-hour clock and
AM/PM. Press C & F button (3) or button (4) to change. “▲ ° ° ” ▼”
“ ”24H
indicates 24-hour clock. “12H” indicates AM / PM.


Produkt Specifikationer

Mærke: Techno Line
Kategori: Vejrstation
Model: WT 643

Har du brug for hjælp?

Hvis du har brug for hjælp til Techno Line WT 643 stil et spørgsmål nedenfor, og andre brugere vil svare dig