Whirlpool WFC 3C33 F X Manual
Whirlpool
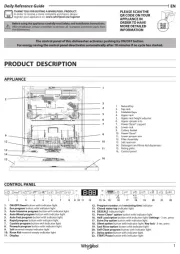
Opvaskemaskine
WFC 3C33 F X
| Mærke: | Whirlpool |
| Kategori: | Opvaskemaskine |
| Model: | WFC 3C33 F X |
| Vekselstrømsindgangsspænding: | 220 - 240 V |
| Vekselstrømsindgangsfrekvens: | 50 Hz |
| Bredde: | 600 mm |
| Dybde: | 590 mm |
| Højde: | 850 mm |
| Vægt: | 47000 g |
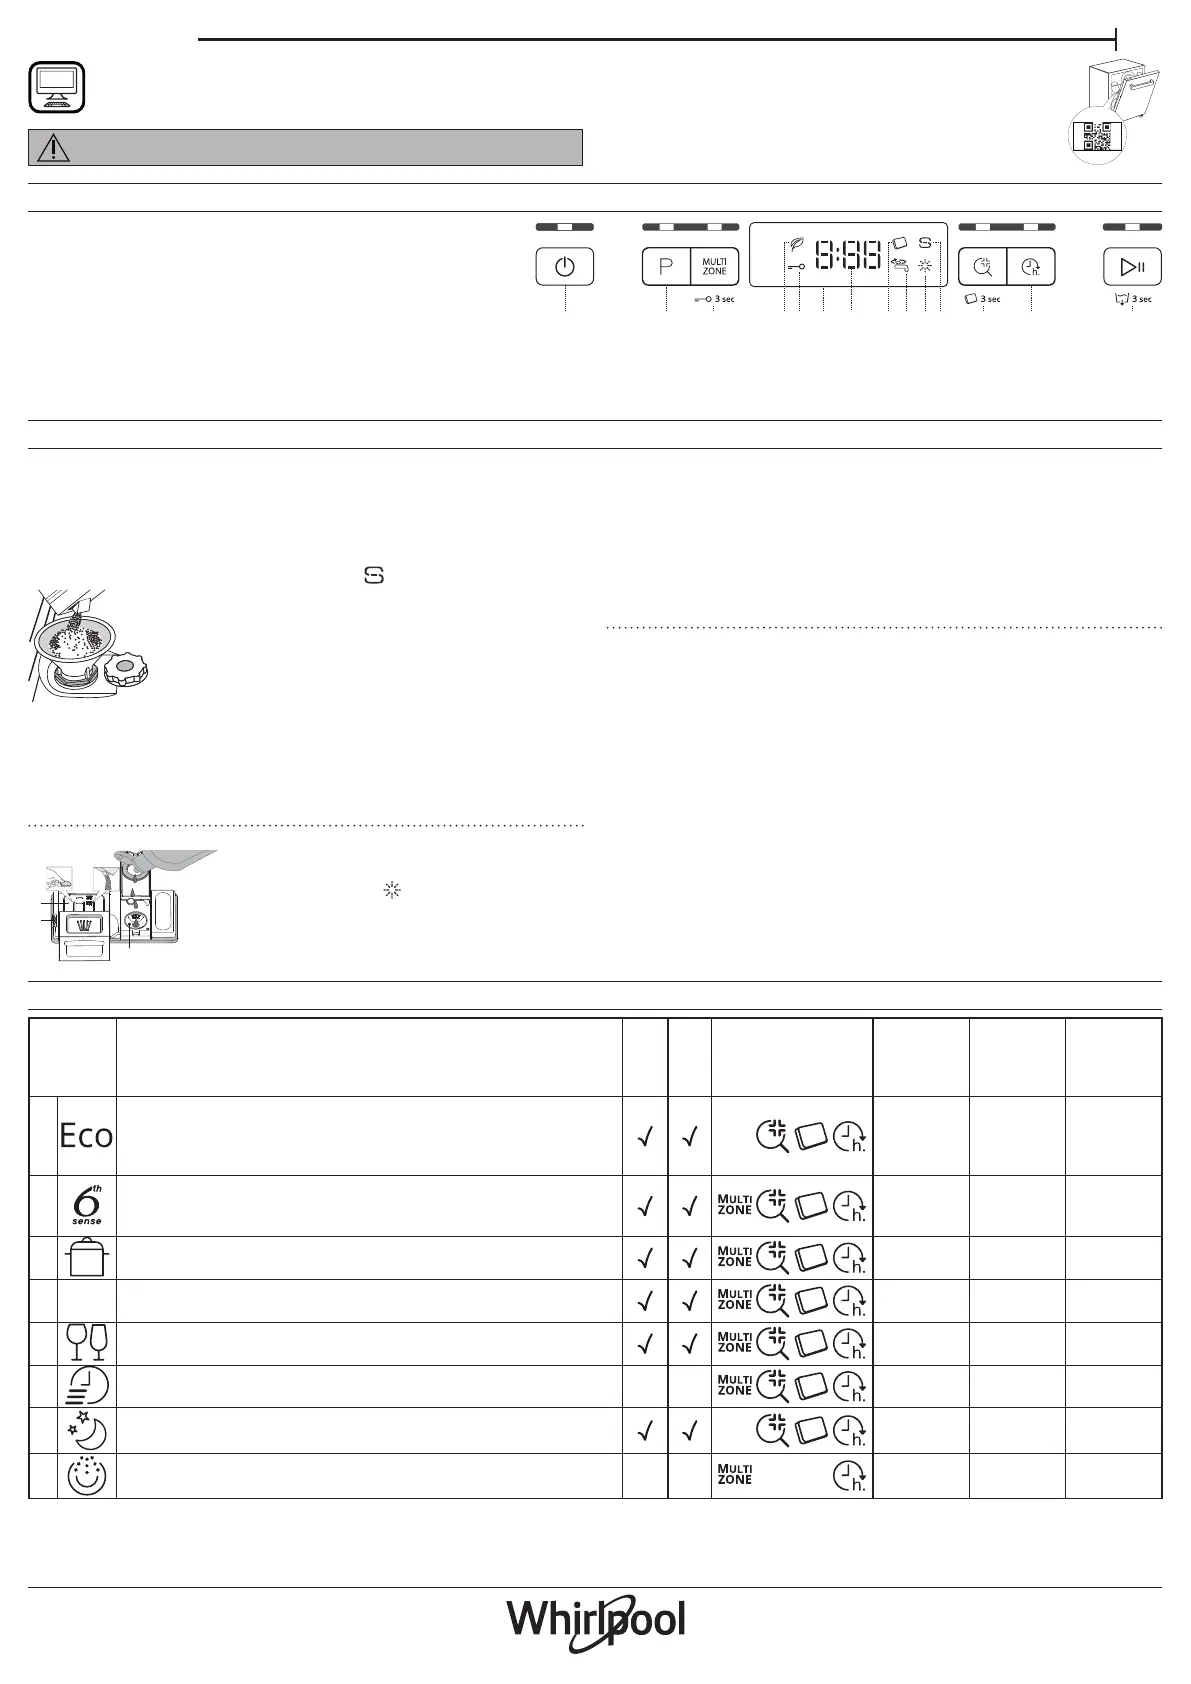
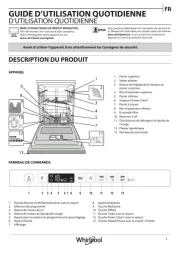
| Kontroltype: | Berøring |
| Indbygget skærm: | Ja |
| Skærmtype: | LED |
| Strøm: | 10 A |
| Ledningslængde: | 1.3 m |
| Pakkevægt: | 49000 g |
| Placering af apparat: | Fritstående |
| Installationsrum bredde: | 600 mm |
| Installationsrum dybde: | 590 mm |
| Tilsluttet belastning: | 1900 W |
| Støjniveau: | 43 dB |
| Tilløbsslange, længde: | 1.55 m |
| Antal vaskeprogrammer: | 8 |
| Forsinket start-timer: | Ja |
| Justerbare fødder: | Ja |
| Dør farve: | Rustfrit stål |
| Balje materiale: | Rustfrit stål |
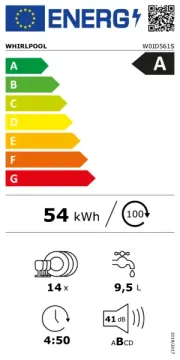
| Vandforbrug pr. cyklus: | 9.5 L |
| Farve på kontrolpanel: | Sort |
| Antal kuverter: | 14 kuverter |
| Cyklustid: | 186 min. |
| Forsinket start (maks.): | 24 t |
| Opvaskeprogrammer: | Auto 50-60°C, Crystal 45°C, Eco 50°C, Intensive 65°C, Pre-wash, Quick, Silent 50°C |
| Halv belastning: | Ja |
| Indikator for afspændingsmiddel: | Ja |
| Energiforbrug pr. cyklus: | 9.5 kWh |
| Energieffektivitetsskala: | A til G |
| Indikator for resterende tid: | Ja |
| Installationsrum højde (min.): | 820 mm |
| Installationsrum højde (maks.): | 900 mm |
| Udøsslange længde: | 1.5 m |
| Produktstørrelse: | Fuld størrelse (60 cm) |
| Integreret timer: | Ja |
| Vandpåfyldning: | Kold |
| Støjemissionsklasse: | B |
| Energieffektivitetsklasse: | D |
| Energiforbrug pr. 100 cyklusser: | 85 kWh |
| Brugerdefineret panel klar: | Ingen |
| Dørpanel inkluderet: | Ingen |
| Temperatur (maks): | 60 °C |
| Saltindikator: | Ja |
| Kurves indstillelige placering: | Øvre |
| Strømstiktype: | Type F (CEE 7/4) |
| Automatiske programmer: | Ja |
Har du brug for hjælp?
Hvis du har brug for hjælp til Whirlpool WFC 3C33 F X stil et spørgsmål nedenfor, og andre brugere vil svare dig
Opvaskemaskine Whirlpool Manualer
14 November 2025
13 November 2025
12 November 2025
7 November 2025

3 November 2025

1 November 2025
30 Oktober 2025
8 Oktober 2025
8 Oktober 2025
8 Oktober 2025
Opvaskemaskine Manualer
- Cylinda
- Elba
- Crosley
- Milectric
- Magic Chef
- Black And Decker
- EKU
- La Germania
- Teka
- Scandomestic
- John Lewis
- Friac
- Brandy Best
- Husqvarna
- Vivax
Nyeste Opvaskemaskine Manualer

11 December 2025

11 December 2025

11 December 2025

11 December 2025

11 December 2025

11 December 2025

11 December 2025

11 December 2025

11 December 2025

11 December 2025