Digi-Wave Connect
DWD 401
USER GUIDE
Digi-Wave Connect is an analog audio cable
converter box that sends audio to and from an
existing Digi-Wave 400 system. By connecting your
Digi-Wave Connect to your local audio system, you
can transmit sound from your audio equipment to
your Digi-Wave group, or output the audio from
your Digi-Wave group to your local sound system.
The USB cable connects the audio in, audio out
from the Digi-Wave DLT Transceiver and provides it
to the Digi-Wave Connect.
Powering On and Charging
Connect the power cable to the power port on the
Digi-Wave connect.
Once USB cable is connected to the DLT Transceiver
from the Digi-Wave Connect, the LED on the top
of the DLT transceiver will light up. The device will
charge and stay charged while connected.
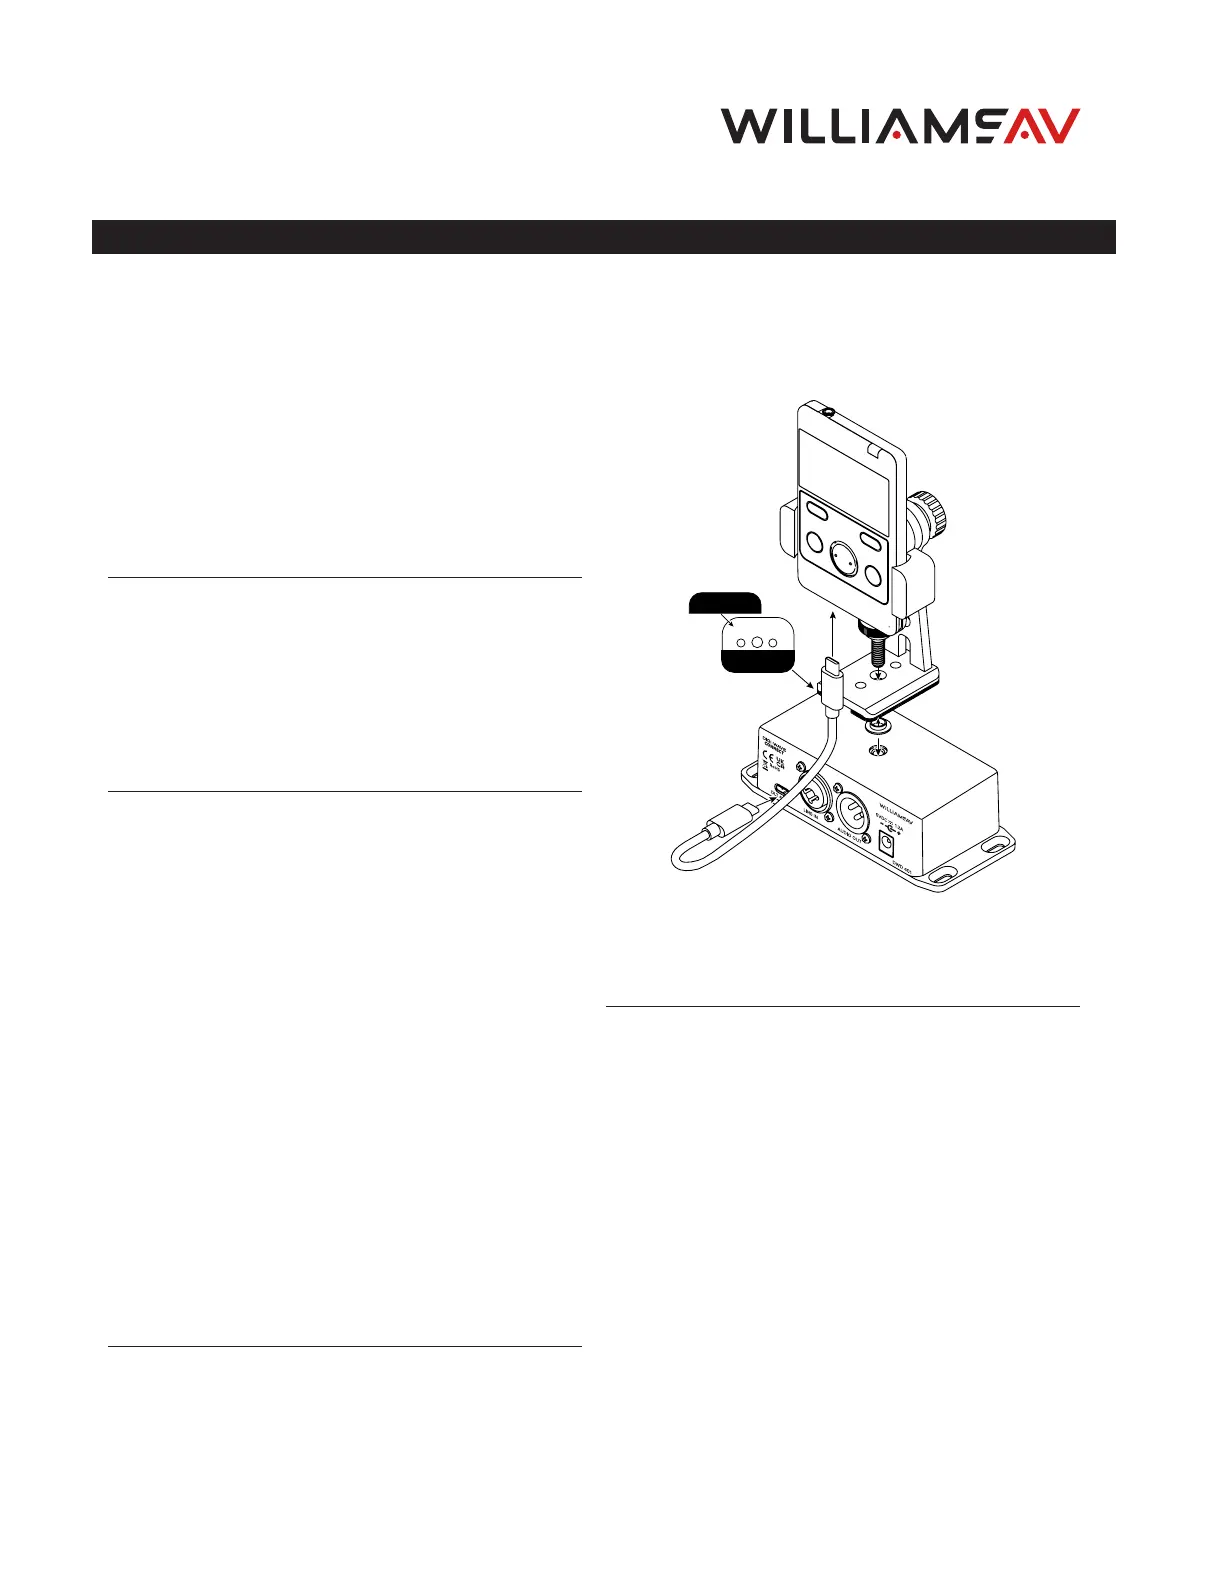
Connecting a DLT
A USB 3.1 type C cable is included with the Digi-
Wave Connect and is used to connect a DLT
transceiver to the Digi-Wave Connect.
NOTE: A Standard USB 2 type C will not work. Make sure
you are using the cable included with the system or
another USB 3.1 type C cable.
Insert one end of the USB 3.1 type C cable into the
bottom of the Digi-Wave DLT transceiver, and insert
the other end into the DLT port on the Digi-Wave
Connect.
No special settings for the DLT transceiver are
required for the Digi-Wave connect to work,
although settings such as line in/out gain can be
adjusted as desired.
The DLT transceiver will constantly transmit sound
once connected to the Digi-Wave Connect, even
without the use of the TALK button. To stop
the transmission of audio, disconnect the DLT
transceiver from the Digi-Wave Connect.
Connecting a DLR
A DLR receiver will not provide the same
functionality as connecting a DLT transceiver. A DLR
receiver does not have a talk feature and cannot
transmit sound to the Digi-Wave group.
The DLR receiver can be used only for sending
sound from a Digi-Wave group to a local sound
system. If sound does not need to be sent to other
Digi-Wave devices, this setup may be suitable.
Connecting the Bracket to the Digi-Wave
Connect
Attaching the Bracket
A bracket (BKT 040) is included with the DWD 401.
This bracket can be used to mount the Digi-Wave
device to the top of the Digi-Wave Connect.
To prevent scratching, remove the lining from the
two pieces of cork and attach the each piece of cork
to the long edges on bottom of the bracket.
Place the provided shoulder washer into the bottom
of the center hole on the base of the bracket. Insert
the provided large screw with the round black head
from the top of the base of the bracket through the
center hole at the bottom of the bracket and into
the shoulder washer.
There is another hole in the top of the Digi-Wave
Connect that the bracket can be screwed into. Twist
the large black screw into this hole until the bracket
is secured to the top of the Digi-Wave Connect.
Place your Digi-Wave device in the upper part of
the bracket. Ensure that the USB 3.1 type cable is
properly connected.