Getting started
Connect the power cord to a wall socket.
Once conn t , h a k ree fl h ec ed t e al rm cloc sc n will as
sho n h .wi g t e time 00:00
Backup system
The radio is equipped with a backup system and
includes a 3V lithium battery already (type: CR2032)
installed. To make it work just remove the plastic strip
that shows outside the battery compartment.
I a c oc s, e ra o aut a a swaps f power ut cur th di om tic lly
to e att u a ke c ck th b ery power s pply nd eps the lo
an er nod tim se n , tti gs nthele n s e rees th LED sc won’t
sho an hing.w yt
If batt eery n eds to be replac eed, ins rt the battery into
the BATTERY COMPARTMENT and ma e suk re the
positive and negative (+ -) sid s of tor e he battery are
in contact with the correspondi g n te armin ls in the
c . ompartment
In ord to o n atter c a e a er pe t bhe y omp rtm nt, use
sc wdriv to r c er. re er emove the ov
W rhen eplac att ying the b er , do n t dis ect to conn he
p e ter. r e, aow r adap Othe wis ll clock an alad rm se ngs tti
will be lost.
Setting the clock
In standby mode, press and hold the SET button to
enter the clock setting mode.
Pres s the BACKWARD but t th ur aton to e s e o h nd
FORWARD b sutton to e e tes. t th minu
Pres utton t con eac n.s the SET b o firm h setting optio
Primer paso
Conecte el ca de n n a t ble alime tació la oma de co ente.rri
Una vez conectado, la pantalla del radio rtador despe
parpad ráea mostrando l hoa ra 00:00.
Batería de reserva
L ra adio stá u e eq ipada c n steon u si ma almacenamiento
te rampo l e incluye una pil de litio da e 3V (tipo: CR2032)
ya nsta a Par u ento em te i lad . a s fun nacio mi , simpl en
r r a gü s co u r ale el eti e l len eta de plá ti q e sob es d
c r nt atería.ompa timie o de la b
S e roduce cort ner a a ra a a i s p un e de e gí , l dio c mbi
aut á am te aom tic en l f da uente e alime c n e a nta ió d l
batería a ene con ra ó e r l y m nti la figu ci n d l eloj y de
temporizador, aunque la pantalla LED o mon strará n .ada
Cuan ree ac a a ns te n l do mpl e l pil , i ér la e e
COMPA MIENT D A AT ÍARTI O E L B ER y asegúrese
de qu los lad s pe o ositivo n a vo + o a y eg ti ( -) de l pila
estén en contacto co o tn l s ermi ales n corresp ndieno tes
en el compartimiento.
Para rir c r nto ater , u n ab el ompa time de la b ía se u
destorn r r t n . illador pa a quita el or illo de la tapa
Cuan c e a ater conecte a e do ambi l b ía, no des el c ble d
alime ció de án elonta n r o se pe r t ajust e rodos los es d j
y alarma.
Ajustar el reloj
Presione y mantenga presionado el botón para SET
ajustar la configuración del reloj.
Pre n tón sio e el bo AT SRÁ p lar esta cera ble a hora.
Presio otón ne el b ADELANTE pa a ajr us o utos. tar l s min
Presione el botón para confirmar la hora primero SET
y después los minutos.
Modo radio FM
1. Presione e t ar encen r l bo ón de ENCENDIDO p a de
la dira o.
2. AT S TE Pre n tón sio e el bo RÁ o ADELAN para
aj ec ciusta rr la f uen a.
3. AT S Manten re n tón ga p sio ado el bo RÁ o
ADELANTE p a ar ntonizara si ut á c ent a om ti am e l
siguient r M e.e emiso a de F disponibl
4. IDOPr e tón esion el bo de ENCEND par a ar a pag
la r o.adi
Aju ee table idst misoras re de e p s c as
P cen s esuede alma ar ha ta 10 taciones prees s.tablecida
1. Sint ce ra a.oni la emiso desead
2. + Pulse y mantenga presionado el botón MEM / M
hasta que apar ca ez P01 (o el siguiente espacio de
memoria predefinida disponible) en la pantalla.
3. AT S TE Pre n tón sio e el bo RÁ o ADELAN para
se c o r n er r efin P0 – P10).le ci na un úm o p ed ido ( 1
4. SET Pre ne sio par confir r uarda a a ma y g r l
emiso adra r e de adio des a.
5. + Pre n r ente tón sio e epetidam el bo MEM / M
mi nte r cha ras escu la adio para selec a cio r na un
emiso tabl cid esio e ra res p e a e r. O bi n, p n e tón l bo
MEM / + M vez u re n tón una y l ego p sio e el bo
ADELATE AT S o RÁ par ecc n n s a sel io ar u a de la
emiso ble idasra reestas p c .
Mode radio FM
1. L ÉA uye r ton pp z su le bou AL UM pour a u r ll me
la radio.
2. uyez sApp ur le b tou on EN ARRIÈRE ou VERS L’AVANT
pour régler la fréquence.
3. yez outon Appu sur le b EN ARRIÈRE ou VERS L’AVANT
pe aintenez e f c synton er t m -l en on é pour is
automa la statio o vante.tiq ntueme n FM disp nible sui
4. L ÉA uye r ton pp z su le bou AL UM pour éteindre
la ra o.di
Régl iona s statge de s s préréglée
Vou uve é r u’às po z m morise jusq 10 station rérégs p lées.
1. Synt e sta n aitée.onis z la tio souh
2. M+ Appuyez sur le bouton MEM / et maintenez-la
enfoncée jusqu’à ce que P01 (ou le prochain
espace disponible dans la mémoire disponible)
apparaisse à l’écran.
3. uyez sur la tApp ouche EN ARRIÈRE ou VERS L’AVANT
pour séle nctio ner un ro rérnumé de p églage (P01 – P10).
4. uye r c v ar r App z su SET pour onfirmer et sau eg de
la sta ra o itée.tion de di souha
5. M+ uye usieu f u a t che App z pl rs ois s r l ou MEM /
pe adi tiond ’écout a rant l e de l o our c p séle nner
un on une tista prér e. n a uyeéglé Ou bie , pp z e oif s
su l outon , u u outon r e b MEM / M+ p is s r le b V S ER
L’AVANT EN ou ARRIÈRE p lour sélectionner ’une
des ti égléessta o rérns p .
To set the alarm
T
th rme ala :
I st db ode res a e n an y m , p s nd hold th ALARM 1
or utton to c r e ALA 2RM b sele t the ala m tim
setting mode.
I e ala e e, res e r n th rm s tting mod p s th A M 1LAR o
ALARM 2 butt repeat t r r e on edly o sc oll th ough th
setting ptionso .
Setting ala e: rm tim
Pres e s th BACKWARD t e e h and o s t th our
FORWARD but o set th minuton t e tes.
Se e r e: t th ala m typ
To sele t th al rm b ps or s th sou d oc e a ee radio a e n f
th s e ala resrm, p a e nd hold th ALARM 1 or ALARM
2 but n until h thto you reac e A m m g lar ti e settin
m eod , on r th t modce you ente a e, release he t
alar uttm b on an res again kly. Then e d p s it quic th
s n atound i dic or o h rf t e ala m will fl sh; Ma ake your
selecti usingon the BACKWAR FOD or RWARD keys.
Ajustar la alarma
La ra odi pe trmi e co ra onfigu r d s a alarm s diferentes:
En modo Sta bynd , pulse y mantenga presiona l do e
botón o r cALA 1RMA ALA 2RMA pa a sele cionar la
c ronfigu ació . n de alarma
En o con ur n e r ne el mod de fig ació d alarma, p esio
el botón AL A AL RMA ARM 1 o A 2 repetidamente
para ver a o n con ra n. l s pcio es de figu ció
Ajus ra: tar la ho
Pr e tesion la ecla AT SRÁ para ec r sel ciona la hora y
AD EELANT par ntr u r o ut . a i od ci l s min os
Régler l’alarme
La radio vous permet de configurer deux alarmes
En v mode eill ine a, m tene uton z le bo ALARME 1 ou
ALARME 2 enfoncé p r sélecti er le ou onn régla e ge d
l’a rme. la
En mode de réglage de l’alarme, appuyez plusieurs
fois sur le bouton ou pour ALARME 1 ALARME 2
Aj mpus z tete le s:
A yez ppu sur la touche EN ARRIÈRE p r séleou ctionner
l’heur e et V S L’AVANTER pour e les minntrer utes.
R e n e ’ala e: égl z le so d l rm
Vous pouvez choisir entre ’ l al rma e tra e ou ditio llnne
la dio rm ppura co amme al e. A ye u uton z s r le bo
ALARME 1 ALARME 2 ou et maintenez-le enfoncé
jusqu’à ce qu’il apparaisse dans l’écran Paramètres
d’alarme, puis re elâch z le outo ’ala b n d rme et appuyez
à nouveau ra empid ent. E uite nns , l’i dicateur sonore e d
l’a r oterla me clign a; faites vot oixr he c en tilisu ant les
to h u uc es EN ARRIÈRE o VERS L’AVANT.
To switch off the alarm
Pres ny s a ALARM OFF
Snooze
To SNOOZE
but on. t The ala a h h oze rm will ring ag in w en t e sno
time h s el d (9 minua apse tes).
The corre n ala o a r ator spondi g rm 1 r la m 2 indic
(ala dio la m) ashr r ram b ps oee a r fl e n e ay s o th displ
du riodr e ooze eing th sn p .
To lacance oz a e al the sno e period nd th r ress m, p
any ton. ALA FRM OF but
Sleep
The o fine h ra n o e sl p fuee ncti n de s t e du tio f tim
When the r sadio is witched on, pres he s t SLEEP timer
button repeatedly to select a sleep setting o on pti
minutes).
T
sle r over. ep pe iod is
Pres e to t che e r a e s th SLEEP but n o ck th em ining tim
Press the POWER button to cancel this function.
Apagar la alarma que está sonando
Para apagar una alarma, presione cualquier tecla
ALA FFRM O .
Éteignez l’alarme qui sonne
Pour a ve a rme, a uye u orte dés cti r e un la pp z s r impn’
qu touche . elle ALARM FOF
Display information
I r e, res he n adio mod p s t BACKWAR FOD or RWARD
but e fly ngt con on to e bri cha e h a r he t e displ y f om t
c c to e curre ra r uency.lo k time th nt dio f eq
USB charging port (Max 2A)
C conne t a exte en rnal d vice (e. eg. smartphon , mp3
play )er via a a USB c ble ro to he (not p vided) t USB
CHARGING. Th re adi t o canno acces hs t e c ten n on ts i
th ce onnec ed t exte evice.rnal d
Display ON/OFF
I s ndb e, res n h e utton n ta y mod p s a d old th DI RMME b
for con a ear n he 2 se ds. OFF pp s o t
Pres n utt t n e a f n her s a y b on o t n our th displ y or a ot
10 seconds.
To de e t is fu ction, p s aactivat h n res nd hold DI RMME
button for c a a n h ay. 2 se onds. ON ppe rs o t e displ
Then h a s tche a t h e. t e displ y wi s b ck o t e clock mod
Mostrar la frecuencia FM
En el modo de radio FM re n e, p sio e l botón ATRÁS o
ADELANTE para cambiar brevemente la visualización
del reloj, a la frecuencia de radio actual.
Puerto de carga USB (Max 2A)
P co r o vo externo uede necta un disp siti (p ploor ejem , un
t felé ono móvil, un repr ct podu or de m 3...) a trav e un és d
c e n u o a a t a abl USB (no i cl id ) l om USB H NG C ARGI
para rgar. ca
Tenga en cuenta e e qu l radio despert dor a n de o pue
a rccede al c tenon ido del dispositivo externo conectado.
Brillo de la pantalla
En modo Standby, presione la tecla para DIMMER
cambiar el brillo de la pantalla a nivel bajo o alto.
Afficher la fréquence FM
E ode rn m adio , uyez FM app sur a to he l uc E EN ARRIÈR
ou V S L’AV TER AN po a e rièvur ch ng r b ement
l’acha ’ rl oge a r enc ra o ge de l ho sur l f équ e di
a e.ctuell
Port de chargement USB (Max 2A)
Vo ouvez co ecteus p nn r un périphérique externe (par
exem epl , un téléphone portable t, un lec eur m 3 ...p ) via
un câbl USB (ne on fourni) à la prise US ARGIB H C NG
pour re rger. le cha
Notez que le réve eil n peut pas a éde u contenucc r a du
périp riquhé e externe connecté.
Luminosité de l’écran
En v mode eill , e appuyez s r lu a touche DIMMER pour
régler la luminosité de l’écran sur un niveau bas ou élevé.
To re ce du the risk of el c ectri shock, do not open the device,
there ar oe n parts that can be changed by the con er. sum
Refe r c t a e r .r all se vi ing o qu lifi d pe so elnn
IMP TA !OR NT
- Mak re t hav s nce m e su o e a minimum di ta of 5c
- En re at vsu th the entil tia on openin args e not covered
with items such as newspap rse , tabl clote hs, curtains, etc.
- o c nak fl rc , uch a hted Do n t pla e ed ame sou es s s lig
ca h a ra .ndles on t e ppa tus
- Do not exp seo the device to dr ipping or hsplas ing water.
- Do o n t pla e objects filled with liquidsc , suc as glah ss
or v e o has n t e device.
- D n hro att ie nt re! Re he o ot t w b er s i o fi spect t
environm o n use att .ent wh dispen si g d b eries
- Batte e o e ex e t exces ve heat ri s sh uld not b pos d o si
such a nshine fire r r a ea urce.s su , o othe simil r h t so
- The pow aer plug t all times must be e sily aa cces e. sibl
- If exposed to any electrostatic phenomenon, the
product may malfunction and the user must reset
of the device. (To do this, rem e the battery and ov
unplug the unit for 1 minute, repeat the process in
reverse to complete the reset).
Para r u e o arga é o abra ed cir l riesg de desc el ctrica. N
el d pi e poispositivo, no hay ninguna eza reparabl r l e
us o. uari
Para ualquic er re raciópa n acuda a servicio técnico
c cualifi ado.
¡I TMPOR ANTE!
- e As gúr uese de q e hay sa una di tanc cm ia mínima de 5
alrededor de la unidad para su correcta ventilación.
- e re que e ura ven l ón As gú se de las ab rt s de ti aci
de l o e bloqa unidad n stén ueadas.
- o coloqu uent can nt co v s N e f es de es, mo ela
ence d r a rato.ndi as sob e el pa
- No exponga este aparato a goteos o r salpicadu as.
- o coloqu jet n u o c o N e ob os lle os de líq id s, om
jarrone obr aparato.s s e el
- rroje¡No a las pilas al fuego!, podr ex nar. ían plosio
R t o ntespe e el medi ambie e al de har a at as sec l s b erí
usa .das
- La bate a n e n e e t raturas s rí s o d be xp erson a empe
elevadas excesivo, como la luz solar, fuego o fuentes
de calor similares.
- La t a co nt enc tra cerca om de rrie e debe on rse
del cil esequ fáipo y ser de acc o.
- fUn en men ctó o é el rico transi rito o y/o electrostá co ti
rápido p impedir el funodría ciona ento correcto l mi de
aparato. e so e rá r o En es ca d be einiciar el disp sitivo.
Pou r re r e e hoc él e N’ouvrez r édui le isqu d c ectriqu .
pas l il, il n’y a au piè able pa’appare cune ce répar r
l’utilisateur.
Pou toute ré ra c ctez u te n n r pa tion, onta n ch icie
qualifié.
IMP TA !OR NT
- Assurez-vous ’ a n qu il y u e distance mi le de nima 5cm
aut r de l’a r r une ven a équate.ou ppa eil pou til tion ad
- ssurez-vou e A s qu les or ce ven a e ifi s de til tion d
el’a r n a s u .ppa eil e sont p s ob tr és
- e z e rce c ude te e e s N place pas d sou s ha s, ll s qu de
bo i a u u ’a ar .ug es ll mées s r l pp eil
- N’exposez c pas et appare eil à d s gouttes d’eau ou des
é abouscl su esr .
- e a z ’o re u t e N pl ce pas d bjets mplis de liq ides, els qu
des as app eiv e r ’s, su l ar l.
- ete e e fe e e rraient Ne j z pas l s pil s dans le u!, ll s pou
e r.xplose
Re ctez ’en r n e r e v etez es spe l vi on em nt lo squ ous j d
pile s.s usagée
- L e oiven a re e s es pil s ne d t p s êt xposées à de
te érature exces ves, te u u re u mp s si lles q e la l miè d
so , fe u rce e air .leil le u o des sou s d cha urle simil es
- La cour prise de ant d it êt e po r roch ’e de l éq ipemeu nt
et acilemef n cces e.t a sibl
- Un phénomène électrique électrostatique transitoire
et/ou rapide po rur ait empêcher l boe n fo nnemnctio ent
de l’appareil. Dans ce cas, vous devez redémarrer
l’appareil.
When this crossed-out wh led bin ee symbo al is ttached
to rodu , e ro cover a p ct it m ans the p duct is ed b he y t
Europea rn Di ecti e v 2012/19/EC.
A r e rll elect ical and lect onic produ u attery cts incl ding b
s o rate rohould be disp sed of sepa ly f m the municipal
waste stream via de atesign d co clle tion faciliti s e a ointed pp
by the g ernment or the local authorities.ov
The correct disposal of your old appliance will help
preve ten a n a ve c uence fo e nt po ti l eg ti onseq s r th
enviro n a uma hea h.nme t nd h n lt
E e c e ur c r el l símbolo d l ubo d bas a ta hado sob e
producto, nifica u roducto u con a sig q e el p c mple l
Di ti op 12 19 rec v ura E e 0a 2 / / EC.
Todo roduct c ctr icos, s los p os eléctri os y ele ón
in oja pa adclu at ía ebe rrida la b er , d n a rse r e po s r o
c eumpli ndo co rn la egulació en d desecho u cs m ni ipales
a ravés ns a n rec c n t de las i tal cio es de ole ció designadas
po o to ales.r el gobierno las au ridades loc
La elimina n corrció ecta u aratde s ap o tiguan o ayudará
a red sibles u ocir p co c n anse ue ci s negativa n a ud s e l sal
h a nte.umana y el medio mbie
L s o be rou t r ur e ymb le de pou lle à let es bar ée s
le p it sig ifie qrodu n ue celui-ci est c fon orme à a l
di cti opée 12re v ure e nne 20 / E.19 / C
Tous l s p es et électe roduits électriqu roniques, y
co s , ven re n ar ent mpris le piles doi t êt élimi és sép ém
c for n a r ta o e on méme t à l églemen ti n municipal
en a r , n nsta a n e m tiè e de déchets da s des i ll tio s d
co t é a ve n o s llec e d signées p r le gou rneme t u le
auto t oca .ri és l les
L e re correcte e v r n e reil a mis au but d ot e a ci n appa
aid s ntu ll s onser réduire ea à l éve e e c équences
néga v r té h e ’en ron e .ti es su la san umain et l vi nem nt
R go r uen a 87.5-10 Hzan de f ec ci : FM 8 M
Nú ro sta one r nt a 0me de e ci s FM p esi oniz das: 1
Potencia a nal ,5W S) de salid nomi : 1 (RM
A nta Alime ción de C
Entrada: A -240V, 0/60 zC 100 5 H
Sa a: Car p 2A)lid ga or USB (DC 5V
Nombre del fabricante del adaptador:
Dongguan Obelieve Electronic Co., Ltd.
Nú ro o ada a r L-05024 Eme de model del pt do : OB 00
Bat a r va 2032erí de eser : CR
G fré enc 87amme de qu e: FM .5 8 -10 MHz
No r sta o r c s 0mb e de ti ns FM p éséle tio éenn : 1
Puis nc n inale ,5W S)sa e de sortie om : 1 (RM
Cour alt na fant er ti
Entr : A -240V, 0/60 zée C 100 5 H
So ie: C rge n a D 2A)rt ha me t p r USB ( C 5V
Batter c rs 032ie de se ou : CR 2
Turning the alarm on or off
When the clock tim is disple ay ,ed press the ALARM 1
or n si d la m. toALARM 2 but t e eo set th d re a r The
corresp ndio ng alarm 1 or alarm 2 indicator rm s (ala beep
or dio wi larm ingsra ala srm) will t e e ach on wh n th r .
Encender o apagar las alarmas
En rmodo eloj, presione el bo t
ón ALARMA 1 o ALARMA 2
pa ti r rm espo diera c a va o va a ala desacti r l a corr n nte.
E nl i dicador de ALAR 1MA o ALAR 2MA correspondiente
(ala arm tradicional o radio ala e rma) s en enc derá cuando
se veacti la ala a.rm
Activer ou désactiver les alarmes
En mode horloge, appuyez sur le bouton ALARME 1
ou our ALARME 2 p a v u a ver ’ala e cti er o dés cti l rm
c r d te. or espon an
L’i dicn ateur c re aor spond nt ALARME 1 ou ALARME 2
(al rma e traditionnelle ou alarme r oadi ) s’allume ue lorsq
l’ala e esrm t tiac vée.
Note:
Note:
Nota:
Note:
Nota:
Note:
Note:
Nota:
Note:
De a con u rev ó e r e estros bido a l tin a isi n y m jo a d nu
pr ct , e eño a e e cac e es n odu os l dis y l s sp cifi ion s tá
suje vio vist a reos a c mbios sin p a o.
E ra e ’ex e e ’ ra n co nus n ison d l am n t de l amélio tio nti
de n s p oduits, la t les spo r conception e écifications
sont s s à modifi n s ns pujette catio a réavis.
USER
MANUAL
MANUAL DE
USUARIO
MODE
D’EMPLOI
BEDIENUNG-
SANLEITUNG
MANUALE
DELL’UTENTE
MANUAL
DO USUÁRIO
CRU-19BK
CRU-19RD
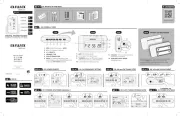
ACCESSORIES ACCESORIOS ACCESSOIRES / /BUTTONS FUNCTION /FUNCIÓN DE LOS B SOTONE /
FONCTIONS DES BOUTONS
SCREEN FUNCTIONS / FUNCIONES DE LA PANTALLA /
FONCTIONS D ÉCRAN ’REAR VIEW / VISTA POSTERIOR / VUE ARRIÈRE
Clock radio
Radio despertador
Radio-réveil
CR2032 Lithium battery 3V
Pila de litio de 3V CR2032
Pile lithium 3V CR2032
SET, ME M+M,
Forwar / A ant / Ve vantd del e rs l’a
Alar nm 1 i dicator (alarm) / In cdi ador e d la alarma 1
(a r nla ma) / I dicateur d’ala a rme)rme 1 ( la
Batte co a Co ento e ry mp rtment / mp timar d
la b pilatería / Compartiment à es
Alar cream 2 and in se volume / Alarma 2 y aumentar
v ume / rme nt v umeol n Ala 2 et augme er le ol
Alarm 2 n i dicato /r (alarm) In ado adic r de la larma
2 a (al rm ) a / cate ’ala Indi ur d rme 2 (al me)ar
B kwar Atrà E a èreac d / s / n rri D a / Paispl y nta a /Acherll Sp r t-peake / avoz Hau Alt / arleur
A 1 larm and decrease volume / Ala 1 y r rma disminui
v ume / rme u o v umeol n Ala 1 et dimin ti n du ol
Alarm 2 indicato ra or ( di )/ Indicador d la e ala a 2 rm
(ra odi ) / Indicate ’alaur d rme 2 (ra o)di P er cor / a a a ó / ow d C ble de liment ci n
Cor ’a e a ondon d lim nt ti
DI R, OOZ SL PMME SN E, EE
A atolarm 1 indic r (radi ) o / o Indicad r d la alarma e 1
(radi ) o / Indicateur d’ ealarm 1 (radio)
Ante a Ant a Ante enn / en / nn
y apagado de la alarma / Bouto ’n d alime tinta on et
alarme désactivée
US char n r Puert rga S / B gi g po t / o de ca U B
Por char SBt de ge U
Manual
Manual
Manuel
Warranty sheet
Hoja de garantía
Fiche de garante
INSTRUCTIONS
RADIO FM
RADIO FM
ALARM
ALARMAS
ALARMES
ALARMAS
DISPLAY
DISPLAY
PANTALLA
ÉCRAN
ÉCRANPANTALLA
WARNING
PRECAUCIÓN
PRÉCAUTION
ESPECIFICACIONES
SPÉCIFICATIONS
1.
2.
Nota:
Aplazar una alarma en curso (Snooze)
Para aplaz na alarm e ear u a u q stá onando s , presione el
botón SNOOZE. ala a v La rm olverá a ona u e s r desp és d
9 minu s (los into terva e rlos d epetición/snooz n e e so d
9 minutos).
E nl i dicador de A 1LARMA o ALARMA 2 correspo din ente
(alarma tradicional o radio alarma), parpadea en la
pantalla durant ríodoe el pe de repetición. Para cance r la
el i alo de bonterv repetició esin, pr one u c alquier tón
ALARM F OF .
Dormir (Sleep)
Esta c fun ión de dormir permite con rafigu r e tervl in alo de
tiempo tan es de que la radio se a ue autpag omáticamente.
Durante e r o ot el modo d adi FM, pulse el b ón SLEEP
repetidamente para seleccionar un intervalo de
tiempo para que se apague la radio automáticamente
( c n v o, 0 20 0, 0, 0 0 70, Op io es: Desacti ad 1 , , 3 4 5 , 6 ,
80 nutos). y 90 mi
La radio se apagará automáticamente cuando finalice
dicho intervalo de tiempo.
Pr e otón ar vesione l b SLEEP p a erifi mpcar e el ti o
restant nt e r e.e a es de qu la adio se apagu
Presione el botón de para cancelar esta ENCENDIDO
función.
Reporter une alarme en cours (Snooze)
Pour r ort a uep er une al rme q i sonne, ppua ye u e z s r l
bouton SNOOZE. L’ a à nouval rme sonne eau ut au bo
de 9 minutes (les interva rlles de épétitio épétition / r n
so tes). nt de 9 minu
L’indicateur corresp ndao nt ALARME 1 ou ALARME 2
(ala erm tra ne udition lle o alarme radio) ligc note à l’écran
pe dan nt la pério ré onde de pétiti . Pour an nuler l’intervalle
de répétition, a uyepp z sur n’importe q el bu outon ALARM
OFF.
Dormir (Sleep)
Cette fonction de ve e vou me eill s per t d défin nterva e ir l’i ll
de temps avan e ra ’étet qu la dio s igne automa em t.tiqu en
En mode ra odi FM, appuyez plusieurs fois s r la u touche
SLEEP pour sél nneectio r un interva ell de te pendant mps
lequel la radio s’éteindra automatiquement (Op o : ti ns
Ar , r 0, 20, 0, 0, 0, 0êt, 1 3 4 5 6 70, 0 0 tes). 8 et 9 minu
La radio s’éteindra automatiquement à la fin de cet
intervalle.
A uye r ton vér e t s pp z su le bou SLEEP pour ifi r le emp
resta ava ’e n a ra o.nt nt l xti ction de l di
Appuyez sur le bouton pour annuler cette ALLUMÉ
fonction.
Listening to radio
1. Press the POWER button o t swit rch on the adio.
2. BACKW Pres s the ARD or FORWARD button to
fa usdj t the req cy.uen
3. Pres a hs nd old the BACKWARD or FORWARD button
to t au om e a ntically tu to e ex av th n t ailable FM station.
4. Pres he s t POWER .
Setting preset stations
You ca n eset tistor t re up o 10 p sta ons.
1. Tune in to a station.
2. Press and h ld to he MEM/M+ button until P01 (or e th
next available preset space) shows on the d ay.ispl
3. BACKW Pres e s th ARD or FORWARD button to
sel t a p eset memo (Pec r ry number 01-P10).
4. T Pres s the SE butto t confir Th r et n o m. e p es
sta n h av .tio as b n see ed
5. M+ Pres s the MEM/ but edly whilton repeat e
li g dio t set tionstenin to e ra th t co sele a re p sta .
Alte a v y, res e ton onc nd rn ti el p s th MEM/M+ but e a
t res e hen p s th BACKWARD or FORWARD button to
sel a r e sta n.ect p es t tio
RADIO FM
RADIO FM
Note:
Tuner ran 87ge: FM .5 8 -10 MHz
N r re r sta 0umbe of p set adio tions: 1
A r rat e W S)mplifie ed output pow r: 1.5 (RM
A er a torC pow dap
Input: A 0-240VC 10 , 50/60 Hz
Ou ut: char n A)tp USB gi g (DC 5V 2
Adaptor Manufacturer’s name:
Dongguan Obelieve Electronic Co., Ltd.
Adaptor u : OBL-0502400E Model n mber
Batte ack 032ry b up: CR 2
SPECIFICATIONS
INSTRUCCIONES
INSTRUCTIONS
Notes:
C k a oloc displ y with dimmer l w is t e d lt settingh efau .
1.
1.
2.
2.
Confi ra e o a ala a: gu r l sonid de l rm
Pu e e r ntr a ala a ra ona o a r io ed el gi e e l rm t dici l l ad
c a Pu tenga r o l omo al rma. lse y man p esi adon e
botón o hasta que aparALARMA 1 ALARMA 2 ezca
e a ta a , a n l pan ll C r rmaonfigu ación de la ala
con a ón suelte el botón de alarma y vuélvalo tinu ci
a pulsar rápidamente. Ent c e n a r e on es l i dic do d
sonido de la alarma parpadeará; haga su selección
mediante las teclas AT S AD TERÁ o ELAN .
Encender / apagar la pantalla
En o St dby el mod an , ma do el bntenga re p siona otón
D RIMME d e lurant 2 arecerá e seg dos. Apun OFF n a
p l ra 0 e ndos, nta a agará.antal a y t s 1 s gu la pa ll se ap
Pre e u ui tón r cend a a sion c alq er bo pa a en er la p ntall
du gundosrante r e ot os 10 s .
Par d a va a n tenga r do a es cti r l funció man p esiona
nu ón aneva nte tme el bo urD MERIM d t otro 2 e s
seg do s u a nun s, ha ta q e en l pa talla aparezca .ON
Allumer / éteindre l’écran
En v mode eill ine a, m tene uton z le bo DIMMER enfoncé
pe da sen n t 2 con .des OFF a ara ’écran e après pp ît à l t
10 eco e ’ ra ’ét nt. s nd s, l éc n s ei
A uyez r rte e uton r umer pp su n’impo qu l bo pou all
l’ ran e conde éme aires.éc p ndant 10 se s suppl nt
Pour a ve a f aintene t che dés cti r l on oncti , m z la ou
D MERIM f cé d encor 2 c , en on e pen ant e se ondes
ju u’à ce ue a arais à ’ r .sq q ON pp se l éc an
Commencer
Branchez le cor n ’do d alimentati n o s a ecteur.ur l prise s
Un f connecté ’écran u rév tera t e ois , l d eil cligno e
in uera heure .diq l’ 00:00
Batterie de secours
L ra es é n système e eco et a dio t quipée d’u d s urs
comprend une pile au lithium 3V déjà (type: CR2032)
installée. Pou cer que la fonc nnetio , re rez sti implem a ent l
bande de pla visiblstique e à l’exté eurri du comp rtima ent
à piles.
En a co ur e c r t, r o a ule c s de up e d ou an la adi b sc
aut a u e u a rc ’a nta n e a om tiq em nt s r l sou e d lime tio d l
batt i n e r a o e e er e et mai ti nt les égl ges de l’horl ge t d
la m ut e. Néanmoins, l’écran LED ne montre rien.in eri
Si la batterie doit être remplacée, insérez-la batterie
dans le COMPARTIMENT À PILES et assurez-vous
que les côtés positif et négatif (+ ou -) de la batterie
sont en contact avec les bornes correspondantes du
compartiment.
Pour ouvri lr e comp tim nt pilar e à es, tilis u ez u tn ournevis
pour retirer a u couver u co a nt. l vis d cle d mp rtime
Lors du remplacemen a atterie, ébra hez t de l b ne d nc
pa cor ns le do d’a nta tou rlime tion, car s les églage e s d
l’horloge et de l’ala ro perdus.rme se nt
Ajuster l’horloge
Appuyez et maintenez le bouton SET pour régler le
réglage de l’horloge.
A uyez s le ut pp ur bo on EN ARRIÈRE pour ré heure. gler l’
A uye r ton pp z su le bou VE LRS ’AVANT pour r r s égle le
mi esnut .
A uye r ton pp z su le bou SET pour c fir heure, on mer l’
pu e t .is l s minu es
Display brightness
In ta s ndb e res e ton to y mod , p s th DI RMME but
cha h a r htnes t o r ev .nge t e displ y b ig s o l w o high l el