Points to Observe for Safe Usage
Points à respecter pour une utilisation
Cette étiquette a pour but de prévenir l’utilisateur de la présence
d’instructions importantes.
Si ces instructions ne sont pas suivies, des blessures graves ou
mortelles risquent d’être occasionnées.
Cette étiquette a pour but de prévenir l’utilisateur de la présence
d’instructions importantes.
Si ces instructions ne sont pas suivies, des blessures ou des
dommages matériels risquent d’être occasionnés.
NE PAS DEMONTER OU MODIFIER
Le fait de démonter ou de modier l’appareil risque de provoquer un accident, un incendie
ou une décharge électrique.
AVANT LE CABLAGE, DEBRANCHER LE CABLE DE LA BORNE NEGATIVE DE LA
Avant d’eectuer le câblage électrique, débrancher le câble de la borne négative (–) de la
batterie. Le non-respect de cette précaution risque de provoquer une décharge électrique
ou des blessures dues à des court-circuits électriques.
GROUPER LES CABLES ELECTRIQUES AFIN D’EVITER DES DANGERS
Disposer les ls et câbles conformément au manuel d’installation an d’éviter des
obstructions pendant la conduite. Des câbles ou ls qui gênent ou pendent au-dessus
d’endroits tels que le volant, le levier de changement de vitesses, les pédales de frein
peuvent créer des risques.
NE PAS INSTALLER DANS DES ENDROITS GENANT LE FONCTIONNEMENT DU
Ne pas installer dans des endroits qui pourraient créer des risques pour les passagers du
véhicule ou gêner le fonctionnement du véhicule (tels que le volant ou le levier de
changement de vitesses) en obstruant la vision avant ou en gênant les mouvements etc.
ARRETER IMMEDIATEMENT L’UTILISATION EN CAS DE PROBLEME
Lorsque des problèmes se présentent tels que l’absence de son ou de vidéo, l’entrée
d’objets étrangers à l’intérieur de l’appareil, un dégagement de fumée, ou d’odeurs
toxiques, arrêter immédiatement l’utilisation de l’appareil et consulter le revendeur auprès
duquel l’appareil a été acheté.
CONFIER LE CABLAGE ET L’INSTALLATION A DES PROFESSIONNELS
Le câblage et l’installation de cet appareil nécessitent une compétence et expérience
technique conrmée. An de garantir la sécurité, toujours contacter le revendeur auprès
duquel l’appareil a été acheté pour lui coner les travaux à faire.
UTILISER LES ACCESSOIRES SPECIFIES ET LES INSTALLER CORRECTEMENT
S’assurer d’utiliser uniquement les accessoires spéciés. L’utilisation d’autres pièces non
désignées risque de provoquer des dommages à l’intérieur de l’appareil ou son installation
risque de ne pas être faite correctement, car les pièces desserrées peuvent provoquer des
NE PAS INSTALLER DANS DES ENDROITS TRES HUMIDES OU POUSSIEREUX
Eviter d’installer l’appareil dans des endroits très humides ou poussiéreux. L’humidité ou la
poussière qui pénètre dans cet appareil risque de dégager de la fumée ou de provoquer un
EFFECTUER CORRECTEMENT LES CONNEXIONS
Si les connexions ne sont pas eectuées correctement, un incendie ou un accident risque
DISPOSER LE CABLAGE DE SORTE QU’IL NE SOIT PAS VRILLE OU PLIE
Acheminer les câbles et les ls de sorte qu’ils ne soient pas vrillés par des pièces mobiles
telles que le rail du siège ou qu’ils n’entrent pas en contact avec des points tranchants ou
pointus qui risquent d’endommager le câblage.
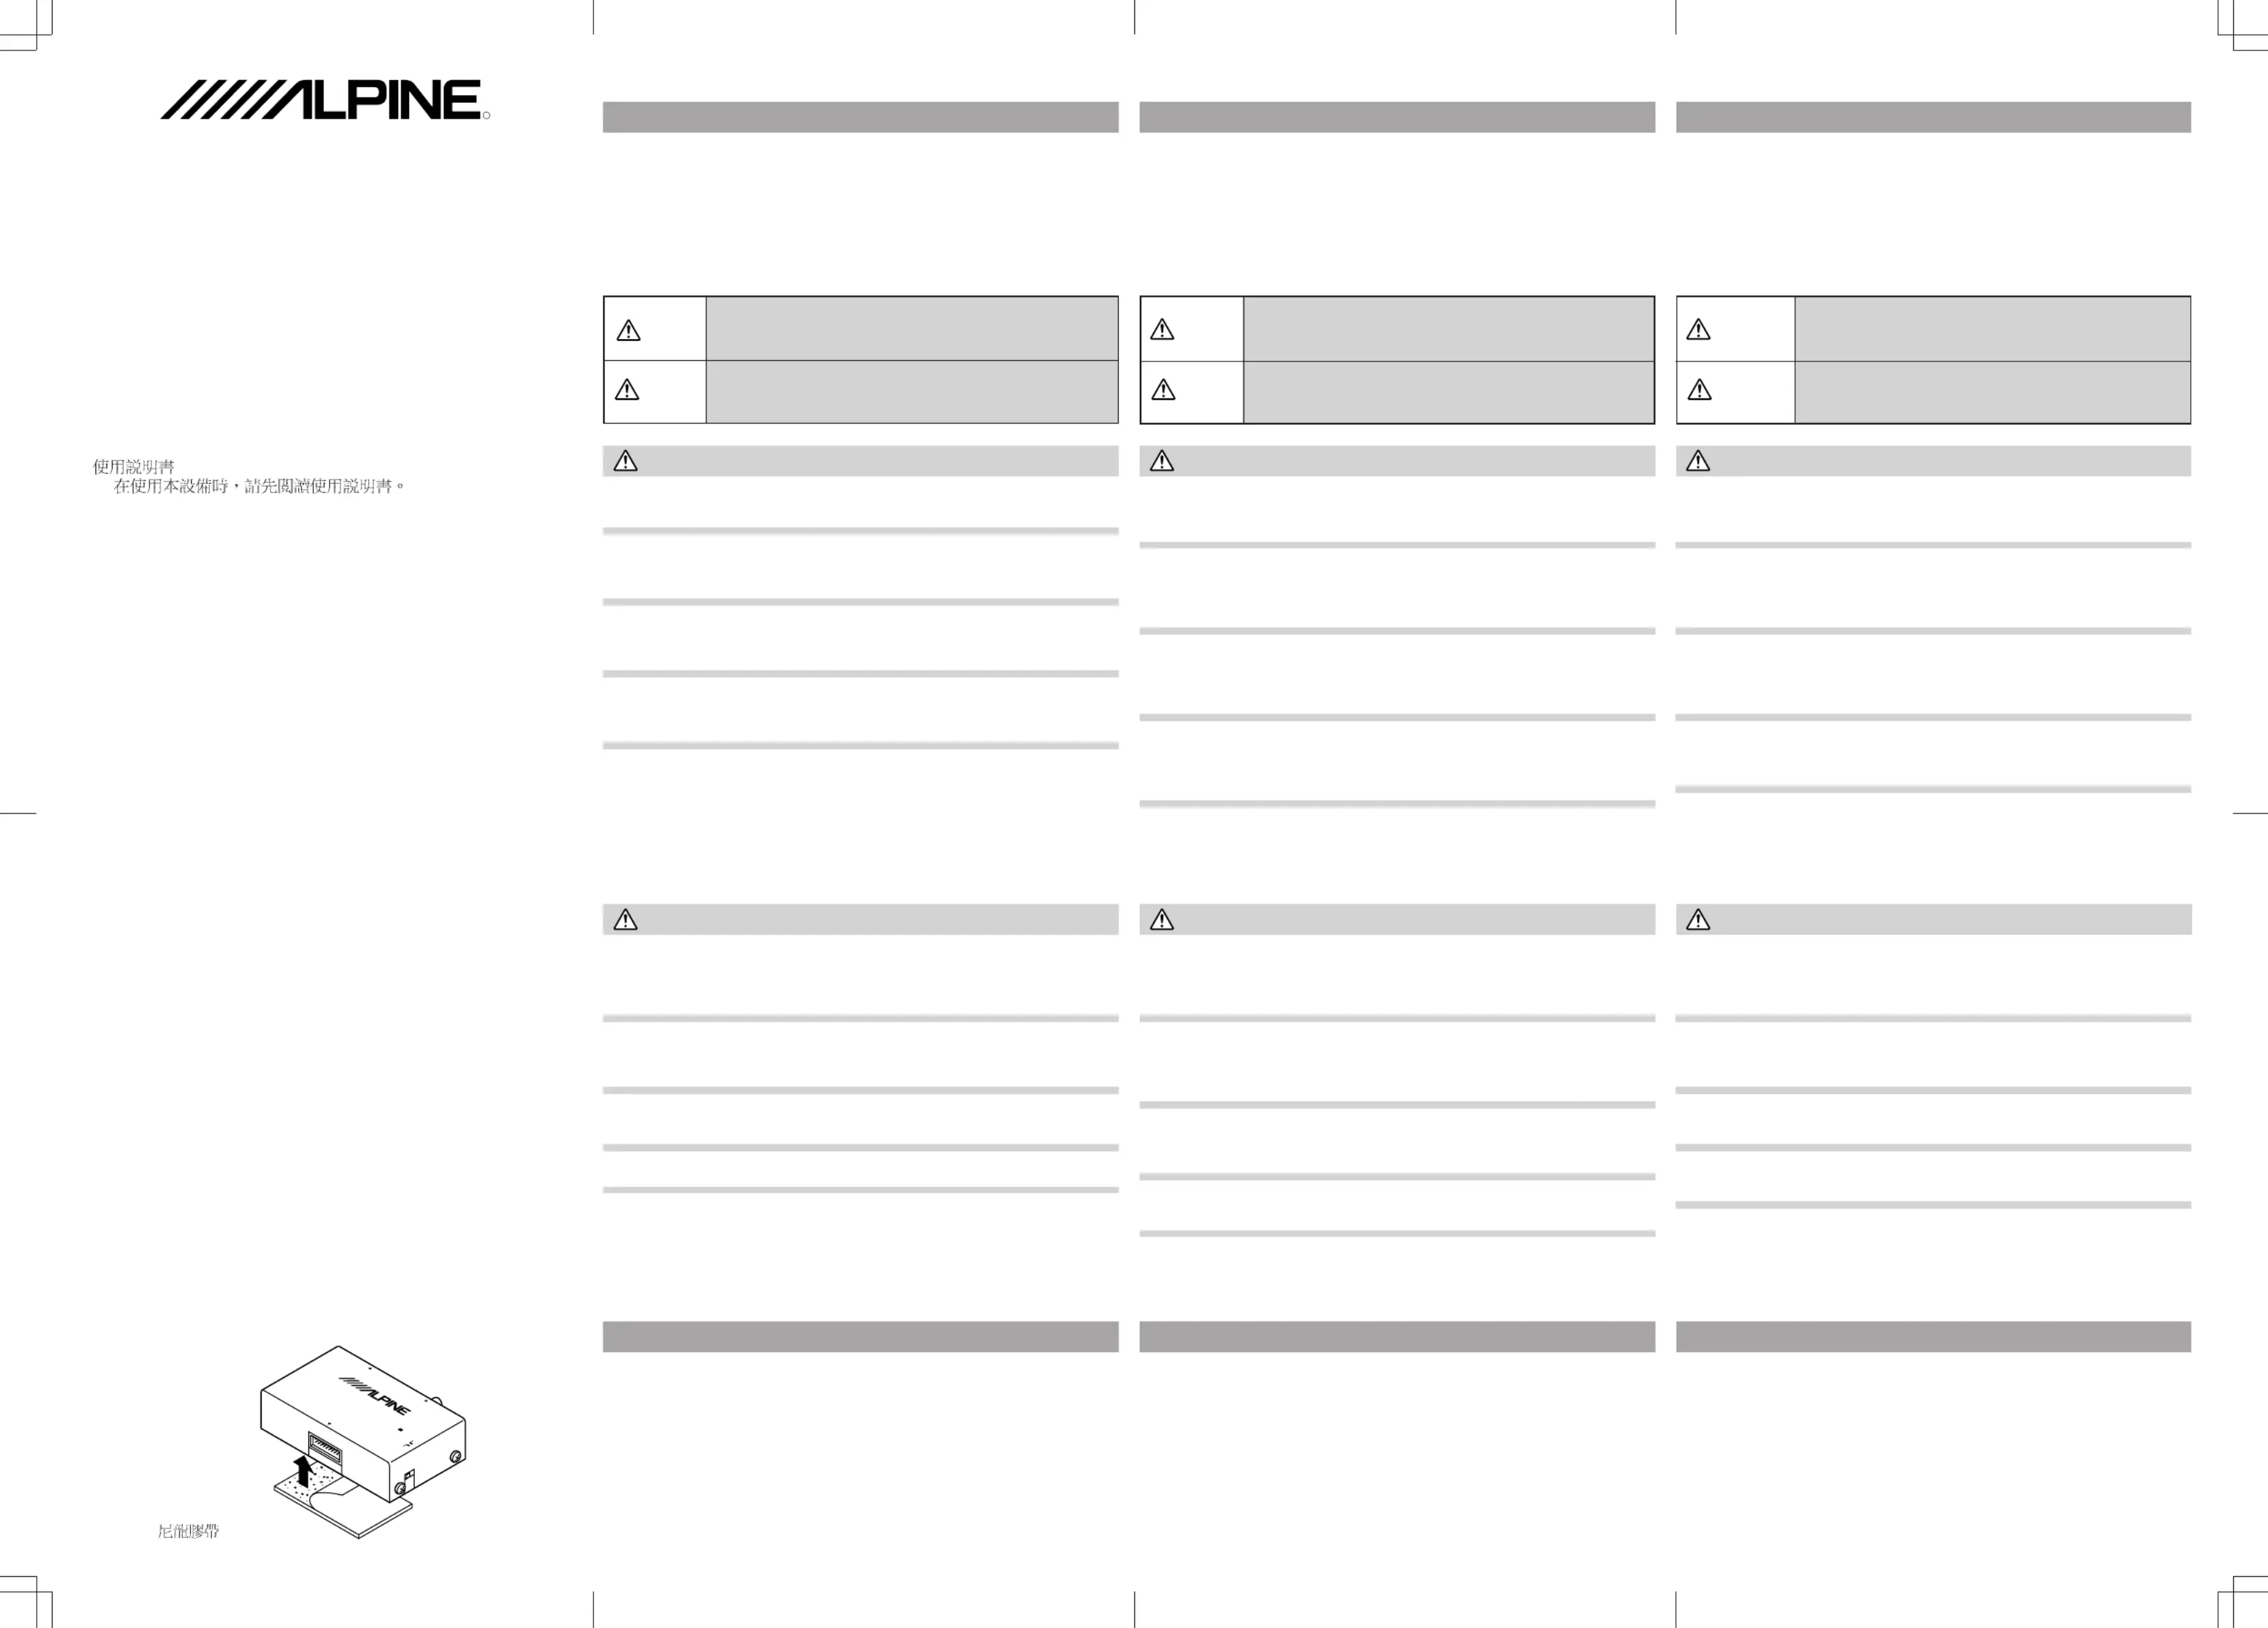
Montage avec la bande Velcro
Cette méthode d’installation est suggérée lorsque l’emplacement de montage ne permet
UTILISER CETTE METHODE UNIQUEMENT QUAND L’UNITE EST MONTEE SUR UNE
SURFACE HORIZONTALE. NE JAMAIS MONTER UNE UNITE A L’ENVERS EN
UTILISANT LA BANDE VELCRO
1. Retirer le papier protecteur sur une face de la bande adhésive Velcro
2. Fixer la face exposée de la bande adhésive sur le dessous de l’unité, au milieu d’un
emplacement. Ne pas couvrir le numéro de série.
3. Vérier que l’emplacement de montage est propre, sec et exempt de contaminants.
4. Retirer la bande protectrice de l’autre face de la bande Velcro
5. Presser l’unité contre son emplacement de xation.
•Read this manual carefully before starting operation and use this system safely. We
cannot be responsible for problems resulting from failure to observe the instructions in
•This manual uses various pictorial displays to show how to use this product safely and
to avoid harm to yourself and others and damage to your property. Here is what these
pictorial displays mean. Understanding them is important for reading this manual.
This label is intended to alert the user to the presence of important
Failure to heed the instructions will result in severe injury or death.
This label is intended to alert the user to the presence of important
Failure to heed the instructions can result in injury or material damage.
DO NOT DISASSEMBLE OR ALTER
Attempts to disassemble or alter may lead to accident, re or electric shock.
BEFORE WIRING, DISCONNECT THE CABLE FROM THE NEGATIVE BATTERY
Before doing any electrical wiring, disconnect the cable from the negative (–) terminal of the
battery. Failure to do so may result in electric shock or injury due to electrical shorts.
KEEP ELECTRICAL CABLES TOGETHER TO AVOID OPERATING HAZARDS
Arrange wiring and cables in compliance with the installation manual to prevent obstruc-
tions when driving. Cables or wiring that obstructs or hangs up on places such as the
steering wheel, gear lever, brake pedals can be extremely hazardous.
DO NOT INSTALL IN LOCATIONS WHICH MIGHT HINDER VEHICLE OPERATION
Do not install in locations which might create hazards for the vehicle occupants or hinder
vehicle operation (such as the steering wheel or gear shift) by obstructing forward vision or
HALT USE IMMEDIATELY IF A PROBLEM APPEARS
When problems occur such as a lack of sound or video, foreign objects inside the unit,
smoke coming out, or noxious odors, stop use immediately and contact the dealer where
you bought the equipment.
HAVE THE WIRING AND INSTALLATION DONE BY EXPERTS
The wiring and installation of this unit requires special technical skill and experience. To
ensure safety, always contact the dealer where you purchased this unit to have the work
USE SPECIFIED ACCESSORY PARTS AND INSTALL THEM SECURELY
Be sure to use only the specied accessory parts. Use of other than designated parts may
damage this unit internally or may not securely install the unit in place as parts that come
loose can create hazards.
DO NOT INSTALL IN LOCATIONS WITH HIGH MOISTURE OR DUST
Avoid installing the unit in locations with high incidence of moisture or dust. Moisture or
dust that penetrates into this unit may cause smoke or re.
MAKE THE CORRECT CONNECTIONS
Failure to make the correct connections can cause re or accident to occur.
ARRANGE THE WIRING SO IT IS NOT CRIMPED OR PINCHED
Route the cables and wiring so as not be crimped by moving parts like seat rail or make
contact with sharp or pointed spots which might damage the wiring.
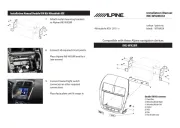
This installation method is suggested when the mounting location does not permit drilling.
USE THIS METHOD ONLY WHEN THE UNIT IS MOUNTED ON A HORIZONTAL
SURFACE. NEVER MOUNT A UNIT UPSIDE-DOWN USING THE VELCRO
1. Remove the adhesive protective paper from one side of the Velcro
2. Attach the exposed adhesive side to the underside of the Unit, in a central location. Do
not cover the serial number.
3. Make sure the mounting location is clean, dry and free from contaminants.
4. Remove the protective strip from the other side of the Velcro
5. Press the unit onto its mounting location.
•Lire attentivement ce manuel avant de commencer l’opération et l’utilisation du
système en toute sécurité. Nous dégageons toute responsabilité des problèmes
résultant du non-respect des instructions décrites dans ce manuel.
•Ce manuel utilise divers achages illustrés pour montrer comment utiliser cet appareil
en toute sécurité, pour éviter de s’exposer soi-même et les autres personnes aux
dangers et pour éviter d’endommager l’appareil. Voici la signication de ces achages
illustrés. Il est important de bien les comprendre pour la lecture de ce manuel.
•Signication des achages
Puntos que debe respetar para un uso
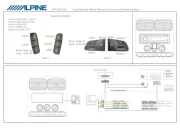
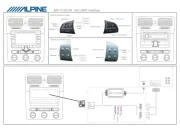
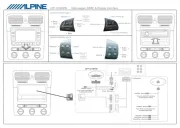
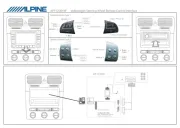
REMOTE IN/OUT VIDEO OUTPUT
STAND BY
OFF
TUNER INPUT
RGB / COMPOSITE CONVERTER
KCE-100V
POWER
•Lea atentamente este manual antes de comenzar la operación y la utilización del
sistema sin riesgos. Declinamos toda responsabilidad si se ocasionan problemas por
no respetar las instrucciones dadas en este manual.
•Este manual utiliza diversas ilustraciones para mostrar como utilizar este aparato de
manera segura, para evitar la exposición de sí mismo y de otras personas a peligros y
para evitar de estropear el aparato. He aquí la signicación de dichas ilustraciones. Es
muy importante que las comprenda bien para la lectura de este manual.
•Signicación de las ilustraciones
Esta etiqueta previene al usuario de la presencia de instrucciones
de operación importantes.
Si no sigue estas instrucciones, corre el riesgo de ocasionar
heridas graves o mortales.
Esta etiqueta previene al usuario de la presencia de instrucciones
de operación importantes.
Si no sigue estas instrucciones, corre el riesgo de ocasionar
heridas o pérdidas materiales.
Si intentase desmontar o alterar el aparato podría ocasionar un accidente, incendio o
ANTES DE EFECTUAR EL CABLEADO, DESCONECTE EL CABLE DEL TERMINAL
Antes de efectuar el cableado eléctrico, desconecte el cable del terminal negativo (–) de la
batería. De no hacerlo así, podría ocasionar una descarga eléctrica o heridas debido a
cortocircuitos eléctricos.
AGRUPE LOS CABLES ELECTRICOS PARA EVITAR PELIGROS
Disponga los hilos y los cables de acuerdo con el manual de instalación para evitar
obstrucciones durante la conducción. Cables o hilos que obstruyan o cuelguen encima de
lugares como el volante, la palanca del cambio de velocidades o los pedales de freno
NO INSTALE EN LUGARES QUE IMPIDAN EL FUNCIONAMIENTO DEL VEHICULO
No instale en lugares en que pueda ocasionar riesgos para los pasajeros del vehículo o
impedir el funcionamiento del vehículo (como el volante o la palanca del cambio de
velocidades) obstruyendo la visión delantera o estorbando los movimientos, etc.
CESE EL USO INMEDIATAMENTE SI HAY ALGUN PROBLEMA
Cuando ocurra algún problema, como por ejemplo falta de sonido o de video, objetos
extraños dejados caer dentro de la unidad, olores nocivos o humo que salga de la unidad,
cese el uso del sistema inmediatamente y póngase en contacto con el distribuidor al que
haya comprado el aparato.
CONFIE EL CABLEADO Y LA INSTALACION A PROFESIONALES
El cableado y la instalación de este aparato necesitan una competencia y experiencia
técnica conrmada. Para garantizar la seguridad, contacte siempre el distribuidor al que ha
comprado el aparato para conarle los trabajos a realizar.
UTILICE LOS ACCESORIOS ESPECIFICADOS E INSTALELOS FIRMEMENTE
Asegúrese de utilizar únicamente los accesorios especicados. La utilización de otras
piezas no designadas puede provocar daños en el interior del aparato o puede hacer que
la instalación no sea segura, p1-ya que las piezas ojas pueden ser peligrosas.
NO INSTALE EN LUGARES MUY HUMEDOS O LLENOS DE POLVO
Evite instalar el aparato en lugares muy húmedos o con mucho polvo. La humedad o el
polvo que penetren en el aparato pueden ocasionar humo o un incendio.
EFECTUE LAS CONEXIONES CORRECTAMENTE
Si las conexiones no son efectuadas correctamente, puede producirse un incendio o un
DISPONGA EL CABLEADO DE MANERA QUE NO SEA AGUJEREADO O DOBLADO
Encamine los cables y los hilos de manera que no sean agujereados por piezas móviles
como el raíl del asiento o que no entren en contacto con puntos cortantes o alados que
puedan dañar el cableado.
Instalación utilizando la cinta Velcro
Este método de instalación se aconseja cuando no es posible perforar el lugar de
UTILICE ESTE METODO UNICAMENTE SI LA UNIDAD ESTA MONTADA EN UNA
SUPERFICIE HORIZONTAL. NUNCA MONTE UNA UNIDAD AL REVES UTILIZANDO LA
1. Retire el papel adhesivo de protección de uno de los lados de la cinta Velcro
2. Fije el lado adhesivo expuesto en la parte inferior de la unidad, en el centro. No cubra
3. Asegúrese de que el lugar de montaje está limpio, seco y sin contaminación.
4. Retire la cinta de protección del otro lado del cojincillo Velcro
5. Presione la unidad contra el lugar de instalación.
Please read before using this equipment.
Veuillez lire ce mode d'emploi avant la mise en service de l'appareil.
Lea antes de utilizar este equipo.
Lesen Sie diese Anleitung bitte vor der Inbetriebnahme.
(RCS PONTOISE B 338 101 280)