Alpine KCI-500B Manual


Læs gratis den danske manual til Alpine KCI-500B (2 sider) i kategorien Ikke kategoriseret. Denne vejledning er vurderet som hjælpsom af 11 personer og har en gennemsnitlig bedømmelse på 4.3 stjerner ud af 6 anmeldelser. Har du et spørgsmål om Alpine KCI-500B, eller vil du spørge andre brugere om produktet?

Side 1/2
R
R
R
R R
KCI-500B
Ai-NET/IONBUSTM CONVERTER
LOWNER’S MANUAL
Please read before using this equipment.
LMODE D'EMPLOI
Veuillez lire ce mode d’emploi avant la mise en service de l’appareil.
LMANUAL DE OPERACIÓN
Lea antes de utilizar este equipo.
LBEDIENUNGSANLEITUNG
Lesen Sie diese Anleitung bitte vor der Inbetriebnahme.
LMANUALE DEL PROPRIETARIO
Si prega di leggere il manuale prima di usare questa attrezzatura.
LBRUKSANVISNING
Läs bruksanvisningen innan utrustningen används.
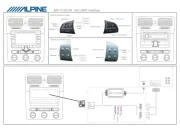
11111 IONBUS terminal
22
22
2IONBUS cable
33
333 S video output terminal
44444 S video input terminal
55555 S video cable (Included with head unit)
66
66
6DVD Audio Link terminal
77777 DVD Audio Link cable (Included with Multimedia Manager)
88888 IONBUS cable (Included with Monitor)
99999 IONBUS cable (Included with KCI-500B CONVERTER)
ppppp Ai-NET connector
qqqqq Ai-NET cable
ww
www Ai-NET Output connector
eeeee Ai-NET Input connector
rrrrr Ai-NET cable (Included with CD Changer)
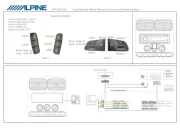
aWhen combined with a KCI-500B, you can connect an Ai-NET compatible changer
XM Radio Module, DAB Tuner Unit to IONBUS compatible products.
aIONBUS compatible products can be connected in any order. The left connection
chart is an example.
aA second KCI-500B cannot be connected to a KCI-500B IONBUS connector.
aUsing a KCA-410C (Versatile Link Terminal) with the KCI-500B, does not allow
more than 2 Ai-NET changers to be connected.
aFor details, refer to the instructions manual of the product to be connected.
*1 To Customers in North America
The XM Radio Tuner Module (TUA-T020XM) can be connected with the CD Changer.
*2 For Customers in other Countries
The DAB Tuner Unit (TUA-T100DAB) can be connected with the CD Changer.
*3Ferrite Core
Two pieces are attached to KCI-500B, TMI-M990, PXI-H990.
*4Connect directly to the KCI-500B Ai-NET connector using Ai-NET cable, when only
a CD changer is being used in the system.
ALPINE ELECTRONICS FRANCE S.A.R.L.
(RCS PONTOISE B 338 101 280)
98, Rue de la Belle Etoile, Z.I. Paris
Nord II, B.P. 50016, 95945 Roissy
Charles de Gaulle Cedex, France
Phone 01-48638989
ALPINE ITALIA S.p.A.
Viale C. Colombo 8, 20090 Trezzano
Sul Naviglio (MI), Italy
Phone 02-484781
ALPINE ELECTRONICS DE ESPAÑA, S.A.
Portal de Gamarra 36, Pabellón, 32
01013 Vitoria (Alava) - APDO 133, Spain
Phone 945-283588
Sankei Kikaku Co., Ltd.
1-13-38, Hinodai,
Hino, Tokyo, Japan
NO DESMONTE NI ALTERE LA UNIDAD. Si lo hace, podrá ocasionar un accidente, un incendio o
una descarga eléctrica.
MANTENGA LOS OBJETOS PEQUEÑOS, COMO LAS PILAS, FUERA DEL ALCANCE DE LOS NIÑOS.
La ingestión de estos objetos puede provocar lesiones graves. Si esto ocurre, consulte con un
dico inmediatamente.
UTILICE EL AMPERAJE CORRECTO CUANDO CAMBIE FUSIBLES. De lo contrario, puede producirse
un incendio o una descarga eléctrica.
UTILICE LA UNIDAD SOLAMENTE EN VEHÍCULOS QUE TENGAN 12 VOLTIOS CON NEGATIVO A
MASA. (Consulte a su distribuidor en caso de duda.) De no ser así, podría ocasionar un incendio, etc.
ANTES DE EFECTUAR EL CABLEADO, DESCONECTE EL CABLE DEL TERMINAL NEGATIVO DE LA
BATERÍA. De no hacerlo a, podría ocasionar una descarga eléctrica o heridas debido a
cortocircuitos eléctricos.
NO EMPALME CABLES ELÉCTRICOS. Nunca corte el aislamiento de un cable para suministrar
energía a otro equipo. Esto hace que la capacidad portadora del cable se supere y puede ser la
causa de incendios o descargas eléctricas.
EVITE DAÑAR LOS TUBOS Y EL CABLEADO CUANDO TALADRE AGUJEROS. Si taladra agujeros
en el chasis durante la instalación, tome las precauciones necesarias para no rozar, dañar u
obstruir los tubos, las tuberías de combustible, los depósitos o el cableado eléctrico. De lo contrario,
podría provocar un incendio.
NO UTILICE TUERCAS O PERNOS EN EL SISTEMA DE FRENOS O DE DIRECCIÓN PARA REALIZAR
LAS CONEXIONES A MASA. Los pernos o tuercas empleados en los sistemas de freno o de
dirección (o en cualquier otro sistema relacionado con la seguridad del vehículo), o los depósitos,
NUNCA deben utilizarse para instalaciones de cableado o conexión a masa. Si utiliza tales partes
podrá incapacitar el control del vehículo y provocar un incendio, etc.
IMPIDA QUE LOS CABLES SE ENREDEN CON LOS OBJETOS SITUADOS ALREDEDOR. Disponga
la instalación eléctrica y los cables conforme a lo descrito en el manual para evitar obstáculos
durante la conducción. Los cables que obstaculizan la conducción o que cuelgan de partes del
vehículo como el volante de dirección, la palanca de cambios, los pedales de freno, etc., se
consideran extremadamente peligrosos.
UTILICE ESTE PRODUCTO CON APLICACIONES VILES DE 12 V. Si se emplea para otra aplicación
distinta de la prevista, podría producirse un incendio, una descarga eléctrica u otras lesiones.
REALICE LAS CONEXIONES CORRECTAMENTE. Una conexión incorrecta puede producir un
incendio o dañar el equipo.
Español
Puntos que debe respetar para un uso seguro
ADVERTENCIA
Este símbolo indica que las instrucciones son importantes. De no tenerse en cuenta,
podría ocasionarse heridas graves o muerte.
PRUDENCIA
Este símbolo indica que las instrucciones son importantes. De no tenerse en
cuenta, podría ocasionarse heridas graves o daños materiales.
UTILICE LOS ACCESORIOS ESPECIFICADOS E INSTÁLELOS CORRECTAMENTE. Asegúrese de
utilizar los accesorios especificados solamente. La utilización de otras piezas no designadas puede
ser la causa de daños en el interior de la unidad o de una instalación incorrecta. Las piezas pueden
aflojarse, lo que, además de ser peligroso, puede provocar averías.
NO INSTALE LA UNIDAD EN LUGARES MUYMEDOS O LLENOS DE POLVO. Evite instalar la unidad
en lugares con altos índices de humedad o polvo. Si entra polvo o humedad, el equipo puede averiarse.
CONFÍE EL CABLEADO Y LA INSTALACIÓN A PROFESIONALES. El cableado y la instalación de este
equipo requieren una competencia y experiencia cnica confirmada. Para garantizar la seguridad, póngase
siempre en contacto con el distribuidor al que p1-ha comprado el equipo para confiarle estas tareas.
DISPONGA EL CABLEADO DE FORMA QUE LOS CABLES NO SE DOBLEN, NO SE CONTRAIGAN
NI ROCEN UN BORDE METÁLICO AFILADO. Aleje los cables y el cableado de piezas viles (como
los raíles de los asientos) o de bordes puntiagudos o afilados. De esta forma evitará dobleces y
daños en el cableado. Si los cables se introducen por un orificio de metal, utilice una arandela de
goma para evitar que el borde metálico del orificio corte el aislamiento del cable.
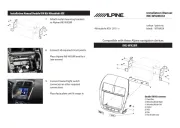
Instalación
1. Utilice la unidad como plantilla, sujétela en su ubicación de montaje y marque los orificios que
deban perforarse. Antes de perforar, asegúrese de que no hay objetos que puedan dañarse detrás
de la superficie de montaje.
2. Perfore los orificios y asegure la unidad con los tornillos autoenroscables (M4 x 14) suministrados.
NE PAS DESASSEMBLER NI MODIFIER L'APPAREIL. Il y a risque d'accident, d'incendie ou de choc électrique.
GARDER LES PETITS OBJETS COMME LES PILES HORS DE PORTEE DES ENFANTS. L'ingestion de
tels objets peut entraîner de graves blessures. En cas d'ingestion, consulter immédiatement un médecin.
UTILISER DES FUSIBLES DE L'AMPERAGE APPROPRIE. Il y a risque d'incendie ou de charge
électrique.
A UTILISER UNIQUEMENT SUR DES VOITURES A MASSE NEGATIVE DE 12 VOLTS. (Vérifiez
auprès de votre concessionnaire si vous n'en êtes pas certain.) Il y a risque d'incendie, etc.
AVANT TOUTE CONNEXION, DEBRANCHER LE CABLE DE LA BORNE NEGATIVE DE LA BATTERIE.
Il y a risque de choc électrique ou de blessure par courts-circuits.
NE PAS DENUDER LES CABLES ELECTRIQUES. Ne jamais enlever la gaine isolante pour alimenter
un autre appareil. Il y a risque de dépassement de la capacité de courant et, partant, d'incendie ou
de choc électrique.
NE PAS ENDOMMAGER DE CONDUITES NI DE CABLES LORS DU FORAGE DES TROUS. Lors du
forage de trous dans le châssis en vue de l'installation, veiller à ne pas entrer en contact, endommager
ni obstruer de conduites, de tuyaux à carburant ou de fils électriques. Le non-respect de cette
précaution peut entraîner un incendie.
NE PAS UTILISER DES ECROUS NI DES BOULONS DU CIRCUIT DE FREINAGE OU DE DIRECTION
POUR LES CONNEXIONS DE MASSE. Les boulons et les écrous utilisés pour les circuits de freinage
et de direction (ou de tout autre système de sécurité) ou les réservoirs ne peuvent JAMAIS être
utilisés pour l'installation ou la liaison à la masse. L'utilisation de ces organes peut désactiver le
système de contrôle duhicule et causer un incendie, etc.
NE PAS COINCER LES CABLES AVEC DES OBJETS VOISINS. Positionner les câbles conformément
au manuel de manière à éviter toute obstruction en cours de conduite. Les câbles qui obstruent
ou passent à des endroits tels que le volant, le levier de changement de vitesses, la dale de
frein, etc., peuvent s'avérer extmement dangereux.
UTILISER CET APPAREIL POUR DES APPLICATIONS MOBILES DE 12 V. Toute utilisation autre que
l'application désignée comporte un risque d'incendie, de choc électrique ou de blessure.
EFFECTUER CORRECTEMENT LES CONNEXIONS. Il y a risque de blessures ou de dommages à l'appareil.
Français
Points à respecter pour une utilisation sûre
AVERTISSEMENT
Ce symbole désigne des instructions importantes. Le non-respect de ces
instructions peut entraîner de graves blessures, voire la mort.
ATTENTION
Ce symbole désigne des instructions importantes. Le non-respect de ces
instructions peut entraîner des blessures ou des dommages matériels.
UTILISER LES ACCESSOIRES SPECIFIES ET LES INSTALLER CORRECTEMENT. Utiliser uniquement
les accessoires spécifiés. L'utilisation d'autres composants que les composants spécifiés peut
causer des dommages internes à cet appareil ou son installation risque de ne pas être effectuée
correctement. Les pièces utilisées risquent de se desserrer et de provoquer des dommages ou une
faillance de l'appareil.
NE PAS INSTALLER A DES ENDROITS TRES HUMIDES OU POUSSIEREUX. Eviter d'installer
l'appareil à des endroits soumis à une forte humidi ou à de la poussière en excès. La nétration
d'humidité ou de poussière à l'intérieur de cet appareil risque de provoquer une défaillance.
FAIRE INSTALLER LE CABLAGE ET L'APPAREIL PAR DES EXPERTS. Le blage et l'installation de
cet appareil requiert des compétences techniques et de l'expérience. Pour garantir la sécurité,
faire procéder à l'installation de cet appareil par le distributeur qui vous l’a vendu.
FAIRE CHEMINER LE CABLAGE DE MANIERE A NE PAS LE COINCER CONTRE UNE ARETE
METALLIQUE. Faire cheminer les bles à l'écart des pièces mobiles (comme les rails d'un siège)
et des arêtes acérées ou pointues. Cela évitera ainsi de coincer et d'endommager les bles. Si un
câble passe dans un orifice métallique, utiliser un passe-cloison en caoutchouc pour éviter que la
gaine isolante du câble ne soit endommagée par le rebord métallique de l'orifice.
Installation
1. Utilisez l’appareil comme modèle, placez-le sur l’emplacement de montage et marquez les trous
à percer. Avant de percer les trous, assurez-vous qu’aucun élément ne peut être endommagé
derrière la surface de montage.
2. Percez les trous et fixez l’appareil avec les vis auto-taraudeuses (M4 x 14) fournies.
English
Points to Observe for Safe Usage
WARNING
This symbol means important instructions. Failure to heed them can result in
serious injury or death.
DO NOT DISASSEMBLE OR ALTER. Doing so may result in an accident, fire or electric shock.
KEEP SMALL OBJECTS SUCH AS BATTERIES OUT OF THE REACH OF CHILDREN. Swallowing
them may result in serious injury. If swallowed, consult a physician immediately.
USE THE CORRECT AMPERE RATING WHEN REPLACING FUSES. Failure to do so may result in
fire or electric shock.
USE ONLY IN CARS WITH A 12 VOLT NEGATIVE GROUND. (Check with your dealer if you are not
sure.) Failure to do so may result in fire, etc.
BEFORE WIRING, DISCONNECT THE CABLE FROM THE NEGATIVE BATTERY TERMINAL. Failure
to do so may result in electric shock or injury due to electrical shorts.
DO NOT SPLICE INTO ELECTRICAL CABLES. Never cut away cable insulation to supply power to
other equipment. Doing so will exceed the current carrying capacity of the wire and result in fire
or electric shock.
DO NOT DAMAGE PIPE OR WIRING WHEN DRILLING HOLES. When drilling holes in the chassis
for installation, take precautions so as not to contact, damage or obstruct pipes, fuel lines, tanks
or electrical wiring. Failure to take such precautions may result in fire.
DO NOT USE BOLTS OR NUTS IN THE BRAKE OR STEERING SYSTEMS TO MAKE GROUND
CONNECTIONS. Bolts or nuts used for the brake or steering systems (or any other safety-related
system), or tanks should NEVER be used for installations or ground connections. Using such parts
could disable control of the vehicle and cause fire etc.
DO NOT ALLOW CABLES TO BECOME ENTANGLED IN SURROUNDING OBJECTS. Arrange wiring
and cables in compliance with the manual to prevent obstructions when driving. Cables or wiring
that obstruct or hang up on places such as the steering wheel, shift lever, brake pedals, etc. can
be extremely hazardous.
USE THIS PRODUCT FOR MOBILE 12V APPLICATIONS. Use for other than its designed application
may result in fire, electric shock or other injury.
MAKE THE CORRECT CONNECTIONS. Failure to make the proper connections may result in fire
or product damage.
CAUTION
This symbol means important instructions. Failure to heed them can result in
injury or material property damage.
USE SPECIFIED ACCESSORY PARTS AND INSTALL THEM SECURELY. Be sure to use only the
specified accessory parts. Use of other than designated parts may damage this unit internally or
may not securely install the unit in place. This may cause parts to become loose resulting in
hazards or product failure.
DO NOT INSTALL IN LOCATIONS WITH HIGH MOISTURE OR DUST. Avoid installing the unit in
locations with high incidence of moisture or dust. Moisture or dust that penetrates into this unit
may result in product failure.
HAVE THE WIRING AND INSTALLATION DONE BY EXPERTS. The wiring and installation of this
unit requires special technical skill and experience. To ensure safety, always contact the dealer
where you purchased this product to have the work done.
ARRANGE THE WIRING SO IT IS NOT CRIMPED OR PINCHED BY A SHARP METAL EDGE. Route
the cables and wiring away from moving parts (like the seat rails) or sharp or pointed edges. This
will prevent crimping and damage to the wiring. If wiring passes through a hole in metal, use a
rubber grommet to prevent the wire’s insulation from being cut by the metal edge of the hole.
Installation
1. Using the unit as a template, hold it at its mounting location and mark the holes to be drilled. Before
drilling, make sure that there are no objects that could be damaged behind the mounting surface.
2. Drill holes and secure the unit with self-tapping screws (M4 x 14) supplied.
System/Système/Sistema
English/Français/Español
68P70033Y26-O
Printed in Japan (S)
ALPINE ELECTRONICS OF AUSTRALIA PTY.
LTD.
6-8 Fiveways Boulevarde Keysborough,
Victoria 3173, Australia
Phone 03-9769-0000
ALPINE ELECTRONICS GmbH
Frankfurter Ring 117, 80807 München,
Germany
Phone 089-32 42 640
ALPINE ELECTRONICS OF U.K. LTD.
Alpine House
Fletchamstead Highway,
Coventry CV4 9TW, U.K.
Phone 0870-33 33 763
ALPINE ELECTRONICS MARKETING, INC.
1-1-8 Nishi Gotanda,
Shinagawa-ku, Tokyo 141-0031, Japan
Phone 03-5496-8231
ALPINE ELECTRONICS OF AMERICA, INC.
19145 Gramercy Place, Torrance,
California 90501, U.S.A.
Phone 1-800-ALPINE-1 (1-800-257-4631)
ALPINE ELECTRONICS OF CANADA, INC.
7300 Warden Ave., Suite 203, Markham,
Ontario L3R 9Z6, Canada
Phone 1-800-ALPINE-1 (1-800-257-4631)
Connections/Connexions/Conexiones
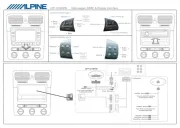
45
6
7
8 9
1
2
3
4cm
11
11
1Power Supply Connector
22
222 Ai-NET Connector
Only an Ai-NET compatible CD Changer, XM Radio Module and
DAB Tuner Unit can be connected. No other Ai-NET products are
compatible.
33333 IONBUS terminal
Connects to an IONBUS compatible product with an IONBUS cable.
44
44
4Choke Coil with Fuse Holder (7.5A)
55
555 Battery Lead (Yellow)
Connect this lead to the positive (+) post of the vehicle’s battery.
66
666 Ground Lead (Black)
Connect this lead to a good chassis ground on the vehicle. Make
sure the connection is made to bare metal and is securely fastened
using the sheet metal screw provided.
77777 Audio Interrupt In Lead (Pink/Black)
Connect this lead to a cellular phone interface which provides a
grounded output when a call is received.
88
888 IONBUS Cable
99999 Ferrite Core
Attach the Ferrite Core (included) to the both ends of the IONBUS cable
at a location where the product does not touch the core when installing.
(When connecting to the main unit, attach the core at a location of
approx. 4 cm from the terminal end.)
11111 Connecteur d'alimentation
22222 Connecteur Ai-NET
Seul un changeur de CD, un Module Radio XM et une unité de
tuner DAB compatibles Ai-NET peuvent être connectés. Aucun
autre produit Ai-NET n’est compatible.
33
333 Borne IONBUS
Se connecte à un produit compatible IONBUS avec un câble IONBUS.
44444 Bobine d'arrêt avec porte-fusible (7,5A)
55555 Fil de la batterie (Jaune)
Connecter ce fil à la borne positive (+) de la batterie du véhicule.
66666 Fil de mise à la terre (Noir)
Connecter ce fil à une bonne masse du châssis sur le véhicule.
S'assurer que la connexion est faite à un métal nu et solidement
fixée en utilisant une vis de feuille métallique fournie.
77
77
7Fil d'entrée d'interruption audio (Rose/Noir)
Connecter ce fil à l’interface d’un téléphone cellulaire fournissant
une sortie de terre lorsqu’un appel est reçu.
88
888 Câble IONBUS
99999 Noyau de ferrite
Attachez le noyau de ferrite (inclus) aux deux extrémités du câble
IONBUS à un emplacement le produit ne touchera pas le noyau lors
de l’installation.
(Lors du branchement à l’unité principale, attachez le noyau à environ
4 cm de l’embout.)
11111 Conector de alimentación
22222 Conector Ai-NET
Sólo se puede conectar un cambiador de CD, un módulo de radio
XM y un sintonizador DAB compatibles con Ai-NET. Ningún otro
producto Ai-NET es compatible.
33
333 Terminal IONBUS
Conecta un producto IONBUS compatible con un cable IONBUS.
44444 Bobina de impedancia protectora con portafusibles (7,5A)
55555 Cable de la batería (Amarillo)
Conecte este cable al terminal positivo (+) de la batería del vehículo.
66666 Cable de tierra (Negro)
Conecte este cable a una buena tierra del chasis del vehículo.
Asegúrese de conectarlo a una parte metálica despejada y de fijarlo
firmemente usando el tornillo para plancha metálica proporcionado.
77
77
7Cable de entrada de interrupción de audio (Rosa/Negro)
Conecte este cable a una interfaz de teléfono celular que proporcione
una salida de conexión a tierra cuando se reciba una llamada.
88
888 Cable IONBUS
99999 Núcleo de ferrita
Acople el núcleo de ferrita (suministrado) a ambos extremos del cable
IONBUS, en un lugar en el que el producto no toque el núcleo mientras
se efectúa la instalación.
(Al conectarlo a la unidad principal, acople el núcleo a una distancia de
aprox. 4 cm del extremo terminal.)
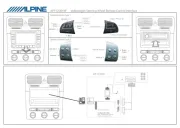
11111 Borne IONBUS
22
22
2Câble IONBUS
33
333 Borne de sortie S vidéo
44444 Borne dénte S vidéo
55555 Câble de borne S vidéo (Fourni avec la Head Unit)
66
66
6Borne de liaison audio DVD
77777 Câble de liaison audio DVD (Fourni avec le Multimedia Manager)
88888 Câble IONBUS (Fourni avec le moniteur)
99999 Câble IONBUS (Fourni avec le CONVERTISSEUR KCI-500B)
ppppp Connecteur Ai-NET
qqqqq Câble Ai-NET
ww
www Connecteur de sortie Ai-NET
eeeee Connecteur d’ente Ai-NET
rrrrr Câble Ai-NET (Fourni avec le changeur de CD)
aLorsqu’il est associé à un KCI-500B, vous pouvez connecter un changeur compa-
tible Ai-NET, un Module Radio XM et une unité de tuner DAB à des produits
compatibles IONBUS.
aLes produits compatibles IONBUS peuvent être connectés dans n’importe quel
ordre. Le tableau de connexion à gauche est un exemple.
a
Un deuxième KCI-500B ne peut être connecté à un connecteur IONBUS du KCI-500B.
aLe fait d’utiliser un KCA-410C (borne de lien polyvalent) avec le KCI-500B, ne
permet pas la connexion de plus de 2 changeurs Ai-NET.
a
Pour de plus amples tails, rez-vous au manuel d’instructions du produit à connecter.
*1Aux clients en Amérique du Nord
Le module du syntonisateur radio XM (TUA-T020XM) peut être relié au changeur CD.
*2Pour les clients d’autres pays
L'unité du syntonisateur (TUA-T100DAB) peut être reliés au changeur CD.
*3Noyau de ferrite
Deux pièces sont attachées aux KCI-500B, TMI-M990, PXI-H990.
*4
Connecter directement au connecteur Ai-NET du KCI-500B avec le ble Ai-NET,
lorsque seul un changeur de CD est utilisé par le système.
11111 Terminal IONBUS
22
22
2Cable IONBUS
33
333 Terminal de salida de S vídeo
44444 Terminal de entrada S vídeo
55555 Cable de terminal S video (Incluido con la Head Unit)
66
66
6Terminal de conexión de audio DVD
77777
Cable de conexión de audio DVD (Incluido con el Multimedia Manager)
88888 Cable IONBUS (Incluido con el el monitor)
99999 Cable IONBUS (Incluido con el CONVERTIDOR KCI-500B)
ppppp Conector Ai-NET
qqqqq Cable Ai-NET
ww
www Conector de salida Ai-NET
eeeee Conector de entrada Ai-NET
rrrrr Cable Ai-NET (Incluido con el cambiador de CD)
aCuando se combina con un KCI-500B, es posible conectar un cambiador Ai-NET
compatible, un dulo de radio XM y un sintonizador DAB con productos
IONBUS compatibles.
aLos productos compatibles con IONBUS se pueden conectar en cualquier orden.
El diagrama que se muestra a la izquierda es un ejemplo de esto.
aNo se puede conectar un segundo KCI-500B a un conector KCI-500B IONBUS.
aNo es posible conectar más de 2 cambiadores Ai-NET cuando se utiliza un KCA-
410C (terminal de conexión versátil) con el KCI-500B.
aPara más detalles al respecto, remítase al manual de instrucciones del producto
que va a conectar.
*1 Para los clientes en Norteamérica
El módulo del sintonizador de radio XM (TUA-T020XM) se puede conectar con el cambiador CD.
*2 Para los usuarios en otros países
La unidad del sintonizador DAB (TUA-T100DAB) se puede conectar con el cambiador CD.
*3 Núcleo de ferrita.
Hay dos piezas acopladas al KCI-500B, TMI-M990, PXI-H990.
*4
Realice la conexión directamente al conector Ai-NET del KCI-500B con el cable Ai-
NET, sólo cuando se utilice en el sistema un cambiador de CD.
IONBUS compatible
monitor (sold separately)/
Ecran compatible
IONBUS (vendu
séparément)/
Monitor compatible con
IONBUS (vendido
por separado)
XM
TM
Radio Tuner*1
Module (sold
separately) or DAB Tuner Unit
*2 (sold
separately)/
Module du tuner radio XM
TM
*1 (vendu
séparément) ou Unité de tuner DAB
*2
(vendue séparément)/
Módulo del sintonizador de radio XM
TM
*1
(vendido por separado) o Unidad del
sintonizador DAB
*2 (vendida por separado)
IONBUS compatible head unit
(sold separately)/
Head Unit compatible
avec IONBUS (vendue
séparément)/
Head Unit compatible con
IONBUS (vendida por separado)
IONBUS compatible Multimedia
Manager (sold separately)/
Multimedia Manager compatible
IONBUS (vendu séparément)/
Multimedia Manager compatible
con IONBUS (vendido por
separado)
TMI-M990 DVI-9990/DVI-9990R/DVI-9990E
PXI-H990
TUA-T020XM or TUA-T100DAB
Ai-NET compatible CD
changer (sold separately)/
Changeur de CD compatible
Ai-NET (vendu séparément)/
Cambiador de CD compatible
con Ai-NET (vendido por
separado)
CHA-S634,
CHA-1214, etc.
*3
*3
*4
*3
*3
*3
*3
8
1
1
1
1
1
p
q
p
r
ew
3
4
6
6
2
5
7
9
English/Français/Español
GER FFNEN.ÄT NICHT Ö Andernfalls besteht Unfallgefahr, Feuergefahr oder die Gefahr eines
elektrischen Schlages.
KLEINE GEGENST NDE WIE BATTERIEN VON KINDERN FERNHALTEN.Ä Werden solche
Gegenstände verschluckt, besteht die Gefahr schwerwiegender Verletzungen. Suchen Sie
unverzüglich einen Arzt auf, wenn ein Kind einen solchen Gegenstand verschluckt.
SICHERUNGEN IMMER DURCH SOLCHE MIT DER RICHTIGEN AMPEREZAHL ERSETZEN.
Andernfalls besteht Feuergefahr oder die Gefahr eines elektrischen Schlages.
NUR IN FAHRZEUGEN MIT 12-VOLT-BORDNETZ UND MINUS AN MASSE VERWENDEN. Fragen
Sie im Zweifelsfall Ihren H ndler. Andernfalls besteht Feuergefahr usw.ä
VOR DEM ANSCHLUSS DAS KABEL VOM MINUSPOL DER BATTERIE ABKLEMMEN. Andernfalls
besteht die Gefahr eines elektrischen Schlages oder Verletzungsgefahr durch einen Kurzschluß.
ELEKTRISCHE KABEL NICHT SPLEISSEN. Kabel d rfen nicht abisoliert werden, um andere Gerü äte
mit Strom zu versorgen. Andernfalls wird die Strombelastbarkeit des Kabels berschritten, undü
es besteht Feuergefahr oder die Gefahr eines elektrischen Schlages.
BEIM BOHREN VON L CHERN LEITUNGEN UND KABEL NICHT BESCHÖ ÄDIGEN. Wenn Sie beim
Einbauen L cher in das Fahrzeugchassis bohren, achten Sie unbedingt darauf, dieö
Kraftstoffleitungen und andere Leitungen, den Benzintank und elektrische Kabel nicht zu berühren,
zu besch digen oder zu blockieren. Andernfalls besteht Feuergefahr.ä
BOLZEN UND MUTTERN DER BREMSANLAGE NICHT ALS MASSEPUNKTE VERWENDEN.
Verwenden Sie f r Einbau oder Masseanschlu NIEMALS Bolzen oder Muttern der Brems- bzw.ü ß
Lenkanlage oder eines anderen sicherheitsrelevanten Systems oder des Benzintanks. Andernfalls
besteht die Gefahr, da Sie die Kontrolle ber das Fahrzeug verlieren oder ein Feuer ausbricht.ß ü
DAFÜR SORGEN, DASS SICH DIE KABEL NICHT IN GEGENSTÄNDEN IN DER NÄHE VERFANGEN.
Verlegen Sie die Kabel wie im Handbuch beschrieben, damit sie beim Fahren nicht hinderlich sind.
Kabel, die sich im Lenkrad, im Schalthebel, im Bremspedal usw. verfangen, k nnen zu ö ä ßu erst
gef hren.ährlichen Situationen fü
DAS GER T NUR AN EIN 12-V-BORDNETZ IN EINEM FAHRZEUG ANSCHLIESSEN. ÄAndernfalls
besteht Feuergefahr, die Gefahr eines elektrischen Schlags oder anderer Verletzungen.
AUF KORREKTE ANSCHL SSE ACHTEN.Ü Bei fehlerhaften Anschl ssen besteht Feuergefahr, undü
es kann zu Sch den am Ger t kommen.ä ä
Deutsch
VORSICHT
Dieses Symbol weist auf wichtige Anweisungen hin. Bei Nichtbeachtung besteht
die Gefahr von Verletzungen bzw. Sachschäden.
NUR DAS VORGESCHRIEBENE ZUBEH R VERWENDEN UND DIESES SICHER EINBAUEN.Ö
Verwenden Sie ausschlie lich das vorgeschriebene Zubeh r. Andernfalls wird das Gerß ö ät
möglicherweise beschädigt, oder es l t sich nicht sicher einbauen. Wenn sich Teile läß ösen, stellen
diese eine Gefahrenquelle dar, und es kann zu Betriebsst rungen kommen.ö
DAS GER T NICHT AN STELLEN EINBAUEN, AN DENEN ES HOHER FEUCHTIGKEIT ODER STAUBÄ
AUSGESETZT IST. Bauen Sie das Ger t so ein, da es vor hoher Feuchtigkeit und Staub geschä ß ützt
ist. Wenn Feuchtigkeit oder Staub in das Ger t gelangen, kann es zu Betriebsst rungen kommen.ä ö
VERKABELUNG UND EINBAU VON FACHPERSONAL AUSF HREN LASSEN.Ü Die Verkabelung
und der Einbau dieses Ger ts erfordern technisches Geschick und Erfahrung. Zu Ihrer eigenenä
Sicherheit sollten Sie Verkabelung und Einbau dem H berlassen, bei dem Sie das Gerändler ü ät
erworben haben.
DIE KABEL SO VERLEGEN, DASS SIE NICHT GEKNICKT ODER DURCH SCHARFE KANTEN
GEQUETSCHT WERDEN. Verlegen Sie die Kabel so, da sie sich nicht in beweglichen Teilen wieß
den Sitzschienen verfangen oder an scharfen Kanten oder spitzen Ecken besch digt werden kä önnen.
So verhindern Sie eine Besch digung der Kabel. Wenn Sie ein Kabel durch eine Bohrung in einerä
Metallplatte f hren, sch tzen Sie die Kabelisolierung mit einer Gummit lle vor Beschü ü ü ädigung
durch die Metallkanten der Bohrung.
Maßregeln für sicheren Betrieb
WARNUNG
Dieses Symbol weist auf wichtige Anweisungen hin. Bei Nichtbeachtung besteht
die Gefahr von schweren Verletzungen oder Todesfällen.
Einbau
1. Halten Sie das Gerät als Schablone an die Montagestelle, und markieren Sie die erforderlichen
Bohrungen. Bevor Sie die Bohrungen anbringen, stellen Sie sicher, da sich hinter derß
Montageoberfl nnten.äche keine Teile befinden, die beschädigt werden kö
2. Bringen Sie die Bohrungen an, und befestigen Sie das Gerät mit den mitgelieferten
Schneidschrauben (M4 x 14).
TAG INTE IS R OCH G R INGA Ä Ö ÄNDRINGAR. Det kan resultera i en olycka, brand eller elektriska
st tar.ö
FÖRVARA MINDRE FÖREMÅL, SOM T.EX. BATTERIER, UTOM RÄCKHÅLL FÖR BARN. Om något
föremål skulle sväljas, skall en läkare kontaktas omedelbart.
ANV KRINGAR.ÄND RÄTT AMPERETAL VID BYTE AV SÄ Fel amperetal kan orsaka brand eller
elektriska stötar.
ANVÄND BARA ENHETEN I BILAR MED 12-VOLTSYSTEM SOM HAR NEGATIV () JORD.
(Återförsäljaren kan hjälpa dig om du är osäker.) Felaktig anslutning kan resultera i brand, elektriska
stötar eller andra skador.
KOPPLA UR KABELN FR N DET NEGATIVA ( BILBATTERIET INNANÅ –) UTTAGET PÅ
ANSLUTNINGARNA GÖRS. Detta för att undvika risken för elektriska stötar eller olycksfall på
grund av kortslutning.
KAPA INTE BORT KABELMANTELN FR N EN STR MKABEL F R ATT STRÅ Ö Ö Ö Ö ÖMF RS RJA NÅGOT
ANNANT TILLBEHÖR. Det leder till en f r h g kabelbelastning och kan resultera i brand ellerö ö
elektriska stötar.
SE TILL ATT VARKEN R R, V TSKELEDNINGAR ELLER KABLAR VIDR RS, SKADAS ELLERÖ Ä Ö
FÖRHINDRAS VID BORRNING AV HÅL. Undersö å å åk chassit innan h len borras s att inte n gra
slangar, kablar, br nsleledningar eller liknande r kar skadas. Det kan leda till att brand uppstä å år.
MONTERA VARKEN MUTTRAR ELLER BULTAR I N GON DEL AV BROMSSYSTEMET VIDÅ
JORDANSLUTNINGAR. Bultar eller muttrar som hör till någon vätsketank, styr- eller bromssystemet
(eller n got annan system som r av betydelse f r s kerheten) ska ALDRIG anv ndas få ä ö ä ä ör
kabeldragning eller jordanslutning. Anv ndandet av s dana delar kan leda till att fordonetsä å
styrf rm rsö åga fö ämras och orsaka bromsfel, brand eller personskada.
SE TILL ATT INTE KABLARNA TRASSLAR IN SIG I OMGIVANDE FÖREM L. ÅUtför kabeldragningen
enligt anvisningarna f r att undvika arrangemang som kan ventyra k rningen. Kablar ochö ä ö
anslutningar i n rheten av rattst ng, v xelspak, bromspedal och liknande kritiska platser kan varaä å ä
mycket farligt.
DEN H R PRODUKTEN R ENDAST AVSEDD F R MONTERING I BILAR MED 12 VOLTS-SYSTEM.Ä Á Ö
Annan anv ndning kan resultera i brand, elektriska st tar eller andra skador.ä ö
GÖR ANSLUTNINGARNA PÅ KORREKT SÄTT. Felaktiga anslutningar kan orsaka brand eller skador
på enheten.
Svenska
RSIKTIGHET!
Den h r symbolen markerar viktig information. Ignorera inte det som s gs hä ä är
eftersom det kan leda till skador p person eller egendom.å
ANVÄND ALLTID SPECIFICERADE TILLBEHÖR OCH MONTERA TILLBEHÖREN ORDENTLIGT.
Användandet av andra delar än som är avsedda för denna apparat kan leda till att apparaten
skadas inv ndigt eller till ostadig montering p grund av lossnande delar.ä å
MONTERA INTE APPARATEN D R DEN UTS TTS F R FUKT ELLER DAMM.Ä Ä Ö Undvik att installera
enheten p platser d r fukt och damm kan tr nga in och st lla till skador.å ä ä ä
LÅT EN FACKKUNNIG TEKNIKER GÖRA KABELDRAGNINGEN OCH MONTERINGEN.
Kabeldragningen och monteringen av denna apparat kr ver teknisk kunskap och erfarenhet.ä
Kontakta terf rså ö äljaren, som sålde apparaten, för utförandet av säker montering.
DRA KABLARNA RAKA OCH S ATT DE INTE KOMMER I KL M ELLER SKAVER MOT SKARPAÅ Ä
KANTER. Undvik kläm- och nötskador genom att se till att kablarna går fria från rörliga delar (t.ex.
bils tenätenas glidbanor) och skarpa och spetsiga kanter. Om kablarna måste dras genom hål i plå
bör gummibussningar användas som skydd, så att inte kablarna ligger och nöter mot metallen.
Observera ang ende s ker anvå ä ändning
VARNING!
Den h r symbolen markerar viktig information. Ignorera inte det som s gs hä ä är,
eftersom det kan leda till allvarliga olyckor, till och med med d dlig utg ng.ö å
Installation
1. Anvä å änd enheten som mall och h ll den som du t nker montera den och markera var du ska
f gotörborra skruvhålen. Innan du börjar borra bör du p2-ha kontrollerat ordentligt att det inte finns nå
på monteringsytans baksida som kan skadas av borren.
2. Borra hå ö ä älen och skruva fast enheten med de medf ljande sj lvg ngande skruvarna (M4 x 14).
Italiano
NON SMONTARE O MODIFICARE. Tale azione potrebbe causare incidenti, incendi o scosse
elettriche.
TENERE LE PARTI PICCOLE QUALI LE BATTERIE FUORI DALLA PORTATA DEI BAMBINI. Se ingeriti
potrebbero causare gravi danni. In caso di ingerimento, consultare immediatamente un medico.
USARE FUSIBILI DI RICAMBIO DELL'AMPERAGGIO CORRETTO. Altrimenti potrebbero derivarne
incendi o scosse elettriche.
UTILIZZARE SOLO IN VEICOLI CON TERRA NEGATIVA A 12 VOLT (se non si sicuri, controllareè
con il proprio rivenditore). Diversamente si potrebbero causare incendi o altri danni.
PRIMA DI ESEGUIRE I COLLEGAMENTI, SCOLLEGARE IL CAVO DEL TERMINALE NEGATIVO
DELLA BATTERIA. Altrimenti potrebbero derivare scosse elettriche o altre lesioni dovute a
cortocircuiti.
NON UTILIZZARE I CAVI PER EFFETTUARE ALTRI COLLEGAMENTI. Non eliminare mai le parti
isolanti dei cavi per alimentare altri apparecchi. Diversamente la capacità di trasporto di corrente
del cavo in questione viene superata causando incendi o scosse elettriche.
NELL'EFFETTUARE I FORI, NON DANNEGGIARE I TUBI O I CAVI. Nell'effettuare i fori nel telaio per
l'installazione, fare attenzione a non entrare in contatto, danneggiare o ostruire i tubi, i condotti
della benzina, i serbatoi o i cavi elettrici. La non osservanza di queste precauzioni potrebbe causare
incendi.
PER ESEGUIRE I COLLEGAMENTI DI TERRA, NON UTILIZZARE BULLONI O DADI DEI SISTEMI DI
FRENATA O DI STERZO. Non utilizzare MAI bulloni o dadi dei sistemi di frenata e di sterzo (o di
qualsiasi altro sistema di sicurezza), o dei serbatoi per eseguire l'installazione o per i collegamenti
di terra. L'utilizzo di queste parti potrebbe inibire il controllo del veicolo e causare incendi o altro.
EVITARE CHE I CAVI SI IMPIGLINO AGLI OGGETTI CIRCOSTANTI. Effettuare i collegamenti
seguendo le istruzioni in modo che i cavi non interferiscano con la guida. I cavi o i fili che
interferiscono o si impigliano in parti quali lo sterzo, la leva del cambio, i pedali, ecc. potrebbero
essere pericolosi.
UTILIZZARE IL PRODOTTO IN VEICOLI CON BATTERIA DA 12 V. Un utilizzo diverso da quello
indicato potrebbe causare incendi, scosse elettriche o altri incidenti.
ESEGUIRE CORRETTAMENTE I COLLEGAMENTI. Altrimenti ne potrebbero derivarne incendi o
danni al prodotto.
ATTENZIONE
Questo simbolo indica istruzioni importanti. La non osservanza di queste norme
potrebbe causare ferite o provocare danni alle cose.
UTILIZZARE LE PARTI ACCESSORIE SPECIFICATE E INSTALLARLE IN MODO CORRETTO.
Assicurarsi di utilizzare solo parti accessorie specificate. L'utilizzo di altri componenti potrebbe
danneggiare l'apparecchio all'interno o determinare in un'installazione non corretta. I componenti
potrebbero non rimanere collegati in modo saldo e provocare problemi di funzionamento o pericoli.
NON INSTALLARE IN LUOGHI ECCESSIVAMENTE UMIDI O POLVEROSI. Evitare di installare
l'apparecchio in luoghi eccessivamente umidi o polverosi. La presenza di umidit o polvereà
all'interno del prodotto potrebbe causare problemi di funzionamento.
I COLLEGAMENTI E L INSTALLAZIONE DEVONO ESSERE EFFETTUATI DA PERSONALE
QUALIFICATO. I collegamenti e linstallazione dellapparecchio richiedono conoscenze tecniche
ed esperienza particolari. Per ragioni di sicurezza, contattare sempre il rivenditore presso il quale
è ’ stato acquistato il prodotto per eseguire l installazione.
SISTEMARE I CAVI IN MODO CHE NON VENGANO PIEGATI O COMPRESSI DA PARTI METALLICHE
TAGLIENTI. Per evitare che vengano danneggiati o piegati, sistemare i cavi e i fili lontano da parti
mobili (quali le guide dei sedili) o da parti taglienti o aguzze. Se i cavi vengono fatti passare
attraverso un foro metallico, utilizzare un anello di gomma per evitare che l'isolante dei cavi venga
tagliato dal bordo metallico del foro.
Punti da osservare per un uso sicuro
AVVERTIMENTO
Questo simbolo indica istruzioni importanti. La non osservanza di tali norme
potrebbe causare gravi ferite o morte.
Installazione
1. Utilizzare lapparecchio come modello, tenerlo nella posizione di montaggio e contrassegnare i
fori da perforare. Prima di praticare i fori, assicurarsi che dietro la superficie di montaggio non vi
siano oggetti che potrebbero essere danneggiati.
2. Praticare i fori e fissare lapparecchio con le viti autofilettanti (M4 x 14) in dotazione.
Deutsch/Italiano/Svenska
System/Sistema/System
Anschl sse/Collegamenti/Anslutningarü
11
111 Hauptnetzanschluß
22222 Ai-NET-Anschluss
Nur Ai-NET kompatible CD-Wechsler und DAB-Tuner Einheiten können
angeschlossen werden. Alle brigen Ai-NET-Produkte sind nichtü
kompatibel.
33
333 IONBUS-Anschluss
Wird mit einem IONBUS-Kabel an ein mit IONBUS kompatibles
Produkt angeschlossen.
44444 Drosselspule mit Sicherungshalter (7,5A)
55
55
5Batteriekabel (Gelb)
Verbinden Sie dieses Kabel mit dem Pluspol (+) der Fahrzeugbatterie.
66
666 Massekabel (Schwarz)
Legen Sie dieses Kabel an einem geeigneten Punkt der Karosserie
an Masse.
Achten Sie darauf, dass der gew hlte Punkt lack- und fettfrei ist, undä
schrauben Sie das Kabel mit der mitgelieferten Blechschraube gut fest.
77
77
7Eingangskabel f r Tonunterbrechung (Rosa/üSchwarz)
Schließen Sie diese Leitung an eine Mobiltelefon-Schnittstelle an, die
bei Empfang eines Anrufs einen geerdeten Ausgang gew hrleistet.ä
88
88
8IONBUS-Kabel
99999 Ferritkern
Befestigen Sie den Ferritkern (im Lieferumfang enthalten) an beiden
Enden des IONBUS-Kabels und an einer Stelle, an der das Produkt
w hrt.ährend der Installation nicht den Kern berü
(Bringen Sie den Kern beim Anschluss an das Hauptger t an einerä
Stelle ca. 4 cm vom Anschluss entfernt an.)
11111 Connettore di alimentazione
22222 Connettore Ai-NET
Possono essere collegati solo un multilettore CD ed un unit di’ à
sintonizzazione DAB Ai-NET compatibili. Nessun altro prodotto Ai-
NET è compatibile.
33333 Terminale IONBUS
Si collega ad un prodotto compatibile con IONBUS mediante un
cavo IONBUS.
44444 Bobina di arresto con portafusibili (7,5A)
55
555 Cavo batteria (Giallo)
Collegare questo cavo al terminale positivo (+) della batteria del veicolo.
66
66
6Cavo di massa (Nero)
Collegare questo cavo ad una buona massa del telaio del veicolo.
Assicurarsi che il collegamento sia eseguito a metallo nudo e che
sia fissato saldamente con la vite per lamiere in dotazione.
77
77
7Cavo di ingresso interruzione audio (Rosa/Nero)
Collegare questa presa all interfaccia di un telefono cellulare che
fornisce un uscita terra quando di riceve una chiamata.
88888 Cavo IONBUS
99999 Nucleo di ferrite
Fissare il nucleo di ferrite (in dotazione) a entrambe le estremit delà
cavo IONBUS in un punto in cui il prodotto non sia a contatto con il
nucleo durante linstallazione.
(Quando si collega l principale, fissare il nucleo a circa 4 cm’ àunit
dall estremit’ à del terminale.)
11111 Str mf rs rjningskontaktö ö ö
22222 Ai-NET-kontakt
Det g r endast att ansluta en Ai-NET-kompatibel CD-v xlare ochå ä
DAB-tunerenhet. Inga andra Ai-NET-produkter r kompatibla.ä
33333 IONBUS-uttag
Ansluter till en IONBUS-kompatibel produkt med en IONBUS-kabel.
44444 Induktansspole med s llare (7,5A)ä åkringsh
55
555 Batterikabel (Gul)
Anslut denna kabel till bilbatteriets positiva pol (+).
66
66
6Jordkabel (Svart)
Anslut denna kabel till ett st lle i bilens underrede som ger braä
jordning. Se till att kabeln ansluts till blank metall och f sts ordent-ä
ligt med hj lp av den medf ljande plä ö åtskruven.
77
77
7Ingående ljudavbrottskabel (Rosa/Svart)
Anslut denna kabel till ett mobiltelefonsgr nssnitt som f rser medä ö
en jordad utg ng d samtal mottages.å å
88888 IONBUS-kabel
99999 Ferritk rnaä
S da ätt fast en ferritkärna (medföljer) på IONBUS-kabelns bå ändar vid
en punkt d r produkten inte vidr r k rnan vid installationen.ä ö ä
(N när du ansluter till huvudenheten sätter du fast kärnan c:a 4 cm frå
kontakten.)
11111 IONBUS-Anschluss
22222 IONBUS-Kabel
33
333 S-Video-Ausgangsanschluss
44
444 S-Video-Eingangsanschluss
55
55
5S-video-Kabel (im Lieferumfang des Hauptger tes enthalten)ä
66666 DVD-Audioverbindungsanschluss
77
77
7DVD-Audioverbindungskabel (im Lieferumfang des Multimedia Ma-
nager enthalten)
88888 IONBUS-Kabel (im Lieferumfang des Monitors enthalten)
99999 IONBUS-Kabel (im Lieferumfang des KCI-500B-CONVERTER)
ppppp Ai-NET-Anschluss
qq
qqq Ai-NET-Kabel
ww
ww
wAi-NET-Ausgangsanschluss
eeeee Ai-NET-Eingansanschluss
rr
rr
rAi-NET-Kabel (im Lieferumfang des CD-Wechslers enthalten)
aBei der Kombination mit einem KCI-500B können Sie ein mit Ai-NET kompati-
blen Wechsler, DAB-tunerger t an mit IONBUS kompatible Produkteä
anschlie en.ß
aIONBUS kompatible Produkte k nnen in beliebiger Reihenfolge angeschlossenö
werden. Beim links angef hrten Anschlussdiagramm handelt es sich um einü
Beispiel.
aEin zweiter KCI-500B kann nicht an einen KCI-500B IONBUS-Anschluss
angeschlossen werden.
aWenn ein KCA-410C (Versatile Link Erweiterungsbox) mit einem KCI-500B
verwendet wird, k nnen nicht mehr als 2 Ai-NET-Wechsler angeschlossenö
werden.
aLesen Sie hinsichtlich der Einzelheiten die Bedienungsanleitung des anzu-
schließenden Produktes.
*1 Ferritkern
Zwei Teile sind an PXI-H990, KCI-500B, TMI-M990, PXI-H990.
*2Führen Sie den Anschluss an den KCI-500B Ai-NET-Anschluss mit Hilfe eines Ai-
NET-Kabels durch, wenn Sie nur einen CD-Wechsler im System verwenden.
11111 Terminale IONBUS
22222 Cavo IONBUS
33
333 Terminale di uscita video S
44
444 Terminale d'ingresso video S
55
55
5Cavo video S (fornito con Head Unit)
66666 Terminale collegamento audio DVD
77
77
7Cavo collegamento audio DVD (fornito con Multimedia Manager)
88888 Cavo IONBUS (fornito con il monitor)
99999 Cavo IONBUS (in dotazione con il CONVERTER KCI-500B)
ppppp Connettore Ai-NET
qq
qqq Cavo Ai-NET
ww
ww
wConnettore di uscita Ai-NET
eeeee Connettore d ingresso Ai-NET
rr
rr
rCavo Ai-NET (fornito con il cambia-CD)
aIn combinazione a KCI-500B è ’ à possibile collegare un cambia ed un unit di
sintonizzazione DAB Ai-NET compatibile con Ai-NET a prodotti compatibili con
IONBUS.
aI prodotti compatibili con IONBUS possono essere collegati in qualsiasi ordine.
Lo schema fornito a destra un esempio.è
aUn secondo KCI-500B non può essere collegato ad un connettore KCI-500B
IONBUS.
aLutilizzo di un KCA-410C (Terminale Link Versatile) con il connettore KCI-500B
non permette il collegamento di pi di 2 cambia Ai-NET.ù
aPer maggiori dettagli, fate riferimento al manuale istruzioni del prodotto da
collegare.
*1 Nucleo di ferrite
Due componenti sono fissati a KCI-500B, TMI-M990, PXI-H990.
*2Collegare direttamente al connettore KCI-500B Ai-NET mediante il cavo Ai-NET,
quando soltanto un cambia-CD in uso nel sistema.è
11111 IONBUS-uttag
22222 IONBUS-kabel
33
333 S-video-utgang-uttag
44
444 S-video-ingang-uttag
55
55
5S-video-Kabel (medf ljer huvudenheten)ö
66666 DVD-ljudl nksuttagä
77
77
7DVD-ljudlänkskabel (medföljer Multimedia Manager)
88888 IONBUS-kabel (medf ljer Multimedia Manager eller monitor)ö
99999 IONBUS-kabel (medf ljer KCI-500B-CONVERTER)ö
ppppp Ai-NET-kontakt
qq
qqq Ai-NET-kabel
ww
ww
wAi-NET-utgang-kontakt
eeeee Ai-NET-ingang-kontakt
rr
rr
rAi-NET-kabel (medf ljer CD-vö äxlaren)
aNär den kombineras med en KCI-500B kan du ansluta en Ai-NET-kompatibel
växlare och DAB-tunerenhet till IONBUS-kompatibla produkter.
aIONBUS-kompatibla produkter kan anslutas i vilken ordning som helst.
Anslutningsschemat till vä änster r ett exempel.
aEn andra KCI-500B kan inte anslutas till en KCI-500B IONBUS-kontakt.
aOm du anv nder en KCA-410C (Versatile Link Terminal) med KCI-500B kan duä
inte ansluta fler n 2 stycken Ai-NET-vä äxlare.
aLäs i bruksanvisningen för den produkt som ska anslutas för mer information.
*1 Ferritkärna
Två stycken är fästa på KCI-500B, TMI-M990, PXI-H990.
*2Anslut direkt till Ai-NET-kontakten på ä KCI-500B Ai-NET med Ai-NET-kabeln n r du
endast anv nder en CD-v xlare i systemet.ä ä
Deutsch/Italiano/Svenska
45
6
7
8 9
1
2
3
4cm
TMI-M990 DVI-9990R/DVI-9990E
PXI-H990TUA-T100DAB
CHA-S634,
CHA-1214, etc.
IONBUS-kompatibler
Monitor (separat im
Handel erh ltlich)/ä
Monitor compatibile
IONBUS (venduto
separatamente)/
IONBUS-kompatibel
sk rm (s ljs separat)ää
DAB-Tunereinheit
*
(separat im Handel erh ltlich)/ä
Unit sintonizzatore DAB à*
(venduta separatamente)/
DAB-tunerenhet
*
(s ljs separat)ä
IONBUS-kompatibles
Steuerger t (separat im Handel ä
erh ltlich)/ä
Head Unit compatibile con
IONBUS (venduta
separatamente)/
IONBUS-kompatibel
huvudenhet (s ljs separat)ä
IONBUS-kompatibler
Multimedia-Manager
(separat im Handel erh ltlich)/ä
IONBUS Manager Multimedia
compatibile (venduto
separatamente)/
IONBUS-kompatibel Multimedia
Manager (s ljs separat)ä
Ai-NET-kompatibler CD-Wechsler
(separat im Handel erh ltlich)/ä
Caricatore CD compatibile con
Ai-NET (venduto separatamente)/
Ai-NET-kompatibel CD-v xlare ä
(s ljs separat)ä
1
1
1
1
1
8
1
p
q
p
r
ew
3
4
6
6
2
5
7
9
*1
*1
*2
*1
*1
*1
*1


Produkt Specifikationer

Mærke: Alpine
Kategori: Ikke kategoriseret
Model: KCI-500B

Har du brug for hjælp?

Hvis du har brug for hjælp til Alpine KCI-500B stil et spørgsmål nedenfor, og andre brugere vil svare dig