NE PAS DESASSEMBLER NI MODIFIER L’APPAREIL. Il y a risque d’accident, d’incendie ou de choc électrique.
GARDER LES PETITS OBJETS COMME LES PILES HORS DE PORTEE DES ENFANTS. L’ingestion de tels objets peut
entraîner de graves blessures. En cas d’ingestion, consulter immédiatement un médecin.
UTILISER DES FUSIBLES DE L’AMPERAGE APPROPRIE. Il y a risque d’incendie ou de décharge électrique.
A UTILISER UNIQUEMENT SUR DES VOITURES A MASSE NEGATIVE DE 12 VOLTS. (Vériez auprès de votre conces-
sionnaire si vous n’en êtes pas certain.) Il y a risque d’incendie, etc.
AVANT TOUTE CONNEXION, DEBRANCHER LE CABLE DE LA BORNE NEGATIVE DE LA BATTERIE. Il y a risque de
choc électrique ou de blessure par courts-circuits.
NE PAS DENUDER LES CABLES ELECTRIQUES. Ne jamais enlever la gaine isolante pour alimenter un autre appareil. Il y a
risque de dépassement de la capacité de courant et, partant, d’incendie ou de choc électrique.
NE PAS INSTALLER A DES ENDROITS SUSCEPTIBLES D’ENTRAVER LA CONDUITE DU VEHICULE, COMME LE
VOLANT OU LE LEVIER DE VITESSES. La vue vers l’avant pourrait être obstruée ou les mouvements gênés, etc., et
provoquer un accident grave.
NE PAS UTILISER DES ECROUS NI DES BOULONS DU CIRCUIT DE FREINAGE OU DE DIRECTION POUR LES
CONNEXIONS DE MASSE. Les boulons et les écrous utilisés pour les circuits de freinage et de direction (ou de tout autre
système de sécurité) ou les réservoirs ne peuvent JAMAIS être utilisés pour l’installation ou la liaison à la masse. L’utilisation
de ces organes peut désactiver le système de contrôle du véhicule et causer un incendie, etc.
N’ACTIVER AUCUNE FONCTION SUSCEPTIBLE DE DETOURNER VOTRE ATTENTION DE LA CONDUITE DU
VEHICULE. Les fonctions requérant une attention prolongée ne doivent être exploitées qu’à l’arrêt complet du véhicule.
Toujours arrêter le véhicule à un endroit sûr avant d’activer ces fonctions. Il y a risque de provoquer un accident.
NE PAS COINCER LES CABLES AVEC DES OBJETS VOISINS. Positionner les câbles conformément au manuel de manière
à éviter toute obstruction en cours de conduite. Les câbles qui obstruent ou dépassent à des endroits tels que le volant, le
levier de changement de vitesses, la pédale de frein, etc., peuvent s’avérer extrêmement dangereux.
NE PAS ENDOMMAGER DE CONDUITES NI DE CABLES LORS DU FORAGE DES TROUS. Lors du forage de trous dans
le châssis en vue de l’installation, veiller à ne pas entrer en contact, endommager ni obstruer de conduites, de tuyaux à
carburant ou de ls électriques. Le non-respect de cette précaution peut entraîner un incendie
EFFECTUER CORRECTEMENT LES CONNEXIONS. Il y a risque de blessures ou de dommages à l’appareil.
GARDER LE VOLUME A FAIBLE NIVEAU DE MANIERE A POUVOIR ENTENDRE LES BRUITS EXTERIEURS PENDANT
LA CONDUITE. Il y a risque d’accident.
UTILISER CET APPAREIL POUR DES APPLICATIONS MOBILES DE 12 V. Toute utilisation autre que l’application désignée
comporte un risque d’incendie, de choc électrique ou de blessure.
NE PAS INSTALLER LE MONITEUR PRES DU COUSSIN D’AIR DU PASSAGER. Si l’appareil n’est pas installé correcte-
ment, il risque d’empêcher le fonctionnement du coussin d’air, et si le coussin se déploie, l’appareil risque d’être projeté dans
l’habitacle, causant un accident et des blessures.
MINIMISER L’AFFICHAGE EN COURS DE CONDUITE. La visualisation de l’achage peut distraire le conducteur de la
conduite du véhicule et, partant, de provoquer un accident.
NE PAS REGARDER DE VIDEO PENDANT LA CONDUITE. Le visionnage d’un enregistrement vidéo peut distraire le
conducteur de la conduite du véhicule et causer un accident.
INSTALLER L’APPAREIL CORRECTEMENT DE FAÇON A CE QUE LE CONDUCTEUR NE PUISSE PAS REGARDER LA
TV/VIDEO TANT QUE LA VOITURE N’EST PAS A L’ARRET ET LE FREIN A MAIN ACTIONNE. Il est dangereux de regarder
la télévision/vidéo tout en conduisant un véhicule. Si le produit n’est pas correctement installé, le conducteur sera en mesure
de regarder la télévision/vidéo pendant la conduite du véhicule, ce qui risque de le distraire et de causer un accident. Le
conducteur ainsi que d’autres personnes risquent d’être blessées.
FAIRE CHEMINER LE CABLAGE DE MANIERE A NE PAS LE COINCER CONTRE UNE ARETE METALLIQUE. Faire
cheminer les câbles à l’écart des pièces mobiles (comme les rails d’un siège) et des arêtes acérées ou pointues. Cela
évitera ainsi de coincer et d’endommager les câbles. Si un câble passe dans un orice métallique, utiliser un passe-cloison en
caoutchouc pour éviter que la gaine isolante du câble ne soit endommagée par le rebord métallique de l’orice.
UTILISER LES ACCESSOIRES SPECIFIES ET LES INSTALLER CORRECTEMENT. Utiliser uniquement les accessoires
spéciés. L’utilisation d’autres composants que les composants spéciés peut causer des dommages internes à cet appareil
ou son installation risque de ne pas être eectuée correctement. Les pièces utilisées risquent de se desserrer et de provoquer
des dommages ou une défaillance de l’appareil.
NE PAS INSTALLER A DES ENDROITS TRES HUMIDES OU POUSSIEREUX. Eviter d’installer l’appareil à des endroits soumis à une forte
humidité ou à de la poussière en excès. La pénétration d’humidité ou de poussière à l’intérieur de cet appareil risque de provoquer une défaillance.
FAIRE INSTALLER LE CABLAGE ET L’APPAREIL PAR DES EXPERTS. Le câblage et l’installation de cet appareil requiert
des compétences techniques et de l’expérience. Pour garantir la sécurité, faire procéder à l’installation de cet appareil par le
distributeur qui vous l’a vendu.
INTERROMPRE TOUTE UTILISATION EN CAS DE PROBLEME. Le non-respect de cette précaution peut entraîner des
blessures ou endommager l’appareil. Retourner l’appareil auprès du distributeur Alpine agréé ou un centre de service après-
vente Alpine en vue de la réparation.
NO DESMONTE NI ALTERE LA UNIDAD. Si lo hace, podrá ocasionar un accidente, un incendio o una descarga eléctrica.
MANTENGA LOS OBJETOS PEQUEÑOS, COMO LAS PILAS, FUERA DEL ALCANCE DE LOS NIÑOS. La ingestión de
estos objetos puede provocar lesiones graves. Si esto ocurre, consulte con un médico inmediatamente.
UTILICE EL AMPERAJE CORRECTO CUANDO CAMBIE FUSIBLES. De lo contrario, puede producirse un incendio o una descarga eléctrica.
UTILICE LA UNIDAD SOLAMENTE EN VEHÍCULOS QUE TENGAN 12 VOLTIOS CON NEGATIVO A MASA. (Consulte a su
distribuidor en caso de duda.) De no ser así, podría ocasionar un incendio, etc.
ANTES DE EFECTUAR EL CABLEADO, DESCONECTE EL CABLE DEL TERMINAL NEGATIVO DE LA BATERÍA. De no
hacerlo así, podría ocasionar una descarga eléctrica o heridas debido a cortocircuitos eléctricos.
NO EMPALME CABLES ELÉCTRICOS. Nunca corte el aislamiento de un cable para suministrar energía a otro equipo. Esto
hace que la capacidad portadora del cable se supere y puede ser la causa de incendios o descargas eléctricas.
NO INSTALE EL EQUIPO EN LUGARES QUE PUEDAN INTERFERIR CON LA OPERACIÓN DEL VEHÍCULO, COMO EL
VOLANTE DE DIRECCIÓN O LA CAJA DE CAMBIOS DE VELOCIDAD. Esto podría obstaculizar la visibilidad y dicultar el
movimiento, etc. y provocar accidentes graves.
NO UTILICE TUERCAS O PERNOS EN EL SISTEMA DE FRENOS O DE DIRECCIÓN PARA REALIZAR LAS CONEXIO-
NES A MASA. Los pernos o tuercas empleados en los sistemas de freno o de dirección (o en cualquier otro sistema
relacionado con la seguridad del vehículo), o los depósitos, NUNCA deben utilizarse para instalaciones de cableado o
conexión a masa. Si utiliza tales partes podrá incapacitar el control del vehículo y provocar un incendio, etc.
NO REALICE NINGUNA OPERACIÓN QUE PUEDA DISTRAER SU ATENCIÓN Y COMPROMETER LA SEGURIDAD DURANTE LA CONDUCCIÓN
DEL VEHÍCULO. Las operaciones que requieren su atención durante más tiempo sólo deben realizarse después de detener completamente el vehículo.
Estacione el vehículo en un lugar seguro antes de realizar dichas operaciones. De lo contrario, podría ocasionar un accidente.
MPIDA QUE LOS CABLES SE ENREDEN CON LOS OBJETOS SITUADOS ALREDEDOR. Disponga la instalación eléctrica y los cables
conforme a lo descrito en el manual para evitar obstáculos durante la conducción. Los cables que obstaculizan la conducción o que cuelgan de
partes del vehículo como el volante de dirección, la palanca de cambios, los pedales de freno, etc., se consideran extremadamente peligrosos.
EVITE DAÑAR LOS TUBOS Y EL CABLEADO CUANDO TALADRE AGUJEROS. Si taladra agujeros en el chasis durante la
instalación, tome las precauciones necesarias para no rozar, dañar u obstruir los tubos, las tuberías de combustible, los
depósitos o el cableado eléctrico. De lo contrario, podría provocar un incendio.
REALICE LAS CONEXIONES CORRECTAMENTE. Una conexión incorrecta puede producir un incendio o dañar el equipo.
MANTENGA EL VOLUMEN A UN NIVEL QUE NO LE IMPIDA ESCUCHAR LOS SONIDOS DEL EXTERIOR MIENTRAS
CONDUCE. De no ser así, podría ocasionar un accidente.
UTILICE ESTE PRODUCTO CON APLICACIONES MÓVILES DE 12 V. Si se emplea para otra aplicación distinta de la
prevista, podría producirse un incendio, una descarga eléctrica u otras lesiones.
NO INSTALE EL MONITOR CERCA DEL AIRBAG DEL ASIENTO DEL PASAJERO. Si el aparato no está bien instalado, el
airbag podrá no funcionar correctamente y, cuando se despliegue el airbag, podrá hacer que el monitor salga despedido hacia
arriba y ocasionar un accidente y heridas.
REDUZCA AL MÁXIMO LA VISUALIZACIÓN DE LA PANTALLA MIENTRAS CONDUCE. El conductor puede distraer su
atención de la carretera mientras mira la pantalla y ocasionar un accidente.
NO MIRE EL VÍDEO MIENTRAS CONDUCE. El conductor puede distraer su atención de la carretera mientras mira el
vídeo y ocasionar un accidente.
INSTALE LA UNIDAD CORRECTAMENTE PARA QUE EL CONDUCTOR NO PUEDA VER EL VIDEO/TELEVISOR A
MENOS QUE EL VEHÍCULO SE ENCUENTRE PARADO Y SE HAYA ACCIONADO EL FRENO DE MANO. Ver el vídeo/
televisor mientras se conduce se considera peligroso. Si la unidad no se instala correctamente, el conductor podrá ver el
vídeo/televisor y distraerse mientras conduce, incrementando el riesgo de accidente. Esto podría causar heridas graves al
conductor y a otras personas.
DISPONGA EL CABLEADO DE FORMA QUE LOS CABLES NO SE DOBLEN, NO SE CONTRAIGAN NI ROCEN UN
BORDE METÁLICO AFILADO. Aleje los cables y el cableado de piezas móviles (como los raíles de los asientos) o de bordes
puntiagudos o alados. De esta forma evitará dobleces y daños en el cableado. Si los cables se introducen por un oricio de
metal, utilice una arandela de goma para evitar que el borde metálico del oricio corte el aislamiento del cable.
UTILICE LOS ACCESORIOS ESPECIFICADOS E INSTÁLELOS CORRECTAMENTE. Asegúrese de utilizar los accesorios
especicados solamente. La utilización de otras piezas no designadas puede ser la causa de daños en el interior de la unidad
o de una instalación incorrecta. Las piezas pueden aojarse, lo que, además de ser peligroso, puede provocar averías.
NO INSTALE LA UNIDAD EN LUGARES MUY HÚMEDOS O LLENOS DE POLVO. Evite instalar la unidad en lugares con
altos índices de humedad o polvo. Si entra polvo o humedad, el equipo puede averiarse.
CONFÍE EL CABLEADO Y LA INSTALACIÓN A PROFESIONALES. El cableado y la instalación de este equipo requieren
una competencia y experiencia técnica conrmada. Para garantizar la seguridad, póngase siempre en contacto con el
distribuidor al que p1-ha comprado el equipo para conarle estas tareas.
DEJE DE USAR LA UNIDAD INMEDIATAMENTE SI APARECE ALGÚN PROBLEMA. Su uso en estas condiciones podría
ocasionar lesiones personales o daños al producto. Lleve la unidad a un distribuidor Alpine autorizado o al Centro de servicio
Alpine más próximo para repararla.
DO NOT DISASSEMBLE OR ALTER. Doing so may result in an accident, re or electric shock.
KEEP SMALL OBJECTS SUCH AS BATTERIES OUT OF THE REACH OF CHILDREN. Swallowing them may result in
serious injury. If swallowed, consult a physician immediately.
USE THE CORRECT AMPERE RATING WHEN REPLACING FUSES. Failure to do so may result in re or electric shock.
USE ONLY IN CARS WITH A 12 VOLT NEGATIVE GROUND. (Check with your dealer if you are not sure.) Failure to do so
BEFORE WIRING, DISCONNECT THE CABLE FROM THE NEGATIVE BATTERY TERMINAL. Failure to do so may result in
electric shock or injury due to electrical shorts.
DO NOT SPLICE INTO ELECTRICAL CABLES. Never cut away cable insulation to supply power to other equipment. Doing
so will exceed the current carrying capacity of the wire and result in re or electric shock.
DO NOT INSTALL IN LOCATIONS WHICH MIGHT HINDER VEHICLE OPERATION, SUCH AS THE STEERING WHEEL OR
GEARSHIFT. Doing so may obstruct forward vision or hamper movement etc. and results in serious accident.
DO NOT USE BOLTS OR NUTS IN THE BRAKE OR STEERING SYSTEMS TO MAKE GROUND CONNECTIONS. Bolts or
nuts used for the brake or steering systems (or any other safety-related system), or tanks should NEVER be used for
installations or ground connections. Using such parts could disable control of the vehicle and cause re etc.
DO NOT OPERATE ANY FUNCTION THAT TAKES YOUR ATTENTION AWAY FROM SAFELY DRIVING YOUR VEHICLE.
Any function that requires your prolonged attention should only be performed after coming to a complete stop. Always stop the
vehicle in a safe location before performing these functions. Failure to do so may result in an accident.
DO NOT ALLOW CABLES TO BECOME ENTANGLED IN SURROUNDING OBJECTS. Arrange wiring and cables in
compliance with the manual to prevent obstructions when driving. Cables or wiring that obstruct or hang up on places such as
the steering wheel, gear lever, brake pedals, etc. can be extremely hazardous.
DO NOT DAMAGE PIPE OR WIRING WHEN DRILLING HOLES. When drilling holes in the chassis for installation, take
precautions so as not to contact, damage or obstruct pipes, fuel lines, tanks or electrical wiring. Failure to take such precau-
MAKE THE CORRECT CONNECTIONS. Failure to make the proper connections may result in re or product damage.
KEEP THE VOLUME AT A LEVEL WHERE YOU CAN STILL HEAR OUTSIDE NOISE WHILE DRIVING. Failure to do so may
USE THIS PRODUCT FOR MOBILE 12V APPLICATIONS. Use for other than its designed application may result in re,
electric shock or other injury.
DO NOT INSTALL THE MONITOR NEAR THE PASSENGER SEAT AIR BAG. If the unit is not installed correctly the air bag
may not function correctly and when triggered the air bag may cause the monitor to spring upwards causing an accident and
MINIMIZE DISPLAY VIEWING WHILE DRIVING. Viewing the display may distract the driver from looking ahead of the vehicle
DO NOT WATCH VIDEO WHILE DRIVING. Watching the video may distract the driver from looking ahead of the vehicle and
INSTALL THE PRODUCT CORRECTLY SO THAT THE DRIVER CANNOT WATCH TV/VIDEO UNLESS THE VEHICLE IS
STOPPED AND THE EMERGENCY BRAKE IS APPLIED. It is dangerous (and illegal in many states) for the driver to watch
TV/Video while driving a vehicle. Installing this product incorrectly enables the driver to watch TV/Video while driving. This may
cause a distraction, preventing the driver from looking ahead, thus causing an accident. The driver or other people could be
ARRANGE THE WIRING SO IT IS NOT CRIMPED OR PINCHED BY A SHARP METAL EDGE. Route the cables and wiring
away from moving parts (like the seat rails) or sharp or pointed edges. This will prevent crimping and damage to the wiring. If
wiring passes through a hole in metal, use a rubber grommet to prevent the wire's insulation from being cut by the metal edge
USE SPECIFIED ACCESSORY PARTS AND INSTALL THEM SECURELY. Be sure to use only the specied accessory parts.
Use of other than designated parts may damage this unit internally or may not securely install the unit in place. This may cause
parts to become loose resulting in hazards or product failure.
DO NOT INSTALL IN LOCATIONS WITH HIGH MOISTURE OR DUST. Avoid installing the unit in locations with high
incidence of moisture or dust. Moisture or dust that penetrates into this unit may result in product failure.
HAVE THE WIRING AND INSTALLATION DONE BY EXPERTS. The wiring and installation of this unit requires special technical
skill and experience. To ensure safety, always contact the dealer where you purchased this product to have the work done.
HALT USE IMMEDIATELY IF A PROBLEM APPEARS. Failure to do so may cause personal injury or damage to the product.
Return it to your authorized Alpine dealer or the nearest Alpine Service Center for repairing.
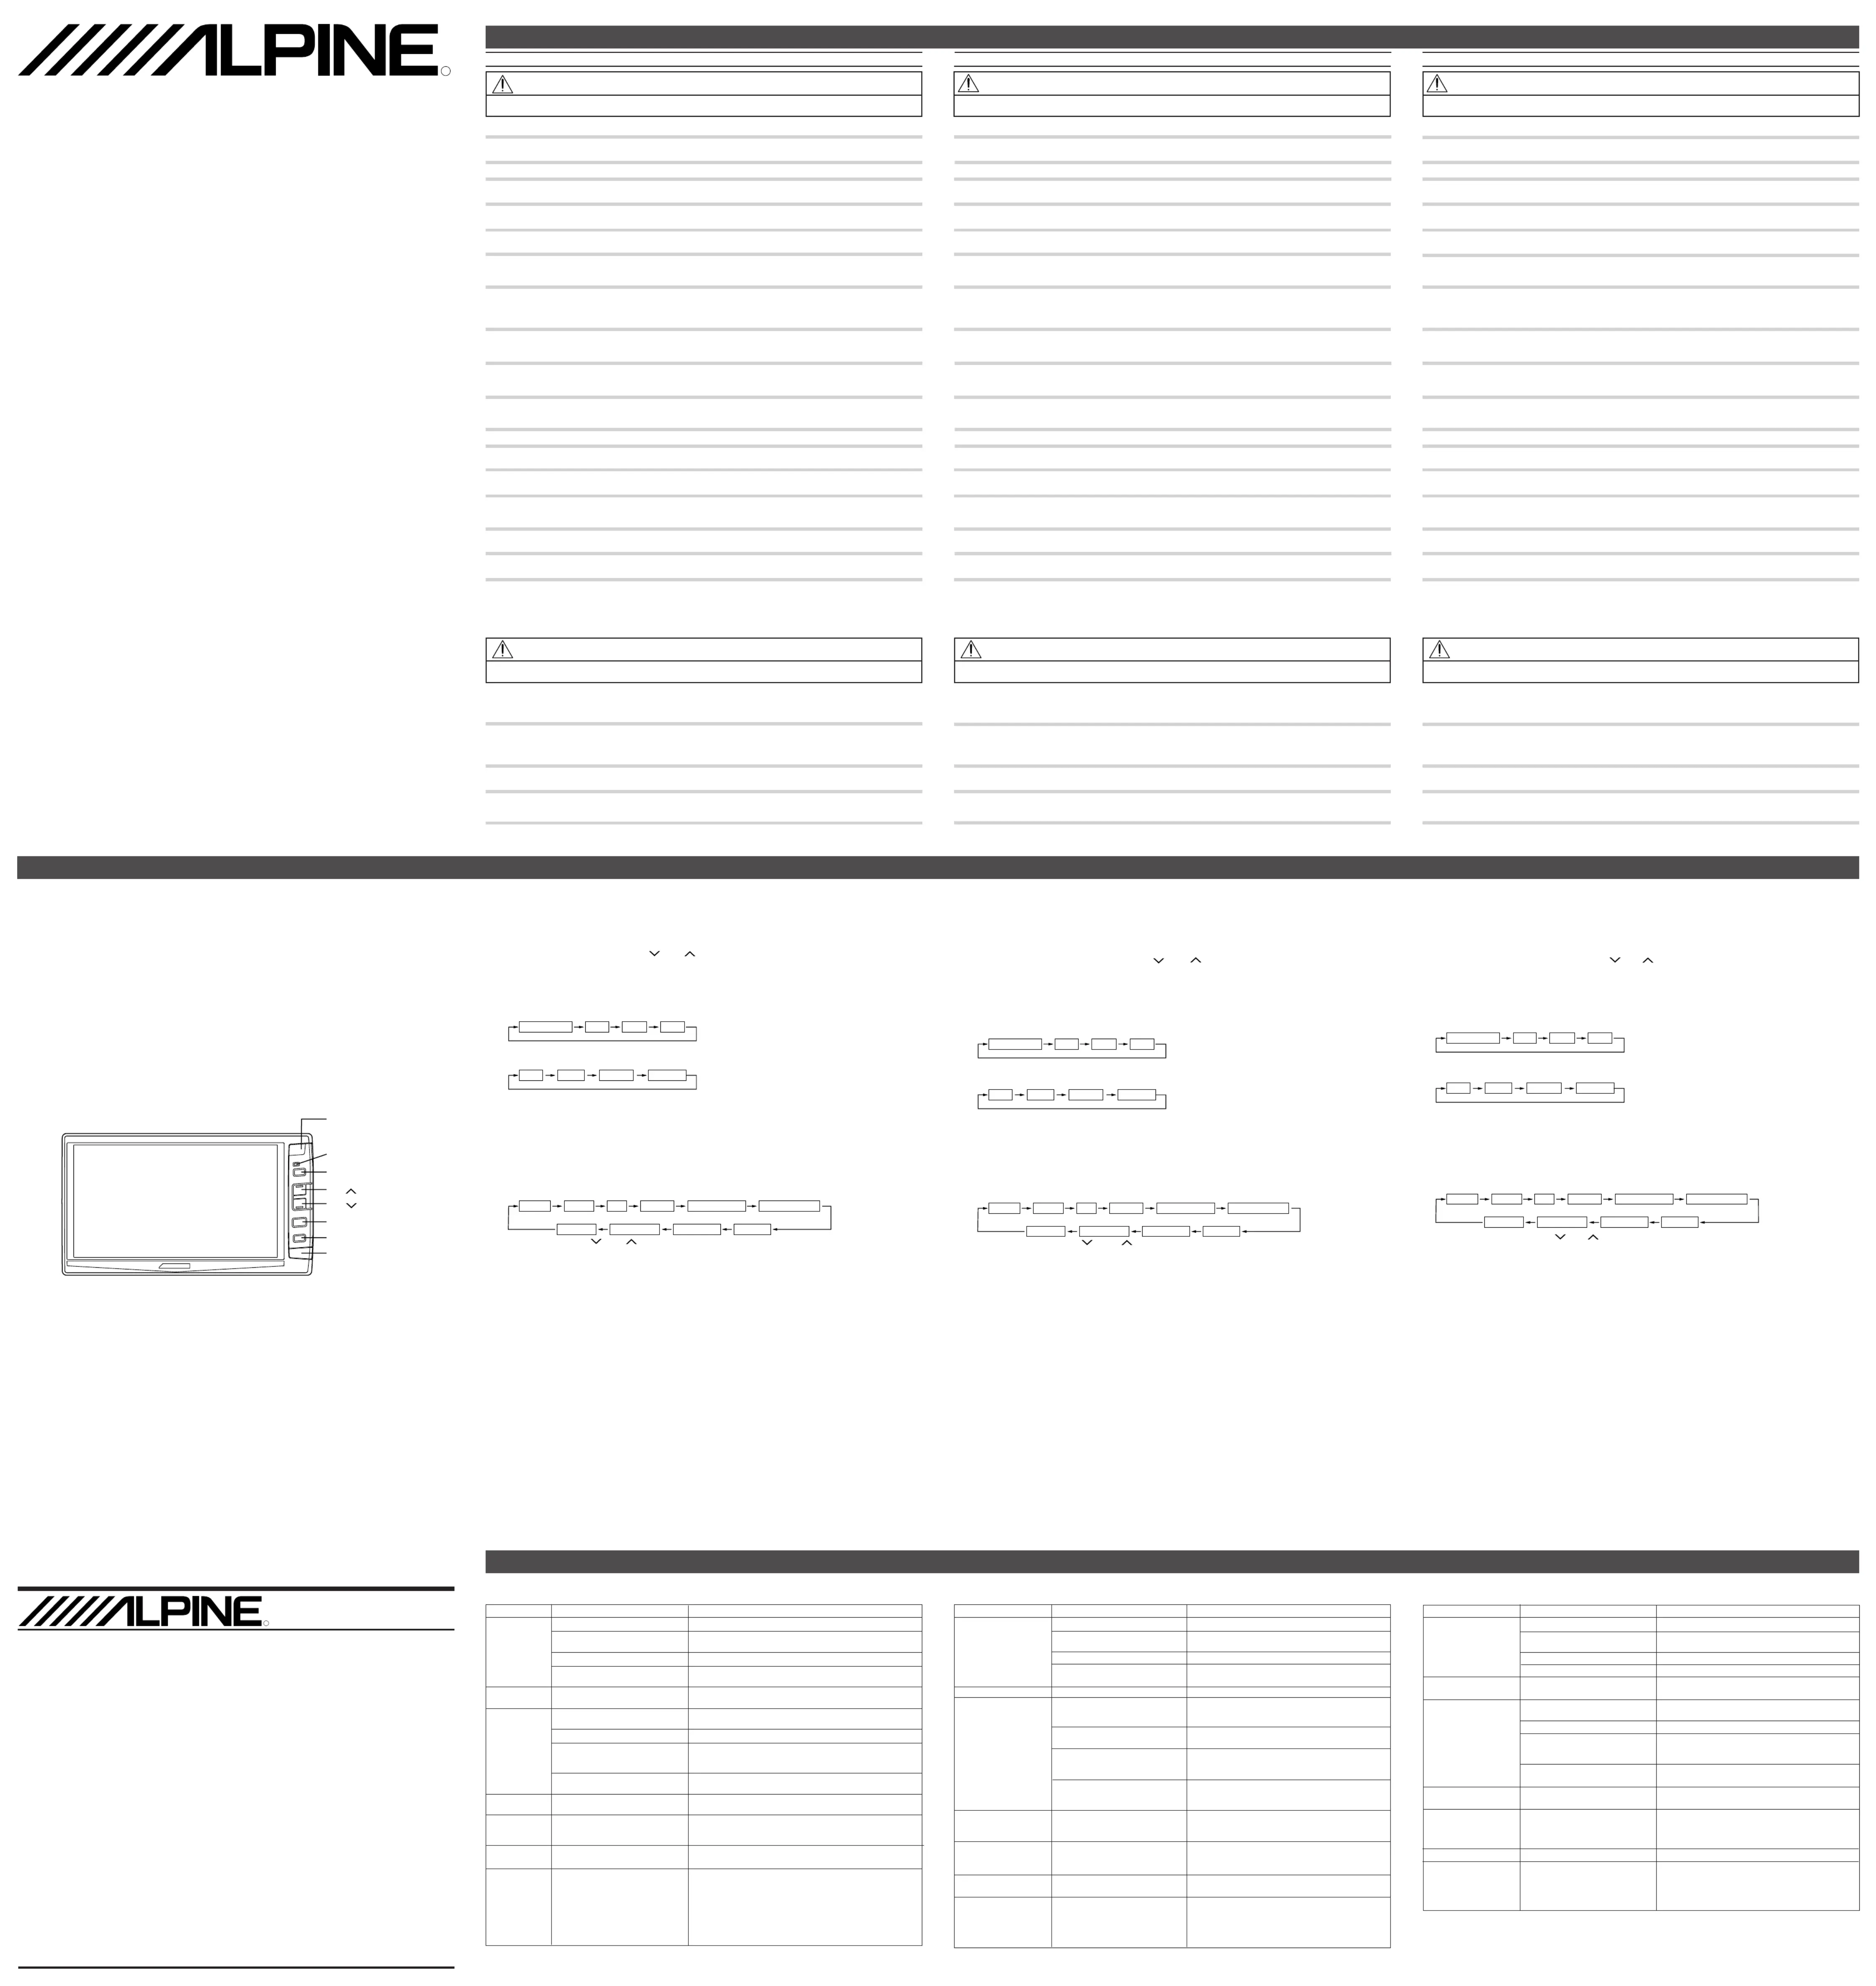
2 To turn o the POWER, press the button again.PWR
If properly connected, the monitors main POWER will turn o when the vehicle's ignition switch is o. If the main power
lamp illuminates in the STAND BY mode, the vehicle's battery may be discharged.
1 Adjust the volume level by pressing the DN
Switch the movie output type NTSC/PAL in AUX1, AUX2 and/or AUX3 mode.
1 Press the button for at least 1 second.DISP
Note: When the movie output type is not compatible, the movie does not output normally.
1 Press the button. Each press of the button will cycle through the modes as follows:SELECT
Switching the display mode.
Each press of the button will cycle through the modes as follows:
WIDE: Normal images are expanded uniformly in the horizontal direction and are displayed over the entire screen.
ZOOM: Normal images are expanded in the horizontal direction and are displayed over the entire screen. The
expansion ratio increases towards the right and left edges of the screen.
CINEMA: Normal images are expanded in the horizontal and vertical directions. The top and bottom of the image is cut
o. This mode is suited for 16:9 cinema size images.
NORMAL: Normal image (4:3)
1 Press and hold the button for at least 1 second.SELECT
2 Each press of the button will cycle through the modes as follows:
3 Adjust by pressing the DN
•BRIGHT: Allows the brightness of the picture.
•COLOR: Change the color balance of the picture.
Note: It is not adjustable in NAVIGATION (RGB connection) mode.
•TINT: Adjust the tint of the picture.
Note: It is not adjustable in NAVIGATION (RGB connection) mode.
AUTO: Display illumination can be adjusted automatically depending on the brightness in the car. (Within the range
of AUTO-HI LEVEL and AUTO LO-LEVEL)
LOW: Backlighting is set to its lowest level.
HIGH: Backlighting is set to its maximum level.
•AUTO HI-LEVEL: Adjusts the HI-LEVEL (16 to MAX) of the dimmer interconnected with the auto mode.
•AUTO LO-LEVEL: Adjusts the LO-LEVEL (MIN to 15) of the dimmer interconnected with the auto mode.
LINK: Output the video/audio portion shown on the main monitor, to the rear monitor.
NAV.: Output the navigation video/audio to the rear monitor. (Only when navigation unit is connected.)
AUX1: Output the AUX1 video/audio to the rear monitor.
AUX2: Output the AUX2 video/audio to the rear monitor.
AUX3: Output the AUX3 (back camera) video/audio to the rear monitor.
MONITOR: Outputs sound through the built-in speakers.
HEADPHONES: Outputs sound to headphones if connected.
* Note that sound will not be output unless the audio output settings are appropriate.
•VOL. OFFSET: The volume can be ne-adjusted for individual sources.
•MONITOR: Not currently used.
4 After completing adjustments, press and hold the button for at least 1 second.SELECT
•After turning the system o, a slight ghost of the image will remain temporarily. This is an eect peculiar to LCD technology
•Under cold temperature conditions, the screen may lose contrast temporarily. After a short warm-up period, it will return to normal.
•The LCD panel is manufactured using an extremely high precision manufacturing technology. Its eective pixel ratio is over
99.99%. This means that there is a possibility that 0.01% of the pixels could be either always ON or OFF.
Please read before using this equipment.
Veuillez lire ce mode d'emploi avant la mise en service de l'appareil.
Por favor, léalo antes de utilizar este equipo.
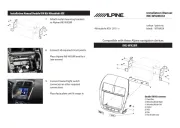
6.5-INCH WIDE LCD COLOR MONITOR
* Le remplacement du tube uorescent n'est pas gratuit même pendant la période de garantie, car le tube est un
En cas de problème, consulter la liste de vérications suivantes. Ce guide devrait vous aider à résoudre tout problème
provenant de l'appareil. Sinon, vérier les connexions du reste du système ou consulter un revendeur Alpine autorisé.
Points à respecter pour une utilisation sûre
Points to Observe for Safe Usage
PROCESS FACTORY IN P. R. C. FU SHUN INDUSTRIAL FACTORY
Xintian Village, Fuyong Town, Bao An County, Shenzhen, P. R. C.
* The uorescent tube replacement is not free of charge even within the warranty period, for the tube is an article of
If you encounter a problem, please review the items in the following check list. This guide will help you isolate the problem if the
unit is at fault. Otherwise, make sure the rest of your system is properly connected or consult your authorized Alpine dealer.
Vehicle's battery is weak.
Fluorescent tube is exhausted.
Brightness control is set for
minimum brightness control.
Incorrect setting of the VCR mode.
Protective circuit is on because of
Incorrect or open connection with
the Monitor, AV Interface unit.
Brightness/Color/Tint control are not
set to the proper positions.
Caused by neon signs, high-voltage
power lines, CB transmitter, other
vehicle's ignition plugs, etc.
Monitor's power is not turned on.
Navigation system’s power is turned
Check the cause and replace the fuse.
Check connection and remedy.
Check the voltage of vehicle's battery.
Replace the uorescent tube*.
Switch to the correct mode.
Wait until the temperature inside the vehicle comes down to the
operating temperature range (45°C).
Check the connection and remedy.
Change the location of your vehicle.
Turn on the monitor's power.
Press the ON/OFF (POWER) button on the navigation system’s
remote controller to turn the navigation system’s power on.
Affichage d'image pas nette.
La couleur de l'image est
L'écran de navigation n'est
Vérier la cause et remplacer le fusible.
Vérier la connexion et la corriger.
Vérier la tension de la batterie du véhicule.
Remplacer le tube fluorescent*.
Commuter au mode correct.
Attendre que la température à l'intérieur du véhicule descende
jusqu'à la plage de température de fonctionnement (45°C).
Vérier la connexion et la corriger.
Modier l'emplacement de votre véhicule.
Mettre le moniteur sous tension.
Appuyer sur la touche ON/OFF (POWER) sur la
télécommande du système de navigation pour allumer le
L'allumage de la voiture est coupé.
Pas de fusible ou le fusible est grillé.
La batterie du véhicule est faible.
Le tube uorescent est épuisé.
La commande de luminosité est réglée
pour une commande de luminosité
Réglage incorrect du mode
Le circuit de protection est activé à
cause d'une température élevée.
Connexion incorrecte ou ouverte
avec le moniteur, l'unité interface
La commande de luminosité/couleur/
teinte n'est pas réglée sur les
Provoqué par des signes néon, des
lignes haute tension, des émetteurs CB,
l'allumage des autres véhicules, etc.
Le moniteur n'est pas sous tension.
Le système de navigation est éteint.
Puntos a tener en cuenta para una cuidadosa utilización
Si se presenta un problema, revise por favor los puntos que se mencionan en la siguiente lista de comprobación. Esta guía
le permitirá aislar el problema si falla la unidad. En última instancia compruebe que el resto de los sistemas estén bien
conectados o acuda a un distribuidor autorizado de Alpine.
En cas de problème En caso de dicultad
* El tubo uorescente de recambio no es gratis, ni en el periodo de garantía, por tratarse de un artículo consumible.
El encendido del coche está apagado.
No hay fusible o se p1-ha fundido.
La batería del coche está baja.
El tubo uorescente está descarga-
El control de brillo está programado
para un control mínimo de brillo.
Mal ajuste de la función VCR.
El circuito de protección se ha
activado por la elevada temperatura.
Conexión incorrecta o abierta con la
unidad de conexión AV, el monitor.
Los controles de Brillo/Color/Tono no
están en la posición correcta.
Causado por señales de neón, líneas
de alto voltaje, transmisor CB,
enchufes de encendido correspondien-
tes a otro vehículo, etc.
No se enciende el monitor.
La alimentación del sistema de
navegación está desactivada.
No funciona, o no aparece
La pantalla de navegación
Ponga en marcha el encendido.
Compruebe la causa y cambie el fusible.
Compruebe las conexiones y corríjalas.
Compruebe el voltaje de la batería del vehículo.
Cambie el tubo uorescente*.
Seleccione el modo correcto.
Espere hasta que la temperatura interior del vehículo
baje hasta el nivel de temperatura de funcionamiento
Compruebe las conexiones y corríjalas.
Compruebe todos los controles.
Cambie la situación de su vehículo.
Active la alimentación del monitor.
Pulse el botón ON/OFF (POWER) en el mando a
distancia del sistema de navegación para activar dicho
2 Pour couper l'alimentation, presser de nouveau le bouton PWR.
S'ils sont correctement raccordés, l’alimentation principale (POWER) des moniteurs s’éteindra quand le commutateur de
l’allumage du véhicule sera éteint. Si le témoin de l’alimentation principale s’illumine pendant le mode STAND BY, la
batterie du véhicule pourrait se décharger.
1 Régler le niveau de volume en pressant le bouton DN
Permet de commuter le type de sortie de lm entre NTSC/PAL en mode AUX1, AUX2 et/ou AUX3.
1 Appuyez sur le bouton pendant 1 seconde au minimum.DISP
Remarque: Si le type de sortie de lm n’est pas compatible avec ces standards, le lm ne sera pas reproduit correctement.
1 Appuyez sur la touche SELECT. A chaque pression sur la touche, il y aura commutation entre les diérents modes de la
Changement de mode d’achage.
1 Appuyez sur le bouton DISP.
A chaque pression sur la touche, il y aura commutation entre les diérents modes de la façon suivante:
WIDE: Les images normales sont proportionnellement agrandies dans la direction horizontale et sont achées sur
ZOOM: Les images normales sont agrandies dans la direction horizontale et sont achées sur la totalité de l’écran.
Le rapport d’expansion augmente vers la droite et vers la gauche de l’écran.
CINEMA: Les images normales sont agrandies dans la direction horizontale et verticale. Le haut et le bas de l’image
sont tronqués. Ce mode est particulièrement adapté aux images au format écran large 16:9 èmes.
NORMAL: Image normale (4:3)
1 Appuyez et maintenez votre doigt sur la touche pendant au moins 1 seconde.SELECT
2 A chaque pression sur la touche fera passer de mode en mode dans l’ordre suivant:
3 Régler en pressant le bouton DN
•BRIGHT: Permet la luminosité de l’image.
•COLOR : Change la balance des couleurs de l’image.
Remarque : Ce paramètre n’est pas réglable en mode NAVIGATION (connexion RGB).
•TINT: Permet de régler la teinte de l’image.
Remarque : Ce paramètre n’est pas réglable en mode NAVIGATION (connexion RGB).
AUTO: La brillance de l’achage peut être réglée automatiquement en fonction de la luminance dans la voiture. (Dans la
plage de réglage de AUTO HI-LEVEL et AUTO LO-LEVEL)
LOW: Le rétro éclairage est réglé à son niveau le plus bas.
HIGH: Le rétro éclairage est réglé à son niveau le plus haut.
•AUTO-HI-LEVEL: Règle le HI-LEVEL (16 à MAX) de l’atténuateur interconnecté avec le mode auto.
•AUTO LO-LEVEL: Règle le LO-LEVEL (MIN à 15) de l’atténuateur interconnecté avec le mode auto.
LINK: Envoie la partie vidéo/audio achée sur le moniteur principal vers le moniteur arrière.
NAV.: Envoie la partie vidéo/audio de navigation vers le moniteur arrière. (Uniquement si l’unité de navigation est
AUX1: Envoie les données vidéo/audio du AUX1 vers le moniteur arrière.
AUX2: Envoie les données vidéo/audio du AUX2 vers le moniteur arrière.
AUX3: Envoie les données vidéo/audio du AUX3 (caméra arrière) vers le moniteur arrière.
MONITOR: Envoie le son vers les enceintes intégrées.
HEADPHONES: Envoie le son vers le casque d’écoute s'il est connecté.
* Veuillez cependant noter que le son ne sera pas reproduit jusqu’à ce que tous les réglages de sortie audio soient
•VOL. OFFSET: Le volume peut être réglé nement pour chaque source individuellement.
•MONITOR: Non utilisé actuellement.
4 Après avoir complété les réglages, appuyez et maintenez votre doigt sur la touche pendant au moins 1 seconde.SELECT
•Après avoir éteint le système, un léger spectre d’image reste temporairement. C’est un effet normal, particulier à la technologie LCD.
•A des conditions de basses températures, l’écran peut perdre temporairement de son contraste. Après une courte période
dé réchauement, il reviendra à la normale.
•Le panneau LCD est fabriqué en faisant appel à des technologies de très haute précision et comporte plus de 99,99% de
pixels eectifs. Il est cependant possible qu'il comprenne 0,01% de pixels manquants ou continuellement allumés.
ENCENDIDO/APAGADO de la pantalla (ON/OFF)
2 Para apagar apriete nuevamente el botón PWR.
Si se han realizado las conexiones correctamente, la alimentación principal (POWER) de los monitores se apagará cuando
se desconecte la llave de encendido del vehículo moviéndola a la posición OFF. Si se ilumina la lámpara de alimentación
principal en el modo STAND BY (preparado), la batería del vehículo puede descargarse.
1 Ajuste el nivel de sonido presionando el botón DN
Cambie el tipo de salida de lme NTSC/PAL en el modo AUX1, AUX2 y/o AUX3.
1 Pulse el botón durante por lo menos 1 segundo.DISP
Nota: Cuando el tipo de salida de lme no es compatible, el lme no sale normalmente.
1 Pulse el botón . Cada vez que pulse el botón pasará por los modos de la siguiente forma:SELECT
Cambio del modo de visualización.
Cada vez que pulse el botón pasará por los modos de la siguiente forma:
WIDE: Las imágenes normales se expanden uniformemente en dirección horizontal y se visualizan sobre toda la
ZOOM: Las imágenes normales se expanden en dirección horizontal y se visualizan sobre toda la pantalla. La razón de
expansión aumenta hacia los bordes de la derecha e izquierda de la pantalla.
CINEMA: Las imágenes normales se expanden en dirección horizontal y vertical. Se corta la parte superior e inferior de
la imagen. Este modo se ajusta a las imágenes de tamaño cine 16:9.
NORMAL: Imagen normal (4:3)
1 Presione y mantenga presionado el botón por lo menos 1 segundo.SELECT
2 Cada vez que presione el botón se cambiarán los modos en el siguiente ciclo:
3 Ajústelo presionando el botón DN
•BRIGHT (brillo): Permite el ajuste del brillo de la imagen.
•COLOR: Cambia el balance del color de la imagen.
Nota: No es ajustable en el modo NAVIGATION (conexión RGB).
•TINT: Ajuste el matiz de la imagen.
Nota: No es ajustable en el modo NAVIGATION (conexión RGB).
AUTO: La iluminación de la pantalla de visualización se puede ajustar automáticamente dependiendo del brillo en el
coche. (Dentro del margen de AUTO HI-LEVEL y AUTO LO-LEVEL)
LOW: La iluminación de fondo queda ajustada a su nivel más bajo.
HIGH: La iluminación de fondo queda ajustada a su nivel máximo.
•AUTO-HI-LEVEL: Ajusta el HI-LEVEL (16 a MAX) del reductor de luz interconectado con el modo automático.
•AUTO LO-LEVEL: Ajusta el LO-LEVEL (MIN a 15) del reductor de luz interconectado con el modo automático.
LINK: Envia la parte de la salida de video/audio mostrada en el monitor principal, al monitor trasero.
NAV.: Envia el video/audio de la navegación al monitor trasero. (Sólo cuando la unidad de navegación está conectada).
AUX1: Envia el video/audio AUX1 al monitor trasero.
AUX2: Envia el video/audio AUX2 al monitor trasero.
AUX3: Envia el video/audio AUX3 (cámara de la parte trasera) al monitor trasero.
MONITOR: Salida del sonido a través de los altavoces incorporados.
HEADPHONES: Salida del sonido a los auriculares si están conectados.
* Tenga en cuenta que el sonido no se emitirá a menos que los ajustes de salida de audio sean los apropiados.
•VOL. OFFSET: Se puede realizar un ajuste no del volumen para fuentes individuales.
•MONITOR: No se usa actualmente.
4 Una vez realizados los ajustes, pulse y mantenga presionado el botón por lo menos 1 segundo.SELECT
•Después de desconectar el sistema, perdurará temporalmente una silueta débil de la imagen. Este es un efecto peculiar y
normal de la tecnología LCD.
•Bajo condiciones de bajas temperaturas, la pantalla puede perder contraste temporalmente. Después de un período corto
de calentamiento, volverá a su estado normal.
•El panel LCD está fabricado con tecnología de alta precisión y dispone de más del 99,99% de píxeles efectivos. Tenga en
cuenta que es posible que falte el 0,01% de píxeles o que dicho porcentaje de los mismos esté continuamente iluminado.
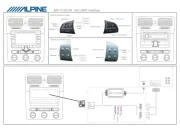
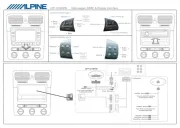
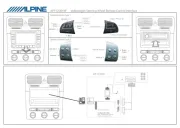
NAVIGATION AUX1 AUX2 AUX3
BRIGHT COLOR TINT DIMMER AUTO HI-LEVEL AUTO LO-LEVEL
SOUND OUT AUX OUTMONITOR VOL. OFFSET
NAVIGATION AUX1 AUX2 AUX3
BRIGHT COLOR TINT DIMMER AUTO HI-LEVEL AUTO LO-LEVEL
SOUND OUT AUX OUTMONITOR VOL. OFFSET
NAVIGATION AUX1 AUX2 AUX3
BRIGHT COLOR TINT DIMMER AUTO HI-LEVEL AUTO LO-LEVEL
SOUND OUT AUX OUTMONITOR VOL. OFFSET
ALPINE ELECTRONICS MARKETING, INC.
Shinagawa-ku, Tokyo 141-0031, Japan
ALPINE ELECTRONICS OF AMERICA, INC.
19145 Gramercy Place, Torrance,
Phone 1-800-ALPINE-1 (1-800-257-4631)
ALPINE ELECTRONICS OF CANADA, INC.
7300 Warden Ave., Suite 203, Markham,
Phone 1-800-ALPINE-1 (1-800-257-4631)
ALPINE ELECTRONICS OF AUSTRALIA PTY. LTD.
6-8 Fiveways Boulevarde Keysborough,
Kreuzerkamp 7, 40878 Ratingen, Germany
ALPINE ELECTRONICS OF U.K. LTD.
ALPINE ELECTRONICS FRANCE S.A.R.L.
(RCS PONTOISE B 338 101 280)
98, Rue de la Belle Etoile, Z.I. Paris
Nord II, B.P. 50016, 95945 Roissy
Charles de Gaulle Cedex, France
20090 Trezzano Sul Naviglio (MI), Italy
ALPINE ELECTRONICS DE ESPAÑA, S.A.
Portal de Gamarra 36, Pabellón, 32
01013 Vitoria (Alava) - APDO 133, Spain
This symbol means important instructions.
Failure to heed them can result in serious injury or death.
Este símbolo indica que las instrucciones son importantes.
De no tenerse en cuenta, podría ocasionarse heridas graves o muerte.
Cette étiquette a pour but de prévenir l'utilisateur de la présence d'instructions importantes.
Si ces instructions ne sont pas suivies, des blessures graves ou mortelles risquent d'être occasionnées.
Este símbolo indica que las instrucciones son importantes.
De no tenerse en cuenta, podría ocasionarse heridas graves o daños materiales.
This symbol means important instructions.
Failure to heed them can result in injury or material property damage.
Lampe d’alimentation principale/
Lámpara de alimentación principal
(La télécommande est vendue
Sensor de mando a distancia
(El mando a distancia se vende
•Controllable with Remote Control
This unit can be controlled with an optional Alpine remote control. For
details, consult your Alpine dealer.
Point the optional remote control transmitter at the remote control
Cet appareil peut être commandé à distance à l’aide d’une télécom-
mande Alpine en option. Pour plus de détails, consultez votre revendeur
Dirigez l’émetteur de télécommande optionnel vers le capteur de télé-
•Controlable con mando a distancia
Esta unidad puede controlarse con un mando a distancia opcional
Alpine. Para más detalles, consulte a su distribuidor Alpine.
Apunte el transmisor del mando a distancia opcional hacia el sensor del
Cette étiquette a pour but de prévenir l'utilisateur de la présence d'instructions importantes.
Si ces instructions ne sont pas suivies, des blessures ou des dommages matériels risquent d'être occasionnés.