Amica VKSR 354 150 B Manual
Læs gratis den danske manual til Amica VKSR 354 150 B (172 sider) i kategorien Køleskab. Denne vejledning er vurderet som hjælpsom af 37 personer og har en gennemsnitlig bedømmelse på 4.3 stjerner ud af 19 anmeldelser.
Har du et spørgsmål om Amica VKSR 354 150 B, eller vil du spørge andre brugere om produktet?

Produkt Specifikationer
| Mærke: | Amica |
| Kategori: | Køleskab |
| Model: | VKSR 354 150 B |
| Vekselstrømsindgangsspænding: | 220-240 V |
| Vekselstrømsindgangsfrekvens: | 50 Hz |
| Bredde: | 550 mm |
| Dybde: | 615 mm |
| Højde: | 1440 mm |
| Vægt: | 40000 g |
| Produktfarve: | Beige |
| Lampe type: | LED |
| Indbygget skærm: | Ingen |
| Ledningslængde: | 1.55 m |
| Pakkevægt: | 45000 g |
| Pakkedybde: | 660 mm |
| Pakkebredde: | 580 mm |
| Pakkehøjde: | 1500 mm |
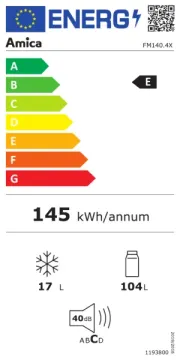
| Årligt energiforbrug: | 128 kWh |
| Placering af apparat: | Fritstående |
| Dørhængsel: | Højre |
| Tilsluttet belastning: | - W |
| Støjniveau: | 41 dB |
| Justerbare fødder: | Ja |
| Energieffektivitetsskala: | A til G |
| Strømkilde type: | Vekselstrøm |
| Støjemissionsklasse: | C |
| Energieffektivitetsklasse: | F |
| Vendbare døre: | Ingen |
| Klimaklasse: | N-ST |
| Køleskab antal hylder/kurve: | 4 |
| Antal grøntsagsskuffer: | 1 |
| Æggebakke: | Ja |
| Køleskabsdøre: | 4 |
| Køleskab, netto rumindhold: | 229 L |
| Køleskab indvendigt lys: | Ja |
| Flaskeholder: | Ja |
| Super Cool funktion: | Ingen |
| Frisk zone, aflukke: | Ingen |
| Automatisk afrimning (køleskab): | Ja |
Har du brug for hjælp?
Hvis du har brug for hjælp til Amica VKSR 354 150 B stil et spørgsmål nedenfor, og andre brugere vil svare dig
Køleskab Amica Manualer

Køleskab Manualer
- Ecotronic
- Respekta
- Indesit
- Uniprodo
- Monogram
- Consul
- Brastemp
- Continental
- Whynter
- Beverage-Air
- Cata
- Bluesky
- Galaxy
- Maytag
- M-System
Nyeste Køleskab Manualer