Atlas Sound SHS-LF Manual
Atlas Sound
Subwoofer
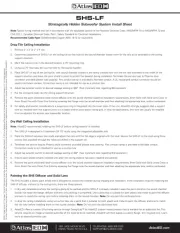
SHS-LF

| Mærke: | Atlas Sound |
| Kategori: | Subwoofer |
| Model: | SHS-LF |
Har du brug for hjælp?
Hvis du har brug for hjælp til Atlas Sound SHS-LF stil et spørgsmål nedenfor, og andre brugere vil svare dig
Subwoofer Atlas Sound Manualer
17 August 2025
17 August 2024
16 August 2024

16 August 2024
Subwoofer Manualer
- Quadral
- Kali Audio
- Ecler
- SVS
- Hertz
- Q Acoustics
- DS18
- KRK
- Velodyne
- APart
- Rockustics
- B&W
- Stinger
- Samson
- Kenwood
Nyeste Subwoofer Manualer

15 December 2025

10 December 2025

10 December 2025

8 December 2025

8 December 2025

7 December 2025

6 December 2025

6 December 2025

6 December 2025

27 November 2025