Prima di procedere all’installazione leggete con attenzione tutte le indicazioni riportate di seguito. E’ opportuno prestare attenzione alle
indicazioni riportate. La mancata osservanza di tali istruzioni potrebbe causare lesioni involontarie o danni all’apparecchio.
AVVERTENZE GENERALI
1. VericarelacompatibilitàdelbitDMIconlapropriaautovetturaconsultandolasezioneBrowseVehicleCompatibilitydigitando
“http://www.audison.eu/bitdmi”.
2. ScaricaredallasezionePCSoftwaredigitando“http://www.audison.eu/bitdmi”,ilsoftwarenecessarioperlacongurazionedelbitDMI
einstallarlonelproprioPC.
3. ScaricaredallasezioneFirmwareupgradedigitando“http://www.audison.eu/bitdmi”illenecessarioperl’aggiornamentodelbitDMI,
tramitePCSoftware.
4. Vericatechel’impiantoelettricodelveicoloabbiaunatensionedialimentazionedi12VDCconnegativoamassa.
5. Nonrealizzatealcuntipodiinstallazioneall’internodelvanomotoreedinposizioniesposteadacqua,umiditàeccessiva,polvereesporcoo
cheinterferiscacondispositivimeccanicioelettricidellavettura.
6. InstallateilbitDMIinzonedelveicoloovelatemperaturanonscendasottogli0°C(32°F)enoneccedai55°C(131°F).
7. Assicurarsicheicavisianoadeguatamentessatipertuttalalunghezzaechelaguainaprotettiva,utilizzataperproteggereicontatti,
siaditipoautoestinguenteallaamma.Bloccareicaviinprossimitàdeiterminali.
8. Posizionarel’interruttore“BY-PASS”inunazonadellavetturafacilmenteraggiungibileduranteleoperazionidimanutenzionedell’autovettura.
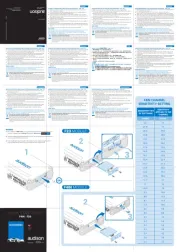
COME COLLEGARE il bit DMI
1. Primadiprocedereconl’installazionedelbitDMI,assicurarsichelasorgenteetuttigliapparatielettronicidelsistemaaudiodellavetturasiano
spenti,perevitarequalsiasipossibiledanno.
2. Fatepassareuncavodialimentazionespecicoedeldiametroadeguato(16AWG,Ø1.5mm
2
/0.059”)dallabatteriaalbitDMI.
3. Applicareunportafusibileisolatoanonpiùdi20cmdalmorsettopositivodellabatteriaecollegaresudiessoilcavodialimentazione
provenientedalbitDMI.Utilizzareunfusibileda3A.
4. Collegareiterminalidialimentazionefacendoattenzioneallapolaritàdiconnessione.Collegareprimailterminale(-)altelaiodell’autovettura,
poiilterminale(+)alcavoprovenientedallabatteria.
5. INPUT MOST:Collegareilcavobraottica“MOST”fornitonellaconfezione,comeindicatonellasezione“DIAGRAMCONNECTIONS”.
6. OPTICAL OUT:CollegaretramitecavootticoconterminazioneToslinkadispositiviAudisondotatidiingressodigitaleotticoS/PDIF
(bitOne,bitTenD,APbitPrima,AudisonTHThesis).TaleingressosaràselezionabiletramiteDRCotramiteterminalediEnabledovepresente
(bitTenD,APbitPrima).
ATTENZIONE:CodicheaudiosurroundmulticanaleDOLBYDIGITAL(AC3),DTSoaltretecnologieproprietarie,provenientidasorgentiA/V(come
adesempiol’audiodiunlminDVD),nonpossonoesseredecodicate.Ilformatoaudiodiuscitaditalisorgentidovràquindiessere
conguratoinmodalitàSTEREO,dovedisponibileattraversoilmenuimpostazioniaudiodelsistemadimultimediale,peressereriprodotto.
7. ACCENSIONE:IlbitDMIsiaccendeautomaticamenteall’accensionedell’autovettura.All’accensioneforniràunsegnaleinuscita(REMOUT)per
l’accensionedidispositivicollegatialsistema(bitOne,bitTenD,APbitPrima,THThesis),opportunamentesettatiinfunzionedelsistemaaudio.
8. PC SOFTWARE:CollegareilPCalbitDMIutilizzandoilcavoUSBfornitoindotazione,perintervenirenelsettaggiodeldispositivoinfunzione
dellavetturautilizzata.AccendereilquadrodellavetturaelanciareilPCSoftware“AudisonbitDMIUpdater”precedentementeinstallatonel
desktopdelproprioPC.Seguirelaproceduradisetupriportatanellasezione“PCCONFIGURATION”.Alterminedellaproceduradisetupchiudere
tutteleportieredellavetturaediseguitolechiusuredisicurezza.Attendere20minutiprimadiriaprirelavetturaedaccendereilsistemaaudio.
9. BY PASS:IlbitDMIpuòesserereso“invisibile”alsistemaMOSTdiserieattraversounasempliceoperazionecheloponeinmodalità“BY-PASS”.
LamodalitàBY-PASSèconsigliataquandoilveicolodevesubireuninterventodiassistenzapressoun’ofcinaautorizzataperevitarechela
diagnosticadell’autorileviilbitDMIcome“intruso”egeneriunerroredurantel’intervento.
Perattivarelamodalità“BY-PASS”procederecomesegue:
a. PerbitDMIconHWprecedentelarev.R03asistemaaccesoefunzionanteagiresull’interruttore“BY-PASS”portandolovelocementein
posizione1ed0per5volteconsecutivamente.
L’audiosiinterromperà,questaèl’indicazionedell’attivazionedellamodalità“BY-PASS”.
Perdisattivarelafunzione“BY-PASS”ripetereglistessipassidellaproceduradiattivazione,l’audioricompariràsubitodopola
disabilitazionedellafunzione.
b. PerbitDMIconHWugualeosuperiorelarev.R03lafunzioneBY-PASSpuòessereattivata/disattivatramitesoftware(vediPCConguration).
ATTENZIONE:lafunzioneBY-PASSvienetenutainmemoriaanchesesispegneeriaccendeilveicolooilsistemaaudioinnitevolte,quindila
suaattivazioneèpermanentenoalladisattivazione.
SAFE SOUND
UTILIZZATEEQUILIBRIOEBUONSENSONELL’ASCOLTO;RICORDATECHEPROLUNGATEESPOSIZIONIADUNLIVELLOECCESSIVODIPRESSIONE
ACUSTICAPOSSONOPRODURREDANNIALVOSTROUDITO.LASICUREZZADURANTELAGUIDADEVERESTARESEMPREALPRIMOPOSTO.
Before installing the components, please carefully read all of the following instructions.
It is advisable to carefully follow the highlighted instructions. Failure to respect these instructions may cause unintentional harm or damage to
the device.
SAFETY CONSIDERATIONS
1. VerifycompatibilityofthebitDMIwithyourvehiclereferringtotheBrowseVehicleCompatibilitysectionandtyping
“http://www.audison.eu/bitdmi”.
2. DownloadthesoftwarerequiredtocongurethebitDMIfromthePCSoftwaresectionbytyping“http://www.audison.eu/bitdmi”
andinstallitonyourPC.
3. DownloadthelerequiredtoupgradethebitDMIviathePCSoftwarefromtheFirmwareupgradesectionbytyping“http://www.audison.eu/bitdmi”.
4. Makesureyourcarhas12VDCvoltagenegativegroundelectricsystem.
5. Donotcarryoutanyinstallationinsidetheenginecompartmentorinareasexposedtowater,excessivehumidity,dustordirtorifitinterferes
withmechanicalorelectricaldevicesofthevehicle.
6. InstallthebitDMIinpartsofthevehiclewherethetemperaturedoesnotdropbelow0°C(32°F)anddoesnotexceed55°C(131°F).
7. Makesureallthecablesareproperlysecuredallalongtheirlength.Also,makesuretheirouterprotectivejacketisflameresistantandself
extinguishing.Securetheconnectedcablesclosetotheterminalblockswithwiretiesorclamps.
8. Setthe“BY-PASS”switchinapartofthevehiclewhereitcanbeeasilyreachedwhileperformingmaintenanceonthevehicle.
HOW TO CONNECT THE bit DMI
1. BeforeinstallingthebitDMI,turnoffthesourceandallotherelectronicdevicesintheaudiosystemtopreventpossibledamage.
2. Runaspecicallydesignedpowerwirewithproperdiameter(Ø1.5mm
2
/0.059”-16AWG)fromthebatterylocationtothebitDMI.
3. Applyanisolatedfuseholdernotmorethan20cmawayfromthebatterypositiveterminalandconnectthepowercablefromthebitDMItoit.
Usea3Afuse.
4. Connectthepowersupplyterminalspayingattentiontotheconnectionpolarity.Firstconnectthe(-)terminaltothechassisofthevehicleand
thenthe(+)terminaltothecablefromthebattery.
5. INPUT MOST:Connectthe“MOST”opticalbrecablesuppliedinthepackageasdescribedinthe“DIAGRAMCONNECTIONS”section.
6. OPTICAL OUT:UseanopticalcablewithaToslinkendtoconnecttoAudisondevicesttedwithanS/PDIFopticaldigitalinput
(bitOne,bitTenD,PrimaAPbit,AudisonThesisTH).ThisinputcanbeselectedviaDRCorviaanEnableterminal,ifany(bitTenD,PrimaAPbit).
WARNING:DOLBYDIGITAL(AC3),DTSorotherproprietarymultichannelsound-surroundcodecs,comingfromA/Vsources(suchastheaudio
ofamovieinDVD),cannotbedecoded.TheoutputaudioformatofthesesourcesmustbesetinSTEREOmode,whereavailablethrough
theinfotainment’saudiosettingsmenu,tobereproduced.
7. TURN-ON:ThebitDMIautomaticallyturnsonwhenthevehicleisstarted.Whenitisturnedon,itwillprovideanoutputsignal(REMOUT)to
turnonthedevicesconnectedtothesystem(bitOne,bitTenD,PrimaAPbit,ThesisTH)andproperlysetaccordingtotheaudiosystem.
8. PC SOFTWARE:ConnectthePCtothebitDMIusingtheUSBcablesuppliedtosetthedeviceaccordingtothevehicleused.Switchthevehicle
panelonandlaunchthe“AudisonbitDMIUpdater”PCSoftwarepreviouslyinstalledonyourPCdesktop.Followtheset-upprocedure
describedinthe“PCCONFIGURATION”section.Oncetheset-upiscomplete,closeallthedoorsofthevehicleandthenthesafetylocks.
Wait20minutesbeforeopeningthevehicleagainandswitchingtheaudiosystemon.
9. BY PASS:bitDMIcanbemade“invisible”totheOEMMOSTsystemthroughasimpleoperationmakingitworkin“BY-PASS”mode.
TheBY-PASSmodeisrecommendedwhenavehicleneedstobeservicedatanauthorizedcarservicecentre,toavoidthecardiagnostic
detectsthebitDMIas“intruder”,sogeneratinganerrorduringtheoperation.
Toactivatethe“BY-PASS”mode,youshouldproceedasfollows:
a. ForbitDMIwithHWversionpriortorev.R03withthesystemturnedonandworking,operateonthe“BY-PASS”switchbymovingit
fastfromposition1to0andbackfor5timesinarow.
Theaudiowillinterrupt,thusindicatingthatthe“BY-PASS”modeactivated.
Todisablethe“BY-PASS”function,repeatthesamestepsasdescribedintheactivationprocedure;theaudiowillcomebackassoonas
thefunctionhasbeendisabled.
b. ForbitDMIwithHWversionequaltoorgreaterthanrev.R03theBY-PASSfunctioncanbeenabled/disabledusingthesoftware(seePCConguration).
WARNING:theBY-PASSfunctionisstoredinthememoryevenifthevehicleortheaudiosystemisturnedoffandonendlesstimes,soitwillstay
permanentlyactivateduntilitisdisabled.
SAFE SOUND
USECOMMONSENSEANDPRACTICESAFESOUND.PLEASEREMEMBERTHATLONGEXPOSURETOEXCESSIVELYHIGHSOUNDPRESSURE
LEVELSMAYDAMAGEYOURHEARING.SAFETYMUSTBEATTHEFOREFRONTWHILEDRIVING.
Informazioniperlosmaltimentodiapparecchiatureelettronicheedelettriche(peripaesieuropeichedispongonodisistemidiraccoltaseparata).
IprodotticontrassegnaticonilsimbolodelcontenitoreperriutisuruotebarratodaunaXnonpossonoesseresmaltitiinsiemeainormaliriutidomestici.
Questiprodottielettriciedelettronicidevonoesserericiclatipressounastrutturaadeguata,ingradoditrattareiprodottistessieilorocomponenti.
Perconosceredoveecomerecapitaretaliprodottinelcentropiuvicino,contattarel’appositoufciocomunale.Ilriciclaggioelosmaltimentocorretto
contribuisceatutelarel’ambienteeadevitareeffettidannosiallasalute.
Informationonelectricalandelectronicequipmentwaste(forthoseEuropeancountrieswhichorganiseseparatecollectionofwaste)
ProductswhicharemarkedwithawheeledbinwithanXthroughitcannotbedisposedofasordinarydomesticwaste.Theseelectricalandelectronic
productsmustberecycledinproperfacilities,capableofmanagingthedisposaloftheseproductsandtheircomponents.Tondoutwhereandhowto
delivertheseproductstoyournearestrecycling/disposalsite,pleasecontactyourlocalcouncilofce.Recyclinganddisposingofwasteinaproperway
contributestotheprotectionoftheenvironmentandpreventsharmfuleffectstohealth.
Italiano / Italian English / English
QuickStartGuidebit DMIQuickStartGuidebit DMI