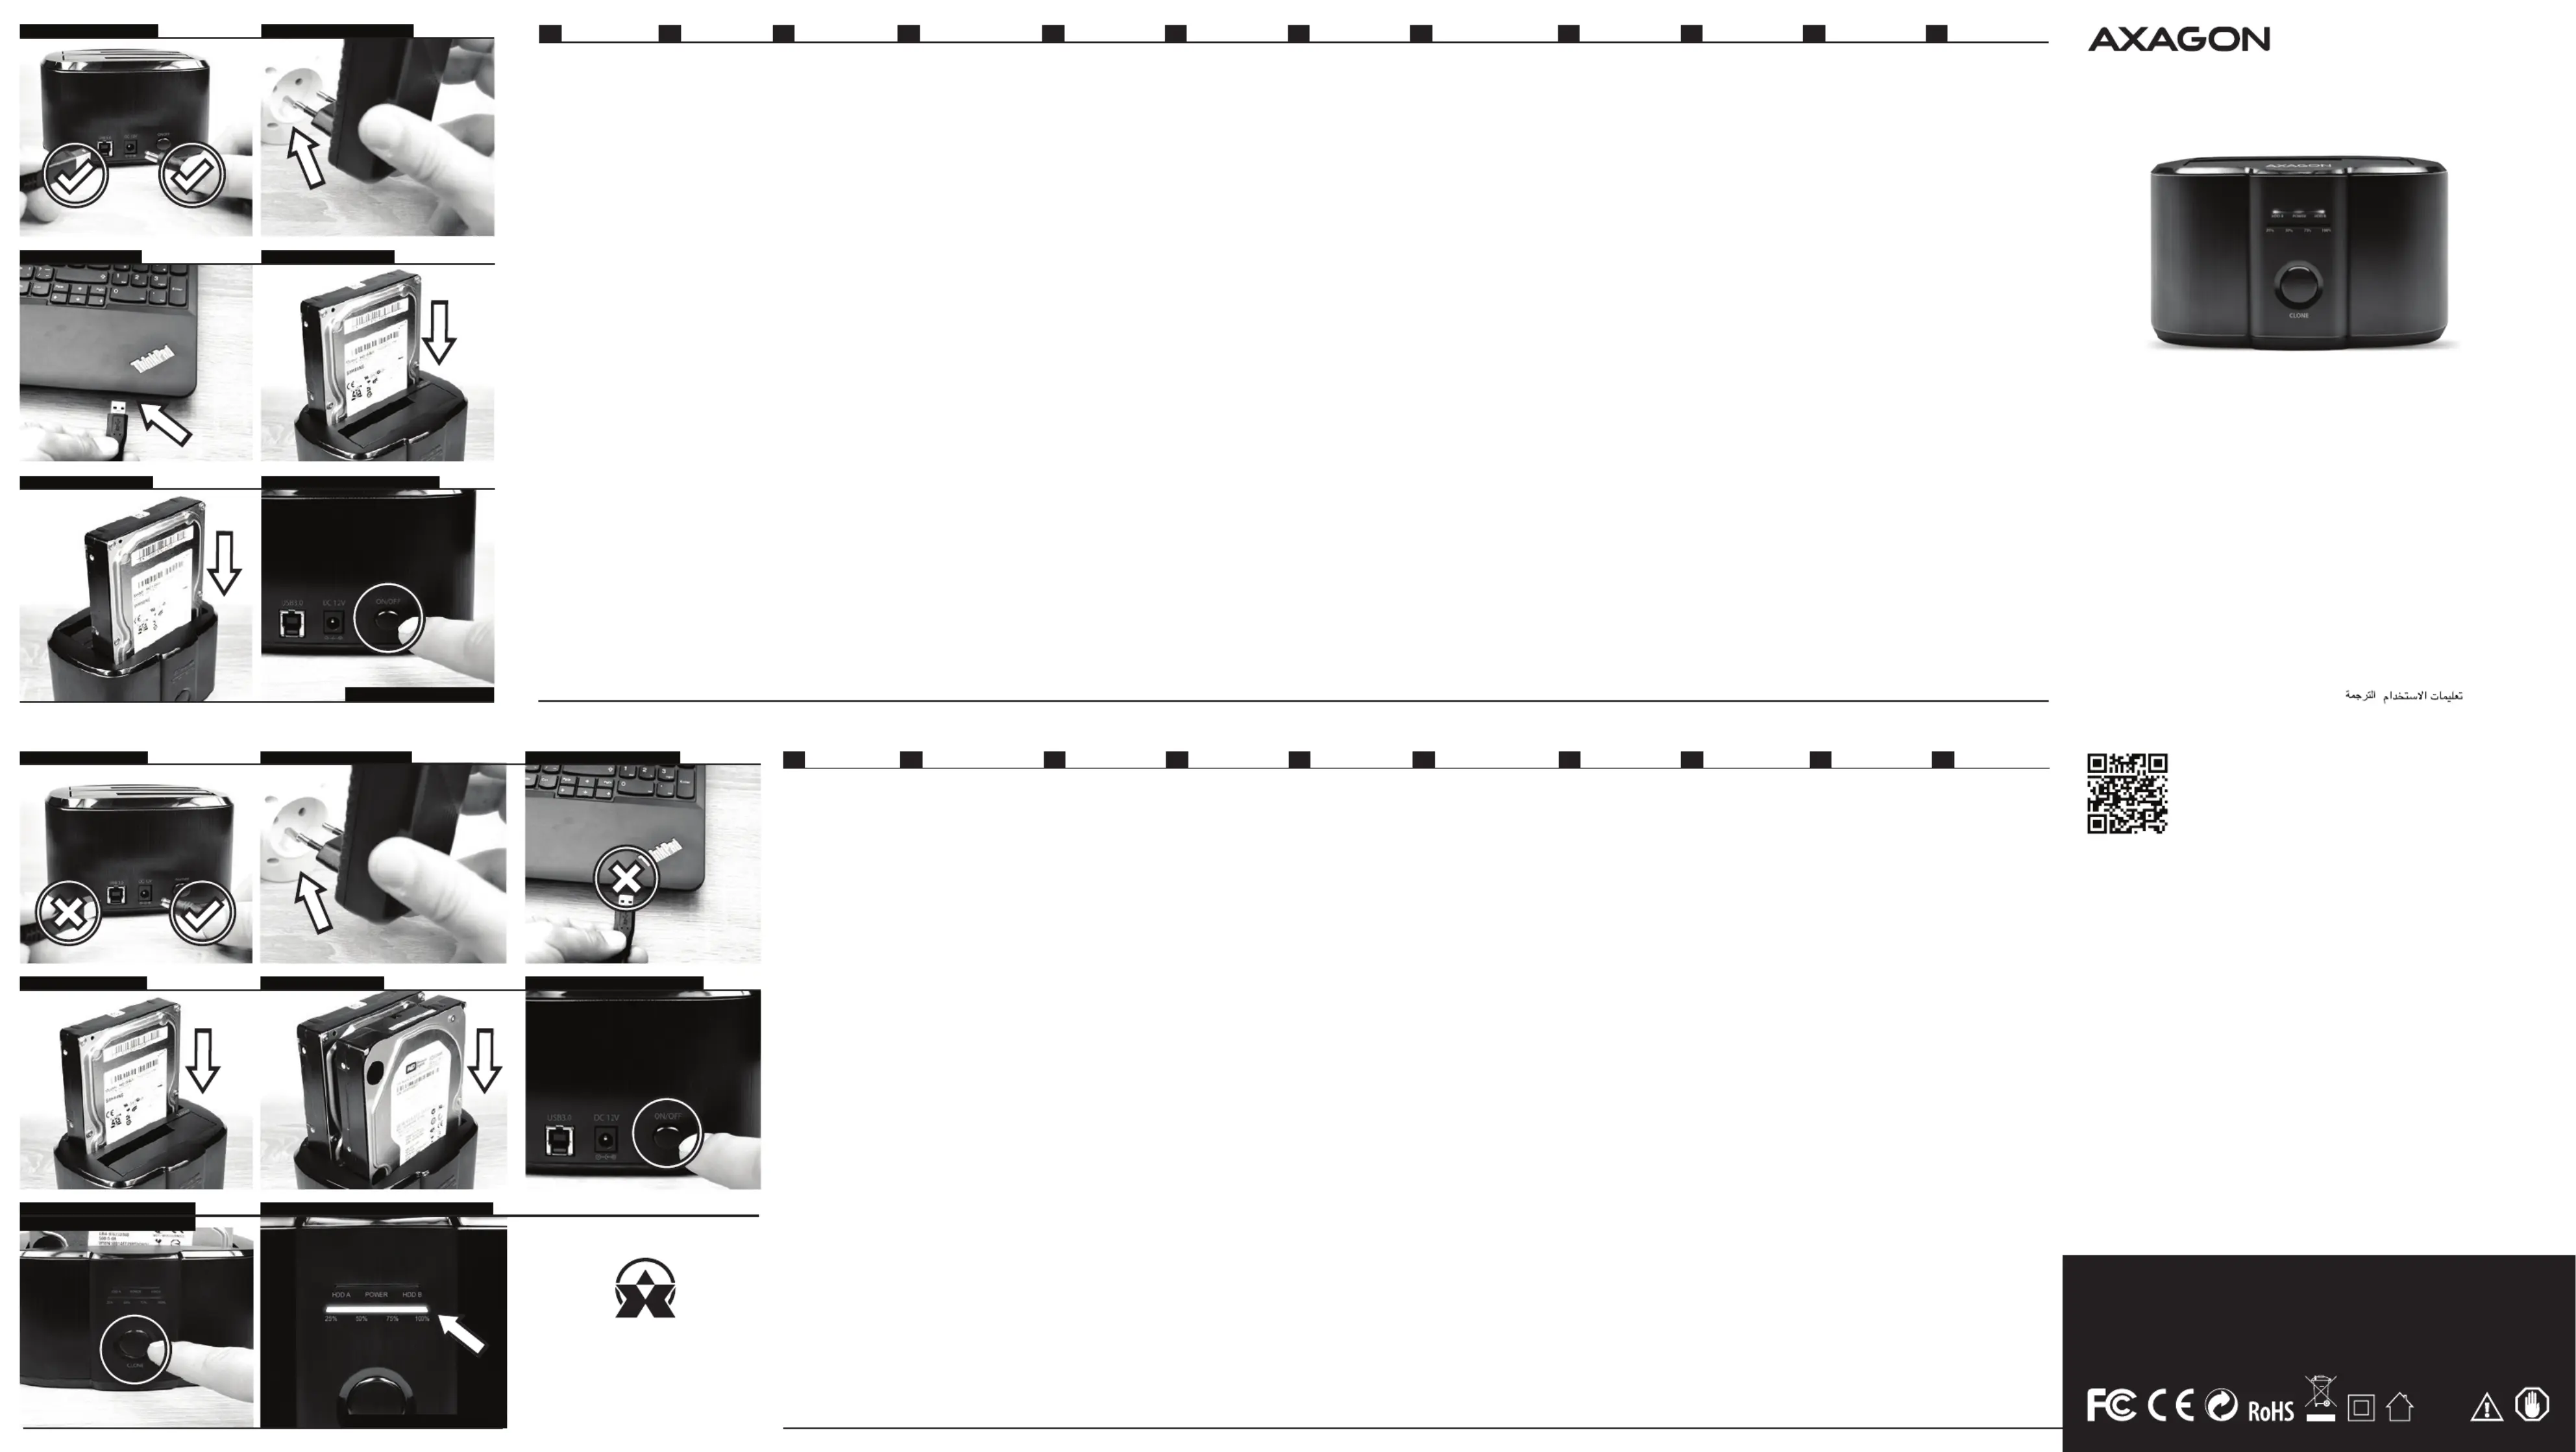
1. Connect power supply to the
DC 12V connector. Use the
adapter for power supply.
2. Connect the docking station
to the computer using the USB
3. Insert the hard disk in the
HDD A or HDD B bay of the
4. Press briefly (1 sec) the
ON/OFF power button at the
back of the docking station.
5. The hard disk will be detected
and installed automatically.
1. Never remove the hard disk
operation; the disk must be
connected for the entire period
of operation with the docking
2. If you want to disconnect the
hard disk, make sure that data
copying is finished and the HDD
indicator is not blinking.
3. Then press the ON/OFF power
button to switch off the station.
The station with the disk will be
4. However, the safest method
of disconnecting disks from
computers is to use the function
hardware. We recommend using
station is disconnected from the
computer you can disconnect
the AC/DC adapter from the
• After connecting to the
computer using the USB cable,
• If the hard disk is detected in
the Device Manager, but it is not
displayed in the My Computer
folder, check that it has been
assigned in the Disk Manager.
• Initialize and format the new
disk in the Disk Manager.
2. Propojte dokovací stanici
USB 3.0 kabelem s počítačem.
4. Stlačte krátce (1 sec.) tlačítko
5. Pevný disk bude detekován
a automaticky nainstalován.
nevysouvejte pevný disk ze
stanice, disk musí být připojen
2. Pokud chcete disk odpojit,
ujistěte se, že je kopírování dat
ukončeno a kontrolka přenosu
3. Poté tlačítkem napájení
Stanice i s diskem se odpojí od
odpojování disků od počítače
operačního systému Windows
5. Až když je dokovací stanice
odpojena od počítače, můžete
• Po připojení USB kabelem k
počítači je pevný disk vždy
• Pokud se pevný disk detekuje
ve Správci zařízení, ale není
počítač, zkontrolujte jeho
přiřazení ve Správě disků.
• Nový disk inicializujte a
naformátujte ve Správě disků.
1. Tilslut strømforsyningen til DC
medfølgende AC/DC 12V/2.5A
adapter til strømforsyning.
2. Tilslut dockingstationen til
computeren ved hjælp af USB
3. Indsæt harddisken i HDD A
eller HDD B på dockingstationen.
4. Tryk kortvarigt (1 sek) på
tænd/sluk-knappen på bagsiden
5. Harddisken registreres og
1. Fjern aldrig harddisken fra
stationen under drift; disken skal
dockingstationen under hele
2. Hvis du vil frakoble harddisken,
skal du sørge for, at datakopiering
er færdig, og HDD A- eller HDD
B-dataoverførselsindikatoren ikke
tænd/sluk-knappen for at slukke
for stationen. Stationen med
disken frakobles computeren.
4. Dog er den sikreste metode til
at frakoble disken fra computeren
Windows-operativsystemet -
sikker ernelse af hardware. Vi
5. Kun når dockingstationen er
frakoblet computeren, kan du
frakoble AC/DC-adapteren fra
• Efter tilslutning til computeren
ved hjælp af USB-kablet opdages
harddisken altid i Plug & Play
• Hvis harddisken registreres i
Enhedshåndteringen, men den
ikke vises i mappen Denne
computer, skal du kontrollere, at
den er tildelt i Diskhåndtering.
• Initialiser og formater den nye
1. Conecte la alimentación
eléctrica al conector DC 12V Para
la alimentación eléctrica utilice el
2. Conecte al ordenador la
estación base mediante el cable
3. Introduzca el disco duro en la
bahía HDD A o HDD B de la
4. Presione brevemente (1 segundo)
el botón de encendido ON/OFF en la
parte trasera de la estación.
5. La detección e instalación del
1. No extraiga nunca el disco
duro de la estación mientras está
trabajando. El disco debe estar
conectado siempre mientras
trabaje con la estación base.
2. Si desea desconectar el disco,
asegúrese de que p1-ha finalizado la
copia de datos y que el led
indicador de transmisión de datos
HDD A o HDD B no parpadea.
3. A continuación, presione el
botón de encendido ON/OFF y
apague la estación. Seguidamente
la estación y el disco se
desconectarán del ordenador.
4. El modo más seguro, sin
embargo, de desconectar los
utilizando la función que para
ello dispone el sistema Windows
5. Cuando la estación base se
ordenador, podrá desconectar el
adaptador de alimentación
eléctrica AC/DC de la estación.
• Tras la conexión mediante el
cable USB al ordenador, el disco
automáticamente mediante el
dispositivos detecta el disco duro,
pero no aparece en la carpeta Mi
asignación en la aplicación de
Administración de discos.
• Inicialice el nuevo disco y dele
formato en la aplicación de
Administración de discos.
an den DC 12V-Stecker an.
Verwenden Sie für den Anschluss
AC/DC-Adapter 12 V/2,5 A.
durch das USB 3.0 Kabel mit dem
3. Setzen Sie die Festplatte in den
HDD A oder HDD B Schacht der
4. Drücken Sie kurz (1 Sek.) die
Stromversorgungstaste ON/OFF
auf der Rückseite der Station.
5. Die Festplatte wird erkannt und
1. Ziehen Sie während der Arbeit
niemals die Festplatte aus der
Station, die Festplatte muss
währen des gesamten Zeitraum
der Arbeit mit der Dockingstation
2. Wenn Sie die Festplatte trennen
möchten, vergewissern Sie sich,
dass das Kopieren von Daten
abgeschlossen ist und die
Datenübertragung HDD A oder
3. Schalten Sie dann mit der
Stromversorgungstaste ON/OFF
die Station aus. Die Station wird
auch mit der Festplatte vom
4. Die sicherste Trennungsweise
von Festplatten von einem
Rechner ist jedoch die Nutzung
der Funktion des Betriebssystems
Windows - sichere Entfernung von
Hardware. Wir empfehlen diese
5. Erst wenn die Dockingstation
vom Rechner getrennt ist, können
Sie den AC/DC-Adapter von der
USB-Kabels zum Rechner wird die
Festplatte immer automatisch mit
Gerätemanager erkannt wird, aber
nicht im Ordner Dieser Rechner
angezeigt wird, kontrollieren Sie
• Initialisieren Sie eine neue
Festplatte und formatieren Sie sie
1. Branchez l'alimentation au
l'alimentation, veuillez utiliser
l'adaptateur AC/DC 12V/2,5 A qui
2. Branchez la station d'accueil à
l'ordinateur à l'aide d'un câble USB 3.0.
3. Insérez le disque dur dans la
fente HDD A ou HDD B de la
4. Appuyez brièvement (1 sec.) sur
la touche d'alimentation ON/OFF
à l'arrière de la station.
5. Le disque dur sera détecté et
automatiquement installé.
1. Ne jamais retirer le disque dur
de la station pendant le travail, le
disque doit toujours être
connecté pendant toute la durée
du travail avec la station d'accueil.
2. Si vous souhaitez débrancher le
disque, assurez-vous que la copie
des données est bien terminée et
que le voyant de transfert des
données HDD A ou HDD B ne
3. Éteignez ensuite la station à
l'aide de la touche d'alimentation
ON/OFF. La station et le disque se
4. Le meilleur moyen pour
déconnecter les disques de
l'ordinateur en toute sécurité est
cependant d'utiliser la fonction du
système opérationnel Windows -
déconnecter le périphérique en
toute sécurité. Cette méthode est
5. Lorsque la station d'accueil est
débranchée de l'ordinateur, vous
pouvez débrancher l'adaptateur
• Après avoir été branché à
l'ordinateur avec un câble USB, le
disque dur fait l'objet d'une
détection automatique Plug&Play.
• Si le disque dur est détecté dans
le Gestionnaire de périphériques,
mais qu'il n'est pas affiché dans le
dossier Mon ordinateur, veuillez
vérifier qu'il est bien présent dans
le Gestionnaire de disques.
• Initialisez le nouveau disque et
formatez-le dans le Gestionnaire
1. Collegate l'alimentazione nel
l'alimentazione utilizzate
l'adattatore AC/DC 12V/2.5A in
2. Collegata la stazione docking al
computer con il cavo USB 3.0.
3. Inserite il disco fisso nel vano
4. Premete brevemente (1 sec.) il
pulsante di alimentazione
ON/OFF sul lato posteriore della
5. Il disco rigido verrà rilevato ed
installato automaticamente.
1. Quando lavorate non estraete il
disco fisso dalla stazione, il disco
deve essere sempre collegato
quando lavorate con la stazione
2. Se desiderate scollegare il disco,
assicuratevi che la copiatura dei
dati sia terminata e che la spia del
trasferimento dati HDD A oppure
3. Dopo spegnete la stazione con
il pulsante di alimentazione
ON/OFF. La stazione con il disco
vengono rimossi dal computer.
4. Per rimuovere però nel modo
più sicuro i dischi dal computer
utilizzare la funzione del sistema
operativo Windows - rimozione
Raccomandiamo questa modalità.
5. Solo quando la stazione
computer potete rimuovere
alimentazione dalla stazione.
• Dopo il collegamento al
computer con il cavo USB il disco
fisso viene sempre rilevato
• Se il disco fisso viene rilevato
nella Gestione dispositivi allora
non viene visualizzato nella
cartella Questo computer,
controllate che sia stato aggiunto
nella Gestione dei dischi.
• Inizializzate e formattate il nuovo
disco nella Gestione dei dischi.
1. Csatlakoztassa a tápegységet
12 V DC csatlakozó aljzatba.
Tápláláshoz a mellékelt AC/DC
12V/2.5A adaptert használja.
2. Csatlakoztassa a dokkoló
állomást 3.0 USB kábellel a
3. Csúsztassa be a merevlemezt
az A HDD házba és vagy a B HDD
hátoldalán található ON/OFF
5. Megtörténik a merevlemez
felismerésre és automatikus
1. Munkavégzés közben soha ne
távolítsa el a merevlemezt az
állomásból, a meghajtónak a
munkavégzés teljes ideje alatt
csatlakoznia kell a dokkoló
lecsatlakozni a meghajtóról,
győződjön meg arról, hogy az
adatok másolása befejeződött és
adatátviteli diódája nem villog.
3. Ezt követően az ON/OFF
kapcsoló gombbal kapcsolja ki az
meghajtóval együtt lecsatlakozik
operációs rendszer - Eszköz
biztonságos eltávolítása -
funkciójának használata a
legbiztonságosabb módja a
merevlemez számítógépről való
lecsatlakozásának. Ezt a módszert
5. Csak a dokkoló állomás
lecsatlakozása után húzza ki az
állomás csatlakozó aljzatából az
• A merevlemez USB kábellel
• Amennyiben a merevlemezt az
Eszközkezelő érzékeli, de a
Sajátgép mappában nem kerül
Lemezkezelőben ellenőrizze
• Inicializálja és formattálja az új
merevlemezt a Lemezkezelőben.
ΔΙΑΔΙΚΑΣΙΑ ΕΓΚΑΤΑΣΤΑΣΗΣ -
1. Συνδέστε το βύσμα DC 12V στο
ρεύμα. Χρησιμοποιήστε τον
μετασχηματιστή AC/DC 12V/2.5A
που σας δίνετε στην πρίζα.
2. Συνδέστε την βάση υποδοχής
χρησιμοποιώντας το καλώδιο USB
3. Εισάγετε τον σκληρό δίσκο στην
θέση HDD A ή HDD B της βάσης
δευτερόλεπτο) το κουμπί ON/OFF
5. Ο σκληρός δίσκος θα εντοπιστεί
και η εγκατάσταση θα γίνει
1. Ποτέ μην αφαιρείτε τον σκληρό
δίσκο από την βάση κατά την
διάρκεια της λειτουργίας του. Ο
δίσκος θα πρέπει να είναι
διάστημα βρίσκεται σε λειτουργία.
2.Αν θέλετε να αποσυνδέσετε τον
σκληρό δίσκο, βεβαιωθείτε ότι η
μεταφοράς δεδομένων HDD A ή
3. Στην συνέχεια πατήστε τα
κουμπί ON/OFF για να σβήσετε
την βάση. Η βάση με τον δίσκο θα
αποσυνδεθεί από τον υπολογιστή.
4. Παρόλα αυτά, η πιο ασφαλής
μέθοδος αποσύνδεσης δίσκων
από τον υπολογιστή είναι να
χρησιμοποιείτε την λειτουργία του
λειτουργικού συστήματος των
Windows – ασφαλής αφαίρεση
χρησιμοποιείτε αυτή την μέθοδο.
5. Μόνο όταν αποσυνδεθεί η βάση
υποδοχής από τον υπολογιστή
μπορείτε να αποσυνδέσετε τον
μετασχηματιστή AC/DC από την
• Αφού τον συνδέσετε στον
υπολογιστή χρησιμοποιώντας το
καλώδιο USB, ο σκληρός δίσκος
θα εντοπίζεται πάντα αυτόματα
• Αν ο σκληρός δίσκος εντοπίζεται
στην Διαχείριση Συσκευών, αλλά
δεν εμφανίζεται στον φάκελο Ο
Υπολογιστής Μου, ελέγξτε αν έχει
• Κάντε εκκίνηση και διαμόρφωση
του νέου δίσκου στην Διαχείριση
1. Sluit de voeding aan op de DC
12V-connector. Gebruik de
meegeleverde AC/DC 12V/2,5A
2. Sluit het docking station aan op
de computer met behulp van de
3. Steek de harde schijf in de
HDD A- of HDD B-poort van het
4. Druk kort (1 sec) op de
aan/uit-knop aan de achterzijde
automatisch gedetecteerd en
1. Verwijder nooit de harde schijf
uit het station tijdens het gebruik;
de schijf moet gedurende de
gehele periode van het gebruik
2. Als u de harde schijf wilt
loskoppelen, zorg er dan voor dat
het kopiëren van gegevens is
voltooid en dat de indicator voor
de gegevensoverdracht van de
HDD A of HDD B niet knippert.
aan/uit-knop om de station uit te
schakelen. De station met de disk
wordt dan losgekoppeld van de
4. De veiligste manier om schijven
van computers los te koppelen is
echter de functie van het
Windows-besturingssysteem te
gebruiken - het veilig verwijderen
van hardware. Wij raden u dan
ook aan om het op deze manier te
5. Alleen wanneer het docking
station is losgekoppeld van de
adapter loskoppelen van het
• Na aansluiting op de computer
via de USB-kabel wordt de harde
schijf altijd automatisch Plug&Play
• Als de harde schijf wordt
apparaatbeheer, maar niet wordt
weergegeven in de map Mijn
computer, controleer dan of de
harde schijf is toegewezen in
• Initialiseer en formatteer de
nieuwe schijf in Schijfbeheer.
1. Priključite napajanje na DC 12V
priključak. Za napajanje koristite
isporučeni AC/DC 12V/2.5A
2. Spojite priključnu stanicu na
računalo s USB 3.0 kabelom.
3. Umetnite tvrdi disk u HDD A ili
HDD B ležište na priključnoj
4. Kratko pritisnite (1 sekunda)
tipku UKLJUČI/ISKLJUČI na
stražnjoj strani priključne stanice.
5. Tvrdi disk će automatski biti
1. Nikada nemojte uklanjati tvrdi
disk iz priključne stanice tijekom
njegova korištenja; disk mora biti
razdoblja rada s priključnom
2. Ako želite ukloniti tvrdi disk,
provjerite je li kopiranje podataka
završeno i da HDD A ili HDD B
indikator prijenosa podataka ne
3. Pritisnite zatim tipku
UKLJUČI/ISKLJUČI za isključivanje
stanice. Stanica s diskom odspojit
4. Međutim, najsigurnija metoda
odvajanja diska od računala jest
korištenje funkcije operacijskog
sustava Windows – sigurno
Preporučujemo korištenje te
5. Tek kada je priključna stanica
odspojena od računala možete
isključiti AC/DC adapter iz stanice.
• Nakon povezivanja s računalom
pomoću USB kabela, tvrdi disk se
automatski Plug&Play otkriva.
• Ako je tvrdi disk otkriven u
Upravitelju uređaja, ali se ne
računalo, provjerite je li dodijeljen
• Inicijalizirajte i formatirate novi
disk u Upravitelju diska.
1. Kytke virtalähde DC 12V
-liittimeen. Käytä mukana
toimitettua AC / DC 12V / 2.5A
-sovitinta virtalähteeseen.
telakointiaseman HDD A- tai
4. Paina lyhyesti (1 sekuntia)
5. Kiintolevy tunnistetaan ja
asennetaan automaattisesti.
1. Älä koskaan poista kiintolevyä
asemasta käytön aikana; Levyn on
oltava kytkettynä koko käytön
2. Jos haluat irrottaa kiintolevyn,
varmista, että tietojen kopiointi
on valmis ja että HDD A- tai
HDD B-tiedonsiirron merkkivalo
3. Sammuta asema painamalla
ON / OFF-virtapainiketta. Asema
4. Turvallisin tapa levyjen
irrottamiseen tietokoneista on
kuitenkin Windows-käyttöjärjes-
telmän toiminnon käyttö -
irrottaminen. Suosittelemme
tämän menetelmän käyttöä.
5. Vasta kun telakointiasema on
irrotettu tietokoneesta, voit
irrottaa AC / DC-sovittimen
• Kun olet liittänyt tietokoneeseen
USB-kaapelilla, kiintolevy
tunnistetaan aina automaattisesti
• Jos kiintolevy havaitaan
Laitehallinnassa, mutta sitä ei näy
Oma tietokone -kansiossa,
tarkista, että se on määritetty
• Käynnistä ja alusta uusi levy
1. Connect power supply to the
DC 12V connector. Use the
adapter for power supply.
2. Do not connect the docking
station to the computer using
3. Insert the source hard disk
into the HDD A bay of the
4. Insert the target hard disk into
the HDD B bay of the docking
5. Press the ON/OFF button at
the back of the station to switch
on power. The upper row of
6. After 10 sec, press the CLONE
cloning button for 3 seconds.
Data duplication from disk A to
disk B will start. All the contents
of the HDD A source disk will be
copied to the HDD B target disk.
7. During duplication, indication
duplication is finished when all
• The size of the HDD B target
disk must be equal or larger
than the size of the HDD A
• If the HDD B target disk is
larger than the HDD A source
disk, the remaining space on
this target disk is not assigned.
The unassigned space can be
managed in the Disk Manager in
• The cloned HDD B disk is an
identical copy of the HDD A disk
and it also takes the ID of the
source disk. Therefore Windows
will switch off one of the disks if
both are connected to the
computer after cloning. The
switched over again to the
1. Připojte napájení do konektoru
DC 12V. Pro napájení použijte
dodaný AC/DC adapter 12V/2.5A.
2. Nepropojujte dokovací stanici
3. Zasuňte zdrojový (Source)
pevný disk do šachty HDD A
4. Zasuňte cílový (Target) pevný
disk do šachty HDD B dokovací
5. Zapněte napájení stanice
tlačítkem ON/OFF na zadní straně
stanice. Rozsvítí se horní řada LED
6. Po 10 sec. stiskněte klonovací
tlačítko CLONE po dobu 3 vteřin.
Bude zahájena duplikace dat z
disku A na disk B. Veškerý obsah
zdrojového disku HDD A bude
zkopírován na cílový disk HDD B.
7. Během duplikace budou blikat
indikační diody 25%/50%/75%/100%.
Duplikace dat je dokončena, až
všechny LED trvale svítí.
• Velikost cílového disku HDD B
musí být stejná nebo větší než je
velikost zdrojového disku HDD A.
• Je-li cílový disk HDD B větší než
zdrojový disk HDD A, je zbývající
místo na tomto cílovém disku
nepřiřazeno. Nepřiřazené místo
lze spravovat ve Správě disků ve
• Naklonovaný disk HDD B je
identickou kopií disku HDD A a
přebírá tak i ID zdrojového disku.
Proto systém Windows vypne
jeden z disků, pokud jsou po
klonování oba disky současně
připojeny k počítači. Vypnutý disk
lze opět přepnout do on-line
režimu ve Správě disků ve
1. Conecte la alimentación
eléctrica al conector DC 12V Para
la alimentación eléctrica utilice el
adaptador AC/DC de 12V/2.5A
2. No conecte al ordenador la
estación base mediante el cable
3. Introduzca el disco duro de
origen (Source) en la bahía
HDD A de la estación base.
4. Introduzca el disco duro de
destino (Target) en la bahía
HDD B de la estación base.
5. Encienda la estación base
mediante el interruptor ON/OFF
situado en la parte trasera de la
estación. Se iluminará la línea
superior de leds (azul, verde, azul).
6. Transcurridos unos 10 segundos,
pulse el botón de clonado CLONE
durante unos 3 segundos. Se
iniciará la duplicación de datos del
disco A al disco B. Todo el
contenido del disco de origen
HDD A será copiado al disco de
7. Durante la duplicación se
iluminarán los diodos indicadores
de progreso 25%/50%/75%/100%.
La duplicación habrá finalizado
permanezcan iluminados sin
• El tamaño del disco de destino
HDD B debe tener una capacidad
de almacenamiento igual o
superior al disco de origen HDD A.
• Si el disco de destino HDD B es de
mayor capacidad que el disco de
origen HDD A, no se asignará el
espacio restante en el disco de destino.
El espacio no asignado podrá
administrarse en la aplicación de
Administración de discos de Windows.
• El clonado del disco HDD B es una
copia idéntica del disco HDD A y
adoptará también el ID de
identificación del disco de origen. Por
ese motivo el sistema Windows
apagará uno de los discos, siempre que
tras el clonado ambos discos estén
conectados al ordenador. El disco
apagado podrá volver a conectarse en
régimen on-line mediante la aplicación
de Administración de discos de
Stromversorgung an den DC
12V-Stecker an. Verwenden Sie
mitgelieferten AC/DC-Adapter
2. Verbinden Sie nicht die
USB-Kabel mit dem Rechner.
3. Schieben Sie die Quell-Festplatte
(Source) in den Schacht HDD A der
4. Schieben Sie die Ziel-Festplatte
(Target) in den Schacht HDD B der
5. Schalten Sie die Stromversorgung
der Station mit der ON/OFF-Taste an
der Rückseite der Station ein. Es
leuchtet die obere LED-Reihe auf
6. Drücken Sie nach 10 Sek. die
Clone-Taste CLONE für einen
Zeitraum von 3 Sekunden. Es wird
die Duplizierung von Daten von
der Festplatte A auf die Festplatte
B gestartet. Sämtlicher Inhalt der
Quell-Festplatte HDD A wird auf
die Ziel-Festplatte HDD B kopiert.
7. Während der Duplizierung
25%/50%/75%/100% blinken.
Die Duplizierung der Daten ist
• Die Größe der Ziel-Festplatte
HDD B muss gleich oder größer
als die Größe der Quell-Festplatte
• Wenn die Ziel-Festplatte HDD B
größer als die Quell-Festplatte HDD A
ist, wird der restliche Platz auf dieser
Ziel-Festplatte nicht zugeordnet. Nicht
zugeordneter Platz lässt sich im
Festplattenmanager in Windows
• Die geclonte Festplatte HDD B ist
eine identische Kopie der Festplatte
HDD A und übernimmt so auch die
ID der Quell-Festplatte. Deshalb
schaltet Windows eine der Festplatten
ab, wenn nach dem Clonen beide
Festplatten gleichzeitig an den
Rechner angeschlossen sind. Eine
abgeschaltete Festplatte lässt sich
wieder in den Online-Modus im
Festplattenmanager in Windows
1. Branchez l'alimentation au
2. Ne connectez pas la station
d'accueil à l'ordinateur à l'aide du
3. Insérez le disque dur source
dans la fente HDD A de la station
4. Insérez le disque dur cible
(target) dans la fente HDD B de la
5. Allumez l'alimentation de la
station à l'aide de la touche
ON/OFF sur la face arrière de la
station. La ligne supérieure LED
s'allume (bleu, vert, bleu).
6. Après 10 secondes, appuyez sur
la touche de clonage CLONE
pendant 3 secondes. Le clonage
des données du disque A sur le
disque B sera lancé. Toutes les
données du disque source HDD A
seront copiées sur le disque cible
7. Pendant le clonage, les diodes
de signalisation clignotent
25%/50%/75%/100%. Le clonage
est terminé lorsque toutes les
diodes sont allumées en continu.
• La taille du disque cible HDD B
doit être identique ou plus
grande que celle du disque
• Si le disque cible HDD B est plus
grand que le disque dur source
HDD A, la place restante sur le
disque cible restera vide. Cet
espace peut être géré depuis le
Gestionnaire de disques dans
• Le disque cloné HDD B est une
copie identique du disque HDD A,
l'identification du disque source.
C'est pourquoi le système
Windows éteint l'un des disques
lorsque les deux disques sont
branchés en même temps sur
l'ordinateur après le clonage. Le
disque éteint peut être remis en
Gestionnaire de disques dans
1. Csatlakoztassa a tápegységet
12 V DC csatlakozó aljzatba.
Tápláláshoz a mellékelt AC/DC
12V/2.5A adaptert használja.
2. Ne csatlakoztassa USB kábellel
3. Csúsztassa be a forráslemezt
(Source) a dokkoló állomás A
4. Csúsztassa be a céllemezt
(Target) a dokkoló állomás B HDD
5. Kapcsolja be az állomást az
állomás hátoldalán található
Világítani kezd a felső LED dióda
6. 10 másodperc után nyomja le 3
másodpercig a CLONE klónozás
gombot. Megkezdődik az adatok
A lemezről B lemezre történő
másolása. Az A HDD forráslemez
minden tartalma átmásolásra
kerül a B HDD céllemezre.
7. A másolás során villogni fognak
jelződiódák. Az adatmásolás
befejeztével minden LED dióda
• A B HDD céllemez méretének az
A HDD forráslemez méretével
• Amennyiben a B HDD céllemez
forráslemezétől, a céllemez
fennmaradó helyei nem kerülnek
hozzárendelésre. A szabad
Lemezkezelőjében kezelhetők.
• A klónozott B HDD merevlemez
megegyező másolat és így átveszi
a forráslemez azonosítóját is. Ezért
számítógéphez a merevlemezek,
a Windows rendszer az egyik
merevlemezt lekapcsolja. A
lekapcsolt merevlemez ismételt
on-line üzemmódba kapcsolása a
1. Συνδέστε το βύσμα DC 12V στην
πρίζα. Χρησιμοποιήστε τον
μετασχηματιστή AC/DC 12V/2.5A
που σας δίνεται για ρεύμα.
2. Μην συνδέσετε την βάση
χρησιμοποιώντας το καλώδιο USB.
3. Εισάγετε τον σκληρό δίσκο που
είναι η πηγή στην θέση HDD A της
4. Εισάγετε τον στοχευόμενο
σκληρό δίσκο στην θέση HDD B
5. Πατήστε του κουμπί ON/OFF στο
πίσω μέρος της βάσης για να την
ανοίξετε. Η πάνω σειρά από LED
(μπλε, πράσινο, μπλε) θα ανάψει.
6. Μετά από 10 δευτερόλεπτα,
πατήστε το κουμπί κλωνοποίησης
CLONE για 3 δευτερόλεπτα. Η
αντιγραφή δεδομένων από τον
δίσκο A στον δίσκο B θα ξεκινήσει.
Όλα τα περιεχόμενα από τον δίσκο
πηγής HDD A θα αντιγραφούν στον
αντιγραφής, οι δίοδοι ενδείξεων
25%/50%/75%/100% θα αρχίσουν
να αναβοσβήνουν. Η αντιγραφή
δεδομένων θα τελειώσει όταν όλα
• Το μέγεθος του στοχευόμενου
δίσκου HDD B θα πρέπει να είναι
ίσο ή μεγαλύτερο από το μέγεθος
του δίσκου HDD A που είναι η
• Αν ο στοχευόμενος δίσκος HDD B είναι
μεγαλύτερος από τον δίσκο HDD A που
είναι η πηγή, ο εναπομείναντας χώρος
στον στοχευόμενο δίσκο θα μείνει
ελεύθερος. Μπορείτε να διαχειριστείτε
τον ελεύθερο χώρο στην Διαχείριση
• Ο κλωνοποιημένος δίσκος HDD B
είναι ένα πανομοιότυπο αντίγραφο
του δίσκου HDD A και παίρνει και την
ταυτότητα του δίσκου που ήταν η
πηγή. Συνεπώς τα Windows θα
απενεργοποιήσουν έναν από τους
δίσκους αν είναι και οι δύο
συνδεδεμένοι στον υπολογιστή μετά
την κλωνοποίηση. Η δίσκος που
απενεργοποιήθηκε μπορεί να ανοίξει
και πάλι σε λειτουργία online στην
Διαχείριση Δίσκων στα Windows.
1. Priključite napajanje na DC 12V
priključak. Za napajanje koristite
isporučeni AC/DC 12V/2.5A
2. Nemojte spajati priključnu
stanicu s računalom pomoću USB
3. Umetnite tvrdi disk u HDD A
ležište priključne stanice.
4. Umetnite ciljni tvrdi disk u
HDD B ležište priključne stanice.
5. Kliknite tipku UKLJUČI/ISKLJUČI
na stražnjoj strani stanice za
uključivanje napajanja. Gornji red
LED-ica (plava, zelena, plava) će
6. Nakon 10 sekundi, pritisnite
tipku KLONIRAJ 3 sekunde.
Započet će dupliciranje podataka
s diska A na disk B. Sad sadržaj
HDD A izvornog diska kopirat će
25%/50%/75%/100% će treperiti.
Dupliciranje podataka je završeno
kada sve LED diode neprekidno
• Veličina HDD B ciljnog diska
mora biti jednaka ili veća od
veličine HDD A izvornog diska.
• Ako je veličina HDD B ciljnog
diska veća od HDD A izvornog
diska, preostali prostor na ciljnom
Nedodijeljenim prostorom može
se upravljati u Upravitelju Diska
• Klonirani HDD B disk je identična
kopija HDD A diska, te preuzima
ID izvornog diska. Stoga će
Windows isključiti jedan od
diskova ako su ova povezana na
računalo nakon kloniranja.
Isključeni disk možete s ponovno
uključiti u Upravitelju Diskova na
1. Tilslut strømforsyningen til
medfølgende AC/DC 12V/2.5A
adapter til strømforsyning.
2. Tilslut ikke dockingstationen til
computeren via USB-kablet.
3. Indsæt kildeharddisken i
HDD A i dockingstationen.
4. Indsæt målharddisken i HDD B
5. Tryk på TÆND/SLUK-knappen
bagpå stationen for at tænde for
strømmen. Den øverste række
LED'er (blå, grøn, blå) vil lyse.
6. Efter 10 sekunder skal du
trykke på CLONE-kloningsknap-
pen i 3 sekunder. Dataduplicering
fra disk A til disk B vil begynde.
Alt indholdet af HDD A-kildedisk
kopieres til HDD B-måldisk.
7. Under duplikering blinker
Dataduplicering er afsluttet, når
alle lysdioder lyser kontinuerligt.
• Størrelsen på HDD B-måldisken
skal være ens eller større end
størrelsen på HDD A-kildedisken.
• Hvis HDD B-måldisken er større
end HDD A-kildedisken, tildeles
den resterende plads ikke. Den
administreres i Diskhåndtering i
• Den klonede HDD B-disk er en
identisk kopi af HDD A-disken, og
den tager også kildediskens ID.
Derfor slukker Windows en af
diskene, hvis de begge er
tilsluttet computeren efter
kloning. Den slukkede disk kan
igen skiftes til onlinetilstand i
Diskhåndteringen i Windows.
1. Kytke virtalähde DC 12V
-liittimeen. Käytä mukana
toimitettua AC / DC 12V / 2.5A
-sovitinta virtalähteeseen.
2. Älä kytke telakointiasemaa
tietokoneeseen USB-kaapelilla.
telakointiaseman HDD A -paikkaan.
telakointiaseman HDD B -paikkaan.
5. Kytke virta painamalla aseman
takana olevaa ON / OFF-painiketta.
LEDien ylempi rivi (sininen, vihreä,
6. Paina 10 sekunnin kuluttua
CLONE-kloonauspainiketta 3
sekunnin ajan. Tietojen kopiointi
levyltä A levylle B alkaa. Kaikki
kopioidaan HDD B -levylle.
7. Kopioinnin aikana merkkivalot
25%/50%/75%/100% vilkkuvat.
Tietojen kopiointi on valmis, kun
kaikki LEDit palavat jatkuvasti.
• HDD B -levykoon on oltava yhtä
suuri tai suurempi kuin HDD A
• Jos HDD B -levy on suurempi kuin
kohdelevyn jäljellä olevaa tilaa ei
ole osoitettu. Määrittämätöntä tilaa
voidaan hallita Windowsin
• Kloonattu HDD B -levy on
identtinen kopio HDD A -levystä ja
sammuttaa yhden levyistä, jos
tietokoneeseen kloonauksen
jälkeen. Pois kytketty levy voidaan
kytkeä uudelleen verkkotilaan
Windowsin Levynhallinnasta.
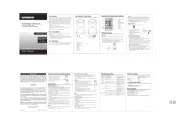
1a. CONNECT USB & POWER 1b. PLUG INTO POWER OUTLET
2. PLUG TO PC USB PORT 3a. INSERT HDD OPTION A
3b. INSERT HDD OPTION B 4. PRESS ON/OFF BUTTON FOR 1 SEC
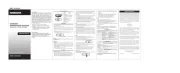
1a. CONNECT POWER ONLY 1b. PLUG INTO POWER OUTLET 2. DO NOT PLUG TO PC USB PORT
5. PRESS ON/OFF BUTTON FOR 1 SEC
3. INSERT SOURCE HDD A 4. INSERT TARGET HDD B
. . . DUPLICATION COMPLETED
6b. PRESS CLONE BUTTON FOR 3 SEC
7. WAIT FOR PERMANENT LIGHTING OF ALL LEDS
5. AUTOMATIC INSTALLATION
FOR DETAILED INFORMATION AND MANUAL GO TO PAGE:
Instructies voor gebruik (vertaling)
Instrukcja użycia (tłumaczenie)
Instruções de utilização (translação)
Instrucțiuni pentru utilizare (traducere)
Инструкция по эксплуатации (трансляция)
Návod na použitie (preklad)
Användarinstruktioner (translation)
Kullanım talimatları (tercüme)
Инструкции за Употреба (превод)
Instructions for use (original)
Návod k použití (originál)
Gebrauchsanweisungen (Übersetzung)
Brugsanvisning (translation)
Instrucciones de uso (traducción)
Instructions d'utilisation (traduction)
Oδηγίες χρήσης (μετάφραση)
Upute za korištenje (prijevod)
Felhasználói kézikönyv (fordítás)
Istruzioni per l'uso. (traduzione)
Výrobce / Manufacturer: RealQ s.r.o. - Železná 5, 619 00 Brno, Czech Republic
All rights reserved. All text and pictorial materials contained in this document
are protected by Copyright Act.
All marks indicated here are the registered trademarks of their appropriate owners.
Specifications are subject to change without prior notice.
Made in CHINA for Axagon.
ENG SuperSpeed USB docking station for two 2.5" or 3.5" disks with cloning function
CZ SuperSpeed USB dokovací stanice pro dva 2.5" nebo 3.5" disky s funkcí klonování
DE SuperSpeed USB-Dockingstation für zwei 2,5" oder 3,5" Festplatten mit Klonfunktion
DK Super Speed USB dockingstation til to 2,5 "eller 3,5" diske med kloning funktion
ESP Estación de SuperSpeed USB para un disco de 2.5" o de 3.5” función de clonación
FIN SuperSpeed USB -telakointiasema kahdelle 2.5" or 3.5" -levylle kloonaustoiminnolla
FR Station d'accueil SuperSpeed USB pour deux disques 2,5 "ou 3,5" avec fonction de clonage
GR Βάση υποδοχής SuperSpeed USB για δύο δίσκους 2.5" ή 3.5" με διπλή λειτουργία
HR SuperSpeed USB priključna stanica za dva 2.5" ili 3.5" diska s funkcijom kloniranja
HU SuperSpeed USB dokkoló két 2.5" vagy 3.5" lemezhez klónozással
IT Docking station SuperSpeed USB per due dischi da 2,5 "o 3,5" con funzione di clonazione
NL SuperSpeed USB-dockingstation voor twee 2,5 "of 3,5" schijven met kloonfunctie
PL SuperSpeed USB-dockingstation voor twee 2,5 "of 3,5" schijven met kloonfunctie
PT Estação de encaixa SuperSpeed USB para dois discos de 2,5 ou 3,5 com função de clonagem
RO Stație de andocare SuperSpeed USB pentru două discuri de 2,5 "sau 3,5" cu funcție de clonare
RU Док-станция с SuperSpeed USB для двух 2.5" или 3.5" дисков с функцией клонирования
SK SuperSpeed USB dokovacia stanica pre dva 2.5" alebo 3.5" disky s funkciou klonovania
SWE SuperSpeed USB-dockningsstation för en 2,5” eller 3,5” disk med kloningsfunktion
TR Klonlama işlevli iki 2.5" p1-ya da 3.5" disk için SuperSpeed USB bağlantı istasyonu
BG SuperSpeed USB свързваща станция за два 2.5" или 3.5" диска с клонираща функция
CN 超快速 USB 扩展坞 适用于两个具有克隆功能的 , 2.5 或 磁盘3.5
خﺎﺴﻨﺘﺳﻻا ﺔﻔﯿظو ﻊﻣ 3.5" وأ "2.5 صاﺮﻗﻷ ءﺎﺳرإ ﺔﻄﺤﻣ
http://axagon.eu/produkty/adsa-st#supportLinkGoal