Bixolon SRP-383 Manual


Læs gratis den danske manual til Bixolon SRP-383 (4 sider) i kategorien Ikke kategoriseret. Denne vejledning er vurderet som hjælpsom af 15 personer og har en gennemsnitlig bedømmelse på 4.5 stjerner ud af 8 anmeldelser. Har du et spørgsmål om Bixolon SRP-383, eller vil du spørge andre brugere om produktet?

Side 1/4
Information
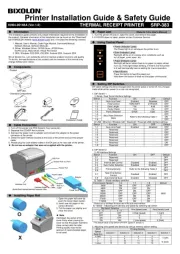
This installation guide contains only simple information required for the installation of
the product. Detailed information of the installation can be found on the "Download"
tab of BIXOLON website ( ) and, it includes the following contents. www.bixolon.com
1. Manual: User’s Manual, Code Page Manual, Command Manual ,
2. Driver: Windows Driver, OPOS Driver, JPOS Driver,
CUPS (Linux, Mac) Driver, Virtual Port Driver
3. SDK: Windows POS SDK, iOS SDK, Android SDK, Xamarin SDK
We at Bixolon Co., Ltd. constantly strive to improve product functions and quality.
To do this, the specications of our product and the contents of the manual may
change without prior notice.
Components
- Product
SRP-383
- Standard Components
Cover Cable
Roll Paper
CD
AC/DC Adaptor
Power Cord
Installation Guide
Cable Connection
1. Turn o the printer and POS System (host computer).
2. Separate the COVER like to picture.
3. Connect the power cord to adaptor and connect the adapter to the power
connector of the printer.
4. Check the type interface located at the back of the printer and connect proper
cable.
5. Please plug the cash drawer cable in the DK port at the rear side of the printer.
Do not use an adapter that was not supplied with the printer.
Installing Paper Roll
1. Open the paper roll cover by
push the Cover-Open button.
2. Insert new roll paper in the
correct direction.
3. Pull the paper out slightly and
close the cover.
Note
Hold down the center of the
cover rmly when closing the
cover so that the paper maintains
close contact with the roller.
Printing quality may not be
optimum if recommended paper
is not used.
Paper Jam (Refer to 1-8 in User’s Manual)
1. Turn the printer o and on, open the cover, and remove the paper.
2. If COVER does not open, please contact Customer Service.
Using Control Panel
Power (Indicator Lamp)
The Power light is on whenever the printer is on.
Error (Indicator Lamp)
Red light will be on in various error conditions such as
out of paper, cover open, etc.
Paper (Indicator Lamp)
Red light will be on when there is no paper or paper almost
runs out. If this light keeps blinking, it means that the printer
is in self-test standby tate or waiting for macro execution.
Feed (Button)
Press this button to feed the paper out.
Hold down this button to feed out the paper continuously.
Setting DIP Switches
DIP switch settings should be changed when the printer power is turned o. Any changes
made while printer power is on are not recognized.
1. DIP Switch 1
1) Serial / Dual Serial Interface Settings
Switch
Function
ON
OFF
Default
1-1
Auto Line Feed
Enabled
Disabled
OFF
1-2
Flow Control
XON/XOFF
DTR/DSR
OFF
1-3
Data Length
7-bit
8-bit
OFF
1-4
Parity Check
Yes
No
OFF
1-5
Parity Selection
EVEN
ODD
OFF
1-6
Baud Rate Selection
(bps)
Refer to the following Table 1
OFF
1-7
ON
1-8
OFF
2) USB / Ethernet / Wireless LAN / Bluetooth / Powered USB interface settings
Switch
Function
ON
OFF
Default
1-1
Auto Line Feed
Enabled
Disabled
OFF
1-2
Reserved
-
-
OFF
1-3
Reserved
-
-
OFF
1-4
Reserved
-
-
OFF
1-5
Reserved
-
-
OFF
1-6
Reserved
-
-
OFF
1-7
Reserved
-
-
ON
1-8
Reserved
-
-
OFF
2. DIP Switch 2
1) All Interface Settings
Switch
Function
ON
OFF
Default
2-1
Reserved
-
-
OFF
2-2
Reserved
-
-
OFF
2-3
Internal Bell Control
Disabled
Enabled
OFF
2-4
Auto Cutter Selection
Disabled
Enabled
OFF
2-5
Printing Density
Refer to the following Table 2
OFF
2-6
OFF
2-7
Near End Sensor
Control
Disabled
Enabled
OFF
2-8
Auto External Buzz
Enabled
Disabled
OFF
2) Table 1 Baud rate(bps) selection
Transmission Speed
1-6
1-7
1-8
Default
2400
ON
OFF
OFF
9600
4800
ON
OFF
ON
9600
OFF
ON
OFF
19200
OFF
OFF
OFF
38400
OFF
ON
ON
57600
OFF
OFF
ON
115200
ON
ON
ON
* Please set up 9,600bps for baud rate of the dual serial interface.
3) Table2 Adjusting print density and speed by selecting dip switch
Dip Switch Selection
Print Speed Level
Print Density Level
2 - 5
2 - 6
OFF
OFF
4 (High Speed)
1 (Light)
OFF
ON
3
2
ON
OFF
2
3
ON
ON
1 (Low Speed)
4 (Dark)
* The default value is Dip Switch OFF/OFF (speed 4, density 1).
3. Adjusting print speed and density by vitrtual memory switch setting
Print
Speed
Selection
Printing Density
Selection 1
Selection 2
Selection 3
Selection 4
Selection 1
4 (fast)
1
2
3
4
1 (Light)
~
16 (Dark)
3
5
6
7
8
2
9
10
11
12
1 (slow)
13
14
15
16
Printer Installation Guide & Safety Guide
KN04- 1 A (Ver.1.0) 00 68
THERMAL RECEIPT PRINTE SRP- R 383
Power Cord
Drawer
Kick- out
Cable
Interface Cable
(Serial/Dual Serial/Ethernet/Powered USB)
Adaptor
Interface Port
USB
Cable
Drawer Kick- Port out
USB Port
Power Port
Power Cable


Produkt Specifikationer

Mærke: Bixolon
Kategori: Ikke kategoriseret
Model: SRP-383

Har du brug for hjælp?

Hvis du har brug for hjælp til Bixolon SRP-383 stil et spørgsmål nedenfor, og andre brugere vil svare dig


Ikke kategoriseret Bixolon Manualer

Bixolon

Bixolon SMP690 Manual

2 September 2025
Bixolon

Bixolon SMP691 Manual

1 September 2025
Bixolon

Bixolon SRP-383 Manual

17 Juni 2025
Bixolon

Bixolon SRP-S300II Manual

7 Februar 2025
Bixolon

Bixolon SMP6210 Manual

4 September 2024
Bixolon

Bixolon SMP6350 Manual

4 September 2024
Bixolon

Bixolon XQ-840II Manual

3 September 2024
Bixolon

Bixolon SRP-Q300II Manual

3 September 2024
Bixolon

Bixolon STP-103III Manual

3 September 2024

Ikke kategoriseret Manualer

Nyeste Ikke kategoriseret Manualer

ANCEL

ANCEL HD3200 Manual

3 November 2025
Lantronix

Lantronix C3220 Manual

3 November 2025
ANCEL

ANCEL AD610 Elite Manual

3 November 2025
ErgoAV

ErgoAV ERIWA1-01W Manual

3 November 2025
QOLIXm

QOLIXm YQAWSL-6A4U Manual

3 November 2025
ANCEL

ANCEL AJ400 Manual

3 November 2025
Emerson

Emerson ITL9907RE Manual

3 November 2025