BodyCraft VC-1 Manual


Læs gratis den danske manual til BodyCraft VC-1 (4 sider) i kategorien Ikke kategoriseret. Denne vejledning er vurderet som hjælpsom af 11 personer og har en gennemsnitlig bedømmelse på 4.5 stjerner ud af 6 anmeldelser. Har du et spørgsmål om BodyCraft VC-1, eller vil du spørge andre brugere om produktet?

Side 1/4
VC-1 Owners Manual
NOTE: Please completely read all installation instructions first.
Installation
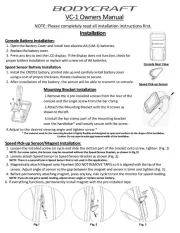
Console Battery Installation:
1.
2.
Replace the battery cover.
3.
Press any key to test the LCD display. If the display does not function, check for
proper battery installation or replace with a new set of AA batteries.
Speed Sensor Battery Installation
1.
Install the CR2032 battery, printed side up and carefully install battery cover
using a coin of proper thickness. Rotate clockwise to secure.
2.
After installation of the battery, the sensor will be able to transmit to console.
Mounting Bracket Installation
1.
Remove the 4 pre-installed screws from the rear of the
console and the single screw from the bar clamp.
2.
Attach the Mounting Bracket with the 4 screws as
shown to the left.
3.
Install the bar clamp part of the mounting bracket
over the handlebar* and loosely secure with the screw.
4.
Adjust to the desired viewing angle and tighten screw.*
* The material used for the mounting bracket is highly flexible and designed to open and conform to the shape of the handlebar.
Caution: Do not open bracket gap beyond width of the handlebar.
Speed Pick-up Sensor/Magnet Installation:
1.
Loosen the installed screw on cycle and slide the slotted part of the bracket onto screw, tighten. (Fig. 1)
NOTE: For some cycles, the Sensor may be mounted without the Speed Sensor Bracket, as shown in Fig.3)
2.
Loosely attach Speed Sensor to Speed Sensor Bracket as shown (Fig. 2).
NOTE: There is a second hole in Speed Sensor that is not used in this application.
3.
Magnetically attach Magnet onto Flywheel (DO NOT REMOVE TAPE) so it is aligned with the tip of the
sensor. Adjust angle of sensor so the gap between the magnet and sensor is 5mm and tighten (Fig. 3).
4.
Before permanently attaching magnet, press any key, ride cycle to test the monitor for speed reading.
NOTE: If you do not get a speed reading, adjust sensor angle or replace sensor battery.
6. If everything functions, permanently install magnet with the pre-installed tape.
Fig 1 Fig. 2 Fig. 3
Console Rear View
Speed Pick-up Sensor
Operation Guide
Quickstart
1. Press any key to power-up console. Begin workout, all values will count from zero.
Set Time OR Distance Goals
1.
With the console on, press the ENTER key to set time goal* or press ENTER again to set distance goal.
NOTE: If the speed or distance display a number other than zero, press and hold ENTER/RESET for 5 seconds.
2.
Use the UP and DOWN keys to set the desired time or distance goal and press ENTER to set goal.
NOTE: If the ENTER key is not pressed, the setting will lock automatically after 15-30 seconds.
4. When the time or distance goal is achieved, the computer will beep. Press any key to stop sound.
NOTE: The Console will continue to operate until the user stops exercise.
Display Illumination
Press any key during workout to illuminate the LCD Display for 5 seconds.
NOTE: The Illumination/back-light is limited to 5 seconds to preserve battery life.
Display Values
Press the UP key to select between these display values: SPEED / PULSE DISTANCE / RPM
Reset Display
Press and hold the ENTER/RESET key for 5 seconds to clear all values.
Display Range Values
Time
: 0:00:00 ~ 99:59:59 counting up. 0:05:00 ~ 99:59:00 counting down.
Speed
: 0.0 ~ 999.9 KPH or MPH.
RPM
: 15 ~ 999 .
Distance
: 0.0 ~ 999.9 KPH or MPH counting up. 1.0 ~ 999.0 KPH.MPH counting down.
Calorie
: 0.0 ~ 9999. Calories are displayed in K/Cal.
Pulse (w/optional Heart Rate Belt)
: 40 BPM ~ 200 BPM. The pulse value will display a “P” if no pulse
signal is received after 16 seconds or the unit is receiving an erratic reading. See troubleshooting.
Auto Off/Pause
If you stop your workout, the computer will pause when speed window reads zero.
The computer will automatically power-down after about 60 seconds.
Low Battery
When the battery symbol flashes, replace batteries with new Alkaline AA (UM-3).


Produkt Specifikationer

Mærke: BodyCraft
Kategori: Ikke kategoriseret
Model: VC-1

Har du brug for hjælp?

Hvis du har brug for hjælp til BodyCraft VC-1 stil et spørgsmål nedenfor, og andre brugere vil svare dig


Ikke kategoriseret BodyCraft Manualer

Ikke kategoriseret Manualer

Nyeste Ikke kategoriseret Manualer

Vivax

Vivax MF-45E Manual

12 September 2025
Havis

Havis C-HDM-176 Manual

12 September 2025
Hurricane

Hurricane HVL-E 1200-31 Manual

12 September 2025
Novation

Novation Nova Laptop Manual

12 September 2025
Parisot

Parisot Alice 2296CO3T Manual

12 September 2025
Lanaform

Lanaform Pulse Oximeter Manual

12 September 2025
Hurricane

Hurricane HEV-E 1200-31 Manual

12 September 2025
Havis

Havis UT-1003-KIT Manual

12 September 2025
Altrad

Altrad BELLE RTX 66 Manual

12 September 2025