このたびはキヤノンマニュアルズームレンズ 16 xをお買い求めいただきまして、誠
この製品は、XL マウントシステムに対応したビデオカメラにつけてご使用いただけ
る高性能ズームレンズです。メカニカルなフォーカスリング、マニュアル/サーボ切
り換え可能なズーム、2 段階の ND フィルターなどのマニュアル操作が可能です
本製品をご使用になる際は、お手持ちのビデオカメラが XL マウントに対応している
ことをご確認のうえ、ご使用ください(XL マウントシステム対応の機器には、
ご使用の前にこの「安全上のご注意」をよくお読みのうえ、正しくお使いください。
この使用説明書および製品への表示では、製品を正しくお使いいただき、あなた
や他の人々への危害や財産への損害を未然に防止するために、いろいろな絵表示
をしています。その内容と意味は次のようになっています。
この表示を無視して、誤った取り扱いをすると、人が重傷を
負う可能性が想定される内容および物的損害のみの発生が想
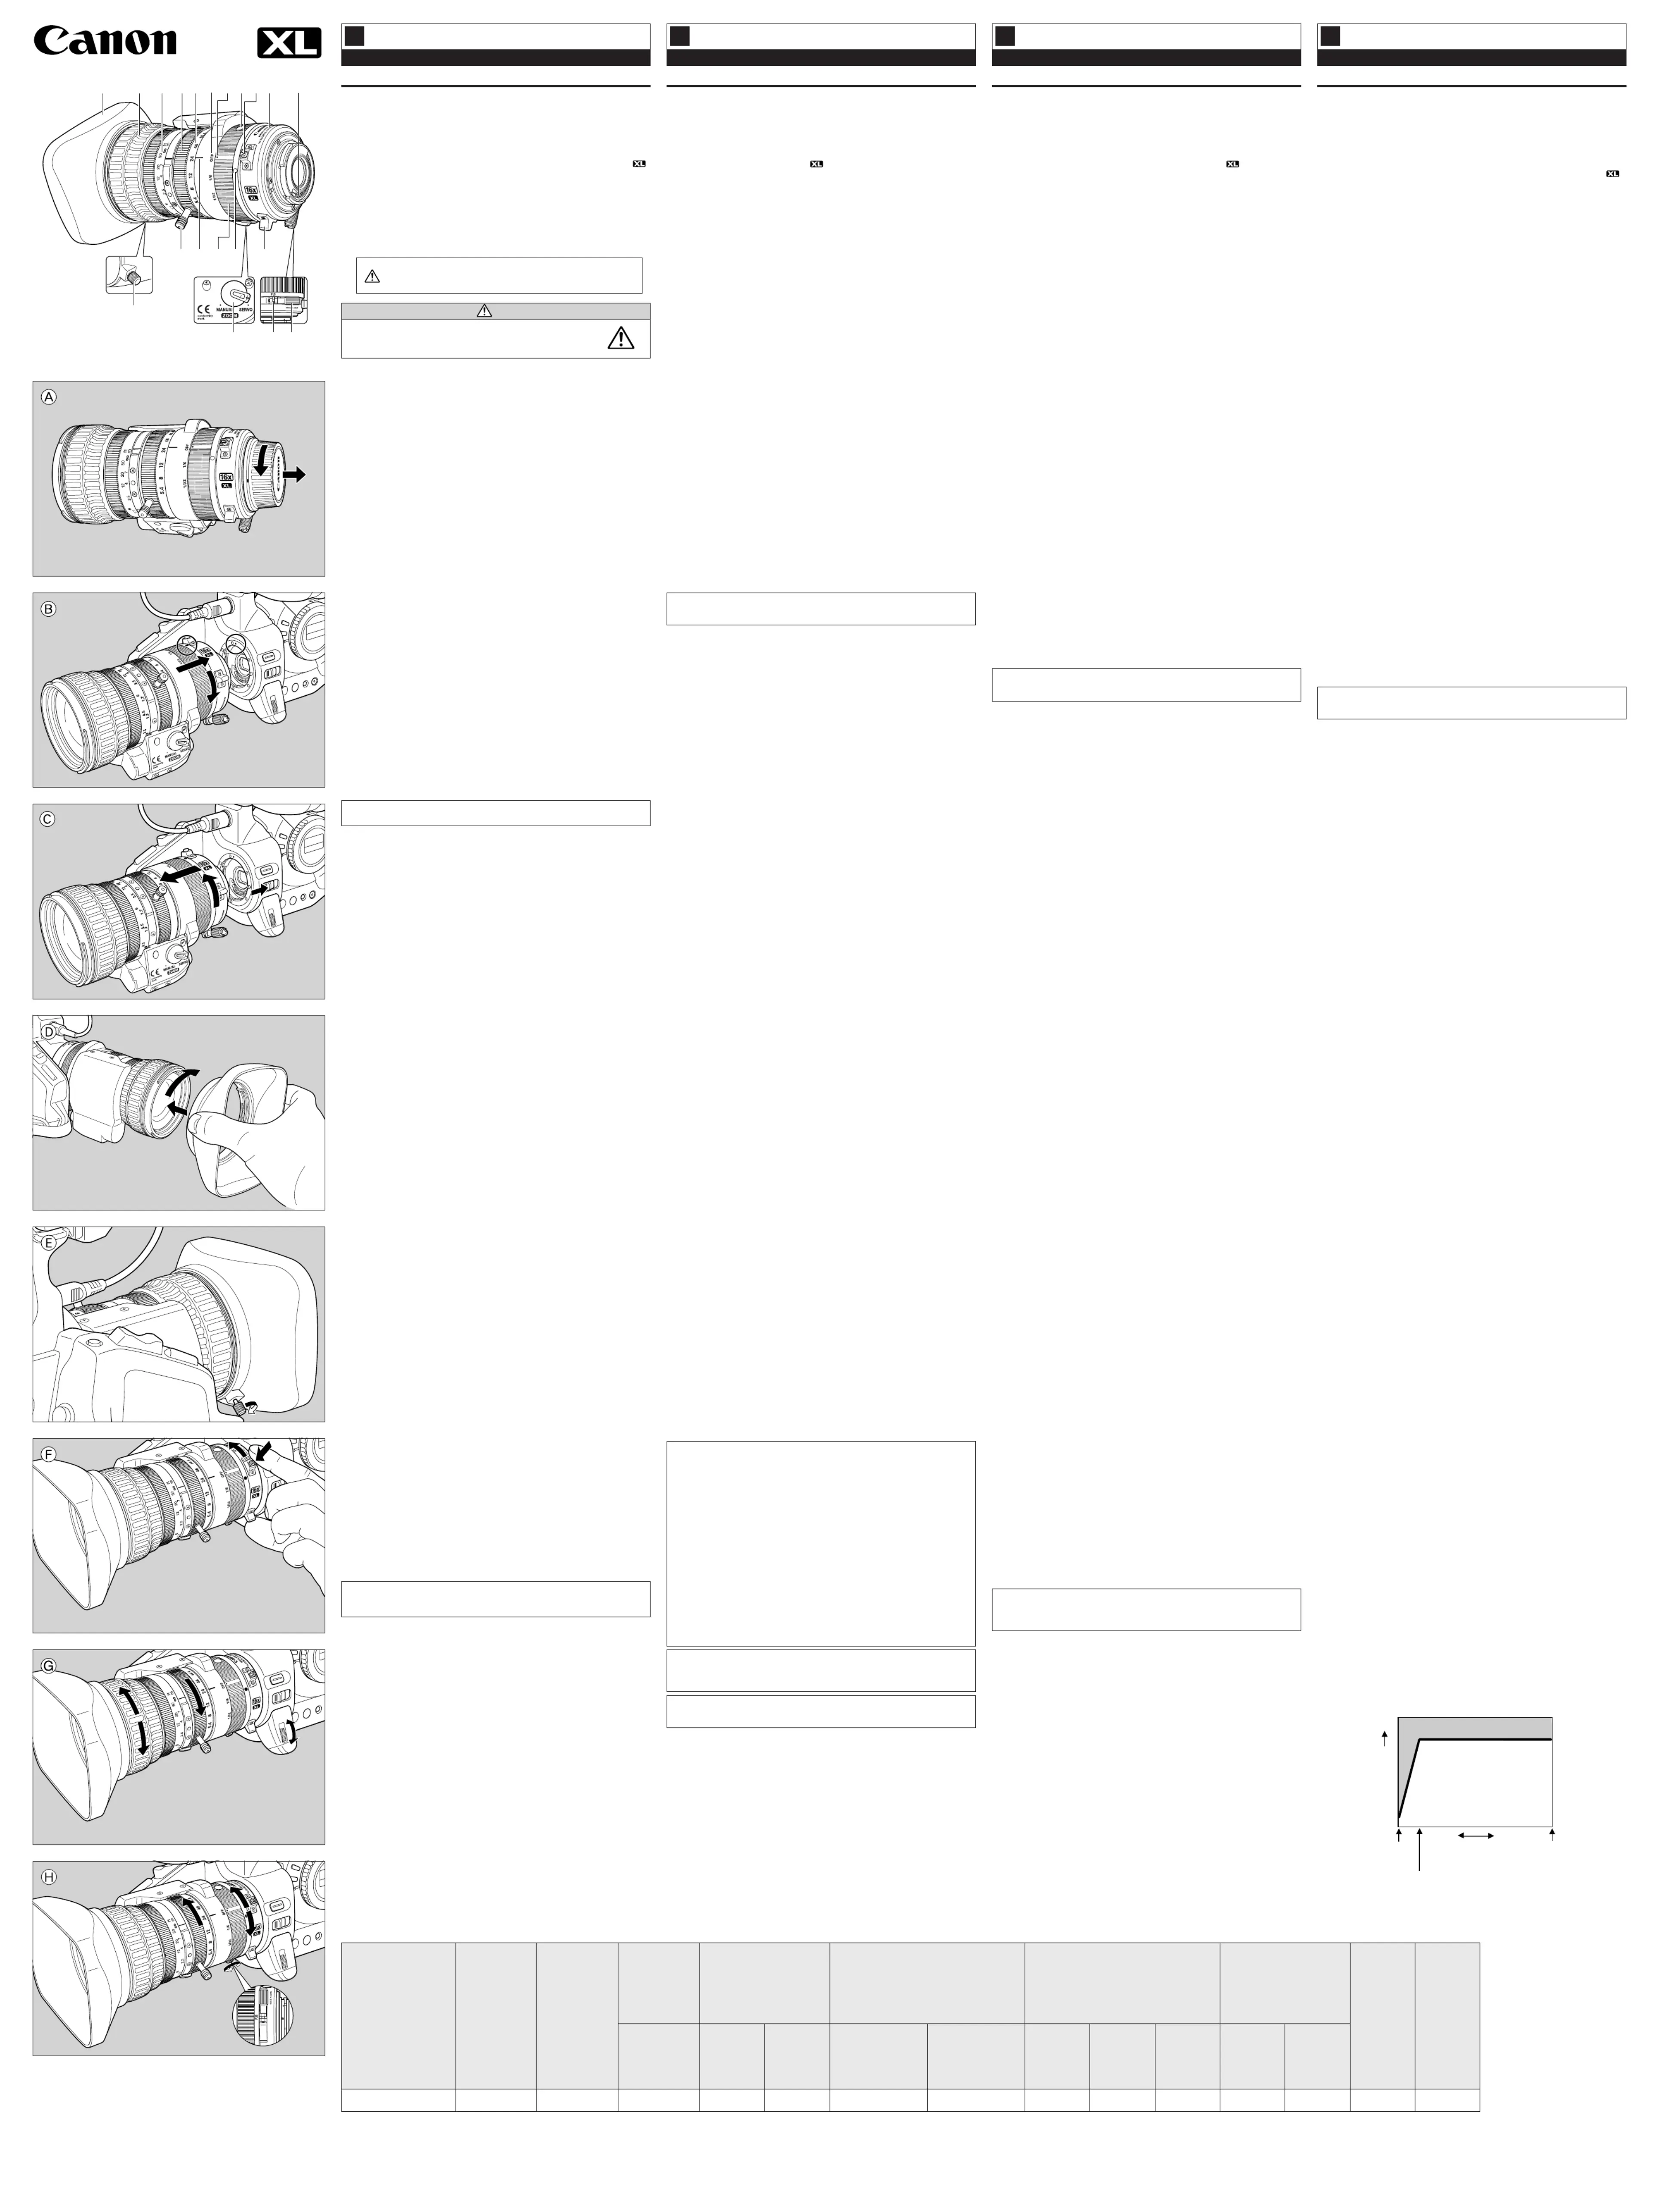
ズームレンズを確実にビデオカメラに取り付けてください。
緩んで脱落して割れると、ガラスの破片でけがの原因となることが
2フォーカスリング !2 フランジバック調整リング固定ネジ
5ズーム/焦点距離数値!5 ズームモード切換レバー
!0 @0フランジバック調整リング/フード固定ネジ
レンズを着脱するときには、ビデオカメラの電源をあらかじめ切ってください。
1)レンズのダストキャップを、反時計方向に回してはずします(図A)。
2)ビデオカメラの指標とレンズ取り付け用赤指標を合わせて、カチッと音がするま
レンズを取りはずすときは、ビデオカメラのレンズ取りはずしスイッチを押しなが
フィルターはレンズ本体にφ 72mm が、レンズフードにφ 82mm が取り付けら
れます(φ 72mm とφ 82mm のフィルターを同時に取り付けることはできませ
φ 72mm、φ 82mm のフィルターはレンズフードをはずして取り付けてくだ
φ 82mm のフィルターを取り付けると付属のレンズキャップは使用できませ
厚いフィルターを重ねて使う場合には、画面にフィルターの枠が映ることがあ
フィルターなどを装着するときは、レンズフードやレンズをやわらかい布など
の上に置いて、まっすぐ、しっかりと取り付けてください。
1)レンズ先端部にフードをはめ込み、時計方向に回します(図)。D
2)フード固定ネジを締めて、フードを固定します(図E)。
レンズの保護および有害光線をカットするために、撮影時には必ずレンズ
被写体に向かって、右に回転させる最短撮影距離方向に、左に回転させると無限遠
望遠側でピントが合わせにくいときは、外部モニターや別売のモノクロビュー
ファインダーユニットFU-1000をお使いになることをおすすめします。フォー
カスリングを操作するときに上部の切り欠き部に指をはさまないように注意し
本製品では、レンズのズームリングによるズーム(マニュアル)とビデオカメラ
被写体に向かって、右に回転させると広角側(ズームアウト)に、左に回転させ
ビデオカメラ本体、リモコン、ズームリモートコントローラー ZR-1000(別
サーボでのズーム操作中はズームリングに触れないでください。
ズームモード切換レバーが「SERVO」にあるときは、無理にズームリングを
本製品に絞りリングはありません。ビデオカメラ本体で露出を調整してください。
マクロ撮影を行うときは、ズームをワイドにし、マクロボタンを押しながら、被
写体に向かって時計方向にマクロ調整リングを回してください(図F)。通常撮影
ではマクロ調整リングを元に戻してください。マクロボタンが押し込まれたまま
本製品では明るさに応じて 2 段階の内蔵ND フィルター(1/6、1/32)を使用で
ND フィルター切換ロック解除ボタンを押しながら、ND フィルター切換リングを
まわし、ND フィルターを選びます(ND フィルターを選ぶとボタンは元の位置に
ND フィルター切換リングは、OFF、1/6、1/32 のいずれかの位置で使用してく
下記の手順でレンズのフランジバックを調整してください。
1)ビデオカメラを三脚に固定し、実際に撮影する距離、または適当な距離(2 〜
コントラストのはっきりしたピントのわかりやすいものを被写体にしてくだ
2)IRIS/SELECT ダイヤルで絞りを開放にしてください(図G)。
3)ズームを望遠(テレ)端にしてください(図G)。
4)フォーカスリングでピントを合わせてください(図G)。
5)ズームを広角(ワイド)端にしてください(図H)。
6)フランジバック調整リング固定ネジをゆるめてください(反時計方向)(図H)。
7)フランジバック調整リングを回してピントを合わせてください(図H)。
フランジバック調整指標と「F.B」が合う位置が目安になります。
8)3)〜 7)の操作を数回繰り返し、ズーム両端でのピントを出します。
正しいフランジバック調整リングの位置が決まったら、フランジバック調整リン
マニュアルビデオズームレンズ 16×XL5.4-86.4mm を XL1S に取り付けたと
デジタルビデオカメラ XL1S に標準のカラーファインダーを組み合わせた場合
※別売のデュアルバッテリーチャージャー/ホルダー CH-900/CH-910 にバッ
テリーパックを 2 個取り付けた場合は、連続使用時間は約2 倍になります。
必ずダストキャップとレンズキャップを付けてください。
直射日光があたる場所、熱器具の近く、夏期の密閉した車内のような高温下に放
レンズの電子接点に汚れ、傷、指紋などが付くと接触不良や腐食の原因となりま
ソフトケースにレンズを出し入れするときは中のひもにズームレバーが引っかか
本製品には保証書が添付されています。必要事項が記入されていることをお確か
Canon Manual 16× Zoom Video Lens
Objectif Vidéo Zoom 16× manuel Canon
XL 5.4-86.4 mm XL 5,4-86,4 mmXL-5,4-86,4 mm
Thank you for purchasing the Canon Manual 16 XL 5.4-86.4 mm Zoom Video×
This is a high-performance zoom lens for camcorders compatible with the XL
Mount System. It has a mechanical focus ring, a zoom that can be switched
between manual and servo-controlled, a two-level ND filter and other features*.
* Aperture will be controlled in AE mode.
Before mounting this lens, make sure that your camcorder is also compatible
with the XL Mount System (that the
mark appears on the camcorder).
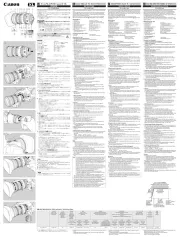
1Lens hood !1 Electrical contacts
2Focusing ring !2 Flange rear ring fixing screw
3Distance scale !3 Flange back adjustment indicator
5Zoom/Focal length values !5 Zoom mode switch lever
6ND brightness level !6 Red mounting dot
7ND brightness index !7 ND switch operation ring
8ND filter switch unlock button !8 Zoom position index
9Macro button !9 Zoom lever
!0 @0Flange rear adjustment ring/ Lens hood fixing screw
Included accessories (1 each)
• Lens hood • Rear dust cap
• Soft case • Lens cap (for 72 mm lens)
1. Mounting and unmounting the lens
Turn the camcorder power off before mounting the lens.
1) Turn the rear dust cap counterclockwise until it stops, and remove it from the
2) Align the mark on the camera body and the red mounting dot on the lens,
then rotate the lens clockwise until it clicks into position (
3) Remove the front lens cap.
Slide and hold the lens release switch on the camcorder, and rotate the lens
counterclockwise until it stops. Then remove the lens (
You can attach 72mm filters to the lens itself, or 82mm filters to the lens
hood. (however, 72 mm filters and 82 mm filters cannot be attached at the
¡Remove the lens hood before attaching a filter to it or the lens.
¡You cannot use the supplied lens cap when a 82 mm filter is attached.
¡Attaching 2 or more thick filters at the same time may cause vignetting.
¡Place the lens and lens hood on a soft cloth before attaching filters or any
other accessories. Make sure they are attached straight and securely.
3. Attaching the lens hood
1) Fit the hood onto the end of the lens and turn clockwise (
2) Secure the hood with the fixing screw (
¡Since the lens hood cuts stray light that may cause flare and ghost
images, and also protects the lens, be sure to attach the hood when you
4. Using the focusing ring
Turn clockwise to bring the focus closer and counterclockwise to move the
focus farther away. If focusing is difficult at the telephoto end, we
recommend using the Monochrome CRT Viewfinder Unit FU-1000 or an
external monitor. When operating the focusing ring, be careful not to get
your fingers caught in the upper part of the lens.
You can use either the zoom ring (manual) on the lens or the zoom button
(servo) on the camcorder to zoom in on your subject.
¡You cannot use digital zoom with this product.
Turn the zoom ring clockwise to zoom out to wide angle and
counterclockwise to zoom in to telephoto.
Use the zoom controls on the camcorder, wireless control, or the ZR-
1000 Zoom Remote Controller (sold separately).
¡Do not touch the zoom ring while using the servo to control the zoom
¡Forcing manual control of the zoom ring when the zoom mode switch
lever is in the “SERVO” position may cause damage.
The lens does not have an aperture ring. Make necessary adjustments with
For shooting in macro mode, place the zoom at the full wide angle setting,
and while pressing the macro button point the lens at the object and turn the
macro adjustment ring clockwise (
). For normal shooting, return the macro
adjustment ring to its original setting. If the macro button is left engaged,
images will be out of focus at some distances.
The 16 Zoom Video Lens has two built-in ND filters (1/6 and 1/32) for×
different lighting conditions.
Turn the ND filter switching ring while holding the ND filter switch unlock
button pressed to choose the desired ND filter (once the filter is selected, the
button returns to off status).
Place the ND filter switching ring at the OFF, 1/6, or 1/32 position.
9. Flange back adjustment of the lens
1) Mount the camcorder on a tripod. Select an object 2-3 m away from the
lens, or an object about the same distance away from the lens as your
¡Use a subject with high contrast so it will be easy tell when focus is
2) Turn the IRIS/SELECT Dial to open the aperture (
3) Zoom all the way in to full telephoto (
4) Turn the focusing ring and focus on the object (
5) Zoom all the way out to full wide angle (
6) Fully release the flange back fixing screw on the lens (counterclockwise)
7) Turn the flange back ring until you obtain correct focus (
¡The approximate position is where the flange back adjustment indicator
8) Repeat steps 3) to 7) until you obtain the correct focus on both ends.
9) Tighten the flange back fixing screw with the ring set in proper position
10. Battery pack continuous usage times
¡The following are the approximate continued usage times for the Manual 16×
XL 5.4-86.4 mm video zoom lens when used with the XL1S digital video
When used with the XL1S’s supplied color viewfinder.
¡When you attach two battery packs to the CH-900/CH-910 Dual Battery
Charger/Holder (optional), maximum continuous usage time will be almost
– Be sure to replace the front lens cap and rear dust cap.
– Do not store the zoom lens in hot places such as in direct sunlight, near a
heater or radiator, in a hot car, etc. This may cause the zoom lens to
become deformed or discolored.
¡Be sure to keep the electronic contacts clean, to ensure proper connection.
¡Protect the lens from strong vibrations or shocks.
¡Do not try to disassemble or modify this zoom lens.
¡Problems with the operation of this lens may be due to faults in not only the
lens, but in the camcorder itself. In the event of problems, contact a dealer or
service center familiar with your camcorder, as well as a Canon authorized
¡Be careful that the lens’ zoom lever does not catch on the cord of the soft
Note: This equipment has been tested and found to comply with the limits for
a Class B digital device, pursuant to Part 15 of the FCC Rules. These
limits are designed to provide reasonable protection against harmful
interference in a residential installation. This equipment generates, uses
and can radiate radio frequency energy and, if not installed and used in
accordance with the instructions, may cause harmful interference to
However, there is no guarantee that interference will not occur in a
particular installation. If this equipment does cause harmful interference
to radio or television reception, which can be determined by turning the
equipment off and on, the user is encouraged to try to correct the
interference by one or more of the following measures:
– Reorient or relocate the receiving antenna.
– Increase the separation between the equipment and receiver.
– Connect the equipment into an outlet on a circuit different from that
to which the receiver is connected.
– Consult the dealer or an experienced radio/TV technician for help.
Do not make any changes or modifications to the equipment unless
otherwise specified in the manual. If such changes or modifications should
be made, you could be required to stop operation of the equipment.
This device complies with Part 15 of the FCC Rules. Operation is subject to
the following two conditions:(1) This device may not cause harmful
interference, and (2) this device must accept any interference recieved,
including interference that may cause undesired operation.
This digital apparatus does not exceed the Class B limits for radio noise
emissions from digital apparatus set out in the Radio Interference
Regulations of the Canadian Department of Communications.
Nous vous remercions d’avoir acheté l’objectif vidéo zoom 16 manuel XL 5,4-×
86,4 mm de Canon. Cet objectif très performant est destiné aux camescopes
compatible avec le système de monture XL. Il est doté d’une bague de mise au
point mécanique, d’un zoom commutable entre manuel et servo, d’un filtre ND
deux niveaux et d’autres caractéristiques*.
* L’ouverture est contrôlable en mode AE.
Avant le montage de cet objectif, vérifier que le camescope est aussi
compatible avec le système de monture XL (que la marque
1Parasoleil !1 Contacts électriques
2Bague de mise au point !2 Vis de fixation de bague arrière
3Echelle des distances de barillete
3Echelle des distances !3 Indicateur de réglage de bague
4Bague de zoom arrière du barillet
5Valeurs de Zoom/Focale !4 Molette
6Niveau de luminosité ND !5
Levier de commutation de mode zoom
7Index de luminosité ND !6 Point de montage rouge
8Bouton de déverrouillage de filtre ND !7 Bague de commutation de filtre ND
Index de position de zoom
!0 !9Bague d’ajustement arrière de Levier de zoom
barillet/bague d’ajustement de macro @0 Vis de fixation de parasoleil
Accessoires fournis (1 de chaque)
• Parasoleil • Bouchon anti-poussière
• Etui souple • Bouchon d’objectif
1. Installation et retrait de l’objectif
Mettre le camescope hors tension avant d’installer l’objectif.
Installation de l’objectif
1) Tourner le bouchon anti-poussière arrière de l’objectif dans le sens anti-
horaire jusqu’à son arrêt et le retirer de l’objectif (
2) Aligner le repère sur le corps de l’appareil et le point de montage rouge, puis
tourner l’objectif dans le sens horaire jusqu’à enclenchement en position
3) Enlever le bouchon de l’objectif.
Faire glisser le commutateur de déverrouillage de l’objectif sur la caméra et
le maintenir dans cette position, puis faire tourner l’objectif dans le sens anti-
horaire jusqu’à son arrêt. Retirer l’objectif (
Il est possible de monter des filtres 72 mm sur l’objectif lui-même, ou des
filtres de 82 mm sur le parasoleil. (Cependant, il n’est pas possible de placer
des filtres de 72 mm et de 82 mm en même temps.)
¡Déposer le paresoleil avant d’installer un filtre sur celui-ci ou sur l’objectif.
¡Le bouchon d’objectif fourni n’est pas utilisable quand un filtre de 82 mm
¡Un vignettage risque de se produire si l’on fixe en même temps deux ou
¡Placer l’objectif et le paresoleil dans un linge doux avant d’installer des
filtres ou d’autres accessoires.
3. Mise en place du parasoleil
1) Présenter le parasoleil sur le bout de l’objectif et le tourner dans le sens
2) Immobiliser le parasoleil avec la vis de fixation (
¡Comme le parasoleil élimine la lumière parasite qui peut provoquer un
voile ou des images fantômes et qu’il protège l’objectif, vérifier à installer
ce parasoleil lors des enregistrements.
4. Utilisation de la bague de mise au point
Tourner dans le sens horaire pour réduire la focale ou dans le sens anti-
horaire pour allonger la focale. Si une mise au point s’avère difficile à la
position téléphoto, nous conseillons d’utiliser le Unité viseur CRT
monochrome FU-1000 ou un écran moniteur externe. En opérant la bague
de mise au point, prendre garde de ne pas se coincer les doigts dans la
partie supérieure de l’objectif.
Utiliser la bague de zoom (manuelle) sur l’objectif ou le bouton de zoom
(servo) sur le camescope pour zoomer en avant sur le sujet.
Le zoom numérique est inutilisable avec ce produit.
Tourner la bague de zoom dans le sens horaire pour zoomer en arrière
vers le grand angle et dans le sens anti-horaire pour passer à la position
Utiliser les commandes de zoom sur le camescope, la commande sans fil
ou la télécommande de zoom ZR-1000 (vendue séprément).
¡Ne pas toucher la bague de zoom en utilisant le servo pour contrôler la
¡Forcer le contrôle manuel sur la bague de zoom quand le levier de
commutation du mode de zoom est sur la position “SERVO” peut
L’objectif est dépourvu de bague des ouvertures. Effectuer les ajustements
nécessaires avec le camescope.
En prise de vue en mode Macro, placer le zoom au réglage grand angle
total, et tout en appuyant sur le bouton Macro, pointer l’objectif vers le sujet
et tourner la bague de réglage Macro dans le sens horaire (
de vue normale, ramener la bague de réglage Macro à son réglage
d’origine. Si le bouton Macro est laissé engagé, les images seront floues à
L’objectif vidéo zoom 16 intègre deux filtres ND (1/6 et 1/32) pour des×
conditions d’éclairage différentes. Tourner la bague de commutation de filtre
ND en maintenant le bouton de déverrouillage de filtre ND pressé pour
choisir le filtre ND souhaité (une fois le filtre sélectionné, le bouton reviendra
en position déverrouillée).
Régler la bague de commutation du filtre ND à la position OFF, 1/6 ou 1/32.
9. Réglage arrière de barillet de l’objectif
1) Installer le camescope sur un trépied. Choisir un objet situé à 2 ou 3 mètres
de l’objectif ou un objet qui se trouve presque à la même distance de
Utiliser un sujet fortement contrasté car il sera plus facile de savoir quand la
mise au point est réalisée.
2) Tourner la bague IRIS/SELECT pour ouvrir le diaphragme (
3) Zoomer à fond en téléphoto total (
4) Tourner la bague de mise au point et effectuer la mise au point sur le sujet
5) Zoomer à fond en grand angle total (
6) Relâcher complètement la vis de fixation de bague arrière de barillet sur
l’objectif (sens anti-horaire) (
7) Tourner la bague arrière de barillet de manière à obtenir une mise au point
¡La position correcte est celle où l’indicateur de réglage arrière du barillet
8) Répéter les étapes 3) à 7) jusqu’à obtenir une mise au point correcte aux
9) Serrer la vis de fixation arrière du barillet tandis que la bague se trouve à la
position adéquate (sens horaire).
10. Durée d’utilisation continue de batterie rechargeable
¡Voici les durées d’utilisation continue approximatives pour l’objectif vidéo
zoom 16× manuel XL 5,4-86,4 mm quand il est utilisé avec un camescope
A l’emploi avec le viseur couleur fourni avec le XL1S.
¡Si l’on raccorde deux batteries rechargeables sur le Double Chargeur/Porte-
batteries CH-900/CH-910 (en option), la durée d’utilisation maximale en
continu sera presque doublée.
¡Pour le rangement de l’objectif:
– Assurez-vous de bien réinstaller les bouchons d’objectif et anti-poussière.
Ne pas ranger objectif zoom dans un endroit expose à la chaleur, au soleil,
à proximité d’un appareil de chauffage ou d’un radiateur ou dans une
voiture sous peine de déformation ou de décoloration.
¡Pour assurer un bon raccordement électrique toujours tenir les contacts
électroniques de l’objectif en parfait état de propreté.
¡Protéger l’objectif des chocs et des vibrations.
¡Ne pas tenter de démonter ou de modifier cet objectif zoom.
Un problème quelconque rencontré lors de prise de vues peut aussi bien être
imputable au camescope qu’à l’objectif. Dans un tel cas, contacter le
revendeur ainsi qu’un service après-vente qualifié Canon.
Veiller à ce que le levier de zoom de l’objectif ne s’accroche pas au cordon de
Le présent appareil numérique n’émet pas de bruits radioélectriques
dépassant les limites applicables aux appareils numériques (de la classe B)
prescrites dans le Règlement sur le brouillage radioélectrique édicté par le
ministère des Communications du Canada.
Field Size at Minimum Focusing
Dimension de champ à la distance de mise au point
Bildfeldgröße bei kürzester Einstellentfernung
Minimum Focusing Distance
Distance de mise au point minimum
Kürzeste Einstellentfernung
XL 5.4-86.4 mm 5.4-86.4 mm 16× ×4.8 3.6 mm 47° ′ ° ° ′ ×55 36′× °×52 3 11′×2 23 5 cm 100 cm 71 53.2 mm 796×597 mm
仕様一覧 / Specifications / Fiche technique / Technische Daten
¡寸法、質量表示はレンズ本体のみで、フード、キャップ等は含みません。
製品の仕様および外観は、改良等の理由で予告なく変更することがあります。
¡Weight and dimensions are for lens only, and do not include lens cap and lens
Weight and dimensions are approximate. Subject to change without notice.
Errors and omissions excepted.
¡Le poids et les dimensions s’entendent pour l’objectif uniquement sans le
capuchon ni le parasoleil.
Le poids et les dimensions sont approximatifs.
Les caractéristiques sont sujettes à modification sans préavis et sont fournies
¡Gewicht und Abmessungen gelten nur für das Objektiv. Objektivdeckel und
Gegenlichtblende sind nicht mit eingeschlossen.
Gewicht und Abmessungen sind nur Annäherungswerte.
Technische Änderungen vorbehalten.
Fehler und Auslassungen Vorbehalten.
Change in minimum focusing distance
Changement en distance de mise au point minimum
Änderung der kürzesten Einstellentfernung
Zoom set to T (Telephoto)
Zoom set to W (Wide-angle)
Zoom réglé sur W (grand angle)
Zoom steht auf W (Weitwinkel)
Canon Manuelles Video-Objektiv mit 16-fach-Zoom
Wir danken Ihnen für das Vertrauen, das Sie Canon mit dem Kauf des
manuellen 16-fach-Zoom-Videoobjektivs XL 5,4-86,4 mm entgegenbringen.
Dieses hochleistungsfähige Zoomobjektiv eignet sich für Camcorder mit XL-
Objektivflansch. Es verfügt über einen mechanischen Fokussierring, die
Zoomfunktion lässt sich umschalten zwischen manueller und Servosteuerung,
ein Doppel-ND-Filter steht zur Verfügung u.v.m.*
* Die Blendensteuerung erfolgt über den AE-Modus.
Bevor Sie dieses Objektiv an einen Camcorder ansetzen, vergewissern Sie
sich bitte davon, dass der Camcorder einen XL-Flansch (zu erkennen am
1Gegenlichtblende !1 Kontakte
2Fokussierring !2 Auflagemaß-Einstellring-
3Distanzskala Sicherungsschraube
4Zoom-Ring !3 Auflagemaßeinstellung-Anzeige
5Zoom/Brennweiten-Werte !4 Knopf
6ND-Helligkeitspegel !5 Zoombetriebsart-Schalthebel
7ND-Helligkeitsindex !6 Roter Montagepunkt
8Entriegelungstaste für !7 ND-Filter-Umschaltring
ND-Filter-Schalter !8 Zoom-Positionsindex
9Makro-Taste !9 Zoom-Hebel
!0 @0Auflagemaß-Einstellring/ Gegenlichtblende-Sicherungsschraube
• Gegenlichtblende • Schutzdeckel
• Weichetui • Objektivkappe (72 mm)
1. Ansetzen und Abnehmen des Objektivs
Schalten Sie den Camcorder aus, bevor Sie das Objektiv ansetzen.
1) Den Schutzdeckel bis zum Anschlag im Gegenuhrzeigersinn drehen und
2) Die Markierung am Camcordergehäuse und den roten Punkt am Objektiv
aufeinander ausrichten und das Objektiv im Uhrzeigersinn drehen, bis es
3) Die vordere Objektivkappe abnehmen.
Den Objektiv-Freigabeschalter am Camcorder verschieben und festhalten,
das Objektiv im Gegenuhrzeigersinn bis zum Anschlag drehen und
Sie können 72-mm-Filter am Objektiv selbst oder 82-mm-Filter an der
Gegenlichtblende anbringen. (der gleichzeitige Einsatz von 72-mm-Filtern
und 82-mm-Filtern ist jedoch nicht möglich).
¡Nehmen Sie die Gegenlichtblende ab, wenn Sie ein Filter an ihr oder
¡Wenn ein 82-mm-Filter angebracht ist, kann die mitgelieferte
Objektivdkappe nicht aufgesetzt werden.
¡Gleichzeitige Verwendung von 2 oder mehr dicken Filtern kann
Vignettierung verursachen.
¡Zum Anbringen von Filtern und anderem Zubehör legen Sie das Objektiv
und die Gegenlichtblende auf einem weichen Tuch ab. Achten Sie
darauf, dass alle Teile gerade und fest angebracht werden.
3. Anbringen der Gegenlichtblende
1) Setzen Sie die Gegenlichtblende vorne an das Objektiv an, und drehen Sie
2) Sichern Sie die Gegenlichtblende mit der Sicherungsschraube (
¡Filmen Sie stets mit Gegenlichtblende. Sie verhindert nicht nur den
Einfall von Streulicht, das Blendenflecken verursachen kann, sondern
schützt auch das Objektiv.
4. Verwendung des Fokussier-Rings
Zum Einstellen des Objektivs auf eine kleinere Entfernung wird dieser Ring
im Uhrzeigersinn gedreht, zum Einstellen auf eine größere Entfernung im
Gegenuhrzeigersinn. Wenn die Scharfeinstellung am Tele-Endanschlag
problematisch ist, empfehlen wir den Gebrauch der Suchereinheit FU-1000
mit Schwarzweiß-Kathodenstrahlröhre oder eines externen Monitors. Beim
Drehen des Fokussier-Rings darauf achten, dass sich die Finger nicht im
oberen Objektivteil verfangen.
Zur Brennweitenverstellung können Sie entweder den (manuellen) Zoomring
am Objektiv drehen oder die Zoomtaste (Servo) am Camcorder betätigen.
¡ Digital-Zoom steht zur Verfügung.
1Manuelles Zoomen [MANUAL]
Zur Brennweitenverstellung in Richtung Weitwinkel drehen Sie den Zoom-
Ring im Uhrzeigersinn; in Richtung Tele im Gegenuhrzeigersinn.
Zur Brennweitenverstellung betätigen Sie die Zoom-Funktionselemente
am Camcorder, der drahtlosen Fernbedienung oder der Zoom-
Fernbedienung ZR-1000 (Sonderzubehör).
¡Beim Zoomen mit Servosteuerung nicht den Zoom-Ring berühren.
¡Mit dem Zoombetriebsart-Schalthebel in Stellung SERVO führt der
Versuch, den Zoom-Ring zu drehen, zu einer Beschädigung.
Dieses Objektiv hat keinen Blendenring. Nehmen Sie die notwendigen
Einstellungen am Camcorder vor.
Für Makro-Aufnahmen setzen Sie das Objektiv auf größte
Weitwinkelstellung, halten Sie die Makro-Taste gedrückt, richten Sie das
Objektiv auf das Objekt, und drehen Sie den Makro-Einstellring im
). Für normale Aufnahmen bringen Sie den Makro-
Einstellring wieder in seine Ausgangsstellung zurück. Bleibt die Makro-Taste
gedrückt, ist bei manchen Aufnahmedistanzen Bildunschärfe die Folge.
Das Objektiv verfügt über zwei eingebaute ND-Filter (1/6 und 1/32) für
verschiedene Lichtbedingungen.
Halten Sie die Entriegelungstaste für den ND-Filter-Schalter gedrückt, und
drehen Sie den ND-Filter-Umschaltring, um das gewünschte Filter zu wählen
(die Taste schaltet anschließend von selbst in die Aus-Stellung zurück).
Setzen Sie den ND-Filter-Umschaltring auf OFF, 1/6 oder 1/32.
9. Einstellung des Objektiv-Auflagemaßes
1) Den Camcorder auf ein Stativ setzen. Ein Objekt in einer Entfernung von 2
bis 3 m vom Objektiv wählen oder einen geeigneten Aufnahmegegenstand
in gleicher Entfernung wie das gewünschte Aufnahmeobjekt.
¡Verwenden Sie ein kontrastreiches Motiv, das eine leichte
Scharfeinstellung ermöglicht.
2) Drehen Sie die IRIS/SELECT-Scheibe, um die Blende zu öffnen (
3) Zoomen Sie voll in die Telestellung (
4) Das Objektiv mit dem Fokussier-Ring scharf auf das Objekt einstellen (
5) Zoomen Sie voll in die Weitwinkelstellung (
6) Die Sicherungsschraube des Auflagemaß-Einstellrings am Objektiv ganz
) (im Gegenuhrzeigersinn drehen).
7) Den Auflagemaß-Einstellring drehen, bis die Scharfeinstellung stimmt (
¡Die nahezu optimale Position ist die, wo die Auflagemaßeinstellung-
Anzeige mit “F.B” ausgerichtet ist.
8) Schritte 3) bis 7) wiederholt ausführen, bis das Bild an beiden Enden des
Brennweitenbereichs optimal scharf ist.
9) Wenn die Einstellung stimmt, die Sicherungsschraube des Auflagemaß-
Einstellrings wieder anziehen (im Uhrzeigersinn drehen).
10. Dauerbetriebszeiten nach Akku
¡Die Zeitangaben sind Anhaltswerte und gelten für kontinuierlichen Betrieb
mit einem Digital-Camcorder XL1S.
Bei Verwendung des XL1S-Farbsuchers.
¡Wenn Sie den Camcorder über das Doppel-Ladegerät/Batteriemagazin CH-
900/CH-910 (Sonderzubehör) mit zwei Batteriepacks betreiben, verlängert
sich die maximale Dauerbetriebszeit auf annähernd das Doppelte.
¡Aufbewahrung des Objektivs:
– Vergewissern Sie sich, den vorderen und Schutzdeckel aufzusetzen.
– Starke Wärme kann das Objektiv beschädigen. Setzen Sie es daher nicht
direkter Sonneneinstrahlung aus und lassen Sie es nicht in der Nähe von
Heizkörpern oder in einem in der Sonne geparkten Fahrzeug liegen.
¡Die elektronischen Kontakte des Objektivs sauberhalten, damit ein
einwandfreier Anschluß gewährleistet ist.
¡Das Objektiv vor Vibrationen und Stößen schützen.
¡Nicht versuchen, das Objektiv auseinanderzunehmen oder zu modifizieren.
¡Funktionsbeeinträchtigungen des Objektivs können ihre Ursache auch im
Camcorder selbst haben. Sollten Probleme auftreten, wenden Sie sich bitte
an Ihren Fachhändler oder eine Kundendienststelle, wo man mit Ihrem
Camcorder vertraut ist, oder an eine autorisierte Canon-
¡Achten Sie darauf, dass der Zoom-Ring-Hebel des Objektivs sich nicht in der
Schnur des Weichetuis verfängt.