CodeRED CRL-100 Manual

CodeRED Røgalarm CRL-100

Læs gratis den danske manual til CodeRED CRL-100 (2 sider) i kategorien Røgalarm. Denne vejledning er vurderet som hjælpsom af 3 personer og har en gennemsnitlig bedømmelse på 4.4 stjerner ud af 2 anmeldelser. Har du et spørgsmål om CodeRED CRL-100, eller vil du spørge andre brugere om produktet?

Side 1/2
04
IMPORTANT! PLEASE READ CAREFULLY AND SAVE.
This user's manual contains important information about your
Smoke Alarm's operation. If you are installing this Smoke Alarm for
use by others, you must leave this manualor a copy of itwith
the end user.
1. SUPERIOR FEATURES
2. IMPORTANT SAFETY INFORMATION 02
3. WHERE TO LOCATE 04……………………………
4. LOCATIONS TO AVOID 07…………………………
5. HOW TO INSTALL 08……………………………
6. LED INDICATORS AND HORN PATTERNS 10
7. FALSE ALARM CONTROL 11…………
8. TESTING THE SMOKE ALARM 11…………………
9. MAINTENANCE AND CLEANING 12…………
10. PRACTICE FIRE SAFETY 13………………………
11. WHAT TO DO IN CASE OF A FIRE 14……
12. TROUBLESHOOTING 15……………………………
13. LIMITATIONS OF SMOKE ALARMS 15……………
14. LIMITED WARRANTY 18……………………………
1. SUPERIOR FEATURES
3.1 As a minimum, smoke alarms should be located
between sleeping areas and potential sources of fire
such as living rooms and kitchens. In single story
homes with one sleeping area, a smoke alarm should
be installed in the hallway, as close as possible to the
living accommodation. To ensure audibility in bedrooms,
no smoke alarm should be further away than 3m from
any bedroom door. It may be necessary to install more
than one smoke alarm, particularly the hallway is more
than 15m long. In single story homes with two separate
sleeping areas, a minimum of two smoke alarms is
required, one outside each sleeping area. In multilevel
or split level homes, as a minimum a smoke alarm
should be installed on the ground floor between the
staircase and any rooms in which a fire might start and
on each story
in circulation areas which form part of
escape route (normally hallways and landings).
3.2 Additional alarms should be installed in bedrooms in
anticipation of fires originating here, caused by faulty
wiring, lights, appliances, smokers or other hazards.
3.3 For best protection, smoke alarms should be installed
in every room in your home, apart from those listed in
the Section 4 LOCATIONS TO AVOID. Heat alarms
should be used in kitchens, boiler rooms, laundry
rooms, garages and such like, where smoke alarms
would be unsuitable.
3.4 Install smoke alarms in circulation areas at a distance
no greater than 7.5m from the farthest wall, no greater
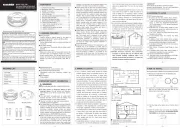
5.1 Remove the smoke alarm from the packaging and
detach the mounting plate
5.3 Drill the holes at the marks with a 3/16-inch (5mm)
drill.
01 03
05
07
02 06 08
2. IMPORTANT SAFETY INFORMATION
3. WHERE TO LOCATE
5.
HOW TO INSTALL
CONTENTS
WARNING!
PLEASE READ AND SAVE THESE INSTRUCTIONS.
DO NOT remove or disconnect battery to quiet
unwanted alarms. This will remove your protection.
Open windows or fan the air around smoke alarm to
silence it.
The test button accurately tests all smoke alarm
functions. DO NOT use any other test method. Test
smoke alarm weekly to ensure proper operation.
Observe and follow all local and national electrical
and building codes for installation.
This smoke alarm IS NOT designed to be the PRIMARY
protection for buildings that require complete fire alarm
systems. Buildings of this type include hotels, motels,
dormitories, hospitals, nursing homes, and group
homes. This is true even if they were once single family
homes. However, this smoke alarm MAY be used inside
individual rooms as SUPPLEMENTAL protection.
Install a smoke alarm in every room and on every level
of the home. Smoke may not reach the smoke alarm for
many reasons. For example, if a fire starts in a remote
part of the home, on another level, in a chimney, wall,
roof, or on the other side of a closed door, smoke may
PACKING LIST
Photoelectric alarms are generally more effective at detecting
slow, smoldering fires that smolder for hours before bursting
into flame. Sources of these fires may include cigarettes burning in
couches or bedding.
Ionization alarms are generally more effective at detecting
fast, flaming fires that consume combustible materials rapidly
and spread quickly. Sources of these fires may include flammable
liquids or paper burning in a waste container.
However, both types of alarms provide adequate detection of both
types of fires.
If you desire the earliest detection of both smoldering fires and fast
flaming fires, you should install smoke alarms that combine both
photoelectric and ionization sensing technologies in one unit.
PART NAME
QUANTITY
Smoke alarm
Smoke alarm
Mounting bracket
Mounting bracket
Anchor plug
Anchor plug
Screw
Screw
Manual
Manual
1 Piece
1 Piece
2 Pieces
2 Pieces
1 Piece
Battery Operated
Long-life lithium-ion battery sealed in the alarm to
lengthen its lifetime to 10 years in standby condition.
Operating Light (LED)
Flashes approximately every
5-6 minutes confirming
unit
is powered.
Low Battery Warning
Alarm beeps every 40 seconds when the battery needs
replacing.
Alarm Pause (Hush mode)
Silence your smoke alarm by momentarily pressing the
test button when non-emergency smoke (e.g. steam),
causes nuisance alarms. The red light flashes every 10
seconds to remind you that the smoke alarm has been
silenced. The alarm will automatically reset after 9
minutes.
Sensitivity Test Button
Test the sensitivity, circuitry, batteries, horn.
Loud 85 Decibel Piezo Electric Alarm
Automatically resets when hazardous condition has
passed.
Easy Installation
Fixings supplied.
not reach the smoke alarm in time to alert household
members. A smoke alarm will not promptly detect a fire
EXCEPT in the area or room in which it is installed.
Smoke alarms may not alert every household member
every time. The alarm horn is loud in order to alert
individuals to a potential danger. However, there may be
limiting circumstances where a household member may
not hear the alarm (i.e., outdoor or indoor noise, sound
sleepers, drug or alcohol usage, the hard of hearing,
etc.). If you suspect that this smoke alarm may not alert
a household member, install and maintain specialty
smoke alarms. Household members must hear the
alarm's warning sound and quickly respond to it to
reduce the risk of damage, injury, or death that may
result from fire. If a household member is hard of
hearing, install special smoke alarms with lights or
vibrating devices to alert occupants.
Smoke alarms can sound their alarms only when they
detect smoke. Smoke alarms detect combustion
particles in the air. They do not sense heat, flame, or
gas. This smoke alarm is designed to give audible
warning of a developing fire. However, many fires are
fast-burning, explosive, or intentional. Oth
ers are
caused by carelessness or safety hazards. Smoke may
not reach the smoke alarm QUICKLY ENOUGH to
ensure safe escape.
Smoke alarms have limitations. This smoke alarm is not
foolproof and is not warranted to protect lives or
property from fire. Smoke alarms are not a substitute for
insurance. Homeowners and renters should insure their
lives and property. In addition, it is possible for the
smoke alarm to fail at any time. For this reason, you
must test the smoke alarm weekly and replace every 10
years.
06
than 7.5m from a door to any room in which a fire might
start and no greater than 7.5m from the next smoke
alarm.
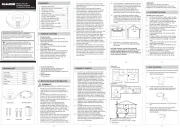
3.5 As it is impossible to predict the source of a fire, the
best location for an alarm is usually the center of a
room or hallway. If it is necessary to place a smoke
alarm on a wall, always locate the detection element of
the alarm 150mm to 300mm (6 to 12 inches) below the
ceiling and the bottom of the alarm above the level of
doors and other openings.
3.6 In rooms with simple sloped, peaked or gabled ceilings,
install smoke alarms on the ceiling 900mm (3 feet) from
the highest point of the ceiling. Dead air at the peak of
a ceiling may prevent the smoke from reaching the
alarm in time to provide an early warning.
3.7 Read Section 4 LOCATIONS TO AVOID and Section
13 LIMITATIONS OF SMOKE ALARMS in this manual.
CAUTION: Research indicates that substantial
increases in warning time can be obtained with
each properly installed, additional alarm. It is
strongly recommended that advice in 3.3 above be
followed to ensure maximum protection.
Single Story,
one sleeping area
Single Story,
more than one sleeping areas
Smoke alarms for limited protection
Additional smoke alarms for better coverage
Heat alarms
KITCHEN
LIVING ROOM
TV ROOM
DINING
ROOM
BEDROOM
BEDROOM
BEDROOM
KITCHEN
LIVING ROOM
DINING ROOM
BEDROOM BEDROOM
BEDROOM
KITCHEN
FINISHED BASEMENT
LIVING ROOM
BEDROOMBEDROOM
HALL
Two Story dwelling
IMPORTANT
These alarms are intended to primarily for single-
occupancy private dwellings. For use in other applications
the manufacturer's advice must be sought.
4. LOCATIONS TO AVOID
DO NOT locate smoke alarms :
4.1 In turbulent air from fans, heaters, doors, windows,
etc., which could draw smoke away from the alarm.
4.2 In high humidity area such as bathrooms and shower
rooms, or where the temperature exceeds 39˚C (
100˚F) or falls below 5˚C ( 40˚F), as high humidity can
trigger nuisance alarm.
4.3 A t the peak of an A frame ceiling. Dead air at the
top may prevent smoke from reaching the alarm in
time to provide early warning.
4.4 Less than 300mm (12 inches) from the wall when
mounted on the ceiling.
4.5 In insect-infested areas. Tiny insects may affect
performance.
4.6 In kitchens, boiler rooms, laundry rooms, garages.
Combustion particles from cooking or car exhaust and
dust and moisture c
ould trigger a nuisance alarm.
4.7 In very dusty or dirty areas. Dirt and dust can build up
and impair performance.
4.8 Within 300mm (12 inches) of light fittings or room
corners.
4.9 In locations which would make routine testing or
maintenance hazardous (e.g. over a stairwell).
4.10 On poorly insulated walls or ceilings.
4.11 Near objects such as ceiling decorations which might
impede the path of smoke to the alarm.
4.12 Within 1500mm (5 feet) of fluorescent light fittings.
Dead air area
Center
15 c m
15 c m
Model: CRL-100
Ten-year Battery Operated
Photoelectric Smoke Alarm
Standards tested to: EN14604:2005/AC:2008
Warning! Test unit before installation and when installation is completed.
Screw
hole
Mounting
plate
Hook
Locate the mounting bracket in your chosen position.
Align the two longest mounting slots with the line.
Draw a mark in the center of each slot.
5.2
5.4 Insert the anchor plugs and screw the mounting
bracket to the chosen position.
DO NOT OVER-TIGHTEN
THE SCREWS
, this will distort the mounting bracket.
Fig. 1 Fig. 2
6/2017
5.6 Installation of Base
Fit the base to the alarm by inserting the two hooks on
the base plate into the corresponding slots on the back
of the alarm. Lock in place by rotating clockwise
08
Slide the red battery pin out and rotate it so the short arm inserts into the
slot against the surface of the alarm
5.5 On the back of the alarm, the red battery pin will
be in the OFF position as Fig. 3. To turn alarm ON slide
the red battery pin out and rotate so the short arm
inserts into the slot against the surface of the alarm the
as Fig.4. Make sure the pin is flat against the base
surface.
5.7 Test Button
Depress the Test/Hush button. The red indicator light
will flash and the alarm will sound. This means the
detector is working properly. At the same time the
detector will enter low sensitivity detecting status,
automatically resuming normal detecting status
approx 9 minutes later
11 13 15 17
10
12
14 16 18
10. PRACTICE FIRE SAFETY
13. LIMITATIONS OF SMOKE ALARMS
The alarm features a False Alarm Control that, when
activated, silences unwanted alarms for up to 9 minutes.
To use the False Alarm Control:
Press and release the test button during an unwanted
alarm to silence the alarm horn. This means the smoke
alarm is in False Alarm Control.
If the smoke alarm does not go into False Alarm Control
and continues to sound its loud alarm horn or if it initially
goes into False Alarm Control then resounds the alarm, the
smoke is too heavy and could be a possibly dangerous
situation take emergency action.
If the smoke alarm sounds its alarm horn, and you have
not pushed the test button, it is warning of a dangerous
situation. Your immediate response is necessary. To
prepare for such occurrences, develop family escape
plans, discuss them with ALL household members, and
practice them regularly.
10.1 Expose everyone to the sound of a smoke alarm and
explain what the sound means.
10.2 Determine TWO exits from each room and an escape
route to the outside from each exit.
10.3 Teach all household members to touch the door and
use an alternate exit if the door is hot. INSTRUCT
THEM NOT TO OPEN THE DOOR IF THE DOOR IS
HOT.
10.4 Teach household members to crawl along the floor to
stay below dangerous smoke, fumes, and gases.
10.5 Determine a safe meeting place for all members
outside the building.
7. FALSE ALARM CONTROL
WARNING!
Test each smoke alarm to be sure it is installed
correctly and operating properly.
The test button accurately tests all functions. DO NOT
use an open flame to test this smoke alarm. You may
ignite and damage the smoke alarm or your home.
Test smoke alarms weekly and upon returning from
vacation or when no one has been in the household for
several days.
Stand at arm's length from the smoke alarm when
testing. The alarm horn is loud to alert you to an
emergency and can be harmful to hearing.
8.1 Press and release the test button to test the alarm.
The alarm will sound loud short beeps. The alarm may
stop sounding once releasing the test button.
8.2 If smoke alarm does not sound, check whether the
alarm is properly attached to the mounting bracket.
NOTE:
REPLACE OR RETURN THE ALARM IF THE TEST
FUNTION DOES NOT OPERATE PROPERLY AFTER
FOLLOWING THE PROCEDURES OUTLINED ABOVE.
DANGER: If alarm horn sounds, and smoke alarm is not
being tested, the smoke alarm is sensing smoke.
THE SOUND OF THE ALARM HORN REQUIRES YOUR
IMMEDIATE ATTENTION AND ACTION.
8. TESTING THE SMOKE ALARM
This unit has been designed to be as maintenance-free as
possible, but there are a few simple things you must do to
keep it working properly:
9.1 Test it at least once a week.
9.2 Clean the smoke alarm at least once a month; gently
vacuum the outside of the smoke alarm using your
household vacuum's soft brush attachment. Test the
11.1 Don't panic; stay calm.
11.2 Leave the building as quickly as possible. Touch
doors to feel if they are hot before opening them. Use
an alternate exit if necessary. Crawl along the floor,
and DO NOT stop to collect anything.
11.3 Meet at a pre-arranged meeting place outside the
building.
11.4 Call the fire department from OUTSIDE the building.
11.5 DO NOT GO BACK INSIDE A BURNING BUILDING.
Wait for the fire department to arrive.
NOTE: These guidelines will assist you in the event of
a fire.
However, to reduce the chance that fires will start, practice
fire safety rules and prevent hazardous situations.
Newfield Group, NZ
purchaser each new smoke alarm to be free from defects
in material and workmanship under normal use and
service for a period of 12 months from the date of purchase.
This warranty does not cover damage resulting from
accident, misuse or abuse or lack of reasonable care of
the product. This warranty is in lieu of all other express
warranties, obligations or liabilities.
THE IMPLIED WARRANTIES OF MERCHANTABILITY
AND FITNESS FOR A PARTICULAR PURPOSE ARE
LIMITED TO A PERIOD OF 12 MONTHS FOR THE
SMOKE ALARM FROM PURCHASE DATE.
Some states do not allow limitations on how long an
implied warranty lasts, so the above limitations may not
apply to you.
IN NO CASE SHALL WE BE LIABLE FOR ANY
INCIDENTAL OR CONSEQUENTIAL DAMAGES FOR
BREACH OF THIS OR ANY OTHER WARRANTY,
EXPRESS OR IMPLIED, WHATSOEVER, EVEN IF THE
LOSS OR DAMAGE IS CAUSED BY ITS NEGLIGENCE
OR FAULT.
This warranty gives you specific legal rights, and you may
also have other legal rights which vary from country to
country.
warrants to the original consumer
9. MAINTENANCE AND CLEANING
CONDITION
HORN
Normal Operation
Test Condition
Hush Mode
Alarm Condition
Low Battery
Malfunction
None
None
Short quick beeps
Short quick beeps
One beep every 40
seconds
One beep every 40
seconds
LED
Red LED flashes
every 5-6 minutes.
Red LED flashes rapidly.
Red LED flashes every
10 seconds.
Red LED flashes every
40 seconds.
Red LED flashes every
40 seconds.
6. LED INDICATORS AND HORN PATTERNS
smoke alarm. Never use water, cleaners or solvents
since they may damage the unit.
9.3 If the smoke alarm becomes contaminated by
excessive dirt, dust and/or grime, and cannot be
cleaned to avoid unwanted alarms, replace the unit
immediately.
9.4 Relocate the unit if it sounds frequent unwanted
alarms. See Section 4 LOCATIONS TO AVOID for
details.
9.5 When the battery back-up becomes weak, the smoke
alarm will sound two beeps every 40 seconds (the low
battery warning).You should replace the alarm
immediately to continue your protection.
Smoke Alarms have played a key role in reducing deaths
resulting from home fires worldwide. However, like any
warning device, Smoke Alarms can only work if they are
properly located, installed, and maintained, and if smoke
reaches the Alarms. They are not foolproof.
13.1 Smoke alarms may not waken all individuals.
Practice the escape plan at least twice a year, making
sure that everyone is involved from kids to
grandparents. Allow children to master fire escape
planning and practice before holding a fire drill at night
when they are sleeping. If children or others do not
readily waken to the sound of the smoke alarm, or if
there are infants or family members with mobility
limitations, make sure that someone is assigned to
assist them in fire drill and in the event of an
emergency. It is recommended that you hold a fire drill
while family members are sleeping
in order to
determine their response to the sound of the smoke
alarm while sleeping and to determine whether they
may need assistance in the event of an emergency.
13.2 Smoke alarms cannot work without power.
Battery operated units cannot work if the batteries are
missing, disconnected or dead, if the wrong type of
batteries are used, or if the batteries are not installed
correctly. AC units cannot work if the AC power is cut
off for any reason (open fuse or circuit breaker , failure
along a power line or at a power station, electrical fire
that burns the electrical wires, etc.). If you are
concerned about the limitations of battery or AC power,
install both types of units.
13.3 Smoke alarms cannot detect fires if the smoke
does not reach the alarms.
Smoke from fires in chimneys or walls, on roofs, or on
the other side of closed doors may not reach the
sensing chamber and set off the Alarm. That is why
one unit should be installed inside each bedroom or
sleeping areaespecially if bedroom or sleeping area
doors are closed at nightand in the hallway between
them.
13.4 Smoke alarms may not detect fire on another
floor or area of the dwelling. For example, a stand-
alone unit on the second floor may not detect smoke
from a basement fire until the fire spreads. This may
not give you enough time to escape safely. That is why
recommended minimum protection is at least one unit
in every sleeping area, and every bedroom on every
11. WHAT TO DO IN CASE OF A FIRE
PROBLEM
Smoke alarm does not
respond.
Red LED flashes and the
alarm sounds one beep
every 40 seconds.
Smoke alarm sounds
unwanted alarms
intermittently or when
residents are cooking,
taking showers, etc.
Red LED flashes and the
alarm sounds two beeps
every 40 seconds.
Please check red battery pin on back
of alarm has been moved to ON
position (see 5.5)
Battery is low REPLACE ALARM
IMMEDIATELY!
The alarm is malfunctioning.
Please clean your smoke alarm .
Or REPLACE OR RETURN FOR
REPAIR IMMEDIATELY!
SOLUTION
12.TROUBLESHOOTING
level of your dwelling. Even with a unit on every floor,
stand-alone units may not provide as much protection
as interconnected units, especially if the fire starts in a
remote area. Some safety experts recommend
installing interconnected AC powered units with battery
back-up (see About Smoke Alarms) or professional
fire detection systems, so if one unit senses smoke, all
units alarm. Interconnected units may provide earlier
warning than stand-alone units since all units alarm
when one detects smoke.
13.5 Smoke alarms may not be heard.
Though the alarm horn in this unit meets or exceeds
current standards, it may not be heard if: 1) the unit is
located outside a closed or partially closed door, 2)
residents recently consumed alcohol or drugs, 3) the
alarm is drowned out by noise from stereo, TV, traffic,
air conditioner or other appliances, 4) residents are
hearing impaired or sound sleepers. Special purpose
units, like those with visual and audible alarms, should
be installed for hearing impaired residents.
13.6 Smoke alarms may not have time to alarm before
the fire itself causes damage, injury, or death, since
smoke from some fires may not reach the unit
immediately. Examples of this include persons
smoking in bed, children playing with matches, or
fires caused by violent explosions resulting from
escaping gas.
13.7 Smoke alarms are not foolproof.
Like any electronic device, smoke alarms are made of
components that can wear out or fail at any time. You
must test the unit weekly to ensure your continued
protection. Smoke alarms cannot prevent or extinguish
fires. They are not a substitute for property or life
insurance.
13.8 Smoke alarms have a limited life.
The unit should be replaced immediately if it is not
operating properly. You should always replace a smoke
alarm after 10 years from date of purchase. Write the
purchase date on the space provided on back of unit.
14. LIMITED WARRANTY
1. Clean smoke alarm. See Section
9 MAINTENANCE AND CLEANING.
2.
Move smoke alarm to a new location.
See Section 3.WHERE TO LOCATE
5.9 Alarm Memory
After the alarm has been activated, the smoke
alarm will go into memory mode. The green LED will
flash 3 times every 43 seconds for a period of 24 hours.
This is so the user can tell if the smoke alarm has been
activated in their absence (eg) while at work or away for
the day. The first time the Test/Hush button is depressed
after an alarm activation cycle, the smoke alarm will
sound. After releasing the Test/Hush button, the alarm
memory will be purged. Depressing the Test/Hush button
again resets the smoke alarm to normal operating status
5.8 Low sensitivity detection (silent mode)
a) When the Hush button is depressed the smoke alarm
will enter low sensitivity status. The smoke alarm will
remain in silent mode for 9 minutes before returning to
normal operation, unless the smoke concentration
increases whereby the alarm will sound again.
b) Depressing the Hush button again cancels low
sensitivity mode. The smoke alarm will then return
to normal detection status.
Note: After canceling low sensitivity mode, if there is
still some residual smoke, the alarm will continue to sound.
Fig. 3 Fig. 4
Fig. 5
Fig. 6
Fig. 7
Fig. 8
www.neweld.co.nz


Produkt Specifikationer

Mærke: CodeRED
Kategori: Røgalarm
Model: CRL-100

Har du brug for hjælp?

Hvis du har brug for hjælp til CodeRED CRL-100 stil et spørgsmål nedenfor, og andre brugere vil svare dig


Røgalarm CodeRED Manualer

Røgalarm Manualer

Nyeste Røgalarm Manualer

GLORIA

GLORIA RC-10 Manual

25 Juni 2025
X-Sense

X-Sense SD2J0AX Manual

20 Juni 2025
ORNO

ORNO OR-DC-637 Manual

15 Juni 2025
Kidde

Kidde 29HD Manual

19 November 2024
Kidde

Kidde P9040 Manual

26 September 2024