GB
GB GB GB GB GB
GB GB GB GB GB GB GB GB
GB GB GB GB GB GB GB GB
GB GB GB GB GB GB GB GB
Press the SET button 20 again. Press the
MODE button 14 to activate or deactivate
individual settings (i.e.CLOCK).
Select “ON“ to add the selected function to
EASY mode. Select “OFF“ if you do not wish
to add the selected function to mode.EASY
Press the SET button 20 to confirm your entry.
Press the MODE button 14 to proceed to the
next function and repeat the steps as described
above.
Press the MODE button 14 to exit settings.
Using the backlight
Press the SET button 20 to temporarily activate
the backlight. The backlight will switch off auto-
matically after a short amount of time.
Note: In scan mode, the display switches automati-
cally between the trip distance, maximum speed,
average speed and trip time.
Note: Refer to the “Changing basic settings“ chapter
to configure the settings.
Note: To deactivate scan mode press the MODE
button 14 to return to ADVANCE mode.
CUSTOMIZE mode
Alongside ADVANCE EASY and mode, you can
also apply your own settings in CUSTOMIZE mode.
Press and hold the MODE button 14 for 3 sec-
onds and press the SET button 20 to enter the
application profile setting.
Press MODE button 14 to select mode.EASY
EASY will be flashing on display. Press and
hold the SET button 20 to enter CUSTOMIZE
mode setting.
ETA: Estimated time of arrival.
ETASTART will be displayed. Press the SET button
20 and MODE button 14 to activate the ETA
function.
Press and hold the SET button 20 for 3 seconds
to change the ETA distance and the ETA mode.
KM + / -: Kilometer counter.
Press and hold the SET button 20 for 3 seconds
and press the SET button 20 again to request
the kilometer counter settings. The LC display will
show the symbol for increasing or decreasing
the number (+ or -) and distance counter value.
TIME + / -: Timer.
Press and hold the SET button 20 for 3 seconds
to change the timer settings. The LC display will
show the symbol for increasing or decreasing
the number (+ or -) and timer counter value.
SCAN: Scan
STPWATCH: Stopwatch.
Press the SET button 20 to start the stopwatch.
Press the SET button 20 again to stop the stop-
watch. Press and hold the SET button 20 for
3 seconds to set the stopwatch to 0.
CAL RATE: Current calorie consumption.
CALORIE: Calorie counter.
Press and hold the SET button 20 for 3 seconds
to set the calorie counter to 0.
FAT-BURN: Fat-burning in grams.
Press and hold the SET button 20 for 3 seconds
to set the fat-burning value to 0.
CO2 KG: CO2 saved.
Press and hold the SET button 20 for 3 seconds
and press the SET button 20 again to request
the reference value for CO2 setting.
FUELSAVE: Fuel save comparison with a car.
Press and hold the SET button 20 for 3 seconds
and press the SET button 20 again to request
th
e fuel unit and fuel consumption setting.
MAXSPEED: Maximum speed.
Press and hold the SET button 20 for 3 seconds
to set the maximum speed to 0.
AVGSPEED: Average speed.
Press and hold the SET button 20 for 3 seconds
to set the average speed to 0.
TRIPTIME: Trip time.
TEMP: Thermometer.
Press the SET button 20 to display the maximum
temperature value reached (HI). Press the SET
button 20 again to display the lowest tempera-
ture value reached (LO). Press the SET button 20
and keep it pressed while the highest or lowest
temperature is displayed to return to the current
temperature and delete the saved information.
Press and hold the SET button 20 for 3 seconds
and press the SET button 20 again to request
temperature unit setting.
CLOCK: Displays the time.
Press and hold the SET button 20 for 3 seconds
and press the SET button 20 again to request
the time and date settings.
Note: Press SET button 20 to can be switch
display of the time / date.
TOTALODO: Total mileage counter.
Press and hold the SET button 20 for 3 seconds
and press the SET button 20 again to change
the tyre size, ODO and maintenance interval
settings.
TOTAL-TM: Total trip time.
Press and hold the SET button 20 for 3 seconds
and press the SET button 20 again to change
the saved total trip time.
TRIPDIST: Trip distance.
Press and hold the SET button 20 for 3 seconds
to set the trip distance, maximum speed, aver-
age speed and trip time to 0.
The bicycle computer features the
following functions:
ADVANCE mode: By pressing the MODE button 14
you can select the following function displays:
CLOCK > TOTALODO > TOTAL-TM > TRIPDIST >
MAXSPEED > AVGSPEED > TRIPTIME > TEMP >
STPWATCH > CAL RATE > CALORIE > FAT-BURN
> CO2 KG >FUELSAVE > ETA > KM+ / - >
TIME+ / - > SCAN
EASY mode:
By pressing the MODE button 14 you can select
the following function displays:
TRIPDIST > MAXSPEED > AVGSPEED > TRIPTIME
Note: You can also apply your own settings to
turn on the remaining function displays. See
“CUSTOMIZE mode” chapter.
“Troubleshooting“ and reset all basic settings.
You will then have to reestablish the connection
between the bicycle computer 8 and the sen-
sor 6.
Using the bicycle computer
Note: The bicycle computer will automatically
switch to standby mode when it has not been used
for over 5 minutes. Pressing any button or vibrations
will reactivate the computer. The function indicator
will show the current mode
Press the MODE button 14 repeatedly to scroll
through the different functions
. Press and hold
the S
ET button 20 to request or reset the saved
values.
– Fuel cons: 3 digit number can be input in unit of
L / 100 KM (LITER) or mpg (GALLON) per select.
– Unit of temperature: °C or °F can be select.
Confirm your choice using the SET button 20 .
Press the MODE button 14 to exit settings. You
have now successfully configured the basic
settings.
If you wish to change the basic settings, please
follow the steps outlined in the chapter “Reset-
ting the bicycle computer“ and reset all basic
settings.
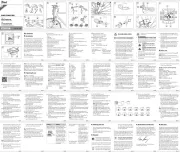
Connecting the bicycle
computer to the sensor
Use the magnet 1 to trigger the sensor 6, the
speed tendency 19 shows a curve to confirm
successful connection. The bicycle computer 8
is now ready to use. If the connection breaks,
please follow the steps in the chapter
– Time: hour and min can be input.
– Date format: DD-MM-YY or MM-DD-YY can
be select.
– Date: Year, month and day can be input.
– CO2 emission rate: 3 digit number can be input
in unit of G / KM.
– Maintenance interval: 3 digit number can be input
in unit of KM or MILE per select.
Note: If the maintenance interval input “000” will
switch off the service indicator.
– Back light ON / OFF: Switch ON or OFF the
back light function. When switch ON, you can
input the LIGHT ON and LIGHT OFF time. The
back light can be activated during the input time.
– ETA distance: 5 digit number can be input in unit
of KM or MILE per select.
– ETA mode: CLOCK or TIME for select.
– Fuel format: LITER or GALLON can be select.
Important functions:
MODE button
14
to configure values / SET button
20
to edit and adopt settings
– Language: 6 language can be select.
– Application profile: ADVANCE EASY or can
be select.
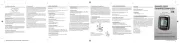
– Tyre size: Enter the circumference for your tyres
size in mm, 4 digit number can be input.
Note: You can calculate your tyre circumference
(U) by multiplying the tyre diameter (D) by 3.1416
(Fig. L). The list (Fig. M) features the tyre circumfer-
ences (U) of conventional tyre diameters (D).
– Unit of length: KM / KMH or MILE / MPH can
be select.
– Age: 2 digit number can be input.
– Unit of weight: KG or LB can be select.
– Weight: 3 digit number can be input in unit of
KG or LB per select.
– Time format: 12 or 24hrs can be select.
Attaching the bicycle computer
To attach the product, proceed as depicted in
Fig. B to I.
Trim the protruding ends of the cable ties 2
using a suitable tool such as a side cutter.
Note: Ensure that the bicycle computer 8 is
attached less than 70 cm from the sensor 6.
Attach the bicycle computer 8 to the sensor 6
within a 30 ° angle, see Fig. B.
Initial use
Changing basic settings
Basic settings: Language > Application profile >
Tyre size > Unit of length > Age > Unit of weight >
Weight > Time format > Time > Date format > Date
>
CO2 emission rate >Maintenance interval >Back
light ON /
OFF > ETA distance > ETA mode > Fuel
format > Fuel cons > Unit of temperature
Before use
Remove the protective film from the LC display 13
before you use the device for the first time.
Note: Do not use this product on electric bikes.
The motor could cause the product to malfunction.
Inserting the battery
To insert the battery 3 proceed as depicted
in Fig. A.
Use a coin to open the battery compartment.
Use this to turn the battery cap counter-clock-
wise. Ensure that you insert the battery correctly
into the battery compartment (polarity). This is
shown in the battery compartment. Ensure that
the O-ring is attached correctly before inserting
the battery.
Turn the battery cap clockwise onto the battery
compartment using the coin to close it.
rechargeable battery
and the product.
Clean the contacts on
the battery / rechargea-
ble battery and in the
battery compartment
before inserting!
Remove exhausted
batteries / rechargeable
batteries from the product
immediately.
the product will not be
used for a longer period.
Risk of damage of
the product
Only use the specified
type of battery /
rechargeable battery!
Insert batteries / rechar-
geable batteries accord-
ing to polarity marks (+)
and (-) on the battery /
In the event of a leakage
of batteries / rechargeab
le
batteries, immediately
remove them from the prod-
uct to prevent damage.
Only use the same type
of batteries / rechargea-
ble batteries. Do not mix
used and new batteries /
rechargeable batteries.
Remove batteries /
rechargeable batteries if
and seek immediate
medical attention.
WEAR PROTEC-
TIVE GLOVES!
Leaked or damaged bat-
teries / rechargeable bat-
teries can cause burns
on contact with the skin.
Wear suitable protective
gloves at all times if such
an event occurs.
t
emperatures, which could
affect batteries / rech
arge-
able batteries, e.g. radi-
ators / direct sunlight.
Avoid contact with the
skin, eyes and mucous
membranes. In the event
of contact with battery
acid, thoroughly flush
the affected area with
plenty of clean water
Never throw batteries /
rechargeable batteries
into fire or water.
Do not exert mechanical
loads to batteries /
rechargeable batteries.
Risk of leakage of
batteries / rechargeable
batteries
Avoid extreme environ-
mental conditions and
DANGER OF
EXPLOSION!
Never recharge non-re-
chargeable batteries.
Do not short-circuit bat-
teries / rechargeable
batteries and / or open
them. Overheating, fire or
bursting can be the result.
Safety
instructions for
batteries /
rechargeable
batteries
DANGER TO LIFE!
Keep batteries / recharge-
able batteries out of reach
of children. If accidentally
swallowed seek immedi-
ate medical attention.
Please note that the guar-
antee does not cover
damages caused by incor-
rect handling, non-com-
pliance with the safety
instructions or use by
unauthorised persons.
lacking experience and
knowledge, when super-
vised or instructed in the
safe use of the product
and understand the asso-
ciated risks. Do not allow
children to play with the
product. Cleaning and
user maintenance must
not be performed by chil-
dren without supervision.
General safety
instructions
KEEP ALL SAFETY NOTICES
AND INSTRUCTIONS FOR
FUTURE REFERENCE!
This product may be used
by children 8 years and
up as well as persons
with physical, sensory or
mental impairments or
Frequency Band: 125 KHz +/-10 KHz
Max. Transmitted power: 125 KHz <6.58 dBm
Scope of delivery
1 Wireless bike
computer
1 Bracket for bicycle
computer
1 Damper for bicycle
computer bracket
1 Bracket with sensor
1 Magnet
6 Cable ties
2 Batteries, 3 V
(direct current),
Model CR2032
button cell battery
2 Replacement O-rings
for bicycle computer
and sensor
1 Instructions for use
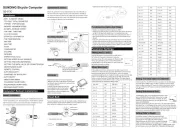
15 Speed comparator display:
Compares the current speed with the
average speed
▲ higher than the average speed
▼ lower than the average speed
16 SCAN display
17 Maintenance interval display
18 Battery state indicator (for bicycle computer)
19 Speed tendency:
This displays the trend in terms of whether
the speed is increasing (large bar, right) or
decreasing (small bar, left).
20 SET button (S)
Technical data
Battery: 3 V (direct current)
(CR2032 button cell
battery)
Operating temperature: 0–50 °C
- ETA (Estimated time of arrival)-Distance
- ETA time
- Fuel Saving
- Back light ON / OFF
Parts Description
1 Magnet
2 Cable ties
3 Battery
4 Damper for bicycle computer bracket
5 Bracket
6 Sensor
7 Bicycle computer battery cap
8 Bicycle computer
9 Sensor battery cap
10 Primary functional value display
11 Function indicator
12 Secondary functional value display
13 LC display
14 MODE button (M)
Functions
– Menu languages: GB, DE, FR, NL, IT, ES
– Clock
– Stopwatch
– Temperature display °C / °F
– Memory function for min. and max. temperature
– Bike speed display (0–99.9 km / h)
– Average speed display (0–99.9 km / h)
– Maximum speed display (0–99.9 km / h)
– Speed comparator
– Speed trend
– Trip timer (max. 9:59:59) (Countdown or
forward-counting)
– Odometer (Countdown or forward-counting)
– Total kilometer and total trip time display
– Calorie counter
– Fat burning display
– CO2 saved
– Scan display (functions are interconnected)
– Automatic start function
Bike Computer
Introduction
We congratulate you on the purchase of your new
product. You have chosen a high quality product.
The instructions for use are part of the product. They
contain important information concerning safety,
use and disposal. Before using the product, please
familiarise yourself with all of the safety information
and instructions for use. Only use the product as
described and for the specified applications. If you
pass the product on to anyone else, please ensure
that you also pass on all the documentation with it.
Intended use
The product is intended to be used as a bicycle
computer. Not for commercial use.
BIKE COMPUTER
IAN 298596
1
G
F
E
DB
I
H J
10
11
14
15
16
17
18
19
5
3
4
6C
1
2
8
1
6
5 2
4
2
6
6
2
1
1 6
max.
2 mm
6
1
20
12
13
A
7
3
86
3
9
max. 30°
max. 70 cm
D
U
L M D U
20 1598 mm
22 1759 mm
24 1916 mm
26 (650 A) 2073 mm
26,5 (Tubular) 2117 mm
26,6 (700 x 25C) 2124 mm
26,8 (700 x 28C) 2136 mm
27 (700 x 32C) 2155 mm
28 (700B) 2237 mm
ATB24 x 1,75 1888 mm
ATB26 x1,4 1995 mm
ATB26 x1,5 2030 mm
ATB26 x1,75 2045 mm
ATB26 x 2 (650B) 2099 mm
27 x 1 2138 mm
27 x 1 1 / 4 2155 mm
K
8
5
KOLESARSKI RAČUNALNIK
Navodila za upravljanje in varnostna opozorila
KERÉKPÁROS COMPUTER
Kezelési és biztonsági utalások
BIKE COMPUTER
Operation and Safety Notes