W
AR
N
IN
W
AR
N
IN
G
!
G
!
R
US
B
AT
T
BA
L
OA
D
IN
G
B
AT
T
BA
L
OA
D
U
SI
N
TT
E
T
TE
G
RY
RY
A
VR
A
V
R
POW
PO
W
E
O
N
R
E
O
N
W
AR
N
IN
G
!
BA
U
SI
T
T
A
TT
B
N
G
E
RY
L
OAD
A
VR
P
O
W
ER
O
N
R
R
750VA
W
AR
N
W
A
RN
IN
G
IN
G
!
!
U
S
U
S
B
AT
T
BA
T
I
NG
B
AT
T
B
AT
IN
G
TE
R
TE
R
Y
Y
L
OA
D
A
V
R
LO
A
V
R
A
D
PO
W
P
OW
E
R
O
E
R
O
N
N
R
CyberPower encourages environmentally sound
methods for disposal and recycling of its UPS and
batteries. Please dispose of and/or recycle your
UPS and batteries in accordance to the local
regulations of your state.
MODEL: CP900AVRa, CP1200AVRa, CP1350AVRLCDa,
CP1500AVRTa, LX1100G, LX1325GU, LX1500GU,
IMPORTANT SAFETY INSTRUCTIONS
Read and follow the important safety instructions before
servicing the batteries. Visit CyberPower o˜cial website
www.cyberpower.com or contact your dealer for more
information on battery replacement.
CAUTION! Use only the specified CyberPower replacement
battery, or battery pack.
CAUTION! Do not dispose of batteries in a fire. The batteries
CAUTION! Do not open or mutilate batteries. Released material
is harmful to the skin and eyes. It may be toxic.
Take the following precautions before replacing the battery:
1. Remove watches, rings, or other metal objects.
2. Use tools with insulated handles.
3. Wear rubber gloves and boots.
4. Do not lay tools or metal parts on top of batteries.
5. Determine if battery is inadvertently grounded. If
inadvertently grounded, remove source from ground.
CONTACT WITH ANY PART OF A GROUNDED BATTERY
CAN RESULT IN ELECTRICAL SHOCK. The likelihood of
such shock can be reduced if such grounds are removed
during installation and maintenance (applicable to
equipment and remote battery supplies not having a
grounded supply circuit).
Smart APP Intelligent LCD Series
MODEL: OR500LCDRM1U, OR700LCDRM1U, OR1000LCDRM1U,
Intelligent LCD Series, AVR Series
MODEL: CP600LCD, CP825LCD, CP800AVR, CP685AVR-G,
CP825AVR-G, CP685AVRLCD-G, CP825AVRLCD-G,
AVRG750U, AVRG900U, AVRG750LCD, AVRG900LCD
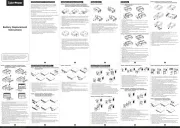
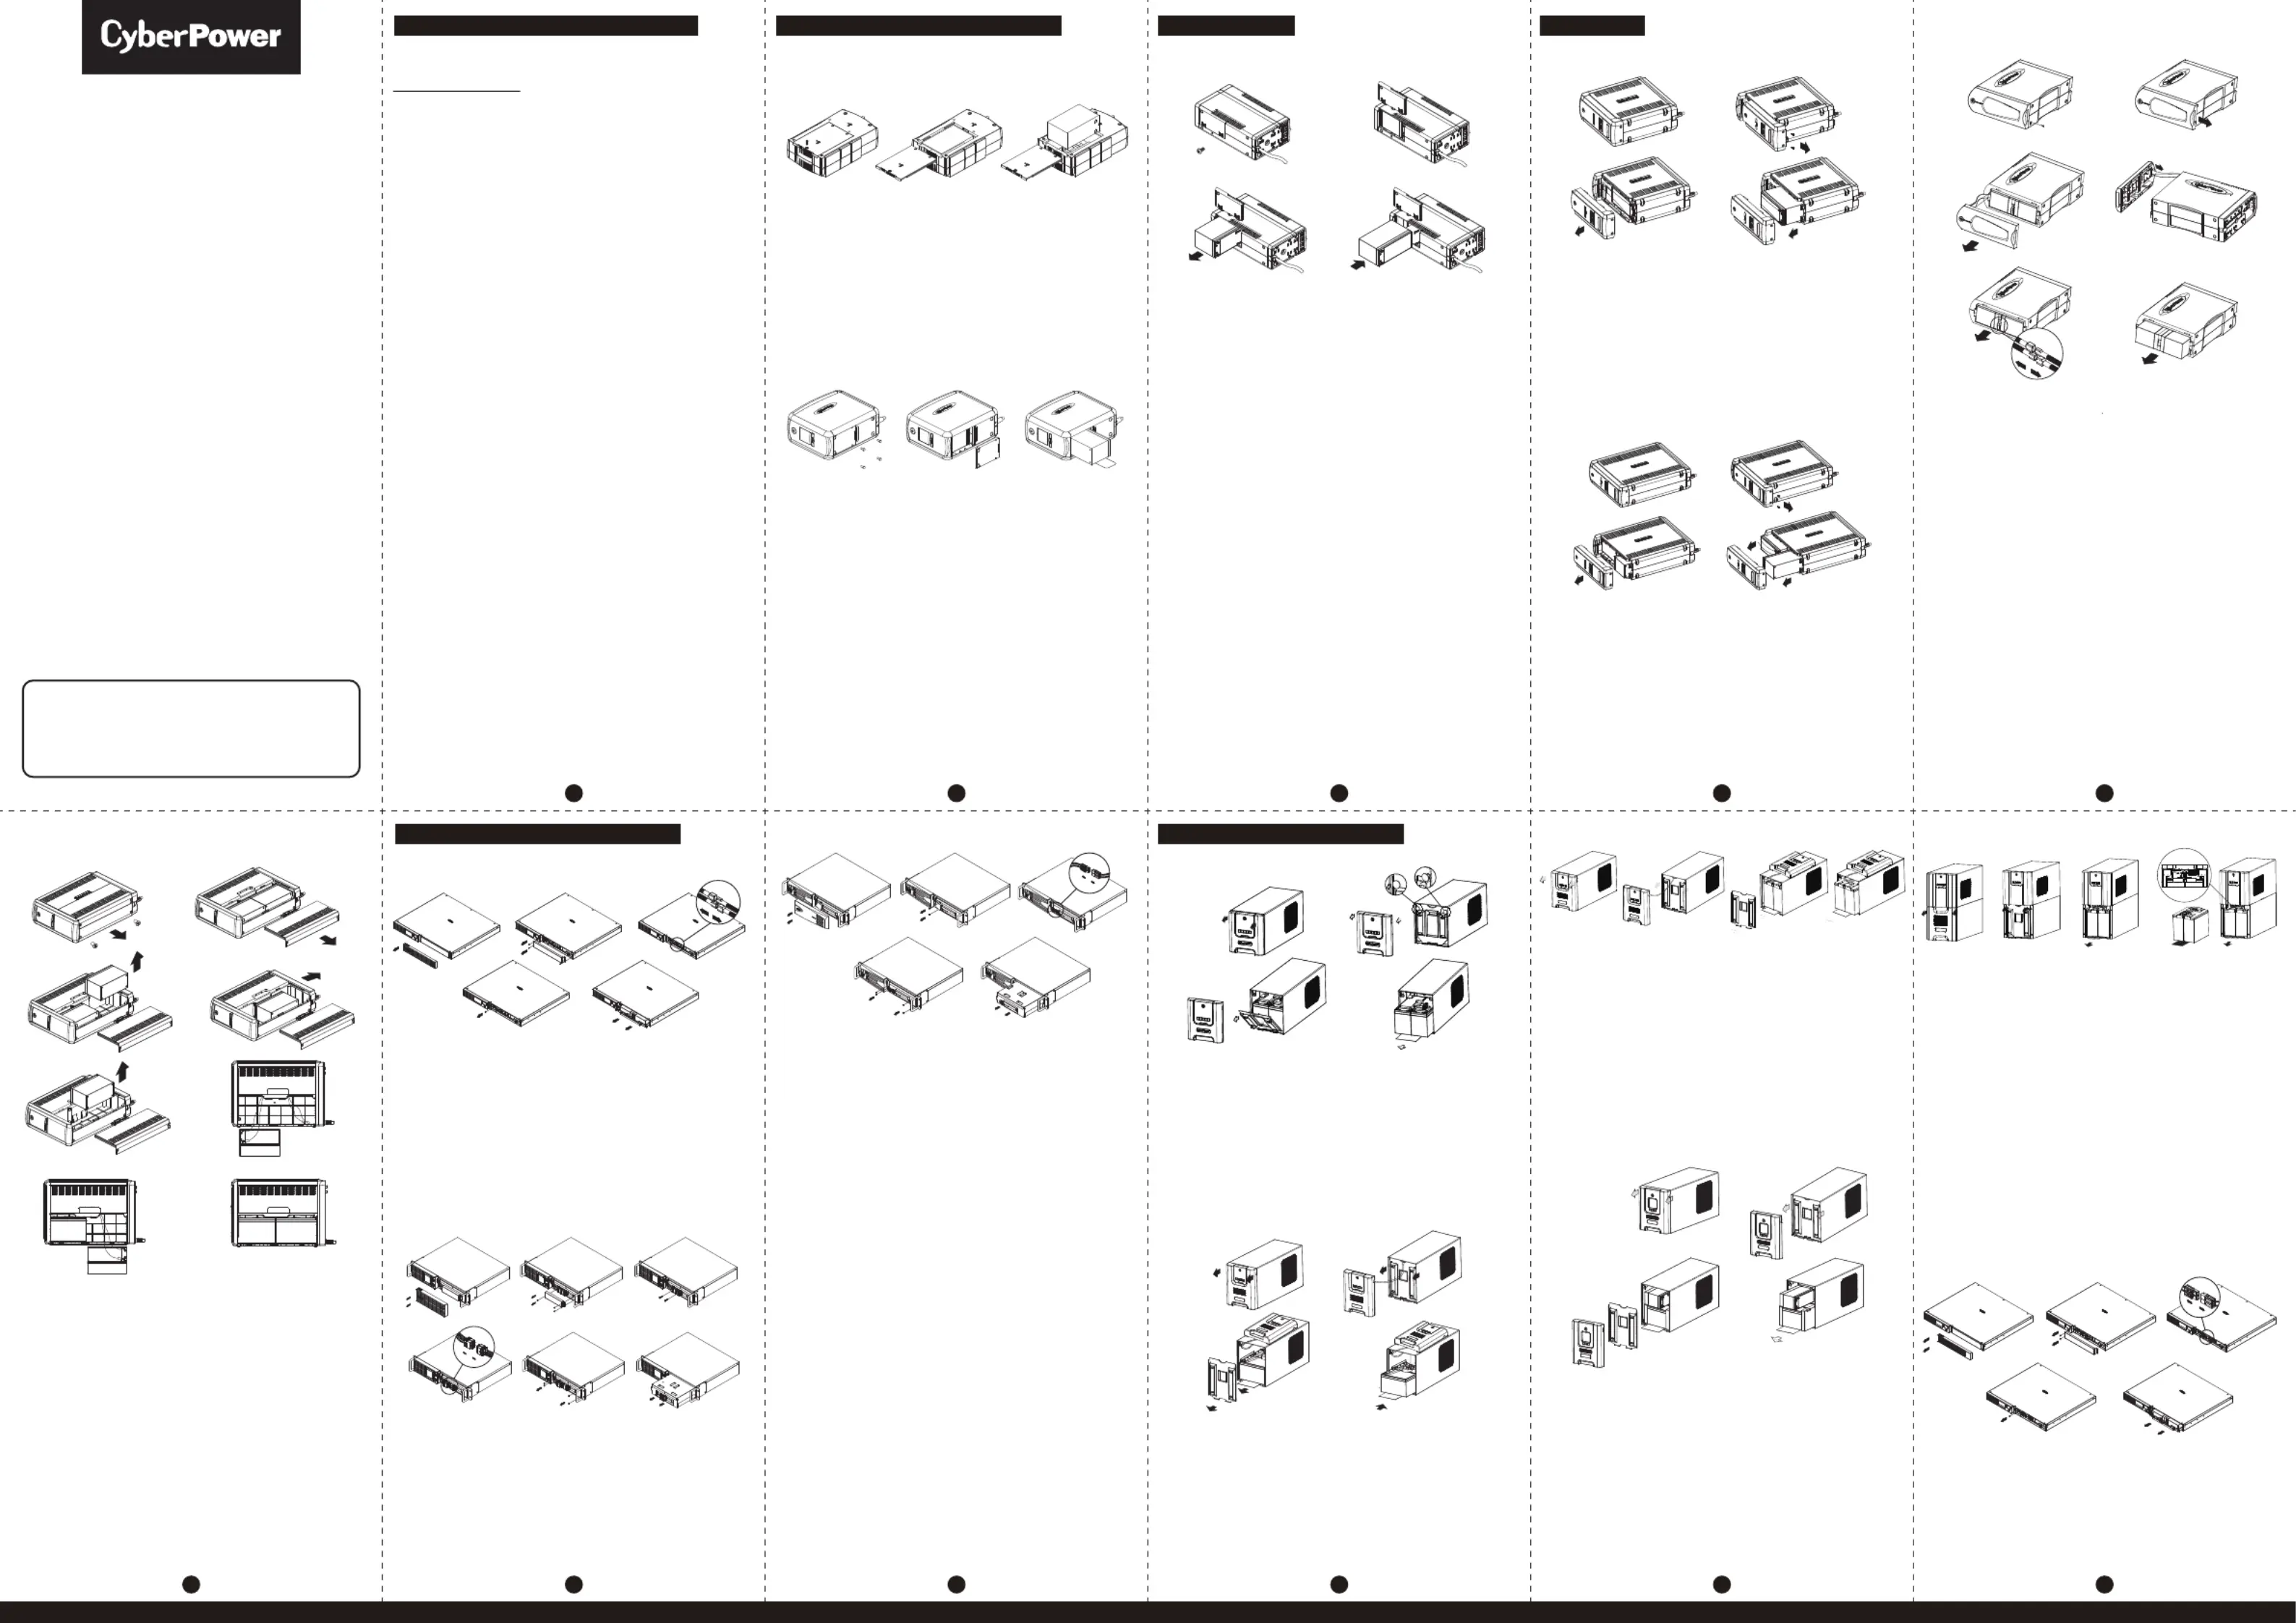
1. Place the UPS on its top and remove the retaining screw (figure 1).
2. Slide the battery compartment cover completely o˛ of the unit
3. Remove the battery from the compartment and disconnect the
battery wires from the battery. Install the replacement battery by
connecting the red wire to the positive (+) terminal and the black
wire to the negative (-) terminal of the battery. (figure 3)
4. Slide the battery compartment cover over the battery and tighten
5. Charge the unit for 4–8 hours to ensure the UPS performs
MODEL: CP850AVRLCD, CP1000AVRLCD
1. Place the UPS on its side and locate the battery compartment
cover on the bottom of the UPS. Remove the four (4) retaining
screws and pull the battery compartment cover o˛ the UPS
2. Remove the battery from the compartment and disconnect the
battery wires from the batteries. Install the replacement batteries
by connecting the red wire and black wire to the same color wires
from the battery pack. Put the battery pack into the compartment
3. Slide the battery compartment cover over the battery and tighten
the retaining screw. Charge the unit for 4–8 hours to ensure the
UPS performs expected runtimes.
1. Place the UPS on its side and remove the retaining screw.
2. Slide the battery compartment cover completely o˛ of the unit.
3. Remove the battery from the compartment and disconnect the
battery wires from the battery.
4. Install the replacement battery by connecting the red wire and
black wire to the positive (+) and negative (-) terminal of the
battery. Put the battery back into the compartment.
5. Slide back the battery compartment cover and tighten the
6. Charge the unit for 8 hours to ensure the UPS performs
Smart APP SINEWAVE Series
MODEL: PR750LCD, PR750 JP, PR750ELCD
MODEL: BRG850AVRLCD, BRG1000AVRLCD, CP850AVRLCDa,
1. Place the UPS on its side.
2. Remove the front panel retaining screws located on the bottom
3. Slide the battery compartment cover (front panel) completely
4. Disconnect the battery wires from the battery and remove the
battery from the compartment.
5. Install the replacement battery by connecting the red wire (+) and
black wire (-) to the same color connectors from the battery pack.
Put the battery back into the compartment.
6. Slide back the battery compartment cover and tighten the
7. Charge the UPS for 8-16 hours to ensure the UPS performs
MODEL: BRG1350AVRLCD, BRG1500AVRLCD, CP1500AVRLCDa
1. Place the UPS on its side.
2. Remove the front panel retaining screws located on the bottom
3. Slide the battery compartment cover (front panel) completely
4. Disconnect the battery wires from the batteries and remove the
batteries from the compartment.
5. Install the replacement batteries by connecting the red wire (+) and
black wire (-) to the same color connectors from both the upper and
lower battery pack. Put the batteries back into the compartment.
Note: Make sure both batteries are new and replaced at the
same time to ensure maximum battery lifespan.
6. Slide back the battery compartment cover and tighten the
7. Charge the UPS for 8-16 hours to ensure the UPS performs
MODEL: PR1500LCD, PR1500 JP, PR1500ELCD
MODEL: CP900AVR, CP1200AVR, CP1500AVRT,
CP1285AVRLCD, CP1350AVRLCD, CP1500AVRLCD
1. Place the UPS on its side to locate and remove the front panel
retaining screw from the bottom of the UPS.
2. Slide the cover (front panel) towards the bottom of the UPS.
3. Detach the cover from the unit.
4. Disconnect the cable located at the top of the cover and remove
5. Disconnect the battery wires from the batteries.
6. Remove the batteries from the compartment.
7. Install the replacement batteries by connecting the red and black
wires to the same color wires from the battery pack. Put the
battery pack back into the compartment.
8. Replace the battery compartment cover and tighten the retaining
9. Charge the unit for 4-8 hours to ensure the UPS performs
MODEL: PR2200LCD, PR3000LC, PR2200ELCD, PR3000ELCD
1. Remove the front panel of the UPS.
2. Remove two screws from the battery compartment cover and
1. Remove the front panel of the UPS and two screws from the
slide the cover completely o˛ of the unit.
battery compartment cover and slide the cover completely o˛
2. Pull out the battery pack on the outside from the compartment.
Disconnect the battery connector from the batteries.
3. Remove the batteries from the compartment. Disconnect the
battery wires from the batteries.
4. Install the replacement batteries by connecting the wire bundle
(composed of one red wire and one black wire) to the
3. Before removing the battery pack on the inside, unlock the
connector from the battery pack.
1. Remove the right side front panel.
cable tie and pull out the battery wires. Disconnect the battery
5. Put the batteries back into the compartment. Re-install the
1. Remove the right side front panel.
2. Remove the two retaining screws for the cable protection cover
2. Remove the three retaining screws for the cable protection cover
1. Remove the front panel of the UPS.
connector from the batteries.
4. Install the replacement battery pack on the inside by
battery compartment cover and tighten the retaining screws.
Put the front panel back on the UPS.
2. Pull out both round knobs and remove the battery compartment
3. Disconnect the black and red cable.
connecting the wire bundle connector (composed of one red
wire and one black wire) to the connector from the battery
6. Connect to AC power and charge the new batteries for up to 16
cover completely o˛ of the unit.
3. Disconnect the black and red cable.
4. Remove the four retaining screws holding the battery pack in
hours to insure a full charge.
3. Remove the batteries from the compartment.
4. Remove the one retaining screw holding the battery pack in place.
pack. Lock the battery wires back with the cable tie.
4. Disconnect the battery wires from the batteries.
5. Remove the battery pack.
5. Remove the battery pack.
5. Install the replacement batteries on the outside by connecting
MODEL: PR2000SL JP, PR3000SL JP, PR2200LCDSL,
5. Install the replacement batteries by connecting the wire bundle
6. Install the new battery pack. Assemble the screws, cover, cable
the wire bundle connector (composed of one red wire and one
6. Install the new battery pack. Assemble the screws, cover, cable
(composed of one red wire and one black wire) to the connector
PR3000LCDSL, PR2200ELCDSL, PR3000ELCDSL,
and front panel in the reverse order of the previous steps. Charge
black wire) to the connector from the battery pack. Put the
and front panel in the reverse order of the previous steps.
from the battery pack. Put the batteries back into the compartment.
the unit for 4-8 hours to ensure the UPS performs expected
battery pack on the outside back into the compartment.
Charge the unit for at least 12 hours to ensure the UPS performs
6. Re-install the battery compartment cover and push both round
6. Re-install the battery compartment cover and tighten the
knobs back into place. Put the front panel back on the UPS.
retaining screws and put the front panel back on the UPS.
7. Connect to AC power and charge the new batteries for up to 16
7. Connect to AC power and charge the new batteries for up to 16
MODEL: OR1500LCDRM2U, OR2200LCDRM2U
hours to insure a full charge.
hours to insure a full charge.
OR1500LCDRTXL2U, OR2200LCDRTXL2U
Note: The battery pack on the outside has a fuse, while the
OR1500LCDRT2U, OR2200LCDRT2U
battery pack on the inside does not.
MODEL: PR1000LCD, PR1000 JP, PR1000ELCD
1. Place the UPS on its side and remove the two retaining screws
located on the bottom of the UPS.
2. Slide the battery compartment cover completely o˛ the unit.
3. Remove the battery which is located on the right side from the
compartment and disconnect the battery wires from the right
4. Slide the remaining battery from the left side to the right side of
5. Remove the remaining battery from the compartment and
disconnect the battery wires from it.
6. Install the "left side" replacement battery by connecting the
yellow wire (+) to the red connector from the battery and the
black wire (-) to the black connector from the battery. Place the
battery into the left side of the compartment.
7. Install the "right side" replacement battery by connecting the red
wire (+) to the red connector from the battery and yellow wire (-)
to the black connector from the battery. Place the battery into
the right side of the compartment.
Note: Make sure both batteries are new and replaced at the same
time to ensure maximum battery lifespan.
8. Slide back the battery compartment cover and tighten the
9. Charge the UPS for 8-16 hours to ensure the UPS performs
Copyright © 2023 Cyber Power Systems, Inc. All rights reserved.
1. Remove the right side front panel.
2. Remove the three retaining screws for the cable protection cover
3. Remove the two retaining screws from the cable connectors.
4. Disconnect the black and red cable.
5. Remove the four retaining screws holding the battery pack in
6. Remove the battery pack.
7. Install the new battery pack. Assemble the screws, cover, cable
and front panel in the reverse order of the previous steps. Charge
the unit for at least 12 hours to ensure the UPS performs
1. Remove the front panel of the UPS.
2. Remove two screws from the battery compartment cover and
slide the cover completely o˛ of the unit.
3. Remove the batteries from the compartment. Disconnect the
battery wires from the batteries.
4. Install the replacement batteries by connecting the wire bundle
(composed of one red wire and one black wire) to the
connector from the battery pack.
5. Put the batteries back into the compartment. Re-install the
battery compartment cover and tighten the retaining screws.
Put the front panel back on the UPS.
6. Connect to AC power and charge the new batteries for up to 16
hours to insure a full charge.
1. Remove the front panel of the UPS.
2. Remove two screws from the battery compartment cover and
slide the cover completely o˛ of the unit.
3. Remove the batteries from the compartment.
4. Disconnect the battery wires from the batteries.
5. Install the replace batteries by connecting the red wire (+) and
black wire (-) to the same color connectors from the battery pack.
6. Put the batteries back into the compartment.
7. Re-install the battery compartment cover and tighten the
8. Put the front panel back on the UPS.
9. Connect to AC power and charge the new batteries for up to 16
hours to insure a full charge.
MODEL: PR750LCDRM1U, PR1000LCDRM1U,
PR750ELCDRT1U, PR1000ELCDRT1U
1. Remove the right side front panel.
2. Remove the two retaining screws for the cable protection cover
3. Disconnect the black and red cable.
4. Remove the one retaining screw holding the battery pack in place.
5. Remove the battery pack.
6. Install the new battery pack. Assemble the screws, cover, cable
and front panel in the reverse sequence of the above steps.
Charge the unit for at least 12 hours to ensure the UPS performs