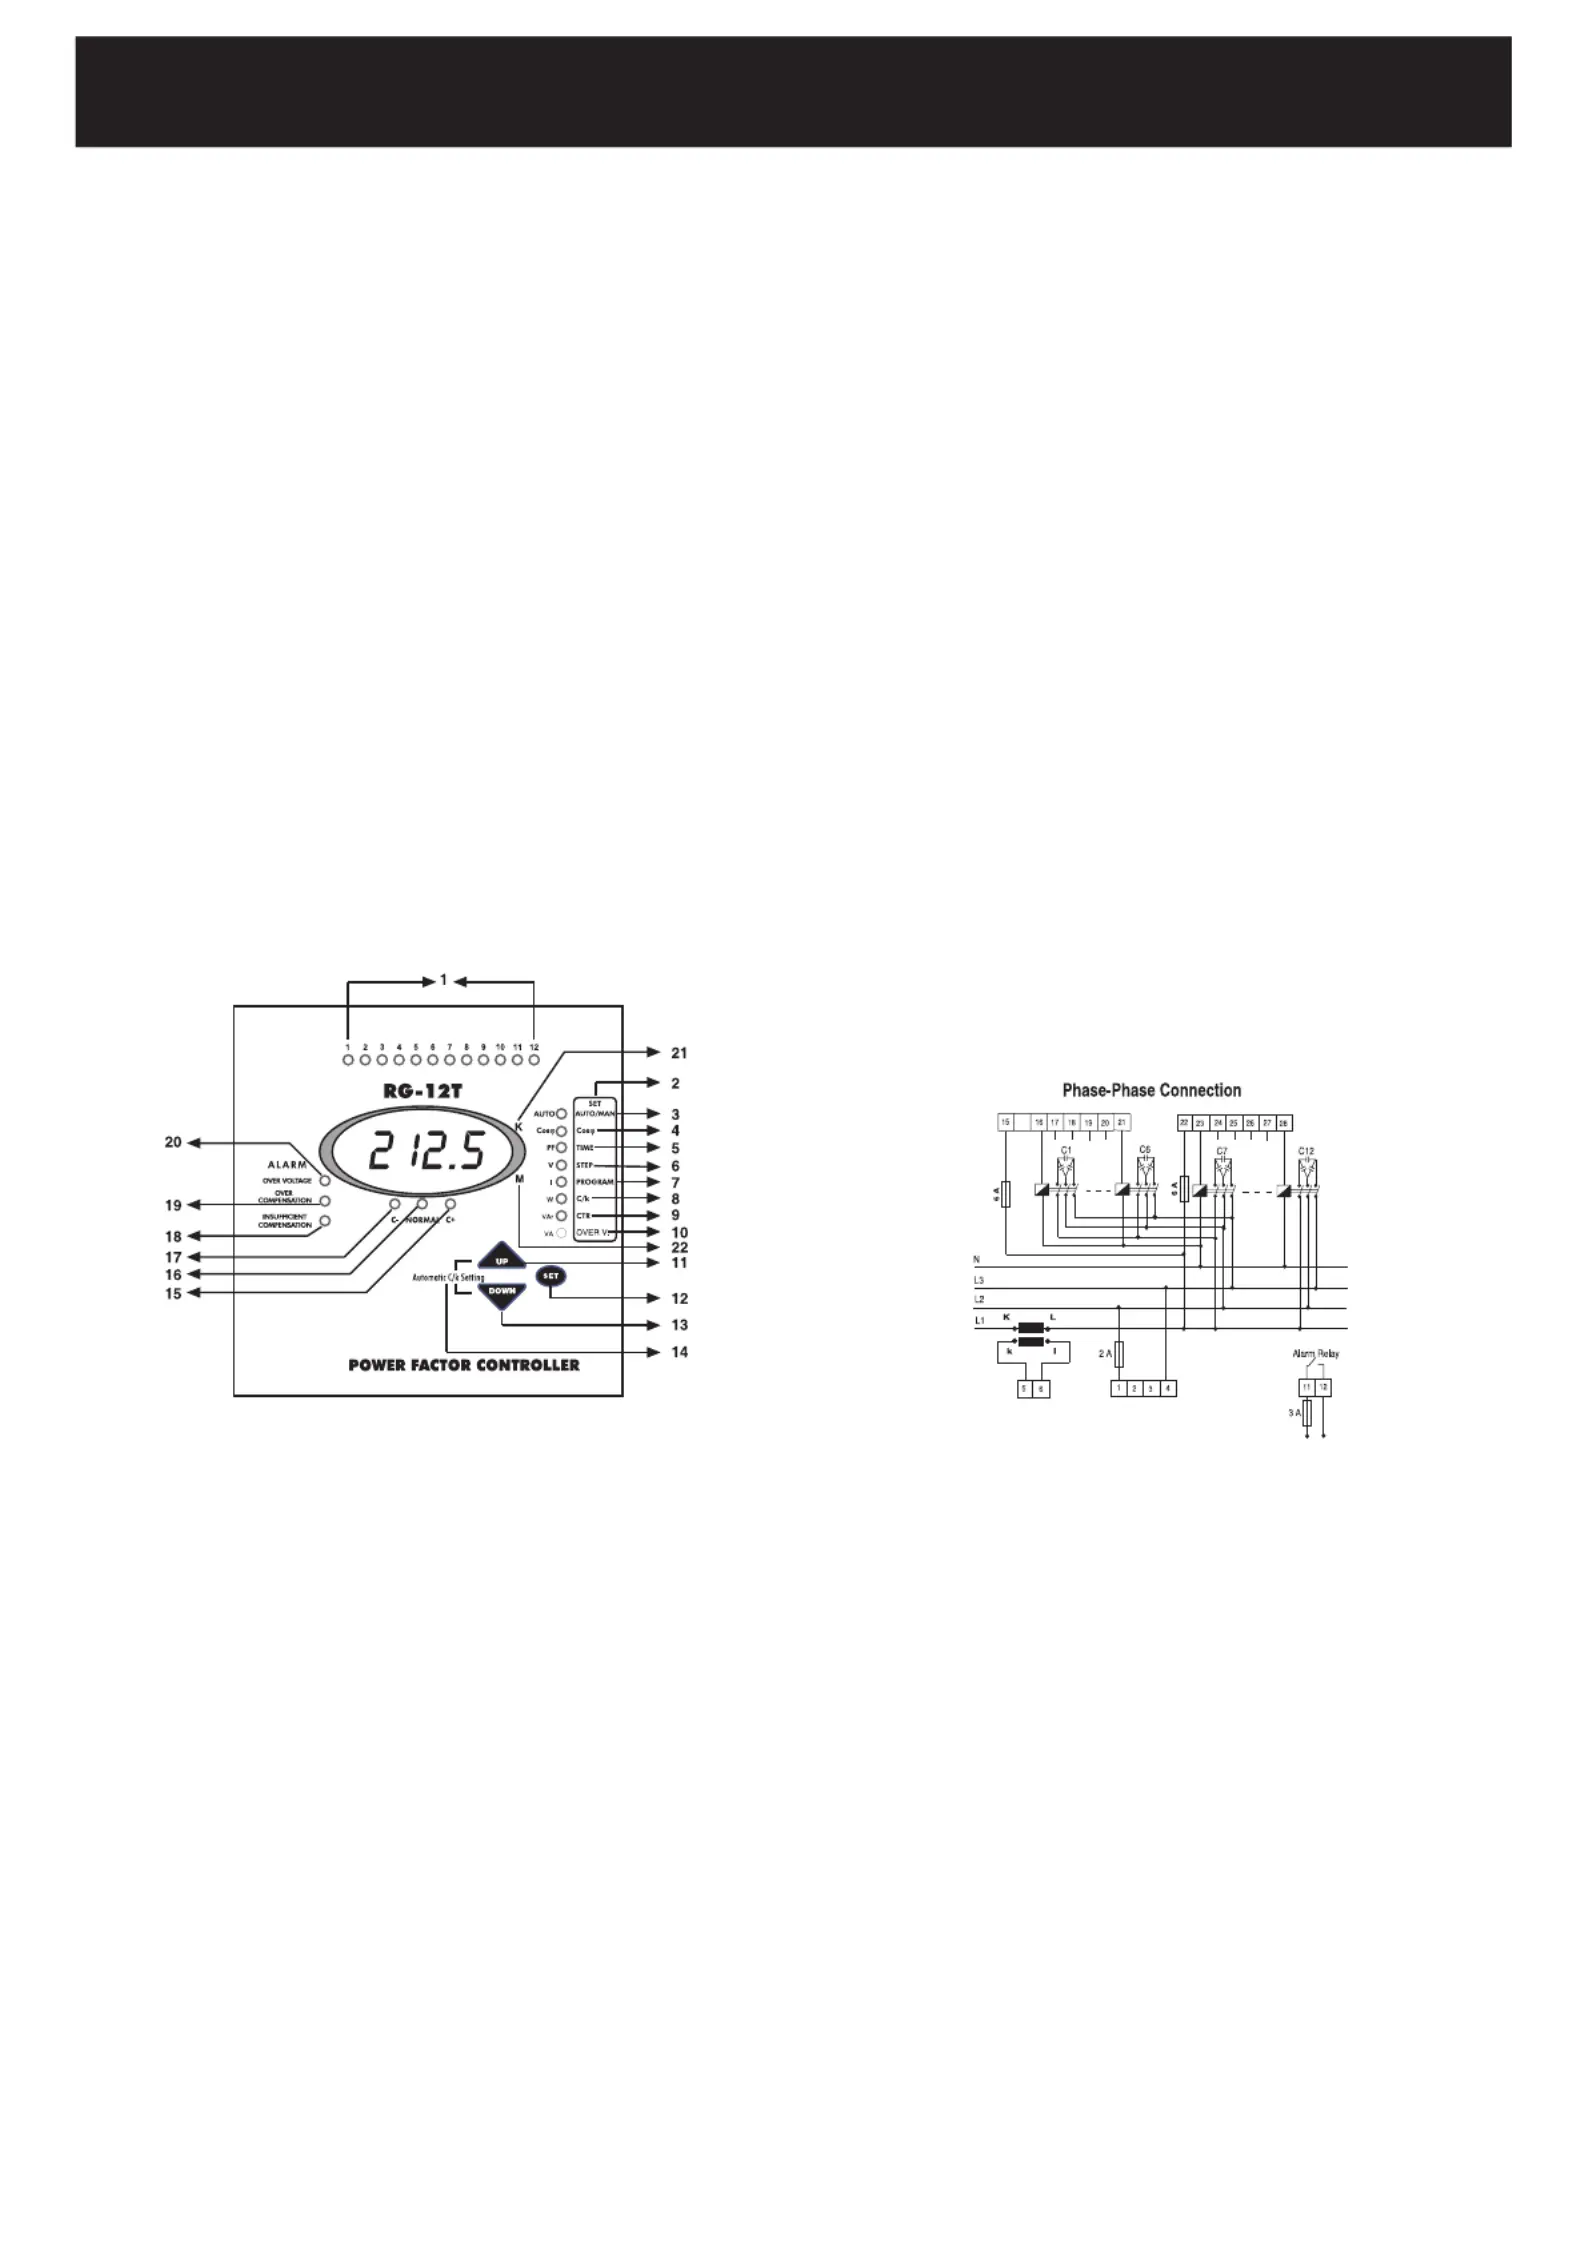
ENTES RG-8T Manual


Læs gratis den danske manual til ENTES RG-8T (4 sider) i kategorien Ikke kategoriseret. Denne vejledning er vurderet som hjælpsom af 36 personer og har en gennemsnitlig bedømmelse på 4.7 stjerner ud af 18.5 anmeldelser. Har du et spørgsmål om ENTES RG-8T, eller vil du spørge andre brugere om produktet?

Side 1/4
1. INTRODUCTION
1.1 About User Manual
This User Manual is designed to help you for quick installation of RG-T. Before
installation and operation, please read this section very carefully.
1.2 Precautions for Safe Use and Installation
- Failure to follow those instructions will result in death or serious injury.
- Disconnect all power before working on equipment.
- When the device is connected to the network, do not remove the back panel.
- Do not try to clean the device with solvent or the like. Only clean the device
with dried cloth.
- Verify correct terminal connections when wiring.
- Electrical equipment should be serviced only by your component seller.
- Only for rack panel mounting.
- An F type fuse must be used and its current limit value must be 6A.
- No responsibility is assured by ENTES A.S or any of its subsidiaries
for any consequences arising out of the use of this material.
2. GENERAL
Power Factor Controllers are used for measurement and control of power
factor control units for central reactive power compensation. The Power Factor
measured by RG-T is compared with the set point values and in order to provide
necessary compensation, Power Factor Controller switches capacitor banks
ON and OFF automatically. RG-T is a microcontroller relay, designed for above
application in 144x144 case for ush mounting with rear plug-in connectors.
In addition to displaying the systems Cos in Automatic Operating Mode, RG-T j
displays the RMS values of Voltage(V) and Current (I), Active Power (W), Reactive
Power (VAr) and Apparent Power (VA) of measuring phase.
3. FRONT PANEL SPECIFICATIONS
On the front panel of RG-T, there are warning lights, display and 3 buttons for settings.
3.1 Buttons and Lights
1. 1,2,.........,12 : Shows the status of each capacitor steps.
2. SET Menu : Shows the Menu options that correspond to the lights.
3. AUTO/MAN Light : If this light is continuously ON, RG-T is in Automatic Mode. If
it is blinking, RG-T is in Manual Mode. By pressing SET button 3
seconds, you enter to Menu and change operating Mode .
(Refer to: 5.1)
4. Cosj Light :
By pressing SET button 3 seconds ; Cos Adjustment can be made j
by selecting this light. (Refer to: 5.3).
In Automatic Mode, when Cos light is selected by pressing UP and j
DOWN buttons, systems Cos and ind/cap state is displayed. j
(Refer to: 5.10)
5. TIME/PF Light : By pressing SET button 3 seconds; you enter to Menu and Step
Time adjustment is made by selecting this light. (Refer to: 5.4)
In Automatic Mode, when this light is selected by pressing UP and
DOWN buttons, systems Power Factor is displayed. (Refer to: 5.11)
6. STEP/V Light : By pressing SET button 3 seconds; you enter to Menu and Step
Number adjustment is made by selecting this light. (Refer to:5.5)
In Automatic Mode, when this light is selected by pressing UP and
DOWN buttons phase voltage (V) is displayed. (Refer to:5.12)
7. PROGRAM/I Light : By pressing SET button 3 seconds; you enter to Menu and Power
Sequence adjustment is made by selecting this light. (Refer to:5.6)
In Automatic Mode, when this light is selected by pressing UP and
DOWN buttons phase current is displayed (I) (Refer to:5.12)
8. C/k - W Light : By pressing SET button 3 seconds; you enter to Menu and Manual
C/k adjustment is made by selecting this light.(Refer to:5.7)
In Automatic Mode when this light is selected by pressing UP and
DOWN buttons, systems Active Power is displayed. (W)
(Refer to: 5.13)
9. CTR - VAr Light : By pressing SET button 3 seconds; you enter to Menu and Current
Transformer Primary Value is made by selecting this light.
(Refer to:5.8)
In Automatic Mode when this light is selected by pressing UP and
DOWN buttons, systems Reactive Power (VAr) is displayed.
(Refer to: 5.14)
10. Over V. /VA Light : By pressing SET button 3 seconds; you enter to Menu and
Protection of Capacitor Steps Against Over Voltage function is made
by selecting this light. (Refer to:5.9)
In Automatic Mode when this light is selected by pressing UP and
DOWN buttons, systems Apparent Power (VA) is displayed.
(Refer to: 5.15)
11. UP Button : To move up in the Menu.
12. SET Button : Enter button for dierent settings and values.
13. DOWN Button : To move down in the Menu.
14. Automatic
C/k Setting : Automatical C/k adjustment is started by pressing UP and DOWN
buttons together at the same time. (Refer to:5.2)
15. C+ Light : This light is ON when RG-T switches capacitor steps on.
16. NORMAL Light : This light is ON when the targeted compensation is achieved.
17. C- Light : This light is ON when RG-T switches capacitor steps o.
18. Insucient
Compensation
Light : This warning light is ON when insucient compensation occurs.
(Refer to:6.1.2)
19. Over
Compensation
Light : This warning light is ON when over compensation occurs.
(Refer to:6.1.3)
20. Over Voltage
Light : This warning light is ON when over voltage occurs. (Refer to:6.1.1)
21. K (Kilo) Light : When this light is ON displayed value must be multiplied by 1000.
22. M (Mega) Light : When this light is ON displayed value must be multiplied by 106.
4. CONNECTION DIAGRAM
Warnings:
a) Connection of a circuit breaker between the network and the power supply
input of the device is highly recommended.
b) Circuit breaker must be in close proximity to the device.
c) Circuit breaker must be marked as the disconnecting device for the equipment.
d) All used fuses must be FF type and the current values of the fuses must be
2A, 3A and 6A.
POWER FACTOR CONTROLLER
RG-T
5. CONTROLS AND MENU OPERATIONS
All settings are made by Menu. The set values except operating mode are kept in memory
even if the device is switched o.When it is switched on, it starts compensation with
the values stored in the memory in Automatic Operating Mode. After entering Menu by
pressing SET button for 3 seconds and if you don’t make any adjustments during 20 seconds
,RG-T operates with the previously stored values.
To quit Menu without any storing operation, UP or DOWN buttons are pressed
until the ESC symbol is displayed and then SET button is pressed.
The details of controls and adjustments are explained in the following sections.
5.1 Selection of Operating Mode(Automatic / Manual Mode )
Two Operating Modes are available for switching on/o the capacitor steps.
1) Automatic Operating Mode: The capacitor steps are controlled by RG-T, automatically.
2) Manual Operating Mode: The capacitor steps are switched on/o, manually.
Mode selection is done as followed.
By pressing SET button 3 seconds SET Menu is started.
AUTO/MAN light is selected by using
UP-DOWN buttons. symbol is
displayed.
AUTO/MAN setting is selected by pressing
SET button. If the device is in Manual Mode,
symbol is displayed.If the device is in
Automatic Mode, symbol is displayed.
Automatic Mode ( ) or Manual Mode
( ) is selected by using UP-DOWN buttons.
When targeted operating mode is displayed, it is selected by pressing
SET button. If Manual Mode is selected, AUTO/MAN light starts blinking
and blinks during this mode.If Automatic Mode is selected, AUTO/MAN
light is continuouslly ON during this mode.
5.1.1 Switching of the Capacitor Steps Manually
When RG-T is in Manual Mode, capacitor steps are connected by pressing UP button.
Each time UP button is pressed, C+ light turns ON and one step is connected accordingly;
NORMAL light will be ON after the connection of the step. This operation must be repeated
to connect more steps.
Capacitor steps are disconnected by pressing DOWN button. Each time UP button
is pressed, C- light turns ON and one step is disconnected after a delay time; NORMAL
light will be ON after the disconnection of the step.This operation must be repeated to
disconnect more steps.
5.2 Automatic C/k Adjustment
C/k adjustment is started by pressing UP-DOWN buttons
together.
5.3 Cos Adjustment j
By pressing SET button 3 seconds, SET Menu is started.
Cosj light is selected by using UP and
DOWN buttons. COS symbol is
displayed
Cosj adjustment is selected by
pressing SET button. Previously
adjusted value is shown at the
display.
A value between 0.85-1.00 i s
adjusted by using UP-DOWN
buttons.
When targeted value is displayed, it is strored by pressing SET button
and RG-T
returns to its normal operating mode.
5.4 Step Time Adjustment
By pressing SET button 3 seconds, SET Menu is started.
TIME light is selected by means of
UP-DOWN buttons.
While TIME light is ON, t 0n symbol is
displayed by means of UP-DOWN buttons
and time delay adjustment for connection
of capacitor steps to system is selected by
pressing SET button.
While TIME light is ON, t 0F symbol
is displayed by means of UP-DOWN
buttons and time delay adjustment for
disconnection of capacitor steps to system
is selected by pressing SET button.
A value between 2-1800 sec. is
adjusted by using UP-DOWN buttons.
When targeted value is displayed, it is stored by pressing SET button
and RG-T returns to its normal operating mode.
5.5 Step Number Selection
By pressing SET button 3 seconds, SET Menu is started.
STEP light is selected by means of
UP-DOWN buttons. StEP symbol is
displayed.
STEP number adjustment is selected by
pressing SET button.Previously selected
value is shown on the display
A preferred step number is selected by
means of UP-DOWN buttons.
When targeted value is displayed, it is red by pressing SET button and
RG-T returns to its normal operating mode.
5.6 Switching Program Selection
By pressing SET button 3 seconds, SET Menu is started.
PROGRAM light is selected by means
of UP-DOWN buttons. symbol is
displayed.
Switching Program is selected by
pressing SETbutton. Previously selected
value is shown on the display.
A value between PS1-PS5 is selected by
using UP-DOWN buttons.
When targeted program is displayed, it is stored by pressing SET button
and RG-T returns to its normal operating mode.
5.7 Selection of C/k Value by the User
By pressing SET button 3 seconds, SET Menu is started.
C/ k light is selected by means of
UP-DOWN buttons. symbol is
displayed.
Manual C/ k adjustment is selected by
pressing SET button. Previously manually
selected or automatically
calculated C/ k
value is shown on the display
A value between 0.02-1 is selected by
using UP-DOWN buttons.
When targeted value is displayed, it is stored by pressing SET button and
RG-T returns to its normal operating mode.
POWER FACTOR CONTROLLER
RG-T


Produkt Specifikationer

Mærke: ENTES
Kategori: Ikke kategoriseret
Model: RG-8T

Har du brug for hjælp?

Hvis du har brug for hjælp til ENTES RG-8T stil et spørgsmål nedenfor, og andre brugere vil svare dig


Ikke kategoriseret ENTES Manualer

ENTES

ENTES GKRC-22E Manual

3 Januar 2025
ENTES

ENTES GKRC-21E Manual

3 Januar 2025
ENTES

ENTES SER-YU Manual

20 November 2024
ENTES

ENTES ERB-50 Manual

6 September 2024
ENTES

ENTES GEM-10SH Manual

6 September 2024

Ikke kategoriseret Manualer

Nyeste Ikke kategoriseret Manualer