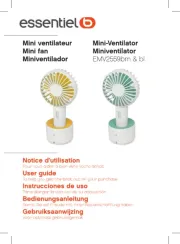
Avant d’utiliser cet appareil électrique, lisez les
instructions ci-dessous et conservez le mode
d’emploi pour un usage ultérieur :
• Avant de brancher l’appareil à une prise
électrique murale, vériez que le courant
électrique local correspond à celui spécié sur
la plaque de l’appareil. Branchez toujours votre
appareil sur une prise reliée à la terre.
• Si le câble d’alimentation est endommagé, il
doit être remplacé par le fabricant, son service
après-vente ou des personnes de qualication
similaire an d’éviter un danger.
• Cet appareil est exclusivement destiné à un
usage domestique. Tout autre usage
(professionnel) est exclu.
• Cet appareil peut être utilisé par des enfants âgés
de 8 ans et plus ainsi que par des personnes
dont les capacités physiques, sensorielles
et mentales sont réduites, ou des personnes
dénuées d’expérience ou de connaissance,
si ceux-ci ont bénécié d’une surveillance ou
d’instructions préalables concernant l’utilisation
de l’appareil en toute sécurité et comprennent
les dangers encourus. Les enfants ne doivent
pas prendre cet appareil pour un jouet. Le
nettoyage et l’entretien usuel par l’utilisateur ne
doivent pas être effectués par des enfants sans
• Ce symbole indique que ce produit ne
doit pas être jeté avec les autres ordures
ménagères au sein de l’UE. Par mesure
de prévention pour l’environnement et
pour la santé humaine, veuillez le recycler de
façon responsable, conformément au principe
de réutilisation des ressources matérielles.
Pour renvoyer votre ancien appareil, veuillez
utiliser les systèmes de renvoi et de collecte
ou contacter le revendeur auprès duquel vous
avez acheté le produit. Ils pourront procéder au
recyclage de ce produit en toute sécurité.
• Débranchez le câble d’alimentation de la prise
de courant dès que vous avez ni d’utiliser
l’appareil, et avant d’effectuer toute opération
de nettoyage ou d’entretien.
• Ne retirez en aucun cas les grilles du ventilateur,
aussi bien pour effectuer une opération
d’entretien que de nettoyage.
• Ne mettez pas l’appareil, le câble d’alimentation
ou la che dans l’eau ou tout autre liquide.
• Attention : ne pas utiliser cet appareil à proximité
des baignoires, douches, lavabos ou autres
récipients contenant de l’eau.
• Mise en garde : ne pas utiliser cet appareil près
• Cet appareil n’est pas destiné à être mis en
fonctionnement au moyen d’une minuterie
extérieure ou par un système de commande à
• Ne pas couvrir le produit.
• Cet appareil doit être utilisé et être posé sur
une surface plane. Ne retournez pas l’appareil
lorsqu’il est en fonctionnement.
• MISE EN GARDE : Maintenir dégagées les
ouvertures de ventilation dans l’enceinte de
• ATTENTION : Une mauvaise utilisation de
l’appareil pourrait présenter un danger et
• ATTENTION : Evitez le contact avec les parties
en mouvements. N’insérez jamais vos doigts,
tout autre partie de votre corps ou objet à
travers la grille du ventilateur.
• Cet appareil est destiné à un usage domestique
et à une utilisation dans des environnements
- les espaces de cuisine pour le personnel
dans les magasins, les bureaux ou autres
environnements de travail ;
- par les clients dans les hôtels, motels et autres
environnements résidentiels;
- les environnements type chambre d’hôte.
• Cet appareil n’est pas approprié à un usage en
• Le câble d’alimentation doit être examiné
régulièrement pour déceler tout signe de
détérioration éventuelle, et l’appareil ne doit pas
être utilisé si le câble est endommagé.
• Ne laissez pas l’appareil sans surveillance
• Pour des informations détaillées sur l’installation
de votre ventilateur, veuillez consulter les
sections correspondantes de votre manuel
• MISE EN GARDE : Assemblez entièrement le
ventilateur avant de l’utiliser.
• Une fois le montage effectué, ne retirez pas les
grilles pour l’utilisation ou le nettoyage.
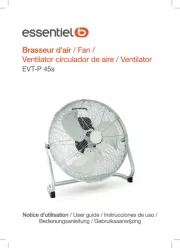
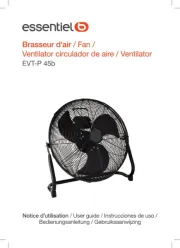
caractéristiques techniques
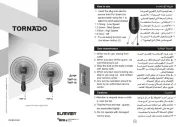
1. Assembler la base (5) Faites passer la vis
de base (1) à travers la rondelle de base (2), le
poids (3) et la base (4), en vous assurant que la
rondelle de base, le poids, le goujon et la base
sont correctement en place.
2. Monter le pied (5) sur la base (4) Alignez et
insérez le pied (5) dans la base (4), puis resserrez
le tout en tournant la vis de base (1) dans le sens
des aiguilles d’une montre. Pour régler la hauteur
du pied, desserrez la vis de xation (6) et réglez à
la hauteur souhaitée, puis serrez la vis de xation
une fois la hauteur souhaitée atteinte.
3. Monter le moteur (9) sur le tube supérieur
(7) Placez le moteur (9) sur le tube supérieur (7),
puis resserrez le moteur à l’aide de la vis de tube
supérieur (20), de l’écrou de tube supérieur (21),
de la vis de moteur A (18) et de la vis de moteur B
(19), en vous assurant que les vis et l’écrou sont
4. Monter la grille arrière (14) sur le moteur (9).
Placez la grille arrière (14) sur le moteur (9), tout
en vous assurant que les quatre trous de la grille
arrière sont alignés avec les quatre trous situés
sur le moteur. La poignée doit être tournée vers
le haut. Puis resserrez la grille arrière à l’aide des
quatre vis (16) et des quatre rondelles.
5. Monter l’hélice (16) sur l’arbre moteur (12).
Desserrez la vis d’hélice (13) de l’hélice (16).
Glissez l’hélice précisément sur l’encoche de
l’arbre moteur (12) et resserrez l’hélice à l’aide
de la vis d’hélice, tout en vous assurant que la
vis d’hélice repose sur la partie plate de l’arbre
6. Attacher la grille avant (17) à la grille arrière
(14) Placez la grille avant (17) sur la grille arrière
(14), en vous assurant que le petit trou situé sur
le rebord de la grille avant est aligné avec le petit
trou situé en bas de la grille arrière. Serrez les
xations de la grille avant, puis resserrez bien à
l’aide de la vis de sécurité avec écrou (22) située
1. Branchez le câble d’alimentation (8) de
l’appareil à une prise secteur (220-240 V/CA,
2. Tournez l’interrupteur rotatif (11) pour choisir
la vitesse de ventilation souhaitée. « I »
correspond à une vitesse faible, « II » à une
vitesse moyenne, « III » à une vitesse élevée,
3. Enfoncez le bouton d’oscillation (10) pour
activer l’oscillation, et tirez-le vers le haut pour
4. Pour modier la direction de l’air vers le haut ou
vers le bas, desserrez l’écrou de tube supérieur
(21) pour modier l’inclinaison du moteur (9),
puis resserrez l’écrou de tube supérieur.
Débranchez toujours l’appareil avant de le
nettoyer. Nettoyez l’appareil à l’aide d’un chiffon à
poussière doux. Vous pouvez utiliser un aspirateur
pour enlever la poussière et les peluches de la
N’utilisez jamais de produits de nettoyage
agressifs. Évitez de mettre l’appareil en contact
avec des substances acides. Stockez l’appareil
à l’abri de la poussière et des températures en-
Garanties et limites de responsabilité
Les produits sont garantis pendant une durée de
24 mois à compter de la date d’achat.
Modalités de Mise en œuvre des garanties
Pour la garantie légale de conformité
Nous vous invitons à vous informer auprès de
votre distributeur et/ou à vous référer à ses CGVs
(Conditions Générales de Vente).
Pour la garantie commerciale
Nous vous invitons à rapporter votre produit
à l’accueil de votre lieu de vente muni de votre
preuve d’achat (tel que le ticket de caisse), du
produit et de ses accessoires fournis, avec
son emballage d’origine, pour tous pays autre
que la France. Il est important d’avoir comme
information la date d’achat, le modèle et le numéro
de série ou d’IMEI (ces informations apparaissent
généralement sur le produit, l’emballage ou votre
preuve d’achat). Vous devez rapporter le produit
avec les accessoires nécessaires à son bon
fonctionnement (alimentation, adaptateur, etc.).
Dans le cas où votre réclamation est couverte par
la garantie, le service après-vente pourra, dans
les limites de la législation locale, soit:
• Réparer ou remplacer les pièces défectueuses.
• Échanger le produit retourné avec un produit qui
a au moins les mêmes fonctionnalités et qui est
équivalent en termes de performance.
• Rembourser le produit au prix d’achat mentionné
Les produits réparés ou remplacés peuvent
inclure des composants et des équipements
nouveaux et/ou reconditionnés.
Exclusion de la garantie commerciale :
• Les dommages ou problèmes causés par une
utilisation incorrecte, un accident, une altération
ou un branchement électrique d’intensité ou de
• L’utilisation ou le stockage nuisible à la bonne
conservation de l’appareil (oxydation, corrosion),
d’utilisation d’énergie, d’emploi ou d’installation
non conforme aux prescriptions du constructeur
ou de négligences ou de l’utilisation de
périphériques, logiciels ou consommables
• L’utilisation professionnelle ou collective,
industrielle ou commerciale du produit.
• Les produits modiés, ceux dont le scellé
de garantie ou le numéro de série ont été
endommagés, altérés, supprimés ou oxydés.
• Les batteries remplaçables et accessoires sont
garantis pour une période de 6 mois.
• La défaillance de la batterie, survenue par un
chargement trop long ou par le non-respect des
consignes de sécurité expliquées dans la notice.
• Les dommages esthétiques, incluant les
rayures, bosses ou vandalisme.
• Les dommages causés par toute intervention
effectuée par une personne non-agréée.
• Les défauts causés par une usure normale
ou dus au vieillissement normal du produit :
joints, ltres, accessoires, brosse et exible
d’aspirateur, lampes, lampes de rétroprojecteur,
• Les mises à jour de logiciel, dues à un
changement de paramètres réseau.
• Les dommages provenant d’éléments extérieurs
à l’appareil (corps étrangers, insectes, etc.).
• Le contenu des appareils - congélateur, lave-
linge…- (denrées, vêtements,...).
• Les défaillances du produit dues à l’utilisation
de logiciels tiers pour modier, changer adapter
• Les défaillances du produit dues à l’utilisation
sans les accessoires fournis avec le produit ou
homologués par le Fabricant.
• Les pièces pour l’usure normale ou dommage
d’utilisation : pneu, chambre à air, frein,...
Le client doit faire son affaire personnelle de la
sauvegarde régulière des données contenues sur
son disque dur ou dans la mémoire interne de son
appareil, et ce avant tout dépôt.
Before using this electrical appliance, read the
instructions below and keep these instructions for
• Before connecting the appliance to a wall
socket, ensure that the local electrical current
matches the one specied on the appliance’s
nameplate. This appliance should only be
connected to a grounded socket.
• If the supply cord is damaged, it must be
replaced by the manufacturer, its service agent
or similarly qualied persons in order to avoid
• This appliance is for indoor use only. Any other
use (professional) is excluded.
• This appliance can be used by children aged
from 8 years and above and persons with
reduced physical,sensory or mental capabilities
or lack of experience and knowledge if they
have been given supervision or instruction
concerning use of the appliance in a safe way
and understand the hazards involved. Children
shall not play with the appliance. Cleaning and
user maintenance shall not be made by children
This marking indicates that this product
should not be disposed with other
household wastes throughout the EU.
To prevent possible harm to the
environment or human health from uncontrolled
waste disposal, recycle it responsibly to
promote the sustainable reuse of material
resources. To return your used device, please
use the return and collection systems or contact
the retailer where the product was purchased.
They can take this product for environmental
• Disconnect the power cable from the mains as
soon as you are done using the appliance and
before performing any cleaning or maintenance.
• Do not under any circumstance remove the fan
guards for either maintenance or cleaning.
• Do not submerge the appliance, mains cable or
plug in water or any other liquid.
• Warning: Do not use this appliance in or around
bathtubs, showers, sinks, or other sources of
• Caution: Do not use this appliance near water.
• This appliance is not intended to be used
through a remote control system or external
• Do not cover the product.
• This appliance must be positioned on a at
surface for use. Do not turn it over while in use.
• CAUTION: Keep all ventilation outlets around
Puissance d’entrée (P) du
Flux d’air (F) maximal du
Valeur de service (SV) 1,3 (m³/min)/W
acoustique du ventilateur
Vitesse maximale de l’air (c) 3,4 mètres/sec.
Norme relative à la mesure