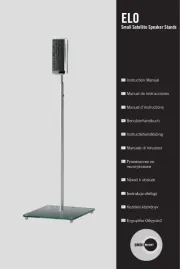
Extron SMK V SB 33 Plus Manual

Extron Højtalerbeslag SMK V SB 33 Plus

Læs gratis den danske manual til Extron SMK V SB 33 Plus (4 sider) i kategorien Højtalerbeslag. Denne vejledning er vurderet som hjælpsom af 7 personer og har en gennemsnitlig bedømmelse på 4.3 stjerner ud af 4 anmeldelser. Har du et spørgsmål om Extron SMK V SB 33 Plus, eller vil du spørge andre brugere om produktet?

Side 1/4
1
IMPORTANT:
Go to www.extron.com for the
complete user guide and installation
instructions before connecting the
product to the power source.
www.extron.com
SMK V SB 33 Plus VESA Mounting Kit • Installation Guide
The SMK V SB 33 Plus VESA Mounting Kit allows the SB 33 Series of soundbar speakers to be attached to the same VESA
mount supporting the display device. The SB 33 speaker front surface can be adjusted ush with the front of the display. It can
be adjusted forward, backward, up, down, and side-to-side.
Installation
VESA display mounts come in a variety of different styles, so installation may vary. Please consult the installation guides for your
specic VESA display mount and your display device before installing the SMK V SB 33 Plus VESA mounting kit. Follow the steps
WARNING: Risk of personal injury or property damage. The final installation should be able to continuously support
the speaker weight. The final installation should also be able to support short term overloading. Be sure to not exceed the
load limit of the VESA mount, mounting surface, and SMK V SB 33 Plus. The maximum load limit of the SMK V SB 33 Plus
is 85 lb (38 kg). Since applications can vary considerably, it is assumed that the installer will exercise good judgment when
selecting the mounting location, method, and hardware. Installation and service must be performed by authorized personnel
only.
AVERTISSEMENT: Risque de dommages corporels ou matériels. L’installation nale doit pouvoir supporter en
permanence le poids de l’enceinte. L’installation nale doit également pouvoir supporter une courte surcharge. Veillez à ne
pas dépasser la charge maximale du support de montage VESA, de la surface de montage, et de l’unité SMK V SB 33 Plus.
La charge maximale du SMK V SB 33 Plus est de 38 kg. Étant donné la possibilité d’évolution considérable des applications,
il est supposé que l’installateur fera preuve de discernement lors de la sélection de l’emplacement, du mode, et du matériel
de montage. L’installation et la maintenance du système doivent être exclusivement effectuées par un technicien agréé.
NOTE: Observe all applicable building codes and local ordinances when installing a soundbar speaker.
The SMK V SB 33 Plus VESA mounting kit is composed of 2 long L-brackets, 2 short L-brackets, 4 metal washers/spacers,
4 plastic spacers, 6 bolts, 6 lock washers, and 6 wingnuts.
1. Install the wall mount portion of the VESA display mount onto the desired wall location.
2. Position one long L-bracket of the SMK V SB 33 Plus kit on the back of the display, while aligning the bottom bolt hole on the
display with a round hole on the L-bracket and the top bolt hole with one of the slotted holes.
NOTE: The L-bend of the long bracket should align with the bottom of the display device.
Repeat this procedure for the other long L-bracket on the other side of the display. Use the included plastic spacers if any
portion of the display back panel protrudes further than the VESA mounting points and prevents the brackets from being
seated properly.
Long L-brackets
Plastic
Spacer
Figure 1. Installing Long L-Brackets
NOTE: The long L-brackets are designed to accomodate a variety of display heights. If the bracket is exposed over the
top of the display, the top 8 (203 mm) of the SMK V SB 33 Plus long L-bracket can be broken off. To do this, simply
bend the top breakaway portion back at the seam until it breaks off. (see figures 1 and 2 for details).
2
SMK V SB 33 Plus VESA Mounting Kit • Installation Guide (Continued)
3. Place the VESA display mount on top of the L-bracket, while aligning the bolt holes of the display mount with the bottom
round hole and top slot hole of the L-bracket and the bolt hole of the display. Repeat this procedure for the other long
L-bracket on the other side of the display.
NOTE: If the VESA display mount uses horizontal mounting brackets or a X-braced bracket, then insert the included
four metal washer/spacers between the long L-bracket and VESA display mount.
4. Insert bolts through the VESA display mounts, the long L-brackets, and the display. Be sure to align the bolt holes of the
VESA display mounts with the display mounting holes and insert the bolts. Hand tighten all 4 bolts. Spacers are provided if
needed (see gure 1 on the previous page).
Mounting Sc wsre
VESA Display
Mount (not included)
Long L-brackets
Washers
Figure 2. Installing VESA display mount
5. Position the short L-bracket under the long L-bracket so that the L-bends of each bracket are paired together (see gure 3).
Afterwards, install one bolt with a wingnut and lock-washer so that the long and short L-brackets are held together. Tighten
the wingnut.
Repeat this procedure for the other long L-bracket on the other side of the display.
NOTE: The short L-bracket may be reversed if the soundbar needs to be positioned further forward relative to the
display (see figure 3).
Lock
Washer
Wingnut
Short
L-bracket
Bolt
Long
L-bracket
Alternative Installation of
Short L-bracket
Short
L-bracket
(Reversed)
Figure 3. Installing short L-brackets on the long L-brackets


Produkt Specifikationer

Mærke: Extron
Kategori: Højtalerbeslag
Model: SMK V SB 33 Plus

Har du brug for hjælp?

Hvis du har brug for hjælp til Extron SMK V SB 33 Plus stil et spørgsmål nedenfor, og andre brugere vil svare dig


Højtalerbeslag Extron Manualer

Højtalerbeslag Manualer

Nyeste Højtalerbeslag Manualer

Flexson

Flexson E100WM Manual

10 Juli 2025
Sonos

Sonos Mount Manual

10 Juli 2025
OmniMount

OmniMount 5.0 Manual

9 Juli 2025
OmniMount

OmniMount AB1 Manual

8 Juli 2025
Hama

Hama 181530 Manual

7 Juli 2025
Bose

Bose UB-20 Manual

24 Juni 2025
OmniMount

OmniMount OCSBA Manual

24 Juni 2025
On-Stage

On-Stage SS7990 Manual

23 Juni 2025
WALI

WALI SWM402 Manual

23 Juni 2025
Vaydeer

Vaydeer YX1021 Manual

23 Juni 2025