Festo EHAM-E20-40 Manual


Læs gratis den danske manual til Festo EHAM-E20-40 (2 sider) i kategorien Ikke kategoriseret. Denne vejledning er vurderet som hjælpsom af 14 personer og har en gennemsnitlig bedømmelse på 5.0 stjerner ud af 7.5 anmeldelser. Har du et spørgsmål om Festo EHAM-E20-40, eller vil du spørge andre brugere om produktet?

Side 1/2
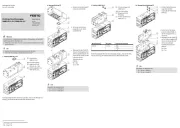
Translation of the original instructions
1 Further applicable documents
All available documents for the product www.festo.com/pk.è
Observe further applicable documents:
Instruction manual for adapter kit EHAM-E20-40-E...
Instruction manual for rotary gripper module EHMD-40
2 Safety
2.1 Safety instructions
Secure screw fittings using an adhesive locking agent.
Observe tightening torques.
Tightening torques 5 Screw sizes and tightening torques.è
2.2 Intended use
Mounting the rotary gripper module EHMD-40 on one of the following Z axes : 7
Adapter kit Z-axis6 7
EHAM-E20-40-E9 EGSK-20
EGSK-26
EHAM-E20-40-E8 EGSL-BS-35
EGSL-BS-45
EHAM-E20-40-E19 EGSC-BS-…-25
EGSC-BS-…-32
Tab. 1 Intended use
3 Product overview
3.1 Product range overview
3.1.1 Included in delivery
1
Socket head screw (4x)
2
Plate (1x)
3
Centring pin (2x)
4
Rail (1x)
5
Socket head screw (3x)
Fig. 1
3.1.2 Not included in the delivery
6
Adapter kit
7
Z-axis
8
Rotary gripper module EHMD-40
9
Adhesive for medium-strength
screw locking
Fig. 2
3.2 Function
The mounting is positioned between the rotary gripper module and the8
adapter kit . The rotary gripper module is mounted by means of a dovetail6 8
clamp. This enables simple adjustment of the rotary gripper module in the8
Zdirection.
4 Mounting
4.1 Preparation
Mount the appropriate adapter kit on the Z axis67
è 1 Further applicable documents.
4.2 Installation
Mounting the mounting on the adapter kit
The number of socket head screws required to mount the plate varies1 2
depending on the adapter kit :6
Mounting Adapter kit Number of socket head6
screws1
EHAM-E20-40-E8 4
EHAM-E20-40-E9 2
EHAM-E20-40
EHAM-E20-40-E19 2
Tab. 2 Number of socket head screws
Fig. 3
1. Position the plate on the adapter kit with the centring pins .2 6 3
2. Tighten the socket head screws .1
Fixing the rail for the dovetail clamp
Fig. 4
Fix the rail on the plate using the socket head screws .4 2 5
Inserting the rotary gripper module in the mounting
Fig. 5
1. Insert the rotary gripper module in the dovetail clamp of the mounting.8
8080688
Mounting
EHAM-E20-40
8080688
2017-12
[8080690]
Instructions|Assembly
Festo SE & Co. KG
Ruiter Straße 82
73734 Esslingen
Germany
+49 711 347-0
www.festo.com
2. Tighten the socket head screws .5
5 Screw sizes and tightening torques
1
[Nm]
5
[Nm]
EHAM-E20-40 M3x8 1.2±20% M2.5x6 0.6±30%
Tab. 3 Screw sizes and tightening torques


Produkt Specifikationer

Mærke: Festo
Kategori: Ikke kategoriseret
Model: EHAM-E20-40

Har du brug for hjælp?

Hvis du har brug for hjælp til Festo EHAM-E20-40 stil et spørgsmål nedenfor, og andre brugere vil svare dig


Ikke kategoriseret Festo Manualer

Ikke kategoriseret Manualer

Nyeste Ikke kategoriseret Manualer

Kimo

Kimo LR 110 Manual

2 September 2025
HMS Premium

HMS Premium LPD02 Manual

2 September 2025
AVer

AVer E1008 Manual

2 September 2025
Biltema

Biltema 17-547 Manual

2 September 2025
Groen

Groen AH/1E Manual

2 September 2025
ACOPower

ACOPower HY-P30 Manual

2 September 2025
Globe

Globe RG30 Manual

2 September 2025
Neutrik

Neutrik NLT4FXX Manual

2 September 2025