Montageanleitung (de)
744 391/ 2010-01a
†‡
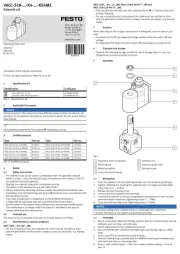
Installationsbausatz
HMIZF-E…-DA…
Festo SE & G Co. K
Postfach
D-73726 Esslingen
++49/(0)711/347-0
www.festo.com
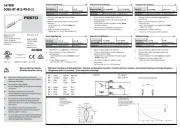
1. Installationsbausatz
1a. HMIZF-E…-DA…
7685d_1
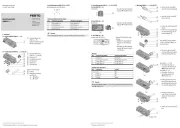
1 Installationsbausatz
HMIZF-E…-DA…
1b. Montagebeispiel
7685d_3
2 Auslegerachse
DGEA-…-ZR
3 Energieführungskette
(! Tabelle)
Bestimmungsgemäß dient der
Bausatz 1 als Anbindungsplatte
der E-Kette 3 beim Aufbau von
Portalsystemen mit Z-Achsen 2.
Bild 1
Warnung
Verletzungsgefahr durch elektrische Spannung!
•Verbinden Sie den Bausatz 1 mit dem Schutzleitersystem
! Montageanleitung Erdungsbausatz für HM… (HMVS-DL…).
Hinweis
•Montieren Sie den Bausatz 1 nur am Profil der Z-Achse 2. Denn über
die Dicke der Platte des Bausatzes 1 wird sichergestellt, dass der erfor-
derliche Biegeradius der Energieführungskette 3 eingehalten wird.
•Verwenden Sie nur zulässige E-Ketten 3 laut Katalog
www.festo.com/catalogue.
•Beachten Sie, dass nur Befestigungskombinationen aus der Tabelle zu-
lässig sind.
•Halten Sie die zulässigen Anziehdrehmomente ein (! Tabelle).
Info
•Beachten Sie die Montagereihenfolge
! Montageübersicht für HM… (HMVS-DL…).
Der Bausatz 1 enthält alle maximal erforderlichen Befestigungselemente.
•Beachten Sie, dass bei einigen Kombinationen Befestigungselemente
übrig bleiben.
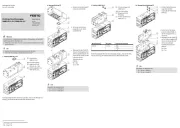
2. Montage
•Wählen Sie die Befestigungselemente (Schrauben, usw.) für Ihre
Kombination (! Tabelle).
•Beachten Sie die Bildzuordnung für Ihre Kombination
(! Tabelle).
Bild 2
Bild 2a
7685d_4
1 Installationsbausatz
HMIZF-E03-DA18
2 Auslegerachse
DGEA-18-ZR
Bild 2b
7685d_5
1 Installationsbausatz
HMIZF-E03-DA25
2 Auslegerachse
DGEA-25-ZR
Bild 2c
7685d_6
1 Installationsbausatz
HMIZF-E03/E05/E07-DA40
2 Auslegerachse
DGEA-40-ZR
Hinweis
Nach der Montage:
•Verfahren Sie die Achsen von Hand und überprüfen Sie dabei die Installa-
tion bzw. das leichte Abrollen der Energieführungsketten.
1)
1) Toleranzen für nicht tolerierte Anziehdrehmomente M A
MA
> 1,Nm: ± 20%
13918d_7
HMIZF-E03- HMIZF-E03- HMIZF-E...-
DA18 DA25 DA40
DGEA-18-ZR DGEA-25-ZR DGEA-40-ZR
E03 E03 E03/E05/E07
2a 2b 2c
M
A
1)
[Nm]
M4x10 3,0 3x
M5x10 6,0 4x
M5x25 6,0 2x
M6x16 10,0 2x 2x 2x
NST-HMV-M4 3x
HMBN-5-M5 2x 4x
C Nutenstein
A Zylinderschraube nach DIN 912
1 Bausatz
Bild
B Senkschraube nach DIN 7991
2 Auslegerachse
3 E-Kette